
⚡ Quick Answer
LTX-2.5 is Lightricks' newest open-weights video model, and it ships in ComfyUI as three ready-made workflows: Text-to-Video, Image-to-Video, and FLF2V (first-frame/last-frame). All three share the same five model files and most of the same settings — only the input and one or two nodes change between them. This guide covers the exact settings that matter for each mode, real example prompts, and the fixes for the errors you'll actually hit.
LTX-2.5 just launched, and if you've opened one of the three LTX-2.5 ComfyUI templates and stared at the default values with no idea what to change, you're not alone — the official documentation lists what each setting does, but not why you'd change it or what to actually type in the prompt box. This guide walks through all three workflows using the free, official templates, plus the prompt patterns that produce clean output instead of flickering or ignored details.
Hardware and versions used for this guide: ComfyUI 0.32.0+, tested on Windows with an RTX 4090 (24GB VRAM).
What to Expect: 3 Example Outputs
Before you download anything, here's what LTX-2.5 actually produces across the three modes covered in this guide — one Text-to-Video example, one Image-to-Video example, and one FLF2V example. Each was generated from a prompt built using the six-element structure covered later in this guide.
Text-to-video (T2V) — a prompt alone, no image needed
Image-to-video (I2V) — a starting image, animated
FLF2V — motion generated between a first and last frame
What's New in LTX-2.5 (and Why It Changes Your Settings)
LTX-2.5 is Lightricks' latest open-weights video and audio model, and it carries a few real changes over LTX-2.3 that affect how you'll set these workflows up — not just marketing language.
Diffusion Fidelity Rendering — instead of spending the same amount of compute everywhere in a scene, LTX-2.5 spends more on complex areas (faces, fast motion, fine texture) and less on simple ones. This is the main reason 2.5 output looks sharper than 2.3 at the same settings.
Native multishot — a single generation can now hold multiple connected shots (a cut, a new camera angle) while keeping the same character, environment, and lighting across all of them. This is what the "Multi-Shot" prompt mode in the prompt guide is built around.
Auto Duration — the model predicts a sensible clip length from the action you describe, rather than you needing to guess a frame count. You still set a duration value, but padding your prompt to "fill time" doesn't actually extend the clip — it just adds noise for the model to reconcile.
Better distilled model — the fast, lower-compute variant of LTX-2.5 now carries noticeably more quality and prompt adherence than the LTX-2.3 distilled model did, which is part of why this guide can recommend it as a sensible default rather than a compromise.
Carried over unchanged from LTX-2.3: native 4K output and synchronized audio-video generation — the audio is produced in the same pass as the video, not layered on afterward.
What You Need Before You Start
Minimum VRAM: 16GB
VRAM (video memory — the dedicated memory on your graphics card, separate from your system's regular RAM) is what actually holds the model while it's generating. LTX's own launch materials state 16GB VRAM as the minimum to run LTX-2.5 at all. If you're on exactly 16GB, stay toward the lower rows of the resolution table further down this guide, and be cautious about running the upscaler on longer clips. A 24GB card, like the RTX 4090 used for this guide, gives you comfortable room across all three workflows at most settings you'd realistically want.
Can you get away with less? NVIDIA's own optimization guidance for this model family recommends 540p at 4-second clips, 20 steps as the target for 8–16GB cards — so an 8GB GPU is workable, just at noticeably lower resolution and duration than the table below, and slower once ComfyUI has to offload part of the model to system RAM. Treat 16GB as the comfortable floor and 8GB as "possible with modest settings," not a hard wall either way.
Update ComfyUI to 0.32.0 or Later
LTX-2.5's nodes only exist in ComfyUI version 0.32.0 and above. If you're on an older version, nodes in the workflows below will show up as red error boxes when you load them. If you've never updated ComfyUI before, open ComfyUI Manager (the puzzle-piece icon in the top toolbar) and click Update ComfyUI, then fully restart the application — new node definitions only load on startup.
The Model Files All 3 Workflows Share
Before you can run any of the three workflows, you need to download five files and place each in the matching ComfyUI folder. All three templates use the exact same files — you only download these once.
| File | Folder | What It Is | Download |
|---|---|---|---|
ltx-2.5-22b-distilled-transformer-comfy-int8-convrot.safetensors | diffusion_models | The main model — this generates the actual video content from your prompt | Download |
gemma4-12b-with-proj-ltx-2.5-comfy-int8-convrot.safetensors | text_encoders | Converts your written prompt into instructions the model can act on | Download |
ltx-2.5-video-vae-bf16.safetensors | vae | Decodes the generated video frames | Download |
ltx-2.5-audio-vae-bf16.safetensors | vae | Decodes the generated audio track — LTX-2.5 outputs synced sound in the same pass | Download |
ltx-2.5-latent-spatial-upscaler-x2-bf16-1.0.safetensors | latent_upscale_models | Sharpens the output before final decode — used by T2V and I2V only, not FLF2V | Download |
Optional: the Prompt Enhancer Model
If you plan to use the built-in prompt_enhance toggle (covered in the settings section below), you'll also need this file:
| File | Folder | What It Is | Download |
|---|---|---|---|
gemma4_e2b_it_bf16.safetensors | text_encoders | Powers the built-in Prompt Enhancer — only needed if you plan to use that toggle | Download |
Where Everything Goes
Workflow 1 — Text-to-Video (T2V): Generate a Clip From a Prompt Alone
Text-to-Video is the simplest of the three — there's no image input, just a written prompt. The core of the graph is a single subgraph node (a node that bundles a whole internal pipeline — conditioning, sampler, CFG guider, VAE decode — behind one block you can also open and edit).
(video_ltx2_5_t2v.json)Node-by-Node: What Each Block Does
- Load the workflow. Open ComfyUI, click Workflow → Open (or drag the file straight onto the canvas), and select the video_ltx2_5_t2v.json file you downloaded above. The full node graph appears on your canvas.
- Write your prompt in the Text to Video (LTX-2.5) node's text box. This is the subgraph node mentioned above — click Enter subgraph at the bottom of it if you ever want to inspect or fine-tune the internal pipeline directly, though you won't need to for normal use.
- Set your resolution using the ResolutionSelector node, covered in the shared settings section above.
- Confirm your model files are loaded. The subgraph pulls in the diffusion model, both VAEs, the text encoder, and the upscaler automatically once they're in the right folders — if any dropdown inside the subgraph shows blank, double-check the folder structure above.
- Click the orange Queue Prompt button in the top-right of the screen. A progress bar appears underneath it. Generation time depends heavily on your resolution and duration — expect anywhere from under a minute at low settings to several minutes at higher ones on an RTX 4090.
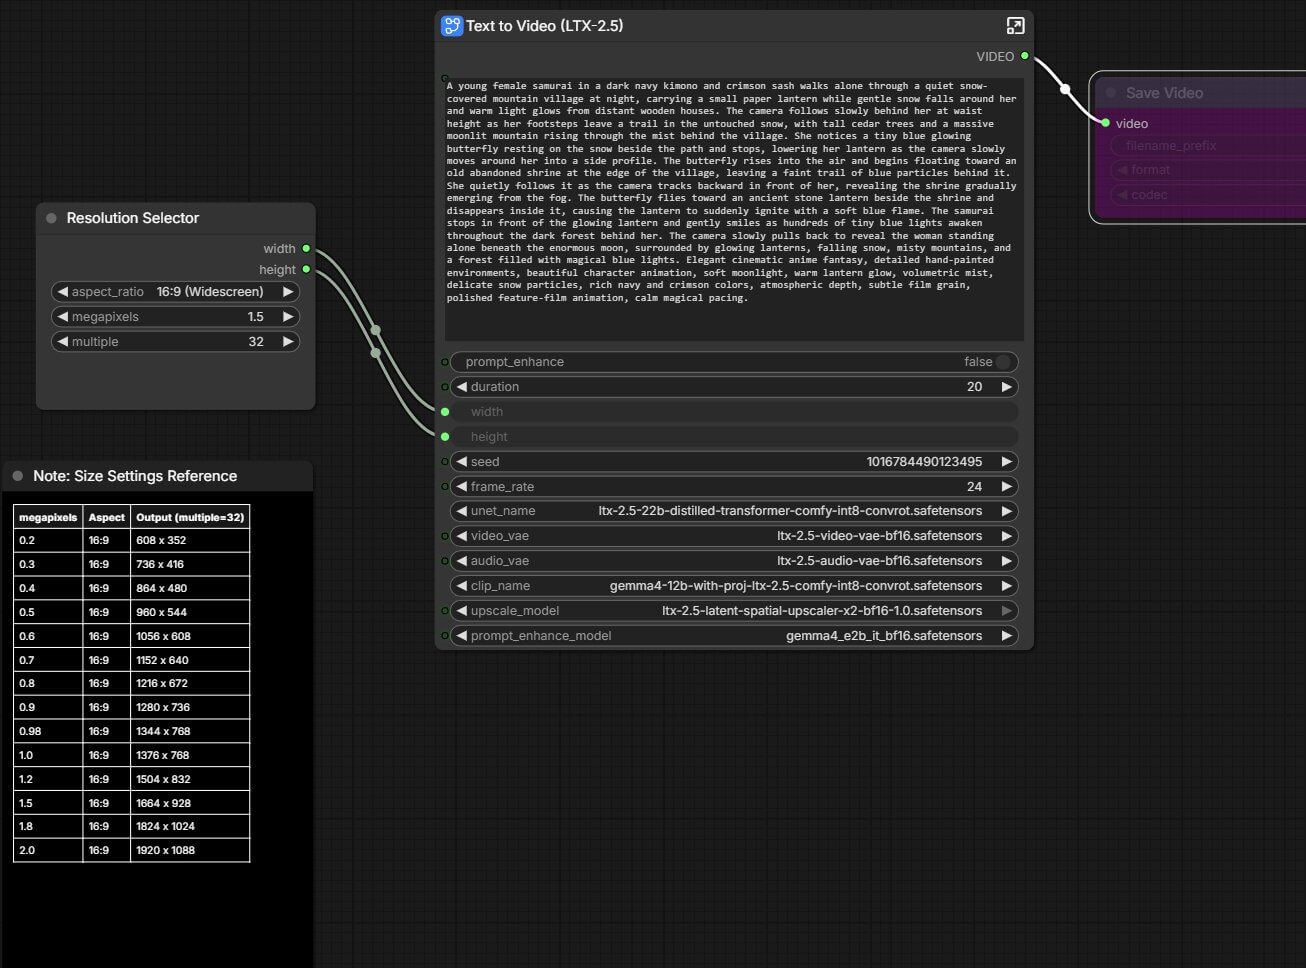
Settings That Actually Matter for T2V
Since there's no source image constraining the shot, T2V is the mode most sensitive to prompt quality — the model has to invent the entire scene from your words. Get the resolution and duration settings from the shared section above right first, then focus your effort on the prompt itself.
Workflow 2 — Image-to-Video (I2V): Animate a Single Photo
Image-to-Video turns one still image into motion. The pipeline is intentionally simple: a LoadImage node (the block that reads an image file from your computer into ComfyUI) brings in your source photo, ResolutionSelector locks in a model-friendly size, and the LTX-2.5 generator node synthesizes the motion sequence around it.
(video_ltx2_5_i2v.json)What's Different From T2V
The only structural addition is the LoadImage node feeding into the generator. LTX-2.5 uses a keyframes-first approach internally — it builds the video around your source image as a high-fidelity anchor point, which is why the subject, lighting, and composition from your photo carry through cleanly instead of drifting into something unrelated, as long as your prompt doesn't fight against what's actually in the image.
- Load the workflow. Open ComfyUI, click Workflow → Open (or drag the file onto the canvas), and select the video_ltx2_5_i2v.json file you downloaded above.
- Click the LoadImage node and select your source image file.
- Write a motion-focused prompt — see the settings note below, this matters more here than anywhere else in this guide.
- Set your resolution and confirm your model files, same as T2V above.
- Click Queue Prompt the same way as the Text-to-Video workflow.
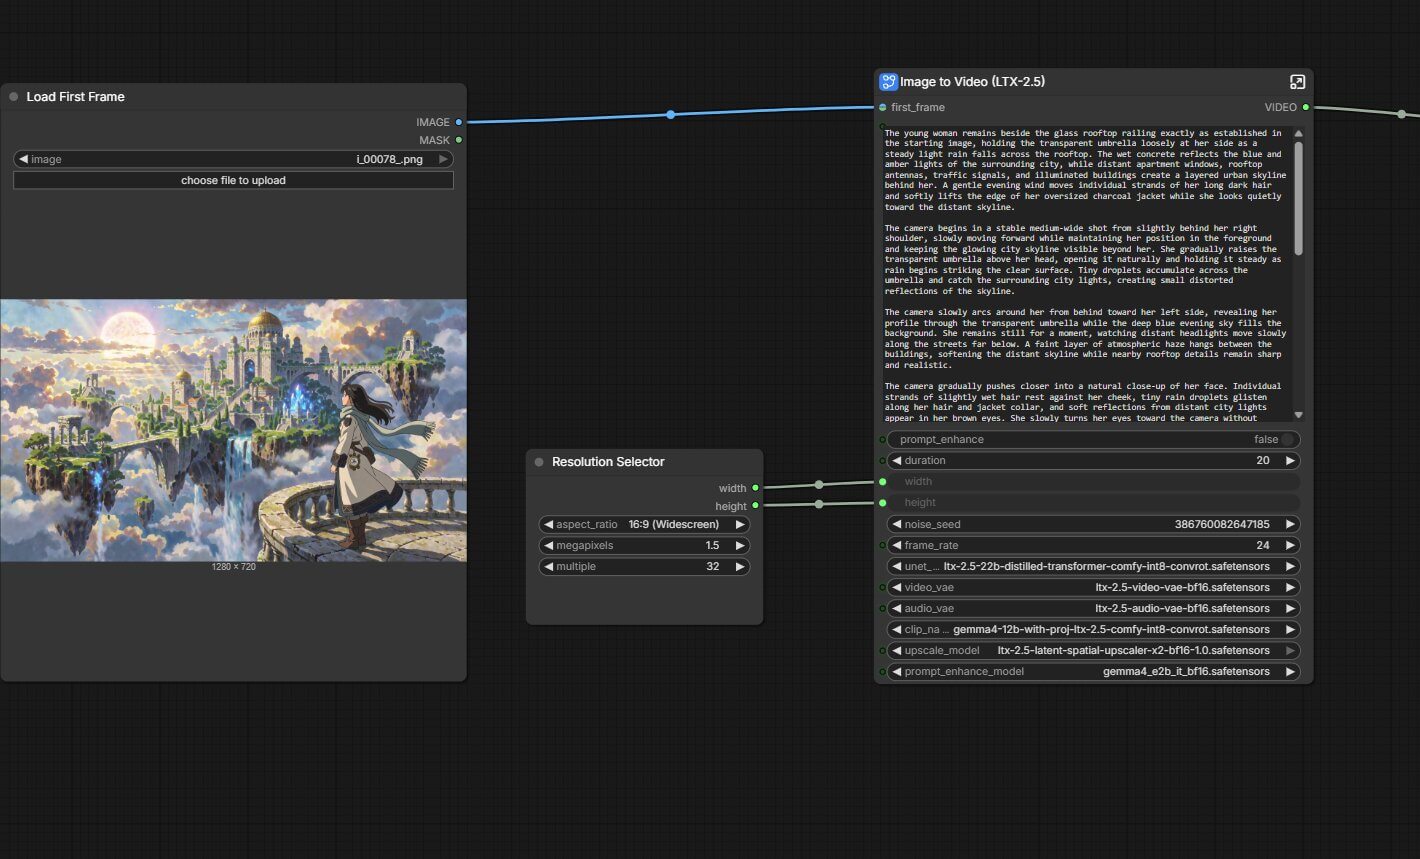
Settings That Actually Matter for I2V
The single biggest factor in I2V output quality isn't a node setting at all — it's whether your prompt describes what happens next, or re-describes what's already visible in the photo. A prompt that restates clothing, hair color, or lighting the image already shows causes the model to reconcile two slightly different descriptions of the same subject, and that's what produces visible drift partway through the clip. Describe only the motion, camera behavior, and audio.
Workflow 3 — FLF2V: Generate Motion Between a First and Last Frame
FLF2V (First-Last-Frame-to-Video) takes two images — a starting frame and an ending frame — and generates everything that happens in between. It's useful for a product spin, a transformation shot, or any scene where you already know exactly how it should end.
(video_ltx2_5_flf2v.json)What's Different (Single-Stage, Two Images In)
Unlike T2V and I2V, FLF2V is single-stage — it doesn't run the upscaler pass at all, so its node graph is actually the simplest of the three. Two LoadImage nodes feed in — one for your first frame, one for your last frame — instead of the single image I2V uses.
- Load the workflow. Open ComfyUI, click Workflow → Open (or drag the file onto the canvas), and select the video_ltx2_5_flf2v.json file you downloaded above.
- Set your first frame. Click the first LoadImage node and select your starting image.
- Set your last frame. Click the second LoadImage node and select your ending image.
- Write a transition-focused prompt describing only the motion connecting the two frames — not either frame's content. See the note below.
- Set your resolution and confirm your model files (remember: no upscaler needed here), then click Queue Prompt.
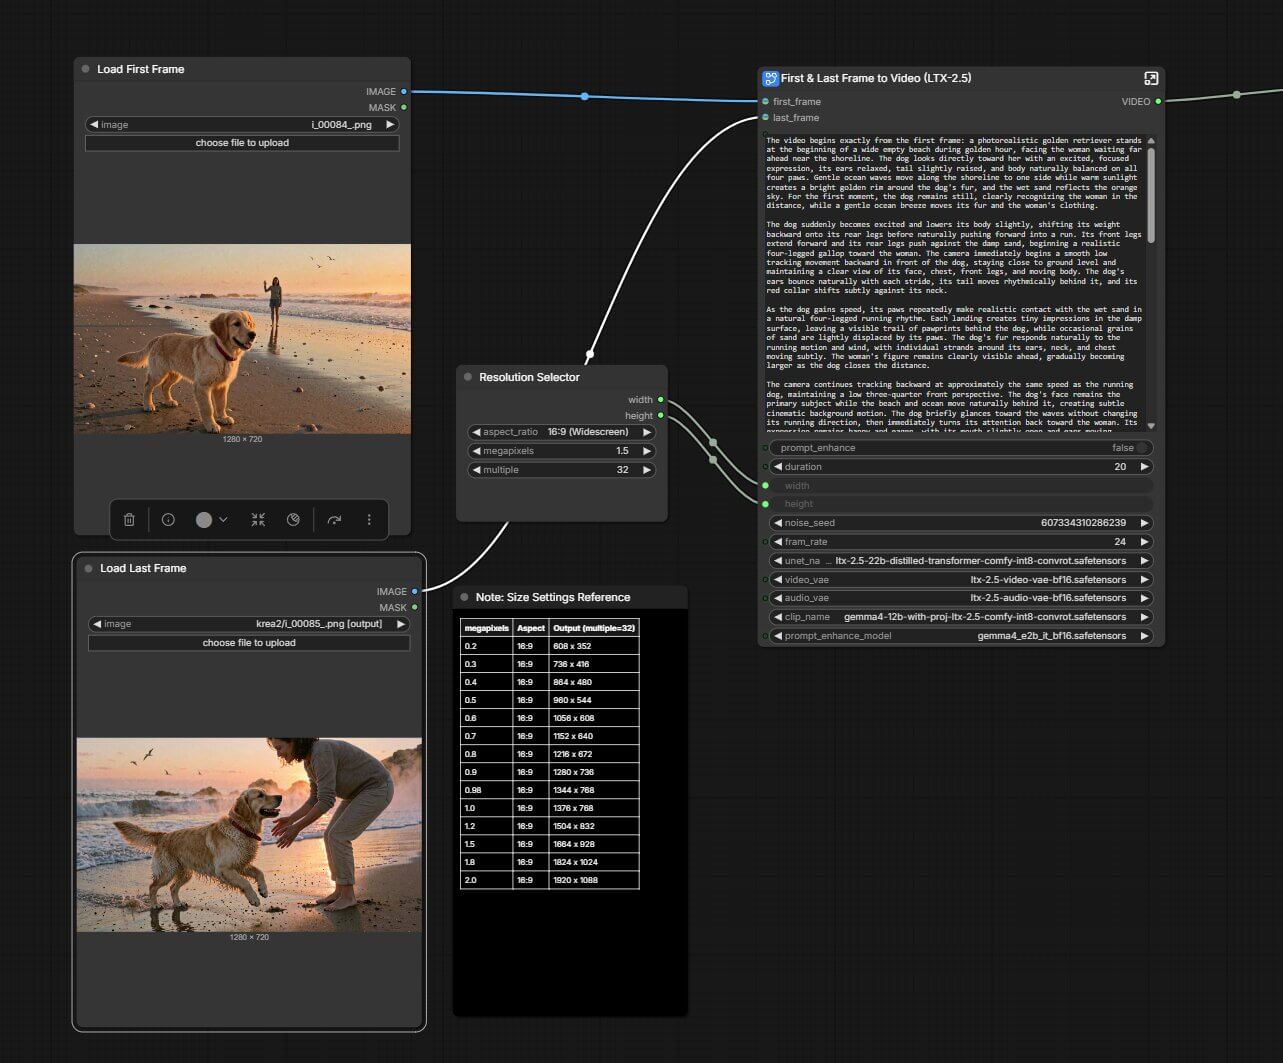
How to Set Your Start and End Frame
Pick two frames that are close enough in composition, subject position, and lighting that a viewer could plausibly imagine what happens between them. The further apart your two frames are, the more the model has to guess — and an overly literal interpolation is what causes a jarring, physically-impossible-looking transition.
How to Write Prompts for LTX-2.5
Prompt quality affects LTX-2.5 more than most sampler settings do. LTX-2.5 reads your prompt through a text encoder — the component that converts written words into instructions the model can act on — and its Gemma-based encoder is unusually literal: it renders almost everything you write, so a vague or list-style prompt produces vague, flickering output, and a specific, motion-focused one produces a specific, motion-focused clip.
We've written a full breakdown of this — the six-part element checklist every reliable prompt needs, which of LTX-2.5's four prompt modes to use for a given shot, a symptom-to-fix diagnostic table, and complete working prompts for Single-Shot, Multi-Shot, Image-to-Video, and FLF2V — in a separate guide: LTX-2.5 Video Looks Wrong? The Prompt Fix for ComfyUI. If your settings here all check out and your output still looks off, that guide's diagnostic table is the fastest way to find out why — most broken LTX-2.5 clips trace back to the prompt, not the node setup.
Troubleshooting: The 3 Most Common Errors
"This node type does not exist"
What causes it: Your ComfyUI installation is older than version 0.32.0, so it doesn't recognize the LTX-2.5 nodes yet.
How to fix it: Open ComfyUI Manager and click Update ComfyUI. Restart ComfyUI completely afterward — node definitions only load on startup.
Out of Memory / CUDA Out of Memory Errors
What causes it: Your chosen resolution, duration, and the upscaler (if enabled) together need more VRAM than your GPU has available.
- Lower your ResolutionSelector megapixel value — try 0.4 or 0.3 first.
- Shorten your target duration.
- Close other GPU-heavy applications before generating.
Video Doesn't Match Your Prompt
What causes it: Almost always the prompt itself, not a node setting — a missing element from the six-part structure, or a Single-Shot-style prompt used for something that needed Multi-Shot.
How to fix it: Run the diagnostic in the prompt guide — it matches the exact symptom you're seeing to the specific fix.
For errors not covered here, see the general ComfyUI troubleshooting guide.
Frequently Asked Questions
What to Do Next
Download the Text-to-Video workflow and generate your first clip today.
It's the fastest of the three to test since it needs no source image. Once it works, come back and try Image-to-Video with a photo of your own.
Published: 2026-08-13 · Last updated: 2026-08-13 · Workflow structure verified against the official LTX-2.5 ComfyUI templates.
Join the discussion
Sign in to leave a comment or reply
No comments yet
Be the first to share your thoughts!