⚡ Quick Answer
LTX 2.3 runs in ComfyUI v0.22 or later with no extra custom nodes (unless you use GGUF — more on that below). Download the workflow file, place the model files in the correct folders, and open the workflow in ComfyUI. The workflow supports both BF16 and FP8 — you switch between them inside the workflow. GGUF uses a separate workflow. Both T2V and I2V have a toggle switch inside the workflow too.
What is LTX 2.3?
LTX 2.3 is a free, open-source video generation model built by Lightricks. At 22B parameters, it handles text-to-video, image-to-video, and native 9:16 portrait output without any cropping — and it runs locally through ComfyUI with no subscription required.
It's roughly 18× faster throughput than WAN 2.2 14B, and audio-to-video is built directly into the generation process — synced during generation, not tacked on afterwards. ComfyUI is the best way to run it locally: full control over every setting, access to the official workflow, and zero dependency on third-party services.
🎬 Demo — LTX 2.3 output
Generated with the prompt below — cinematic framing, clear motion, and a specific scene are the three things LTX 2.3 responds to best.
See the results before you download anything
All three model versions produce solid output. The differences mostly show up at the limits of your hardware. Here's the same prompt run through each version — watch before you commit to a 23–39GB download.
🎬 Same prompt · Three models · Compare the output
Sharpest edges, slowest — only worth it over FP8 in very close detail shots.
Near-identical to BF16 at normal playback. Best choice for RTX 4070 and above.
Slightly softer edges on fine textures. Best option for older or 8–12GB cards.
| Model | Output quality | Generation time | VRAM needed | Use this when... |
|---|---|---|---|---|
| Distilled 1.1 BF16 | Highest detail | Slowest | 24GB+ | Max quality, RTX 3090 / 4090 |
| Distilled 1.1 FP8 ✅ | Near-identical to BF16 | Faster | 16GB+ | Best balance — RTX 4070 and up |
| GGUF | Good, softer edges | Fastest | 8–16GB | Older or lower-VRAM cards |
Not sure which to pick? If you're on an RTX 4070 or better, download the FP8 version and stop reading this column. Only go BF16 if you need absolute maximum quality and have 24GB+ VRAM to spare.
What you need before you start
Two things break most installs before they begin: the wrong ComfyUI version, and not enough VRAM for the chosen model. Check both before downloading anything.
ComfyUI version — check you're on v0.22 or later
LTX 2.3 nodes are built into ComfyUI natively from v0.22 onwards — no custom nodes needed for BF16 and FP8. The version number is shown in the bottom-left corner of the interface.
Which model should you download?
The v1.1 distilled models are newer and better than the original LTX 2.3 release. Use one of these, not the original dev weights, unless you specifically need dev-quality for a final render.
| Version | File | Size | VRAM | Use this when... |
|---|---|---|---|---|
| Distilled 1.1 BF16 | ltx-2.3-22b-distilled-1.1_transformer_only_bf16.safetensors | 39.1GB | 24GB+ | Maximum quality, RTX 3090/4090 |
| Distilled 1.1 FP8 ✅ | ltx-2.3-22b-distilled-1.1_transformer_only_fp8_scaled.safetensors | 23.4GB | 16GB+ | Best balance — RTX 4080/4090, 30-series |
| GGUF (Q4_K_M) | ltx-2-3-22b-dev-Q4_K_M.gguf | ~12GB | 8–16GB | Older or lower-VRAM cards |
Running on less than 8GB VRAM?
If your GPU is under 8GB, RunPod lets you rent an A100 for under €1 per hour and run LTX 2.3 at full quality without touching your local machine.
Download LTX 2.3 — the right files and folders
Most failed installs come down to a missing file or a file in the wrong folder. Start by downloading the workflow file below, then follow the model download instructions — this way you have the workflow ready and the downloads listed in order.
Step 1 — Download the Workflow
Download the workflow JSON file first. There is one workflow for both BF16 and FP8 — you switch between the models inside the workflow. The GGUF version uses a separate workflow. Each workflow also has a T2V / I2V toggle button inside — you can switch between text-to-video and image-to-video without loading a different file.
💡 To load: open ComfyUI → drag the JSON file onto the canvas, or go to Load in the menu and select the file.
Step 2 — Download the model files
LTX 2.3 needs more than just the main model — here's every file and exactly where it goes. Use the download buttons to get each file directly from HuggingFace.
BF16 and FP8 Models — download the one that matches your VRAM
| File | What it does | Download |
|---|---|---|
ltx-2.3-22b-distilled-1.1_transformer_only_bf16.safetensors | Main model — BF16 (39GB, 24GB+ VRAM) | Download |
ltx-2.3-22b-distilled-1.1_transformer_only_fp8_scaled.safetensors | Main model — FP8 recommended (23GB, 16GB+ VRAM) | Download |
gemma_3_12B_it_fp8_scaled.safetensors | Text encoder 1 ⚠ required | Download |
ltx-2.3_text_projection_bf16.safetensors | Text encoder 2 (projection) ⚠ required | Download |
LTX23_audio_vae_bf16.safetensors | Audio VAE | Download |
LTX23_video_vae_bf16.safetensors | Video VAE | Download |
taeltx2_3.safetensors | TAE (fast preview VAE) | Download |
ltx-2.3-22b-distilled-1.1_lora-dynamic_fro09_avg_rank_111_bf16.safetensors | Distilled LoRA (required) | Download |
ltx-2.3-spatial-upscaler-x2-1.1.safetensors | Spatial upscaler ×2 | Download |
GGUF Model files — use these if you're on 8–16GB VRAM
| File | What it does | Download |
|---|---|---|
ltx-2-3-22b-dev-Q4_K_M.gguf | GGUF main model Q4_K_M (~12GB) | Download |
gemma_3_12B_it_fp4_mixed.safetensors | Text encoder 1 ⚠ required (GGUF version) | Download |
ltx-2.3_text_projection_bf16.safetensors | Text encoder 2 (projection) ⚠ required | Download |
LTX23_audio_vae_bf16.safetensors | Audio VAE | Download |
LTX23_video_vae_bf16.safetensors | Video VAE | Download |
taeltx2_3.safetensors | TAE (fast preview VAE) | Download |
ltx-2.3-22b-distilled-1.1_lora-dynamic_fro09_avg_rank_111_bf16.safetensors | Distilled LoRA | Download |
ltx-2-19b-ic-lora-detailer.safetensors | IC LoRA detailer | Download |
ltx-2.3-spatial-upscaler-x2-1.1.safetensors | Spatial upscaler ×2 | Download |
Step 3 — Put each file in the right folder
Two things catch people out: (1) GGUF models go in checkpoints/, not diffusion_models/ — wrong folder means ComfyUI won't see it. (2) Both text encoder files are required — missing either one causes black frames.
📁 BF16 / FP8 folder structure
📁 GGUF folder structure
How to load LTX 2.3 in ComfyUI
You've already downloaded the workflow JSON above. Here's how to open it in ComfyUI.
Load the workflow — step by step
- Open ComfyUI in your browser.
- Drag and drop the downloaded JSON file directly onto the ComfyUI canvas — it will load automatically.
- Alternatively, click the Load button in the ComfyUI menu bar and select the JSON file.
- The workflow opens with all nodes connected. If you downloaded the main workflow (BF16 + FP8), you'll see a model selector node — point it to your downloaded model file.
- To switch between BF16 and FP8, change the model file in the checkpoint loader node inside the workflow.
- To switch between text-to-video and image-to-video, use the T2V / I2V toggle button inside the workflow — no need to load a different file.
Red nodes or errors on first load?
Two causes cover most cases. First, check your ComfyUI version — you need v0.22+. Second, confirm both text encoder files are in models/text_encoders/. A single missing file produces either red nodes or silent generation failures.
🔴 Red nodes or errors on first load?
If you see red nodes, check these two things first:
- Your ComfyUI version must be v0.22+ — check the bottom-left corner of the interface.
- Both text encoder files must be in
models/text_encoders/— missing either one causes red nodes or black frames.
If you're still getting red nodes after checking both, you likely need a custom node. Follow the step-by-step guide: How to fix red / missing nodes in ComfyUI →
Required nodes
The GGUF workflow requires these two custom nodes — install via ComfyUI Manager or the GitHub links below:
Full installation instructions for both are in the missing nodes guide.
Speed up generation with SageAttention
The workflow uses SageAttention — an optimized attention implementation that can speed up generation by 30–50%. If you haven't installed it, generation will still work but will be slower. Install SageAttention once and all your ComfyUI workflows benefit.
Text to Video (T2V) with LTX 2.3
Switching between BF16, FP8, and T2V/I2V in the workflow
The main workflow covers everything — you don't need separate files for each mode. Inside the workflow, look for the model checkpoint loader to switch between BF16 and FP8. The T2V / I2V toggle is a button near the top of the workflow canvas.
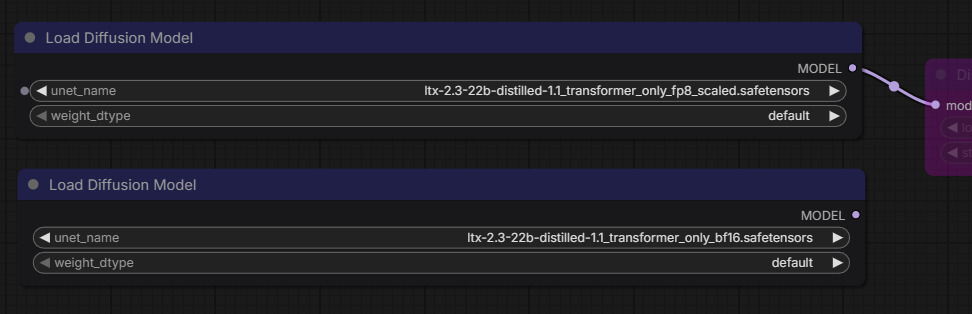
Add your workflow screenshot here — shows the checkpoint loader (to switch BF16/FP8) and the T2V/I2V toggle button at the top of the canvas.
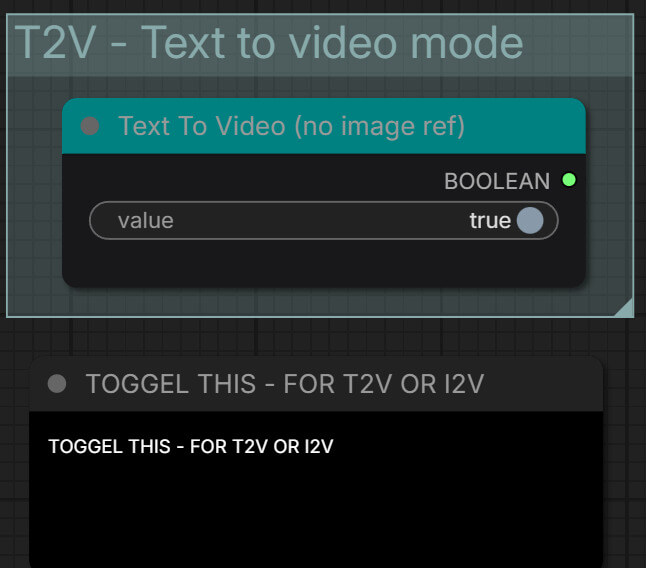
Add a close-up screenshot of the T2V / I2V toggle button — so users know exactly where to click to switch modes.
Settings that work — what to set and why
These are reliable starting values. Don't change anything until you've confirmed a basic generation works.
Resolution
768×512
landscape
544×960 for portrait
Frames
24
≈ 5 sec at 24fps
Resolution
1280×720
landscape
720×1280 for portrait
Frames
48
≈ 5 sec at 48fps
How to write prompts for LTX 2.3
LTX 2.3 responds to cinematic, scene-specific language. Vague prompts produce vague motion. The more specific you are about scene, lighting, and camera behaviour, the more consistent the result.
✗ Weak prompt
"a cat playing"
No scene, no lighting, no motion description. The model guesses everything.
✓ Strong prompt
"A tabby cat batting a ball of yarn across a sunlit hardwood floor, slow motion, shallow focus, warm morning light, photorealistic"
Specific scene + lighting + camera behaviour = consistent output.
Want the full breakdown of prompt structure, camera language, and mode-specific tips? Read the complete LTX 2.3 prompting guide →
🎬 T2V output — strong prompt example
Download the T2V / I2V workflow
The main workflow covers both T2V and I2V — switch modes with the toggle button inside. Download the version that matches your hardware.
Image to Video (I2V) with LTX 2.3
I2V works differently from T2V. You provide a still image and the model generates motion from it. Your prompt describes how things move — not what the scene looks like, because the scene is already your image. Use the I2V toggle button inside the workflow to switch to image-to-video mode.
📸 I2V workflow — where to add your image and switch modes
screenshot here showing the I2V toggle switched on and the image loader node — so users can see exactly where to load their input image.

Example of the input image you used — helps users understand what makes a good I2V source image.
What makes a good input image
LTX 2.3's I2V is notably better than LTX 2 — sharper edge preservation, more consistent subjects across frames. For best results:
- Clear subject with no motion blur — the model needs a clean frame to start from.
- Good, even lighting — extreme contrast or heavy shadows create flickering across frames.
- Avoid overly busy backgrounds if you want the subject to stay consistent.
Settings and prompting for I2V
Settings are similar to T2V. The key difference is denoise strength — start at 0.85 for subtle motion. Lower it for more movement from the source image.
The prompt describes motion, not the scene. Here's an example using a portrait photo as the input:
🎬 I2V output — portrait animation example
Settings: FP8 distilled, 24 frames
Download the I2V workflow
Use the main workflow (BF16 + FP8) and toggle to I2V mode, or use the dedicated GGUF I2V workflow if you're on a lower-VRAM card.
Frequently asked questions
What to do next
Pick your model, download your workflow, run your first generation.
Once you're generating video reliably, that skill becomes a service. Fiverr and Upwork both have active demand for AI video — here's how to turn it into income.
Roadmap Level 2 · Video Generation series · Previous → LTX 2 Text to Video · WAN 2.2 Guide
Join the discussion
Sign in to leave a comment or reply
No comments yet
Be the first to share your thoughts!