
What is LTX-2 Image to Video (I2V)?
Want to animate your images and create smooth, AI-generated video clips from a single picture? The LTX-2 Image to Video (I2V) model for ComfyUI lets you turn still images into lifelike videos with realistic movements, facial expressions, and dynamic scenes.
LTX-2 I2V is an advanced generative AI model that brings static images to life as smooth, realistic videos. It can animate everything from portraits to landscapes, adding camera movement, dynamic backgrounds, and subtle changes in expression or lighting — all directly inside ComfyUI.
Key Features of LTX-2 Image to Video
- Ultra-realistic AI video generated from a single input image
- Smooth camera movement — dolly, pan, zoom, and handheld effects
- Custom LoRA support for fine-grained camera control and detail enhancement
- Native ComfyUI integration — no extra tools or installations needed
- High-quality output with built-in spatial upscaling (2x latent upscaler)
Example Outputs & Prompts
Here are four real examples generated with the LTX-2 I2V workflow. Each shows the output video and the exact prompt used to create it.
High-Speed Cinematic Car Drift & Camera Chase
Prompt used
Animate the car accelerating directly toward the camera at high speed. As it passes close by, the camera pans left smoothly to follow the car's aggressive drive down the road.

Add realistic motion blur on the background and wheels, with light tire smoke and dust trailing behind the car. Introduce a subtle handheld camera feel for intensity, as if the camera operator is struggling to keep up.

The car then initiates a fast drift, sliding sideways and turning around in a controlled arc. Tire smoke increases briefly as the car completes the turn.

After the drift, the car drives back toward the camera, accelerating into an extreme close-up of the front end, headlights and grille filling the frame. End on a dramatic, high-speed stop or pass-by.

Motion should feel fast, cinematic, and realistic, with smooth vehicle physics and dynamic camera movement.
Colorful Puppet Singing Performance on a Playful Stage
Prompt used
A bright, playful stage scene with a colorful puppet character standing center frame, holding a microphone. Medium, front-facing shot. The puppet sings an upbeat, cheerful song with clear lip-sync, its fabric mouth opening and closing rhythmically.

Lyrics sung clearly:
🎵 "Lights are on, the beat is right, Sing it loud, feel the night!" 🎵

The puppet bounces lightly, nods its head to the beat, blinks expressively, and waves one hand in a playful, comedic way. Movements are smooth and well-timed with the music.

The camera stays steady with a gentle push-in. Bright, even lighting highlights vibrant colors and soft puppet textures. The performance ends with the puppet raising the microphone and striking a silly, triumphant pose.
Cinematic Night Street Scene
Prompt used
Cinematic, high-tension night scene on a busy city street. The woman stands still under glowing streetlights, neon reflections shimmering on wet asphalt behind her. She slowly turns her head toward the camera, her expression focused and controlled, breathing steady but tense.

The camera gently pushes in toward her face, capturing subtle eye movement, a soft blink, and a slight tightening of her jaw. She speaks calmly but firmly: "This just got serious."

She shifts her weight slightly, adjusting her stance, her hair moving gently in the night air. Traffic lights and headlights blur softly in the background, creating depth and motion without chaos.

The camera holds on her face in a steady medium close-up, city lights flickering behind her as the tension lingers, ending on her intense, unwavering gaze.
Cinematic Daytime Walk with Natural Motion
Prompt used
A bright daytime outdoor scene. The camera starts in a medium shot, tracking a confident young woman as she continues walking forward along the pathway, her movement smooth and natural with proper weight shift and relaxed arm swing. She looks slightly toward the camera, blinking naturally, her facial muscles moving subtly as her lips begin to move as if she is speaking calmly.

As she walks, she makes a small, natural hand gesture and gently turns her head, maintaining balanced posture and realistic body motion. The camera maintains a steady forward follow with slight cinematic micro-movement, keeping her face and upper body in clear focus while the background remains softly blurred.

Her hair and clothing respond subtly to her movement, and the lighting stays consistent and even throughout, emphasizing realism and lifelike motion.
How to Set Up LTX-2 Image to Video in ComfyUI
Follow these steps to get LTX-2 I2V running in ComfyUI. The setup involves updating ComfyUI, downloading model files, placing them in the correct folders, and configuring the workflow.
Step 1 — Update ComfyUI
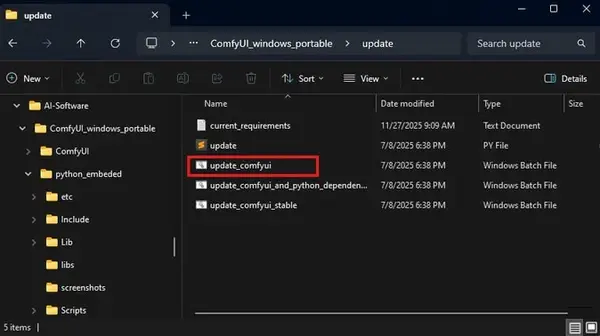
Update via the update folder
Go to your ComfyUI_windows_portable\update folder and double-click update_comfyui to update to the latest version.
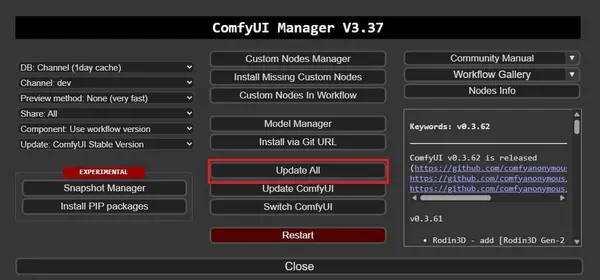
Update all nodes via Manager
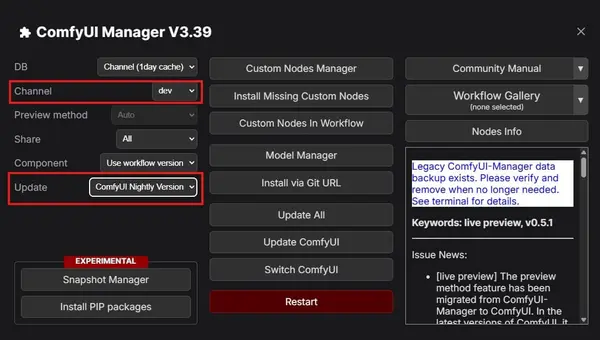
Launch ComfyUI, open the Manager, and click 'Update all' to update every installed custom node.
Switch to v0.8.1 or higher
Click Switch Version in ComfyUI. Ensure the version is v0.8.1 or higher.
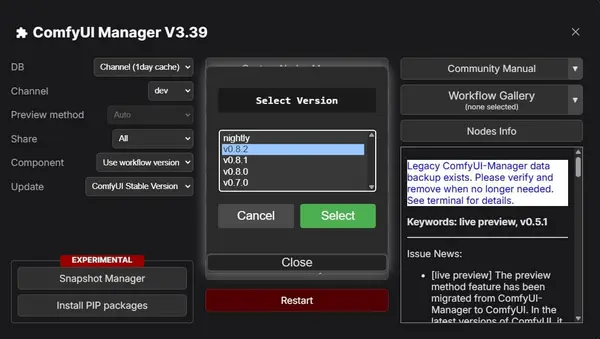
Set channel to dev / nightly
Confirm your channel is set to dev and the update version is ComfyUI nightly for the latest compatibility.
Step 2 — Download the LTX-2 I2V Workflow
Download the ready-to-use workflow and drag it directly into the ComfyUI canvas.
Step 3 — Download Required Models
Download all four model types below for full workflow functionality:
Checkpoint
⬇ ltx-2-19b-dev-fp8.safetensorsText Encoder
⬇ gemma_3_12B_it_fp8_e4m3fn.safetensorsLatent Upscaler
⬇ ltx-2-spatial-upscaler-x2-1.0.safetensorsStep 4 — Place Models in the Correct Folders
Organize the downloaded files exactly as shown below:
ComfyUI/
└── models/
    ├── checkpoints/
    │   └── ltx-2-19b-dev-fp8.safetensors
    ├── text_encoders/
    │   └── gemma_3_12B_it_fp8_e4m3fn.safetensors
    ├── loras/
    │   ├── ltx-2-19b-distilled-lora-384.safetensors
    │   └── ltx-2-19b-ic-lora-detailer.safetensors
    └── latent_upscale_models/
        └── ltx-2-spatial-upscaler-x2-1.0.safetensors
Step 5 — Load the Workflow and Select Models
Open the workflow
Open ComfyUI and drag-and-drop the downloaded JSON workflow file onto the canvas.
Select the checkpoint
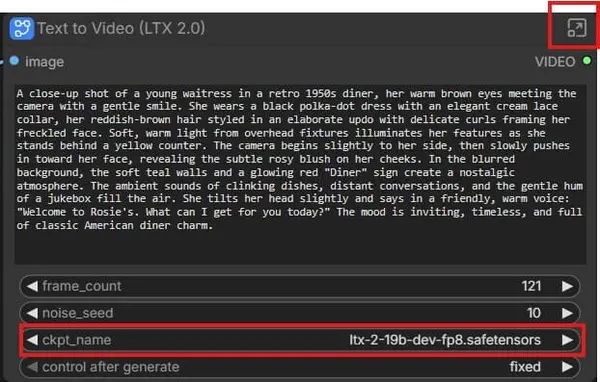
Click on any node or subgraph containing model selection. Confirm CKPT_name is set to ltx-2-19b-dev-fp8.safetensors.
Select the text encoder
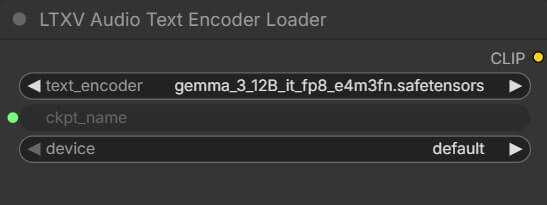
In the LTXV audio text encoder loader node, select gemma_3_12B_it_fp8_e4m3fn.safetensors.
Step 6 — Generate AI Video from Image
Add your input image
Load your source image in the image input node. This is the still image that will be animated.
Write your animation prompt
Enter a detailed description of the motion you want — camera direction, character movement, lighting changes, and scene dynamics all help guide the model.
Queue Prompt
Click 'Queue Prompt' to run the workflow. The output will be a smooth, high-quality AI video saved to your ComfyUI output folder.
Tips and Troubleshooting
Out-of-memory (OOM) error during generation
Fix: Open run_nvidia_gpu.bat in Notepad and add --reserve-vram 4 to the launch command. Lower this value to 3, 2, or 1 on lower-end cards. Restart ComfyUI after saving.
Still getting memory errors after adjusting VRAM
Fix: Increase your system's page file size. See this guide: How to Change Pagefile Size. Restart your computer afterward.
Red nodes after importing the workflow
Fix: Open the ComfyUI Manager, click "Install missing custom nodes", install all required nodes, then restart ComfyUI.
Low-quality or jittery video output
Fix: Use a high-quality, well-lit source image. Write more detailed prompts that describe specific motion, camera angle, and movement style. The more precise your prompt, the better the output.
Model files not appearing in node dropdowns
Fix: Double-check all files are in exactly the right sub-folder (checkpoints, text_encoders, loras, latent_upscale_models). Refresh your browser after adding new files.
Frequently Asked Questions
Conclusion
LTX-2 I2V makes it straightforward to turn still images into vivid, realistic AI videos right inside ComfyUI. With the right model files, the free downloadable workflow, and the setup steps above, anyone can start generating smooth animated clips from any photo or artwork.
Experiment with different prompts, camera directions, and input images to discover what works best. The more detail you include in your prompt, the more cinematic and controlled your output will be.
Join the discussion
Sign in to leave a comment or reply
No comments yet
Be the first to share your thoughts!