
⚡ Quick Answer
To upscale a video with Wan in ComfyUI, you run it through two stages: first Wan 2.1's 14B model re-renders the video at low resolution with a stack of FusionX LoRAs to fix detail and motion, then a RealESRGAN model and RIFE frame interpolation scale it up to full resolution and smooth, high frame-rate output. Minimum 12 GB VRAM, with Block Swap for 8 GB cards.
Most "upscale" workflows just resize a video and sharpen the pixels. This one is different — Wan's diffusion model actually redraws the video at a low resolution first, fixing blur, compression artifacts, and warped motion, before a classic upscaler blows it up to full size. That's why it's called an enhance-and-upscale pipeline, not a plain upscale.
This guide walks through the exact wan video upscale comfyui workflow: which nodes to connect, which LoRAs to stack, and the settings that keep it from running out of memory.
How Does Wan Video Upscale Work in ComfyUI?
The pipeline has two separate stages that most tutorials online mix up:
- Enhance pass (Wan diffusion). Your source video is loaded, resized down to a small working resolution (this workflow uses 512×896), and fed into WanVideoSampler with a low denoise value. The Wan model doesn't generate a new video from scratch — it redraws the existing frames, using the LoRA stack to sharpen detail and stabilize motion.
- Upscale pass (RealESRGAN + RIFE). The enhanced frames go through ImageUpscaleWithModel using RealESRGAN_x2 to double the resolution, then ImageScale stretches it to your final target (2880×2160 in this build), and RIFE VFI doubles the frame rate (24fps → 48fps) so motion looks smooth instead of choppy.
What You Need Before You Start
Grab the workflow JSON first so you can follow along with the real node graph while you download the models below.
Download Workflow JSONRTX 4090 (24 GB)ComfyUI portable, Windows12 GB8 GB possible with Block SwapCustom Nodes
- Install via ComfyUI Manager, or ComfyUI-WanVideoWrapper on GitHub ↗
- Install via ComfyUI Manager, or ComfyUI-KJNodes on GitHub ↗
- Install via ComfyUI Manager, or ComfyUI-VideoHelperSuite on GitHub ↗
- Install via ComfyUI Manager, or ComfyUI-Frame-Interpolation (RIFE) on GitHub ↗
- Install via ComfyUI Manager, or rgthree-comfy on GitHub ↗
Models
| File | Folder | Source |
|---|---|---|
Wan2_1-T2V-14B_fp8_e4m3fn.safetensors | models/diffusion_models | Download ↗ |
Wan2_1_VAE_bf16.safetensors | models/vae | Download ↗ |
umt5-xxl-enc-bf16.safetensors | models/text_encoders | Download ↗ |
RealESRGAN_x2.pth | models/upscale_models | Download ↗ |
rife49.pth | models/rife | Download ↗ |
LoRA Stack
All six go in ComfyUI/models/loras:
| LoRA | File | Strength | Source |
|---|---|---|---|
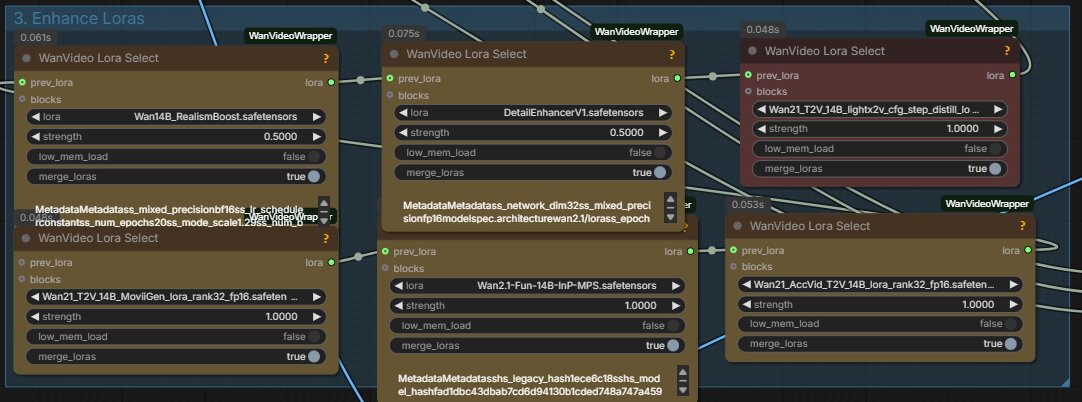
| MPS Rewards | Wan2.1-Fun-14B-InP-MPS.safetensors | 1.0 | HuggingFace ↗ |
| AccVid | Wan21_AccVid_T2V_14B_lora_rank32_fp16.safetensors | 1.0 | HuggingFace ↗ |
| MoviiGen | Wan21_T2V_14B_MoviiGen_lora_rank32_fp16.safetensors | 1.0 | HuggingFace ↗ |
| LightX2V Fast | Wan21_T2V_14B_lightx2v_cfg_step_distill_lora_rank32.safetensors | 1.0 | HuggingFace ↗ |
| Realism Boost | Wan14B_RealismBoost.safetensors | 0.5 | HuggingFace ↗ |
| Detail Enhancer | DetailEnhancerV1.safetensors | 0.5 | HuggingFace ↗ |
Before / After: What the Full Pipeline Produces
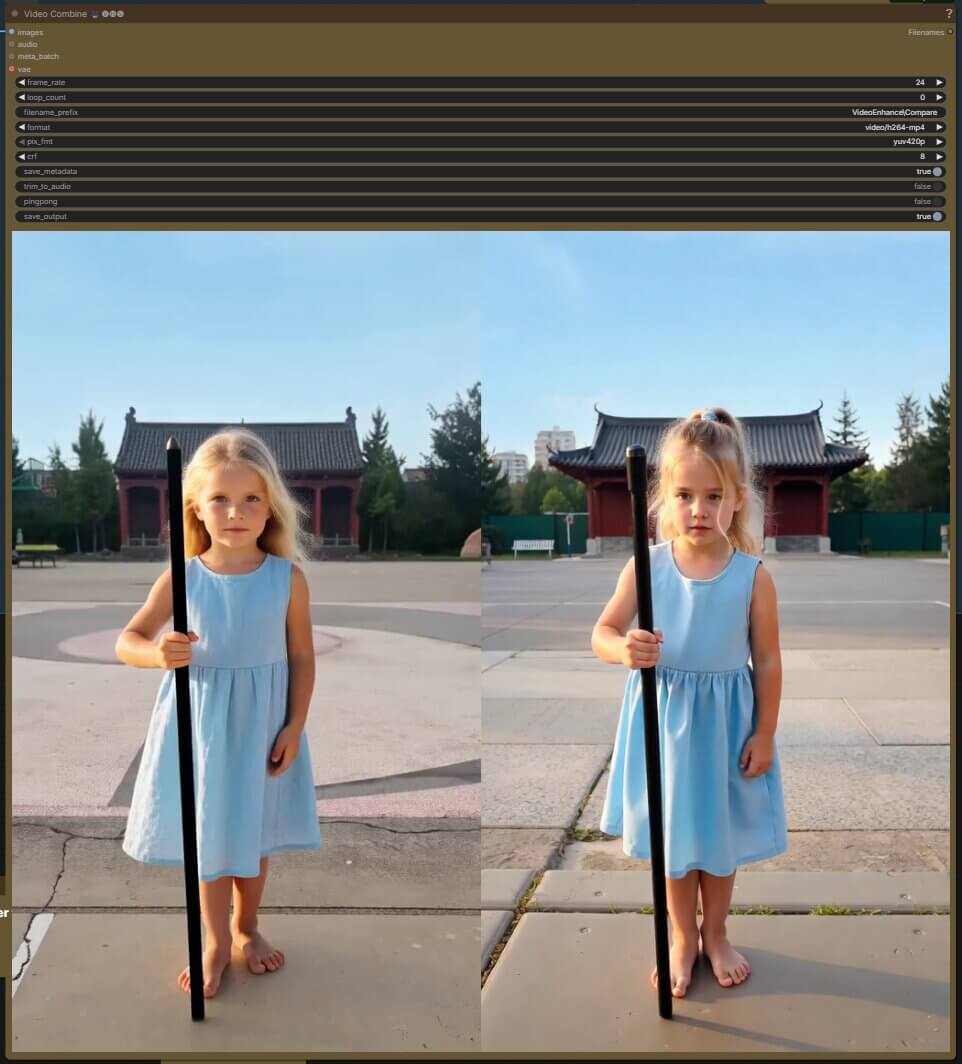
Here's the same clip run through the full pipeline above — Wan enhance pass, RealESRGAN upscale, RIFE interpolation — so you can see what to expect before running it yourself.
// Fix this partStep-by-Step Setup
Load your source video
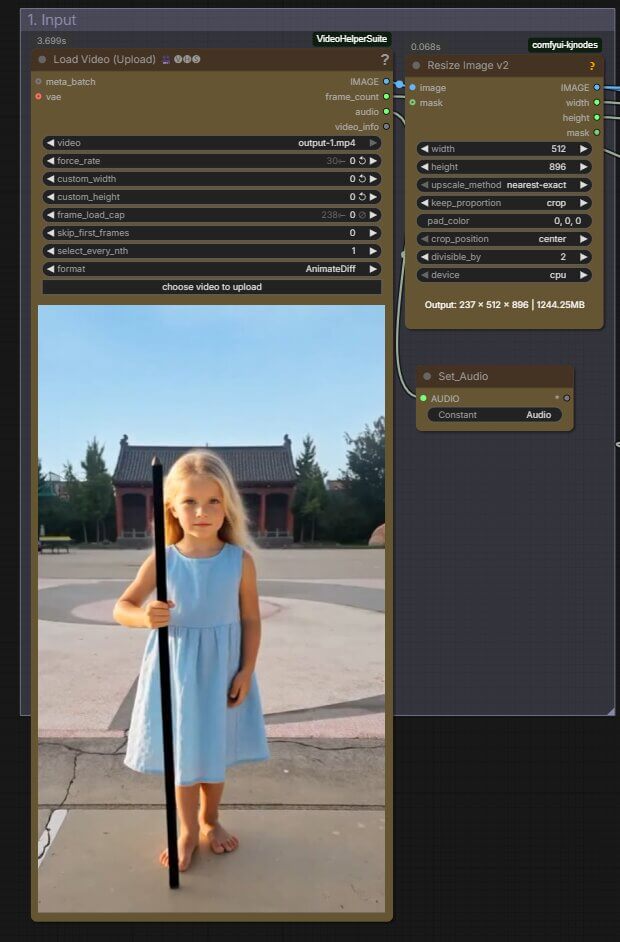
Add a VHS_LoadVideo node (from Video Helper Suite). Click choose video to upload and select your file. Leave frame_load_cap at 0 to process the whole clip, or set a number to test on a short clip first.
Resize the video down for the enhance pass
Connect the loaded video to an ImageResizeKJv2 node (from KJNodes). Set width and height to a size your GPU can handle — this workflow uses 512x896. Set the resize method to nearest-exact and crop mode to center.
This step exists because the Wan diffusion pass is expensive. Running it at full resolution would need far more VRAM than most GPUs have — you upscale to full size after the enhance pass, not before.
Load the Wan model, VAE, and text encoder
Add three nodes: WanVideoModelLoader (select Wan2_1-T2V-14B_fp8_e4m3fn.safetensors, base_precision fp16_fast, attention_mode sdpa), WanVideoVAELoader (Wan2_1_VAE_bf16.safetensors), and LoadWanVideoT5TextEncoder (umt5-xxl-enc-bf16.safetensors).
Build the LoRA stack
Add six WanVideoLoraSelect nodes and chain them together (each one's prev_lora output feeds the next one's prev_lora input). Set each LoRA and strength as listed in the table above. Connect the final chained output into the WanVideoModelLoader's LoRA input.
Set up VRAM management
Add a WanVideoBlockSwap node and connect it to the model loader. Start with it bypassed. If you hit an out-of-memory error in step 7, enable it and raise the swap block count gradually (up to 40) until generation completes without crashing.
Configure the sampler
Add a WanVideoSampler node. Set steps to 4, cfg to 1.0, denoise to 0.5 (for cleanup without changing the video's content), and scheduler to flowmatch_causvid.
Leave the prompt empty in WanVideoTextEncode if you just want cleanup with no style changes. If your video is longer than 81 frames, add a WanVideoContextOptions node set to uniform_standard with context frames at 81 — this splits long videos into chunks so you don't run out of memory.
Run the enhance pass and check the output
Click Queue Prompt. Generation time depends on your video length and GPU — expect several minutes for a short clip on a 24 GB card. Once done, a WanVideoDecode node converts the result back to viewable frames, and a VHS_VideoCombine node saves it as an MP4.
Upscale and interpolate
Feed the enhanced frames into UpscaleModelLoader (set to RealESRGAN_x2.pth) → ImageUpscaleWithModel → ImageScale (set to your target resolution, e.g. 2880x2160, method lanczos) → RIFE VFI (rife49.pth, multiplier 2 to double your frame rate).
Export the final video
Connect the RIFE output to a final VHS_VideoCombine node. Set frame_rate to double your source (e.g. 24 → 48 if you used a multiplier of 2 in RIFE). Click Queue Prompt to render the finished, upscaled video.
Troubleshooting
"CUDA out of memory" during the enhance pass
Your working resolution or LoRA stack is too heavy for your VRAM.
- Lower the resolution in ImageResizeKJv2 (try 384x672 instead of 512x896).
- Enable WanVideoBlockSwap and raise the swap block count gradually.
- Drop MoviiGen and AccVid from the LoRA chain — they add load without changing upscale quality much.
Error message contains "FlowMatch"
Your ComfyUI-WanVideoWrapper version doesn't support the flowmatch_causvid scheduler as configured.
- Open WanVideoSampler.
- Change scheduler from flowmatch_causvid to unipc.
- Re-run. dpm++_sde or beta also work if unipc gives soft results.
Output video looks smeared or overly changed from the original
Your denoise value is too high for a cleanup pass.
- Open WanVideoSampler and lower denoise to between 0.3 and 0.5.
- Make sure WanVideoTextEncode has an empty prompt — a prompt at high denoise pushes Wan toward generating new content instead of preserving your original.
Frequently Asked Questions
What to Do Next
Download the workflow and run it on a short test clip first.
Run it once with the default settings (denoise 0.5, no prompt) before processing a full video — once you confirm it runs on your GPU, adjust the resolution and LoRA strengths to match your hardware.
Published: 2026-07-30 · Last updated: 2026-07-30 · Tested on RTX 4090
Join the discussion
Sign in to leave a comment or reply
No comments yet
Be the first to share your thoughts!