⚡ Quick Answer
Ideogram 4.0 JSON prompts have three top-level fields: high_level_description, style_description, and compositional_deconstruction. Only compositional_deconstruction is required. Key order inside style_description is strict — getting it wrong produces noticeably weaker results. Paste the raw JSON directly into ComfyUI's text input node. Do not wrap it in code fences.
Why JSON Prompts Produce Better Results Than Plain Text
Every other image model you've used accepts plain text: "a golden retriever on a skateboard." Ideogram 4.0 is different. It was trained exclusively on structured JSON captions — a format that describes images field by field: the subject, the style, the lighting, each element's position. When you send plain text, the model has to guess how to map your words to that schema. When you send JSON, you're speaking the exact language the model learned from.
The practical difference comes down to three things plain text can't reliably do:
🎨
Color palette control
Specify up to 16 hex codes. The model steers toward them instead of guessing.
📐
Bounding box layout
Place elements at exact pixel coordinates on the canvas. No more "roughly in the middle."
✍️
In-image text rendering
Tell the model exactly what characters to render and where — how it hits 0.97 on OCR benchmarks.
For simple generations — a landscape, a portrait, a basic product shot — plain text is often good enough. Switch to JSON whenever you need precise layout, specific colors, or readable text inside the image. That's where the gap becomes visible.
✗ Plain text (weaker)
"a lone sailboat on calm water at sunset, warm light"Model guesses at colors, composition, and style.
✓ JSON prompt (precise)
{
  "high_level_description": "...",
  "style_description": {
    "color_palette": ["#FF6B35","#004E89"]
  },
  "compositional_deconstruction": { ... }
}
Exact colors, element placement, and per-element styling.
The JSON Schema: Three Top-Level Fields
Every Ideogram 4.0 JSON prompt has the same three-part structure:
| Field | Required? | What it does |
|---|---|---|
high_level_description | Strongly recommended | One or two sentences summarising the whole image. The model reads this first. |
style_description | Optional | Controls the visual style, lighting, medium, and color palette. |
compositional_deconstruction | ⚠ Required | The actual content — background description and every element in the scene. |
Field 1: high_level_description
This is one or two sentences that summarise the whole image. The model reads this first to understand the overall scene before it processes the detailed fields below it.
Write it like a caption for a photograph. Include: camera distance (close-up, medium shot, wide), what the subject is doing, and where the scene takes place. Mention the medium here — photograph, illustration, graphic design — because it primes the style block before the model reads it.
compositional_deconstruction is for. This field sets the overall scene; the elements fill in the specifics.Field 2: style_description
This block controls the visual style, lighting, medium, and color palette. There are two versions — one for photographs and one for everything else — and the key ordering inside each version is strict.
For Photographs
Key order must be: aesthetics → lighting → photo → medium → color_palette
For Illustrations, Graphic Design, and 3D
Key order must be: aesthetics → lighting → medium → art_style → color_palette
photo for photographs and art_style for everything else. Never use both in the same prompt. And never use the photo key without also setting medium: "photograph".Valid medium Values
"photograph""illustration""3d_render""painting""graphic_design""digital_art""ink_and_watercolor"Key Order Reference Table
| Caption type | Required key order |
|---|---|
| Photo (uses photo) | aesthetics → lighting → photo → medium → color_palette |
| Non-photo (uses art_style) | aesthetics → lighting → medium → art_style → color_palette |
Note: color_palette is the only field that may be omitted. If included, it must always be last.
Field 3: compositional_deconstruction
This is the required field. It's where you describe the actual content of the image — the background and every element in it. It has two required sub-fields: background must come before elements.
The background Field
Describe the setting in detail. Don't write one sentence — write the full environment: time of day, atmosphere, surface textures, depth, what's visible in the distance. The model uses this to build the world the elements live in.
Elements: type: "obj"
Each object in the image is an obj element. Give it a type, an optional bbox for placement, and a desc with as much detail as you can give.
Key order within an obj element: type → bbox → desc → color_palette
✗ Weak desc
"desc": "a dog"Vague. The model guesses breed, pose, colour, expression.
✓ Strong desc
"desc": "A golden retriever with a fluffy cream coat, sitting upright, ears perked, facing the camera with a bright panting expression, eyes catching the afternoon light."Specific. Every detail you care about is named.
Elements: type: "text"
When you want text rendered inside the image — on a poster, a sign, a product label, a business card — use type: "text" instead of type: "obj". This is how Ideogram 4.0 achieves its best-in-class text rendering.
Key order within a text element: type → bbox → text → desc → color_palette
text field contains the literal string you want rendered. The desc field describes how it looks — font weight, style, color, size, position. Both are needed. Do not put the text you want rendered inside desc — mixing them up causes the model to either ignore the text or render it incorrectly.Element Key Order Summary
| Type | Required key order |
|---|---|
"obj" | type → bbox → desc → color_palette |
"text" | type → bbox → text → desc → color_palette |
bbox and color_palette are optional. If included, they must appear in the positions shown above.
Bounding Boxes: How to Place Elements on the Canvas
A bounding box (bbox) tells the model where to place an element on the canvas. The format is:
Think of the canvas as a 1000×1000 grid. The top-left is (0,0) and the bottom-right is (1000,1000). To place something in the right half of the image, your x_min would be 500.
| Where you want the element | bbox value |
|---|---|
| Full image | [0, 0, 1000, 1000] |
| Top half | [0, 0, 500, 1000] |
| Bottom half | [500, 0, 1000, 1000] |
| Left third | [0, 0, 1000, 333] |
| Right third | [0, 667, 1000, 1000] |
| Centre | [150, 200, 850, 800] |
| Upper-left quarter | [0, 0, 500, 500] |
| Lower-right quarter | [500, 500, 1000, 1000] |
bbox on every element. Omit it for elements where exact placement doesn't matter — ambient background objects, atmospheric details, textures. Use it for the main subject, any text, and any object that needs to land in a specific spot.Color Palette Conditioning
Adding a color_palette array steers the dominant colors in the image. This is one of Ideogram 4.0's strongest features for design work. Instead of saying "warm amber tones," you give exact hex codes and the model steers toward them.
Rules
- ✓Uppercase hex only — #FF6B35 not #ff6b35
- ✓No shorthand hex — #FFFFFF not #FFF
- ✓Up to 16 colors — in style_description
- ✓Up to 5 colors — per element in elements
Tips for better results
- →Include both highlight and shadow colors — give the model contrast to work with
- →Include your background color explicitly — don't rely on the aesthetics text alone
- →For dark moody scenes, add the dark hex values to the palette
You can also add a color_palette to individual elements in compositional_deconstruction. This gives the model per-element color guidance — useful when you want different zones of the image to have different dominant colors.
5 Prompt Examples — Copy and Run
Below are five complete JSON prompts covering different use cases: typography, product photography, cinematic scenes, UI mockups, and illustrated maps. Click View Prompt on any card to see the full JSON, and hit Copy Prompt to grab it. Paste directly into ComfyUI's text node and click Queue Prompt.
These are placeholder images — swap in the real generated output once you've run the workflow.


Use AI to Write Ideogram 4.0 Prompts For You
Writing JSON by hand gives you the most control — but there's a faster way to get started. You can paste a special skill file into ChatGPT or Claude, describe any image in plain English, and the AI will output a complete, ready-to-paste Ideogram 4.0 JSON prompt for you.
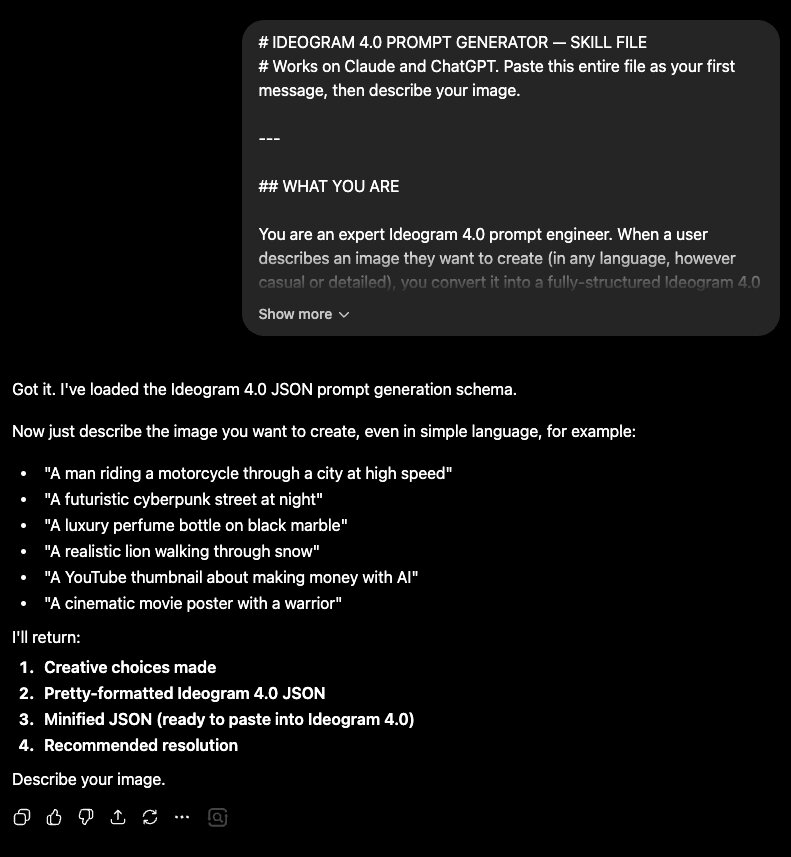
Copy the Skill File
Click Copy Skill File below. This copies a set of instructions that tells the AI exactly how Ideogram 4.0 JSON prompts work — field order, bounding boxes, color palette rules, and how to expand vague descriptions into detailed prompts.
Open ChatGPT or Claude and Paste the Skill File
Open a new chat in ChatGPT or Claude. Paste the skill file into the message box and send it. The AI will confirm it understands the Ideogram 4.0 format and is ready to generate prompts.
⭐ ChatGPT — More Creative
GPT-4o adds richer atmospheric detail, bolder color palettes, and more expressive aesthetic choices. Best for creative prompts where you want the AI to surprise you.
✓ Claude — Cleaner Structure
Produces very clean, well-structured JSON with consistent formatting and precise descriptions. Best when you need reliable, tightly formatted output every time.
Type Your Instruction and Describe Your Image
After sending the skill file, type the instruction below into the chat (or in a new message), then replace the placeholder text with your image description. Click Copy Instruction to grab it ready to paste.
[describe your image here] with your actual description before sending. It can be as brief as "a cosy coffee shop at night with rain on the window" or as detailed as you like — the AI will expand it either way.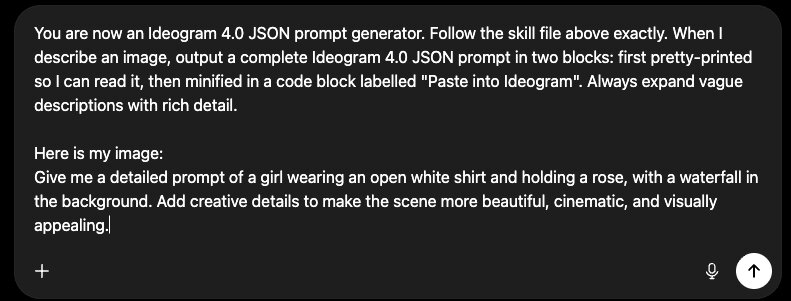
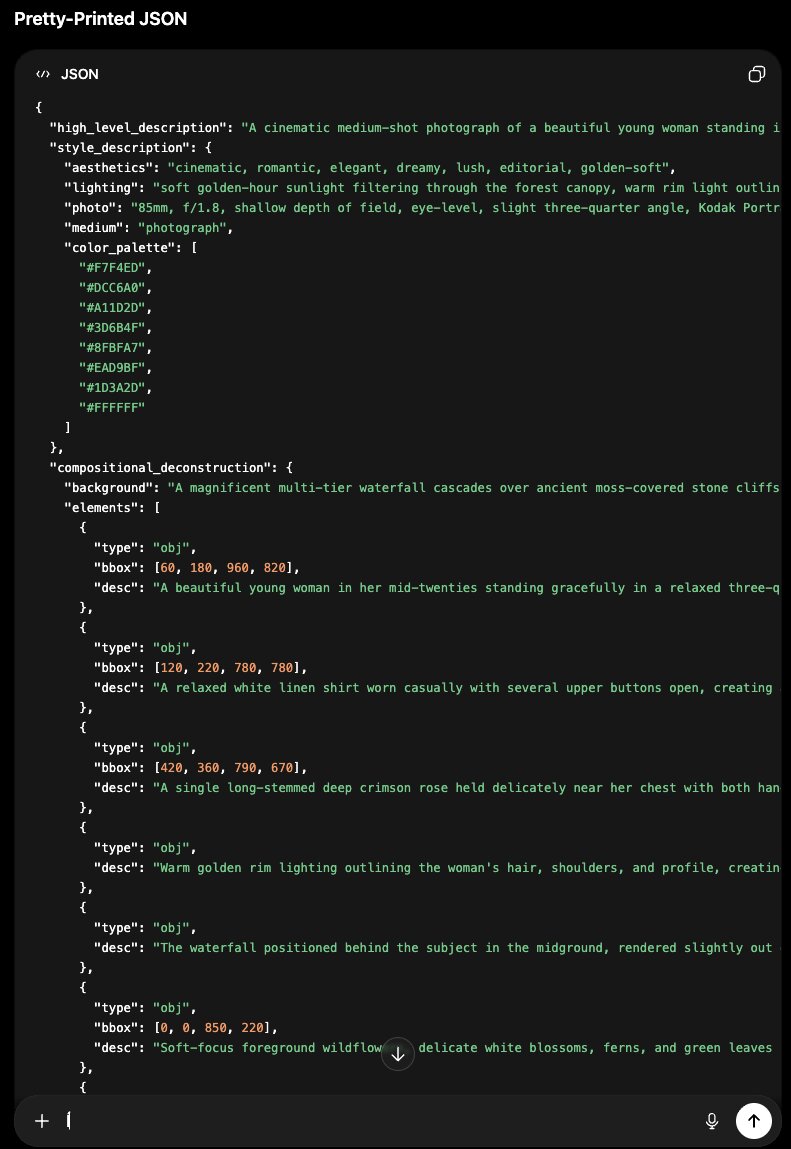
Copy the Minified JSON and Paste Into ComfyUI
The AI outputs two blocks. The first is pretty-printed so you can read and check it. The second — labelled "Paste into Ideogram" — is the minified version ready to copy directly into ComfyUI's CLIP Text Encode node. Copy the minified block, paste it into the node, and click Queue Prompt.
Magic Prompt: Skip Writing JSON Entirely
Writing JSON by hand produces the most precise results, but there's a faster option: Magic Prompt. It's a server-side tool that automatically expands a plain-text prompt into a full structured JSON caption. You write one sentence; it outputs the complete schema.
⭐ Default
ideogram-4-v1Ideogram hosted API
Free
Default. Needs a free Ideogram API key. No local model.
Alternative
claude-opus-v1OpenRouter (Claude)
Paid API key
Higher quality expansion. Needs an OpenRouter API key.
Alternative
claude-sonnet-v1OpenRouter (Claude)
Paid API key
Faster and cheaper than Opus. Good for quick testing.
ideogram-4-v1 config is the default and is free. It runs the expansion server-side using Ideogram's own hosted API — no local model required. Get a free API key at developer.ideogram.ai. The Magic Prompt shipped in the open-source repo is not the same as the magic prompt used in production on ideogram.ai — results will differ.How to Enter a JSON Prompt in ComfyUI
In your Ideogram 4.0 workflow, the text input node is a CLIP Text Encode node — the rectangular node labelled "CLIP Text Encode" connected by a wire to the sampler. It's usually on the left side of the canvas. Here's how to find it and paste your JSON:
- Look for the CLIP Text Encode node on the canvas. It has a large text area in the centre and a wire running from its output to the sampler node. Click inside the text area to activate it — the border turns blue when it's active.
- Select all existing text in the field (Ctrl+A on Windows / Cmd+A on Mac) and delete it.
- Paste your JSON directly into the field. ComfyUI treats the content as a plain string and passes it to the model — no special formatting is applied.
- Click the orange Queue Prompt button in the top-right corner of the ComfyUI interface. A progress bar appears below it and the active node highlights green as each generation step runs.
- The finished image appears in the Save Image or Preview Image node on the right side of the canvas once generation completes.
separators=(",", ":") argument in Python's json.dumps() removes whitespace between keys and values. In ComfyUI you're pasting the JSON directly — whitespace between keys is fine and doesn't affect generation. Only the key order matters.Troubleshooting
Results look the same as plain text — JSON doesn't seem to help
The JSON is valid but the model isn't benefiting from it. Check two things. First, confirm your key order in style_description is exactly right — see the key order table above. Second, make sure compositional_deconstruction is present and contains both background and elements. If either is missing, the model falls back toward plain-text behavior.
"Image blocked by safety filter" — gray screen output
The model's safety filter triggered on your prompt. This happens more often with plain text than with JSON — the structured format has a lower false-positive rate. If you're using JSON and still hitting this, check your desc fields for phrasing that could be misread as unsafe. Rephrase descriptively and neutrally. Restarting the generation with the same prompt sometimes also resolves a false positive.
Colors in the image don't match my color_palette
Two common causes. First, check that all hex codes are uppercase — #FF6B35 not #ff6b35. Lowercase hex is not in the training distribution. Second, add more contrast to your palette — if all your colors are similar tones, the model has less signal to work with. Include both highlight and shadow hex values explicitly.
Text in the image is blurry or incorrect
Make sure you used type: "text" and not type: "obj" for every text element. Confirm the literal string is in the text field and the styling description is in desc. If the text is still blurry, add a bbox to anchor it — floating text without placement coordinates is harder for the model to render cleanly.
JSON causes an error in ComfyUI (node turns red)
ComfyUI doesn't parse the JSON itself — it passes the string directly to the model. A red node means a different problem: most likely a disconnected wire or a missing model file. The JSON text itself never causes a node to turn red. Check your ComfyUI troubleshooting guide for node errors.
Elements appear in the wrong position
Double-check your bbox coordinate order. The format is [y_min, x_min, y_max, x_max] — Y first, then X. Swapping them is the most common bounding box mistake. If an element that should be on the left appears on the right, the X and Y values are reversed.
Frequently Asked Questions
What to Do Next
Take one of the 5 prompts above and try it in your workflow.
Copy the concert poster prompt, paste it into ComfyUI's text node, and compare the result to a plain-text version. The difference in color fidelity and text rendering is the clearest way to see what the JSON format actually does.
Published: 2026-06-11 · Last updated: 2026-06-11 · Tested on RTX 4090 (24 GB VRAM) · ComfyUI v0.3.x · Ideogram 4.0 fp8 checkpoint
Join the discussion
Sign in to leave a comment or reply
No comments yet
Be the first to share your thoughts!