
⚡ Quick Answer
The fastest way to install Ostris AI Toolkit is its built-in Manager: clone the repository, run one script for your operating system (run_windows.bat, run_linux.sh, or run_mac.zsh), and it installs Python, PyTorch, Node.js, and FFmpeg for you automatically. When it finishes, it opens a Web UI at http://localhost:8675. You need git installed and an NVIDIA GPU — 8GB VRAM minimum, 24GB+ recommended for training FLUX LoRAs.
Ostris AI Toolkit is a free, open-source training suite for fine-tuning diffusion models with LoRA — a technique that teaches an AI image or video model a specific character, style, or product without retraining the entire model. This guide covers how to install AI Toolkit for LoRA trainingusing its official Manager, the method the project itself now recommends, plus the manual fallback if the Manager doesn't run on your setup. You'll have it installed and its Web UI open in under 20 minutes.
What You Need Before You Start
AI Toolkit's Manager installs almost everything for you, but a few things need to already be on your computer first.
- Git — the tool GitHub uses to download ("clone") a project's code to your computer. Download it free from git-scm.com if you don't already have it.
- An NVIDIA GPU with at least 8GB of VRAM (the memory built into your graphics card, separate from your system RAM) for basic LoRA training — 24GB or more if you plan to train LoRAs for FLUX-based models.
- Around 20–30GB of free disk space for the toolkit itself, plus more per model you download later.
- Windows, Linux, or macOS on Apple Silicon (macOS support is still experimental — see the warning in Step 2).
| Operating System | GPU Minimum | Notes |
|---|---|---|
| Windows | RTX 3060 (12GB) or better | Full Manager support |
| Linux | RTX 3060 (12GB) or better | Most tested platform |
| macOS (Apple Silicon) | M-series chip | Experimental — manual install may be needed |
Step 1: Clone the AI Toolkit Repository
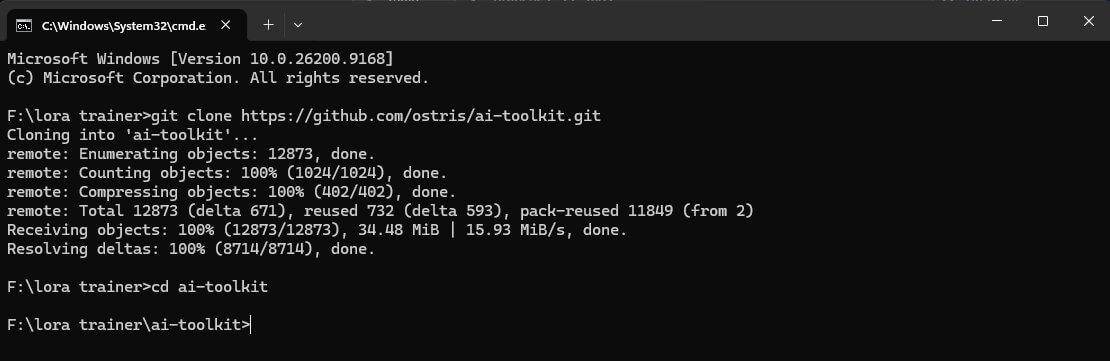
Cloningdownloads a full copy of AI Toolkit's code from GitHub onto your computer. This is the starting point no matter which install method you use next.
- Open a terminal — Command Prompt or PowerShell on Windows, Terminal on Linux or macOS.
- Type the following command and press Enter:
You'll see lines of text scroll by as Git downloads every file in the repository. This takes anywhere from a few seconds to a couple of minutes depending on your connection.git clone https://github.com/ostris/ai-toolkit.git - Move into the new folder:
Your terminal prompt changes to show you're now inside the ai-toolkit folder.cd ai-toolkit
Step 2: Run the AI Toolkit Manager
The Manager is a built-in script that replaces the old manual pip and PyTorch install entirely. It detects your hardware, then installs the matching PyTorch build, a local Python environment, Node.js, and FFmpeg — all kept inside the ai-toolkit folder, nothing installed system-wide.
Windows
- Open the ai-toolkit folder you just cloned in File Explorer.
- Double-click run_windows.bat. Or, from the same terminal you used in Step 1, type:
run_windows.bat - A terminal window opens and the Manager starts detecting your hardware — GPU model, VRAM, OS version — then downloads and configures everything. This is the slowest part of the whole install: expect 5 to 15 minutes depending on your connection.
Linux
- In your terminal, inside the ai-toolkit folder, type:
This gives the script permission to run as a program — Linux blocks this by default for downloaded files.chmod +x run_linux.sh - Then run it:
Setup runs the same way as described above for Windows../run_linux.sh
macOS (Apple Silicon, experimental)
chmod +x run_mac.zsh
./run_mac.zsh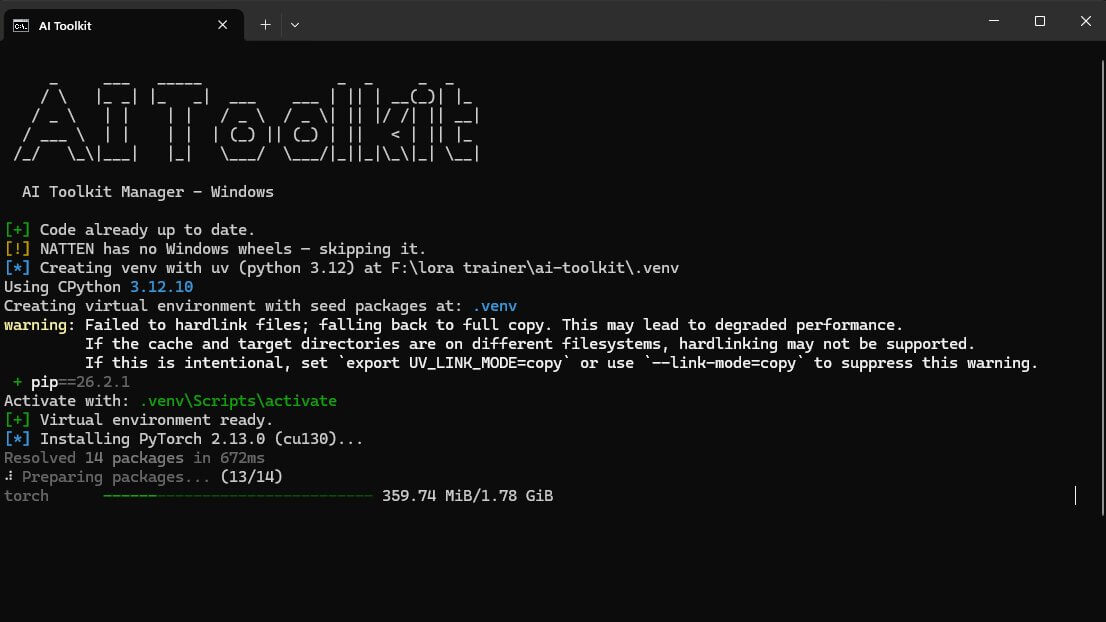
Step 3: Open and Verify the Web UI
This last step confirms the install actually worked before you move on to training anything.
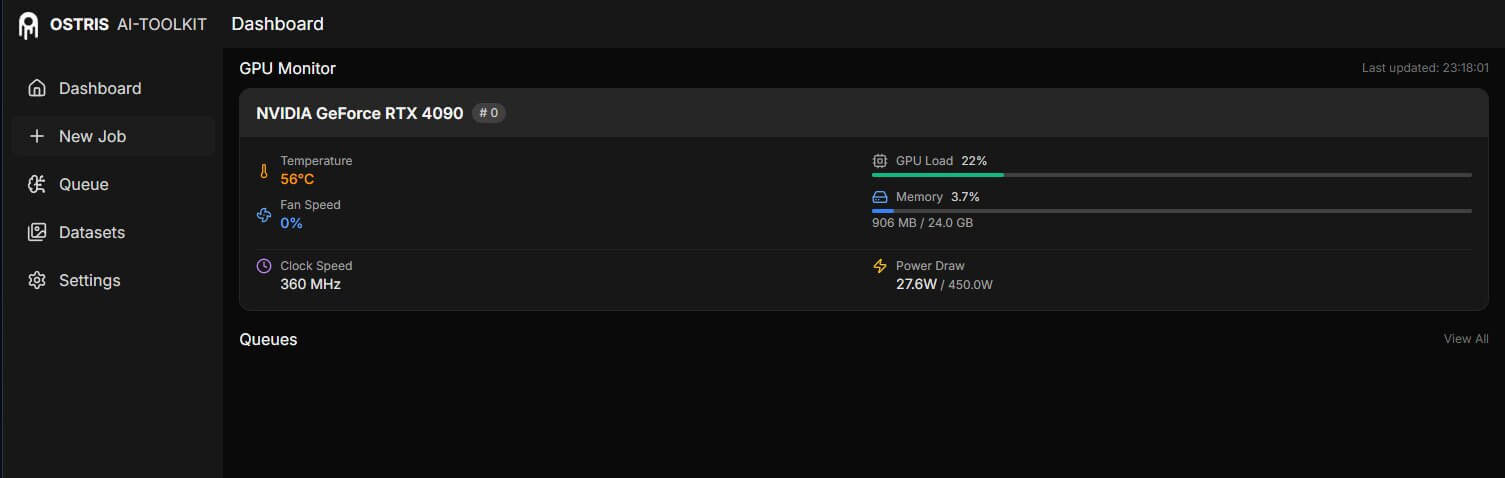
- Once the Manager finishes, open your browser and go to:
http://localhost:8675 - The AI Toolkit interface loads, with an empty Jobs panel and navigation for Datasets, Jobs, and Settings. If the page loads, your installation is working.
- Leave the terminal window open — closing it shuts down the Web UI, though it isn't needed once a training job is already running.
What If You'd Rather Install Manually?
The Manager above is the recommended path, but the manual method still works if you want full control over each package, or the Manager doesn't run on your setup.
This method uses a Python venv— a self-contained Python environment that keeps AI Toolkit's packages separate from anything else installed on your computer, so nothing conflicts with other projects.
python3 -m venv venv
source venv/bin/activate  # Windows: .\venv\Scripts\activate

pip3 install --no-cache-dir torch==2.13.0 torchvision==0.28.0 torchaudio==2.11.0 --index-url https://download.pytorch.org/whl/cu130
pip3 install -r requirements.txt
The requirements.txt file lists every remaining package AI Toolkit needs — pip installs all of them in one pass.
How Much VRAM Do You Actually Need?
VRAM needs vary a lot depending on which model you're training a LoRA for — there isn't one blanket number that applies to everything.
| Model | Minimum VRAM | Example Config File |
|---|---|---|
| SD 1.5 / SDXL | 8GB | — |
| FLUX.1-dev | 24GB | train_lora_flux_24gb.yaml |
| FLUX.1-schnell | 24GB | train_lora_flux_schnell_24gb.yaml |
| Z-Image Turbo | 6–8GB (community-reported) | — |
AI Toolkit ships ready-made config files for common setups inside config/examples/. Copy the one matching your model into the configfolder, rename it, and edit the values following the comments already inside it — you don't need to build a config from scratch.
For a full VRAM breakdown across image and video models beyond just AI Toolkit, see the VRAM and hardware guide for AI video and image generation.
Troubleshooting
"'git' is not recognized as an internal or external command"
What causes it: Git isn't installed, or your terminal was already open before you installed it.
How to fix it: Install Git for Windows from git-scm.com, then close and reopen your terminal before trying the clone command again.
Manager update skipped with a warning
What causes it: This is intentional, not a bug — the Manager never overwrites files you've modified yourself. If you've edited config files inside ai-toolkit, running an update skips those files and warns you instead of silently replacing your changes.
How to fix it: If you actually want the fresh version, back up your edited files first, then let the update run or re-clone the repository.
Web UI won't load at localhost:8675
What causes it: Either the Manager is still installing dependencies in the background, or something else on your computer is already using port 8675 (the address your browser needs to reach the Web UI).
How to fix it: Wait until the terminal shows the Manager has finished, then refresh the page. If it still won't load, run python3 -m manager doctor from the ai-toolkit folder to check for problems.
For errors that come from ComfyUI itself rather than AI Toolkit, see the common ComfyUI errors and fixes guide.
Frequently Asked Questions
What to Do Next
Your next step isn't training yet — it's building the image dataset AI Toolkit will train on.
Where to actually get your training images, and the quality checklist to run before you start a job.
Published: 2026-08-17 · Last updated: 2026-08-17
Join the discussion
Sign in to leave a comment or reply
No comments yet
Be the first to share your thoughts!