
⚡ Quick Answer
DLSS5 in ComfyUI runs NVIDIA's real neural rendering engine over your generated images and video, reconstructing skin, hair, and fabric detail with optional 1.5x–3x upscaling. It installs as a custom node pack called ComfyUI-DLSS5-Enhancer, needs an RTX 30/40/50 GPU on Windows, and takes about 10 minutes including a one-time ~700MB runtime download.
If your ComfyUI renders come out a little plastic-looking — flat skin, mushy hair, fabric that reads as texture instead of actual thread — DLSS5 is built to fix exactly that. This guide walks through installing DLSS5 in ComfyUIfrom scratch, using the real terminal commands and output from an actual install, so you know exactly what should happen at each step and what to do if it doesn't.
You'll set this up once and use it for both images and video. Here's what it actually does, before you spend ten minutes installing it.
See What DLSS5 Actually Does Before You Install Anything
DLSS5 isn't a filter that fakes a sharper look. Your frame gets sent to NVIDIA's real neural renderer and comes back reconstructed — the renderer fills in material detail (skin pores, individual hair strands, the weave in fabric) that your generation left out. It's rebuilding what's already implied in the frame. It won't restore a face your source image never had in the first place.
Image enhancement
Image example A
Image example B
Video enhancement
Video example A
Video example B
What You Need Before You Install DLSS5 in ComfyUI
Check every item on this list before you download anything. The most common reason people waste the 700MB download is skipping the first one.
| Item | Requirement |
|---|---|
| GPU | NVIDIA RTX 30, 40, or 50 series. RTX 20 series and older are refused outright. |
| OS | Windows only — no Mac or Linux support for this node pack. |
| Driver | Current NVIDIA GeForce driver, updated within the last few months. |
| ComfyUI | A build that supports the newer node system this pack is written against — recent installs already have this. |
| Disk space | ~700MB free for the runtime files, on top of whatever ComfyUI already uses. |
| VRAM | 8GB or more handles most image and short video work comfortably. |
The VRAM(this is the dedicated memory on your graphics card that holds the image data while it's being processed) you need depends on your resolution and upscaling mode — a card with 8GB or more handles most image and short video work comfortably.
Step 1 — Install the ComfyUI-DLSS5-Enhancer Node Pack
ComfyUI doesn't come with DLSS5 support built in. You need to add it as an extension first, before you can download the actual DLSS5 runtime that does the rendering.
- Open a command prompt or terminal window inside your ComfyUI portable folder — the folder that contains
python_embededandComfyUI. - Run this command to download the node pack into your custom nodes folder:
- Move into that new folder and install its Python dependencies:
You'll see output like this:
Expected output
WARNING: Ignoring invalid distribution ~orch. It looks alarming the first time, but it has nothing to do with this install and is safe to ignore — it's Python flagging a leftover partial package from something else entirely.This installs the custom node(an extension that adds new building blocks to ComfyUI beyond what it ships with by default) code itself — but not the actual DLSS5 rendering engine yet. That's Step 2.
What Is DLSS5, and What Is This Runtime You're About to Download?
Before you run the next command, it helps to know exactly what it's about to download and why — the install prompt names five files and their licenses, which can feel unexpected if you weren't ready for it.
DLSS5 is NVIDIA's neural rendering technology. It's normally used inside video games to reconstruct visual detail that real-time rendering has to skip for the sake of speed. This node pack drives that same renderer over your ComfyUI frames — it runs a small external program alongside ComfyUI and hands it your images one at a time.
The install script downloads five components, each under its own license:
nvngx.dll— the worker program that talks to ComfyUI, built by a separate open-source projectnvngx_dlss.dllandnvngx_dlssnr.dll— NVIDIA's actual DLSS rendering engines, under NVIDIA's own termsdxgi.dll— a component from ReShade (an open-source rendering tool), BSD-3-Clause licensedrenodx-dlss5.addon64— a bridge add-on with its own distribution termsffmpeg.exe/ffprobe.exe— standard open-source video tools, needed only for the video node
None of these are hosted or owned by the ComfyUI-DLSS5-Enhancer node pack itself — it's an installer that fetches them from where they actually live. That's why the next step asks you to confirm before downloading anything.
Step 2 — Download and Register the DLSS5 Runtime
Step 1 only installed the ComfyUI-side code. The nodes won't render anything until the real DLSS5 engine is downloaded and registered — that's what this command does.
- From the same folder, run:
- You'll see a licensing notice listing exactly what's about to be downloaded, followed by a prompt:
Type y and press Enter.
- The download starts. This is the ~467MB file mentioned earlier — on most home connections, it's the step that eats up the bulk of your ten minutes:
- Once it finishes downloading, you'll see the files extract, and a final confirmation:
Expected output
That last line is your cue that everything installed correctly.
nvngx.dll is technically an executable program despite its .dll-style name. If the download or extraction gets blocked or quarantined, check the Troubleshooting section below before trying again.Step 3 — Restart ComfyUI and Find the DLSS5 Nodes
- Fully close ComfyUI and start it back up.
- Refresh your browser tab — a hard refresh (Ctrl+F5 on most browsers) clears any cached node list from before the install.
- Double-click anywhere on the empty canvas to open the node search, then type "DLSS5". You should see three nodes: DLSS5 Settings, DLSS5 Enhance Images, and DLSS5 Enhance Video File. They also sit under the image/upscaling category if you'd rather browse manually.
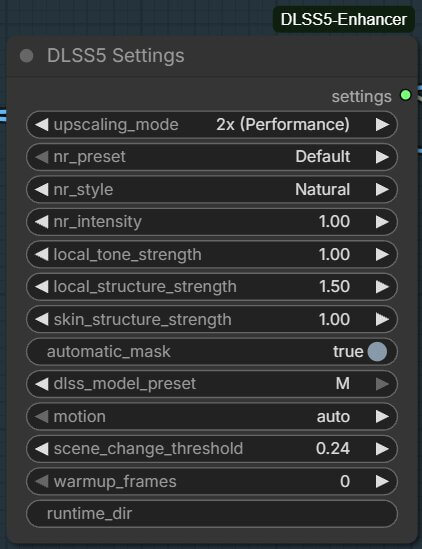
If nothing shows up here, the node pack itself didn't load. Double-check Step 1 finished without errors before moving on.
Build the Workflow — Enhance an Image
The three DLSS5 nodes need to be wired together before anything renders. Here's the simplest version — one image in, one enhanced image out.
- Add a Load Image node (a single building block in your workflow that does one specific job — here, loading a picture from your computer) and pick any image you want to enhance.
- Add a DLSS5 Settings node. Leave the defaults alone for your first test — you can adjust these later once you've seen a result.
- Add a DLSS5 Enhance Images node. Connect the Load Image node's output into its
imagesinput, and the DLSS5 Settings node's output into itssettingsinput. - Add a Save Image node and connect it to the DLSS5 Enhance Images output.
- Click the orange Queue Prompt button in the top-right of the screen. A progress bar appears underneath it — a single image usually finishes in a few seconds to under a minute, depending on your GPU and the upscaling mode you picked.
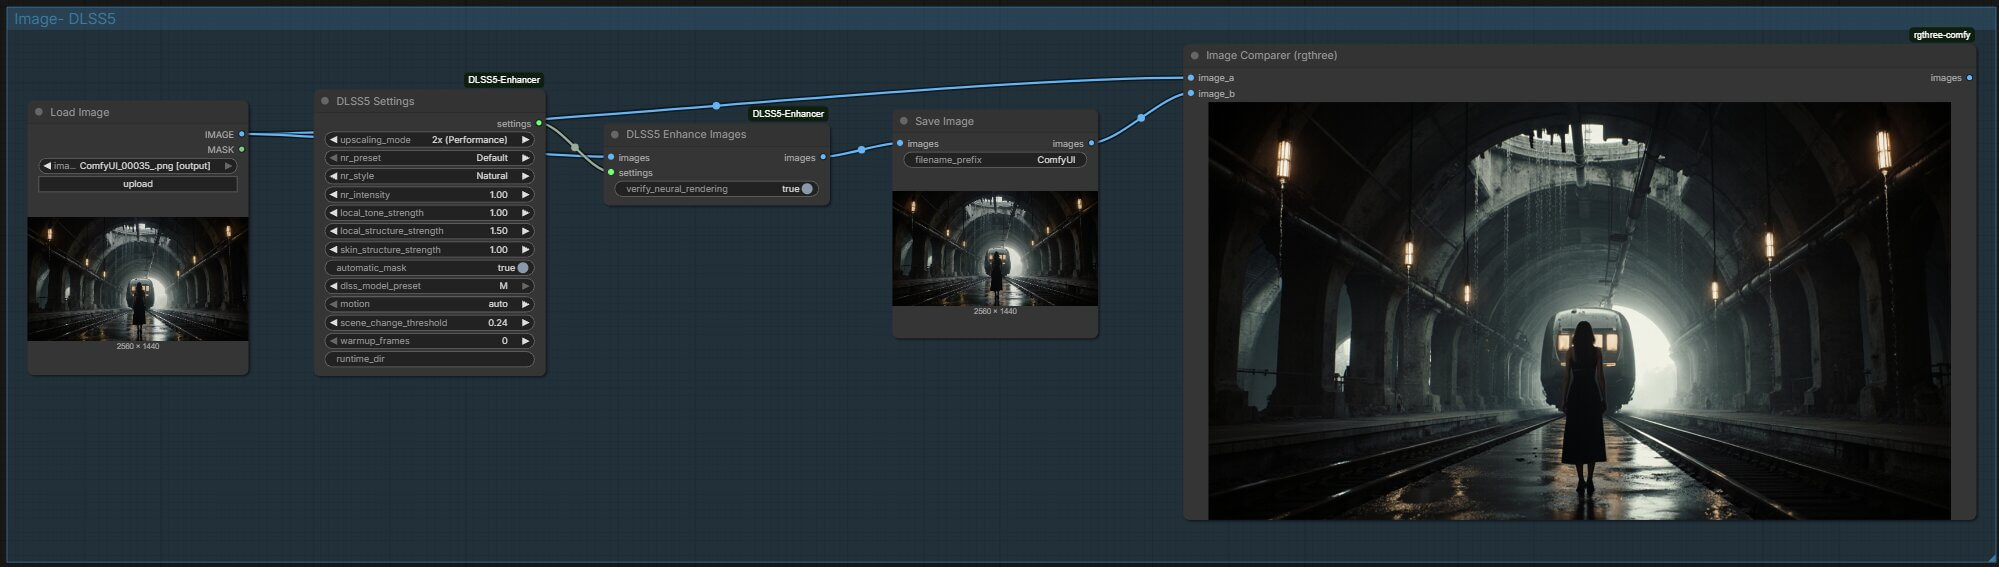
Your enhanced image shows up in the Save Image node once it's done.
Build the Workflow — Enhance a Video
Video works the same way as images, just with different loader and output nodes — a video file is a sequence of frames plus audio, not a single image.
- Add a VHS Load Video node (this comes from a separate, widely-used extension called ComfyUI-VideoHelperSuite) and select your video file.
- Add a DLSS5 Settings node, same as before.
- Add a DLSS5 Enhance Images node — yes, this same node handles video frames too, since a loaded video is really just a batch of images in order. Connect the video loader's image output to its
imagesinput, and the settings node to itssettingsinput. - Add a VHS Video Combine node. Connect the DLSS5 output to its
imagesinput, and connect the audio output from your video loader into itsaudioinput so the sound carries through. - Click Queue Prompt. Video takes noticeably longer than a single image — expect anywhere from several seconds to a few minutes depending on clip length, resolution, and your GPU.
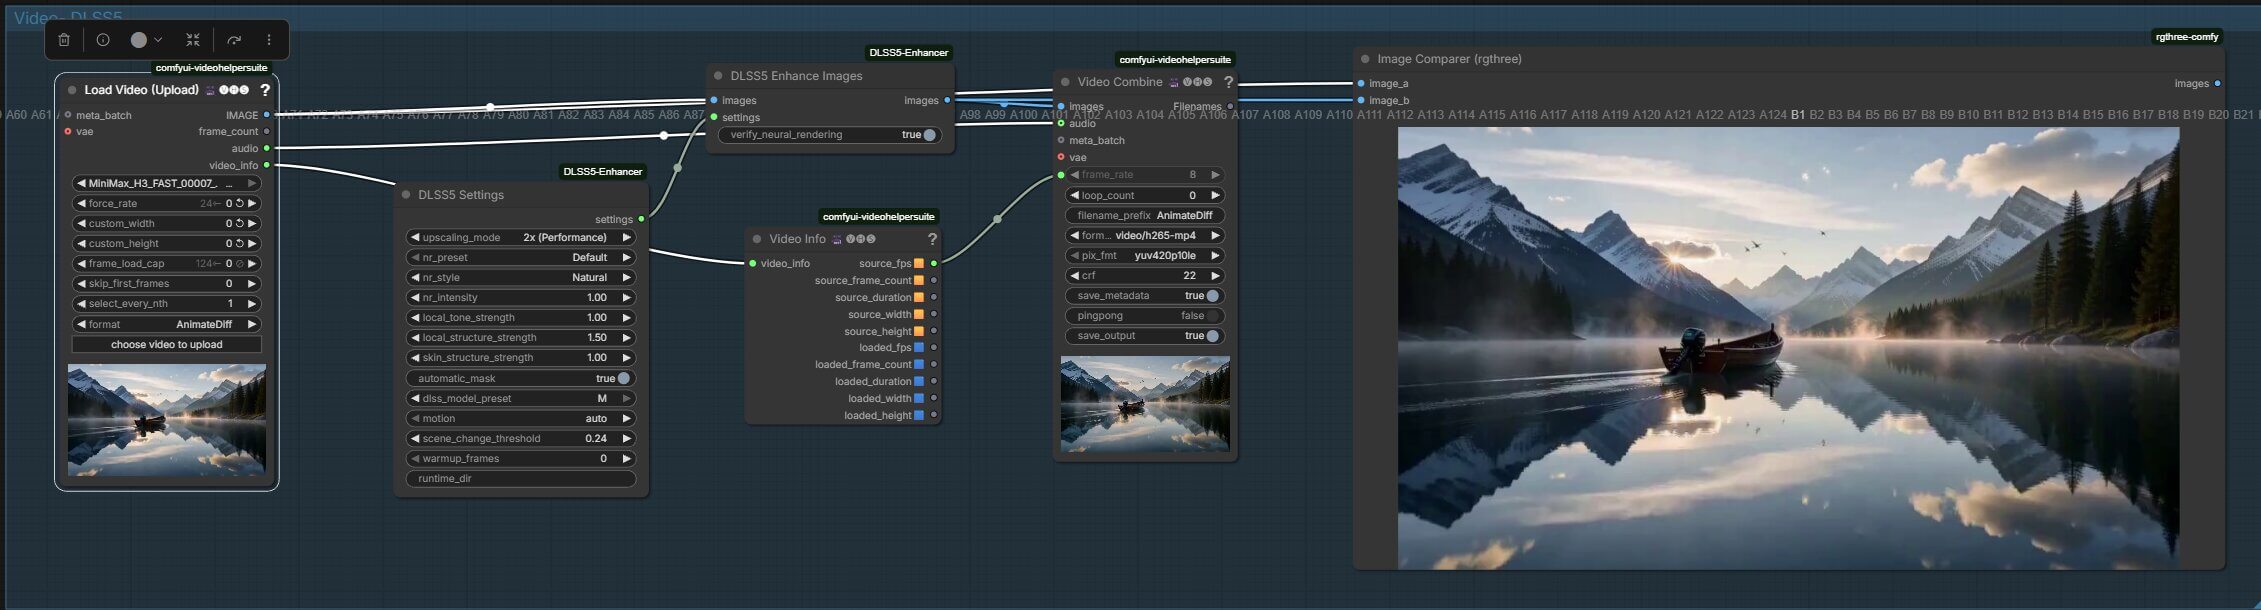
Download the Ready-Made DLSS5 Workflow (Image + Video)
Don't want to wire the nodes by hand? Download the exact workflow file used to produce the comparisons at the top of this article. It has both the image branch and the video branch in one file, plus a side-by-side comparison viewer already wired in so you can drag the slider between the original and the enhanced result yourself.
(dlss5-comfyui-image-video-workflow.json)Drag the file straight onto your ComfyUI canvas to load it.
Troubleshooting DLSS5 in ComfyUI
"No DLSS 5 runtime was found"
What causes it: Step 2 either wasn't run, or the runtime files ended up somewhere the node doesn't expect.
How to fix it: Re-run install_runtime.py from inside the ComfyUI-DLSS5-Enhancer folder. If you already have the DLSS 5 Visual Enhancer application installed elsewhere on your system, you can point the node straight at it instead of downloading again — set the runtime_dir field on the DLSS5 Settings node to that folder's path.
"The native DLSS worker could not be started"
What causes it: This almost always means antivirus software is blocking the worker program. Because nvngx.dll runs as an executable process rather than a passive file, Windows Defender or third-party antivirus sometimes quarantines it automatically.
How to fix it: Add the runtime folder inside your ComfyUI-DLSS5-Enhancer directory to your antivirus's exclusion list, then try again.
"No supported NVIDIA RTX GPU was detected" / "outside the supported RTX 30/40/50 scope"
What causes it: Your graphics card genuinely isn't supported here — DLSS5 through this node pack only runs on RTX 30, 40, or 50 series cards.
How to fix it: There's no workaround or setting to change — it's a hardware limit, not a configuration issue. AMD GPUs get rejected the same way, at the very first check the worker program runs.
Frequently Asked Questions
What to Do Next
Try the image workflow first with one of your own generations.
Once you're comfortable with the defaults, move on to video. For a deeper look at what each DLSS5 setting actually changes, check the roadmap for the next tutorial in this series.
Published: 2026-09-17 · Last updated: 2026-09-17 · Install steps verified against a real terminal session on the current ComfyUI-DLSS5-Enhancer release.
Join the discussion
Sign in to leave a comment or reply
No comments yet
Be the first to share your thoughts!