
⚡ Quick Answer
To generate a video that morphs from one image into another in ComfyUI, use the FramePack Start and End Frame workflow — it needs the ComfyUI-FramePackWrapper_PlusOne custom node, the FramePack I2V diffusion model, a CLIP vision encoder for each image, and the Hunyuan Video VAE. The same workflow also runs as plain single-image FramePack if you mute the end-image branch — you don't need two separate workflows. Minimum 8 GB VRAM with the fp8 model; 16 GB+ recommended for bf16.
FramePack normally takes one image and a text prompt, then generates motion outward from that single frame. This build goes further: give it a second image — an end frame — and it generates the motion that connects the two. The two modes live in the same node graph, so this guide covers both instead of treating them as separate workflows.
Tested on ComfyUI v0.3.28, RTX 4090 (24 GB VRAM). Minimum VRAM: 8 GB (fp8 model, lower resolution).
What You Need Before You Start
Custom nodes:
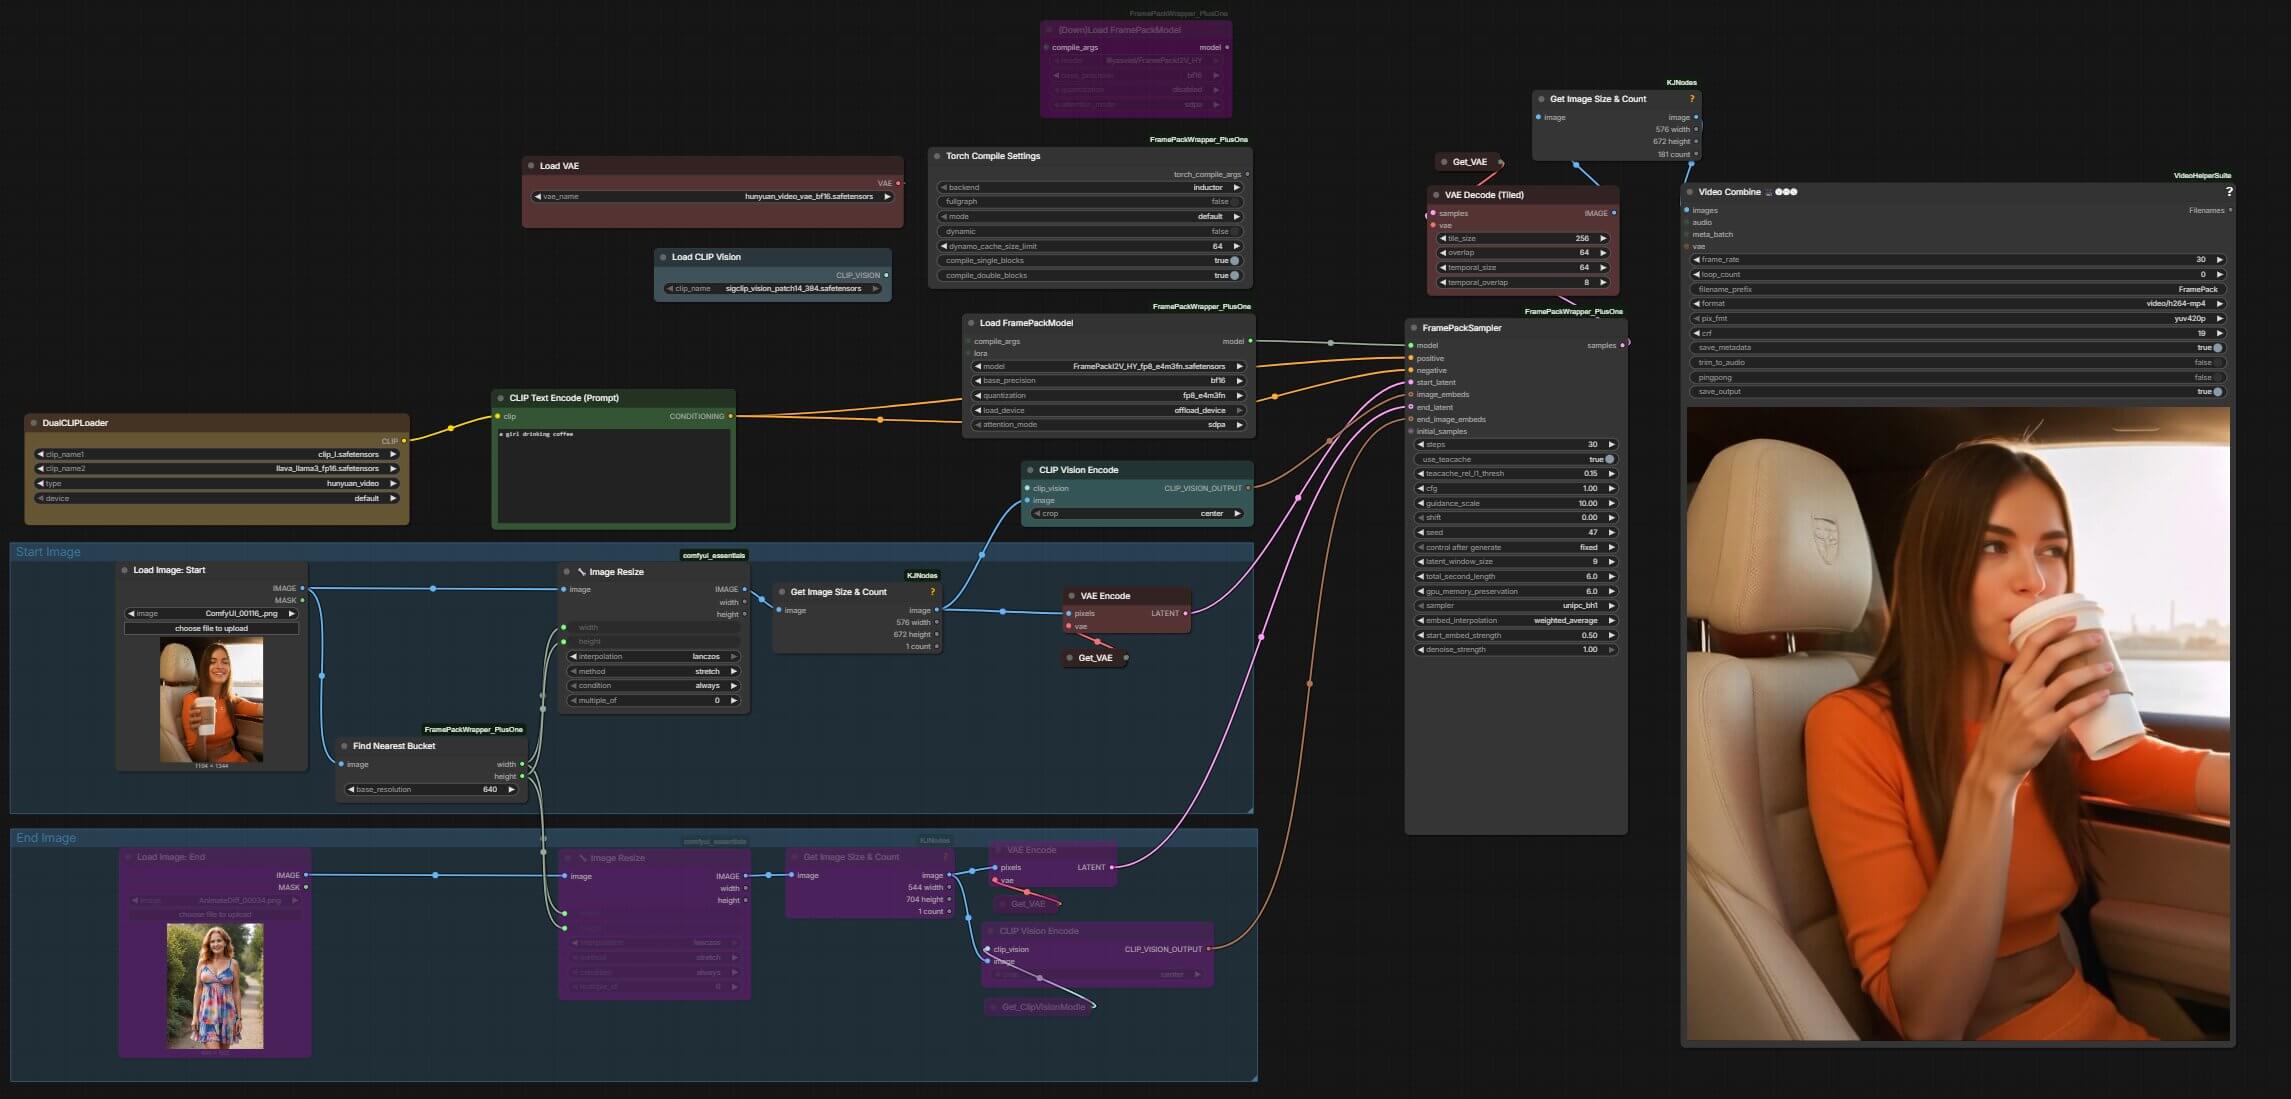
This workflow needs two custom node packs — ComfyUI-FramePackWrapper_PlusOne (adds the FramePackSampler and DownloadAndLoadFramePackModel nodes) and ComfyUI-KJNodes (adds the GetImageSizeAndCount, SetNode, and GetNode utility nodes). You don't need to hunt these down one by one — load the workflow JSON above in ComfyUI, then let the Manager find and install whatever's missing automatically:
- Drag the downloaded workflow JSON into your ComfyUI canvas (or use Workflow > Open on the top menu).
- Open Manager from the top menu.
- Click "Install Missing Custom Nodes." ComfyUI scans the loaded workflow and lists every node pack it can't find locally — this will include ComfyUI-FramePackWrapper_PlusOne and ComfyUI-KJNodes.
- Select both from the list and click Install.
- Restart ComfyUI once installation finishes.
Models (exact filenames and folders):
| Model | Filename | Goes in |
|---|---|---|
| FramePack diffusion model (quality) | FramePackI2V_HY_bf16.safetensors | models/diffusion_models/ |
| FramePack diffusion model (low VRAM) | FramePackI2V_HY_fp8_e4m3fn.safetensors | models/diffusion_models/ |
| CLIP Vision | sigclip_vision_patch14_384.safetensors | models/clip_vision/ |
| Text encoder | clip_l.safetensors | models/text_encoders/ |
| Text encoder | llava_llama3_fp16.safetensors | models/text_encoders/ |
| VAE | hunyuan_video_vae_bf16.safetensors | models/vae/ |
Get the exact node graph used in this guide instead of building it from scratch:
Download Workflow JSONTwo Ways to Run This Workflow
This is one node graph, not two. The end-image branch — a second LoadImage, its GetImageSizeAndCount, VAEEncode, and CLIPVisionEncode — feeds FramePackSampler's end_latent and end_image_embeds inputs. Both are optional.
Mode 1 — Simple Image-to-Video
Mute the end-image branch and leave end_latent / end_image_embeds disconnected. FramePack generates motion outward from the single start image, same as a standard FramePack workflow.
Mode 2 — Start/End Frame
Unmute the end-image branch and connect both outputs into FramePackSampler. The model blends between the two identities using the weighted_average setting, generating the frames in between.
To switch from start/end back to simple I2V:
- Select the end-image LoadImage node, its GetImageSizeAndCount, VAEEncode, and CLIPVisionEncode nodes (drag a selection box around all four).
- Press Ctrl+M (Cmd+M on Mac) to mute them. Muted nodes turn grey and stop passing data.
- On FramePackSampler, confirm end_latent and end_image_embeds show no connection — if a wire is still attached to a muted node, disconnect it manually.
- Queue Prompt. The workflow now runs as plain single-image FramePack.
How Start/End Frame Differs From Standard FramePack
The difference happens at the CLIP vision stage. Instead of one CLIPVisionEncode node, the workflow has two: one encodes your start image, the other encodes your end image. Both outputs feed into FramePackSampler separately, as image_embeds and end_image_embeds. The sampler blends between them using the weighted_average method — this tells the model how much to weight the start frame's identity versus the end frame's identity while generating the frames in between.


Step-by-Step: Building the Workflow
1. Load the FramePack diffusion model
Right-click the canvas and select Add Node > FramePackWrapper > DownloadAndLoadFramePackModel. This loads the main video model — the transformer that predicts each frame.
Set: Model to lllyasviel/FramePackI2V_HY, Precision to bf16 (or fp8 under 12 GB VRAM), Compile to disabled, Attention mode to sdpa. You should see a single FramePackMODEL output — this feeds the sampler later.
2. Load the text encoders
Add a DualCLIPLoader node. Set clip_name1 to clip_l.safetensors, clip_name2 to llava_llama3_fp16.safetensors, and type to hunyuan_video. This node reads your text prompt and turns it into a format the model understands.
3. Load the VAE
Add a VAELoader node and select hunyuan_video_vae_bf16.safetensors. The VAE (this converts the AI's internal latent representation into an actual image you can see, and back again) is needed twice in this workflow: once to encode your input images, once to decode the final output.
4. Write your prompt and zero out the negative
Add a CLIPTextEncode node connected to the DualCLIPLoader's CLIP output. Describe the motion, not just a static scene — for example, "the woman turns her head slowly and smiles."
Add a ConditioningZeroOut node and connect your CLIPTextEncode output into it. FramePack doesn't use a traditional negative prompt — zeroing out the conditioning is how this model architecture handles the negative side of guidance.
5. Load your start image and encode it
Add a LoadImage node for your start frame. Connect its output through a GetImageSizeAndCount node, then into two places: a VAEEncode node (producing start_latent) and a CLIPVisionEncode node — loaded with a CLIPVisionLoader using sigclip_vision_patch14_384.safetensors — producing image_embeds.
6. Load your end image and encode it (skip for simple I2V)
Repeat step 5 with a second LoadImage node for your end frame. Connect it through its own GetImageSizeAndCount, then to a second VAEEncode (producing end_latent) and a second CLIPVisionEncode using the same loaded CLIP vision model (producing end_image_embeds).
7. Connect everything into FramePackSampler
Add the FramePackSampler node and connect:
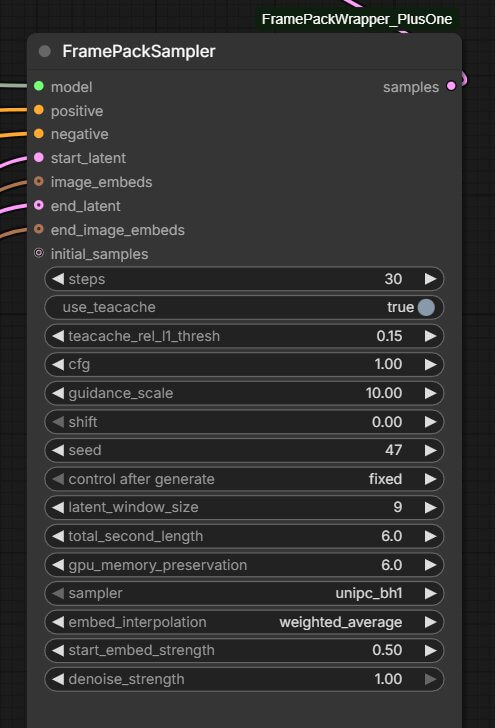
model→ the FramePackMODEL output from step 1positive→ your CLIPTextEncode conditioningnegative→ the ConditioningZeroOut outputstart_latent→ your start image's VAEEncode outputimage_embeds→ your start image's CLIP vision outputend_latent→ your end image's VAEEncode output (simple I2V: leave disconnected)end_image_embeds→ your end image's CLIP vision output (simple I2V: leave disconnected)
8. Decode and save the video
Connect FramePackSampler's samples output into a VAEDecode node (using the same VAE), then into a VHS_VideoCombine node (from ComfyUI-VideoHelperSuite) to save it as an MP4.
9. Run it
Click Queue Prompt (top-right, orange button) or press Ctrl/Cmd + Enter. A progress bar appears below the button. On an RTX 4090 with the bf16 model, a 5-second clip at these settings takes several minutes — fp8 is noticeably faster at a small quality cost.
FramePackSampler Settings Explained
These are the values from a tested, working configuration — apply to both modes unless noted.
| Setting | Value | What it does |
|---|---|---|
| steps | 30 | How many denoising passes run. More steps = cleaner motion, slower generation. |
| use_teacache | true | Skips redundant computation between similar frames — speeds up generation with minimal quality loss. |
| teacache_rel_l1_thresh | 0.15 | How aggressive the TeaCache skipping is. Lower is safer, higher is faster but riskier for quality. |
| seed | 47 (fixed) | Locks the random seed so re-runs match — useful while tuning other settings. |
| guidance / real guidance / rescale | 9 / 5 / 6 | Controls how strictly the model follows your prompt versus the input images. |
| sampler | unipc_bh1 | The denoising algorithm — FramePack's default and generally the most stable choice. |
| blend method | weighted_average | How the model combines start and end frame identities across the sequence (start/end mode only). |
| blend strength | 0.5 | Even 50/50 blend. Push toward 0 to favor the start image, toward 1 to favor the end image. |
Output Examples: Both Modes
Same base settings, run once with the end-image branch muted and once with it active.
Troubleshooting
"This node type does not exist" (red node in workflow)
You're missing one or both custom node packs this workflow depends on. Let the Manager find and install them for you instead of tracking down each one manually:
- Make sure the workflow JSON is loaded on your canvas (drag it in, or Workflow > Open).
- Click Manager in the top menu.
- Click "Install Missing Custom Nodes" — ComfyUI reads the loaded workflow and lists every node pack it can't find, including ComfyUI-FramePackWrapper_PlusOne and ComfyUI-KJNodes.
- Select the listed packs and click Install.
- Restart ComfyUI completely once installation finishes.
CUDA out of memory
The bf16 model needs roughly 16 GB+ VRAM at default settings.
- Switch the DownloadAndLoadFramePackModel node's precision to fp8.
- Lower your input image resolution — 704×544 is already conservative; go smaller if you're still hitting OOM.
- Increase gpu_memory_preservation in the sampler node if your GPU is shared with other applications.
The video "jump cuts" instead of morphing smoothly (start/end mode)
This is the frozen-background / slideshow issue — it happens when the start and end images differ too much in pose, background, or composition.
- Re-crop or re-generate your start/end images so the subject and background match more closely.
- Lower the blend strength toward 0.3–0.4 so the start image has more influence throughout the sequence.
- Increase steps to 35–40 — more denoising passes give the model more room to find a smooth path between the two frames.
For anything not covered here, see the full ComfyUI troubleshooting guide.
Frequently Asked Questions
What to Do Next
Run the workflow once as simple I2V first
Download the workflow JSON above and drag it into ComfyUI. Run it once with the end-image branch muted and the default settings first — once you get a clean single-image result, unmute the end-image branch, add your second image, and start tuning the blend strength.
Published: 2026-07-18 · Last updated: 2026-07-18 · Tested on ComfyUI v0.3.28, RTX 4090 (24 GB VRAM) · Custom node: ComfyUI-FramePackWrapper_PlusOne
Join the discussion
Sign in to leave a comment or reply
No comments yet
Be the first to share your thoughts!