
⚡ Quick Answer
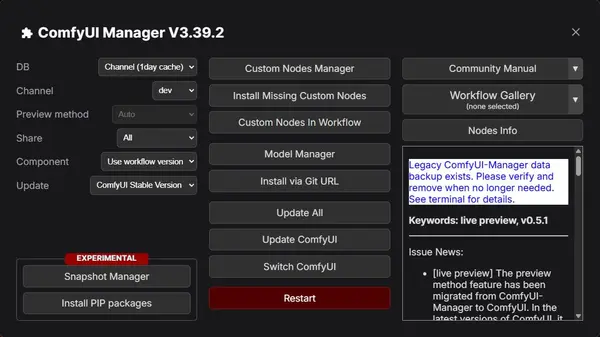
To install missing nodes in ComfyUI: open ComfyUI Manager → click "Install Missing Custom Nodes" — it's on the main Manager panel. The button auto-detects and installs every node your workflow needs. Restart ComfyUI after it finishes.
If you instead see a "Missing Node Packs" popup telling you to run pip install -U --pre comfyui-manager, you're on ComfyUI's newer integrated Manager — see the pip install fix section just below.
If you see "this action is not allowed with this security level configuration", change security_level = weak in your Manager config file, install, then change it back. Full steps in the security error fix section below.
Fix: "Missing Node Packs" — pip install -U --pre comfyui-manager
pip install -U --pre comfyui-manager in your Python environment to install Node Manager, then restart ComfyUI with the --enable-manager flag."This message shows up on ComfyUI's newer, officially-integrated Manager — since it was folded into Comfy.Org's own codebase, it installs as a separate pip package instead of a plugin sitting in custom_nodes. If you see this exact popup instead of individual red nodes, it means that pip package isn't installed yet.
How to fix it (Portable builds)
Open a terminal in your ComfyUI_windows_portable folder.
Click the address bar in Windows Explorer, type "cmd", and press Enter.
Run the pip install command.
Paste the command ComfyUI showed you, using the embedded Python interpreter:
.\python_embeded\python.exe -s -m pip install -U --pre comfyui-managerAdd --enable-manager to your launch file.
Right-click run_nvidia_gpu.bat → Edit, add --enable-manager to the end of the launch line, then save.
Restart ComfyUI using that .bat file.
Reload your workflow. The "Missing Node Packs" list becomes an install screen instead of a blocking error.
Desktop builds with auto-updates typically install this for you automatically. If that's your setup and you're still seeing the error, updating ComfyUI Desktop to the latest version usually resolves it.
Fix ComfyUI Missing Nodes — Complete 2026 Guide
Red nodes in ComfyUI mean a custom plugin your workflow needs isn't installed yet. It's one of the most common problems when you load a new workflow someone else created — and it's usually quick to fix once you know where to look.
This guide covers everything: where the Install Missing Custom Nodes button is, how to fix the security level error that blocks Git URL installs, how to install nodes manually from GitHub, and what to do when nodes are still red after you've already installed them.
If you haven't set up ComfyUI Manager yet, do that first — follow the ComfyUI Manager installation guide and come back here once it's running.
What Are Red Nodes in ComfyUI?
A red-bordered node means ComfyUI can't find the custom plugin that node requires. When you load a workflow, ComfyUI checks your ComfyUI/custom_nodes folder for each plugin the workflow needs. Any it can't find gets marked red.
The workflow won't run until every red node is resolved. The four most common causes are:
- The custom node plugin was never installed in your custom_nodes folder
- The plugin is installed but outdated — incompatible with the current ComfyUI version
- ComfyUI itself is outdated and doesn't support a newer node type
- The plugin was installed in the wrong folder (not inside custom_nodes)
Install ComfyUI Manager First (If You Haven't)
ComfyUI Manager handles all three methods in this guide — it's the interface you'll use to find the Install Missing Custom Nodes button, install nodes by Git URL, and update everything in one click. You need it before following any method below.
If it's not installed yet:
ComfyUI Manager Installation GuideMethod 1 — Install Missing Nodes with ComfyUI Manager
This is the fastest method. ComfyUI Manager scans your loaded workflow and installs everything it's missing automatically — no command line needed.

Fix: "This Action Is Not Allowed With This Security Level Configuration"
This error appears when you try to use Install via Git URL in ComfyUI Manager. The Manager's default security level blocks Git URL installs. You need to temporarily change it to weak to allow the installation.
How to change the security level (step by step)
Navigate to the Manager config folder.
Go to ComfyUI_windows_portable\ComfyUI\user\__manager in Windows Explorer. Your startup log also prints the exact config path if this folder doesn't exist on your setup.
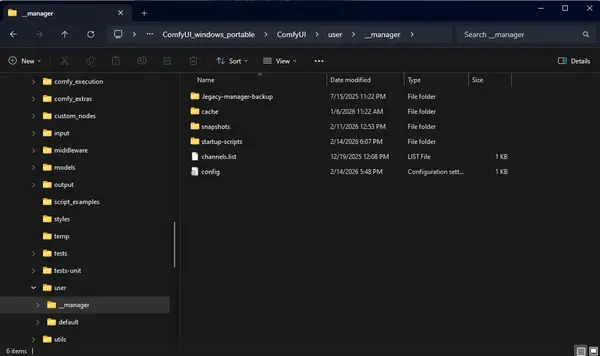
Open the config file in Notepad.
Right-click the file named config (or config.ini on older Manager versions) and open it with Notepad.
Change the security_level line.
Find security_level = and change it to:
security_level = weak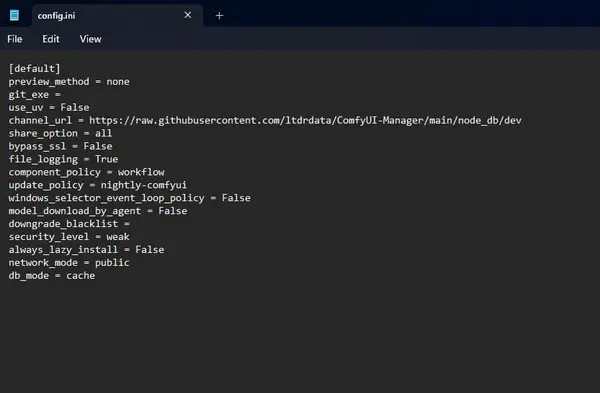
Save → restart ComfyUI → complete the install.
Save the config file, restart ComfyUI, then go back to Manager and use Install via Git URL. Wait for the install to finish.
Change security_level back immediately.
Open the config file again and set it back to security_level = normal. Don't leave it on weak.
security_level = weak for the duration of a single trusted install. Change it back to normal as soon as the installation is done. Running weak security long-term increases your risk from malicious custom nodes. Valid values are weak, normal-, normal, and strong — "medium" and "high" aren't real settings and will be ignored if you type them.config.ini, or reinstall ComfyUI-Manager if it genuinely isn't there. On cloud/JupyterLab environments, edit it from the built-in terminal instead of Windows Explorer.Method 2 — Install a Missing Node Manually from GitHub
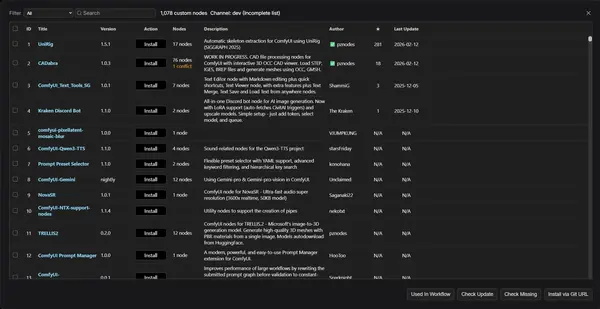
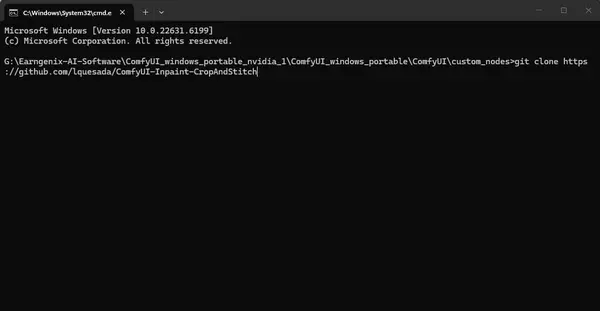
Use this when a node doesn't appear in the Manager registry, or when you prefer to clone it directly. You'll need Git installed on your system.
Not sure which GitHub link to use? Check the workflow description — most workflow creators include the required node links there. If not, search GitHub with the node name plus "ComfyUI".
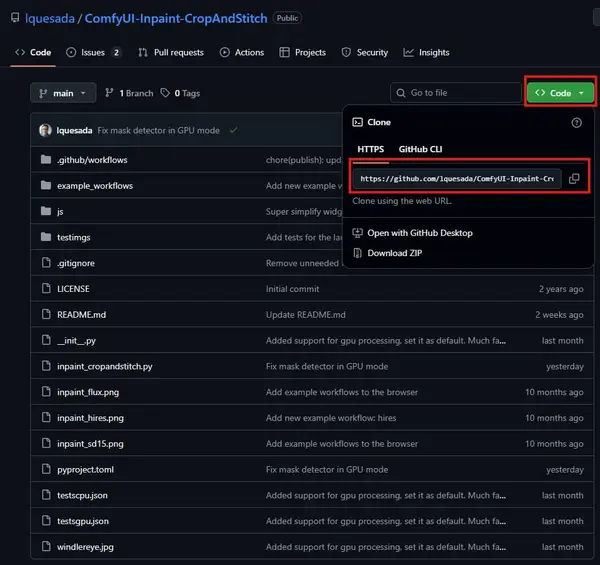

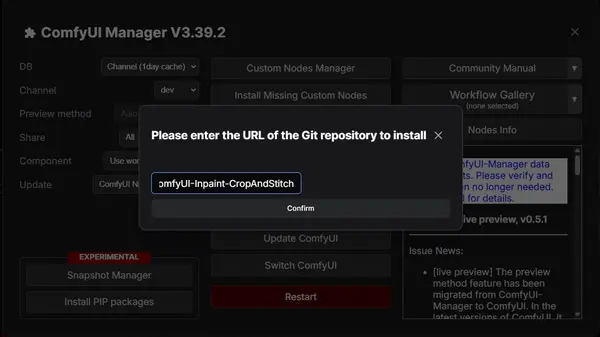
Method 3 — Install via Git URL in ComfyUI Manager
ComfyUI Manager can install a node directly from a GitHub URL without using the command line. It's easier than Method 2 for most people — paste the URL and the Manager clones it for you.
Note: this method requires the security level fix above if you see the "not allowed" error. Once that's resolved, the process is straightforward.
Custom Nodes Still Red After Installing and Restarting?
You installed the node, restarted ComfyUI, and the node is still red. This is frustrating — but it's almost always one of four causes, and they're all fixable.
1. You restarted the browser, not the server
This is the most common cause. Refreshing the ComfyUI browser tab does nothing. You need to stop the ComfyUI server process and start it again — the actual Python server, not just the browser page.
2. The node folder is in the wrong location
The node folder must be inside ComfyUI/custom_nodes — not in the root ComfyUI folder, not in ComfyUI_windows_portable, and not anywhere else. If you cloned it to the wrong place, move it to custom_nodes and restart again.
3. Python dependency errors
The node installed but its Python packages didn't. Check your ComfyUI terminal window for red error text after startup. If you see import errors for a node, navigate to that node's folder in custom_nodes, open a terminal there, and run the requirements.txt pip install command shown in Method 2.
4. ComfyUI or the node is outdated
A version mismatch between ComfyUI and the installed node causes red nodes even when everything is in the right place. Update ComfyUI and click "Update All" in ComfyUI Manager — the steps for this are in the next section.
For a full list of startup errors and how to fix them, see the ComfyUI troubleshooting guide.
Update ComfyUI to Prevent Red Nodes
Many red node errors aren't missing nodes at all — they're version mismatches. If a custom node was written for a newer version of ComfyUI than you're running, it will show red even if it's installed correctly. Keeping everything updated prevents most of these.
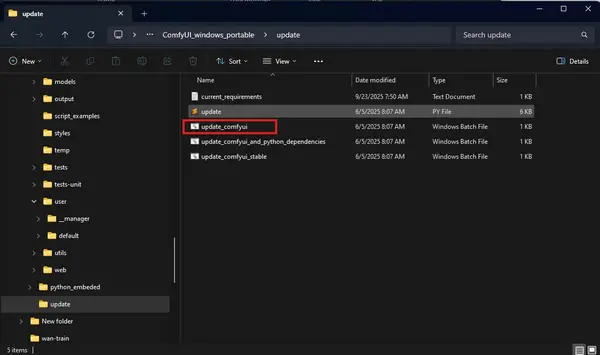
Run the update file.
Go to ComfyUI_windows_portable\update and double-click update_comfyui.
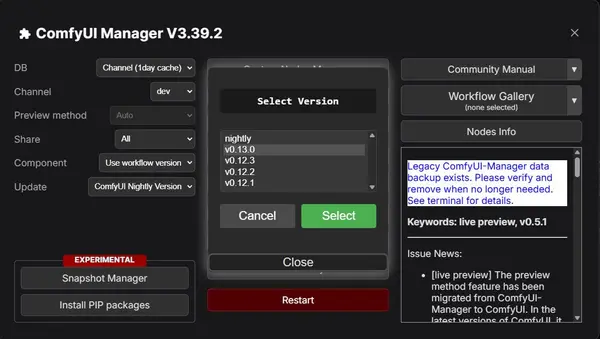
Start ComfyUI and switch to the latest version.
Open ComfyUI Manager and use "Switch ComfyUI" to select the latest available version.
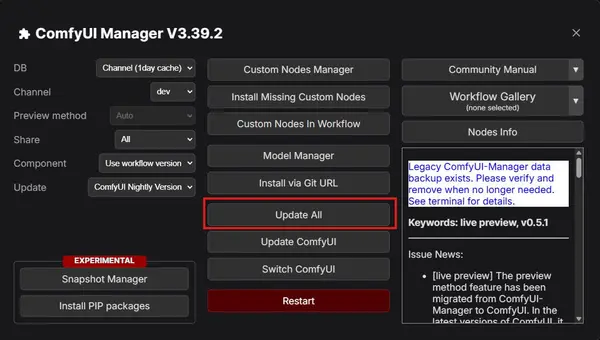
Click "Update All" in Manager.
This updates every installed custom node to its latest version, resolving most compatibility-related red node errors in one go.
Restart ComfyUI.
After updating, restart the server. Then reload your workflow. If any nodes are still red, use "Install Missing Custom Nodes" to catch anything that was missed.
If you're setting up ComfyUI for the first time, start with the full ComfyUI installation guide before coming back to this page.
Frequently Asked Questions
What to do next
Open ComfyUI Manager right now and click "Update All" — this takes 30 seconds and clears most red node problems before they start. Then load your workflow and use "Install Missing Custom Nodes" for anything that's still red.
If you're still getting stuck with ComfyUI setup, the ComfyUI learning roadmap walks through every step in order — from installation through to running advanced workflows.
Join the discussion
Sign in to leave a comment or reply
No comments yet
Be the first to share your thoughts!