
⚡ Quick Answer
To turn a photo into a 3D model in ComfyUI, use Hunyuan3D 2.1 for a single image, or Hunyuan3D 2.0 Multi-View for four angles (front, back, left, right) of the same object. Both run locally and are free — no login, no credits. Minimum 8 GB VRAM to run either.
Turning a single product photo into a usable 3D mesh used to mean learning photogrammetry or paying for a scanning service. In ComfyUI, Hunyuan3D 2.1 does it from one image, and Hunyuan3D 2.0 Multi-View does it more accurately from four. Both are free, local models — you download a checkpoint once and run everything on your own GPU.
This guide covers both workflows end to end: single-image generation, four-angle generation with a chair as the example, what to do if you only have one photo of your subject, and how to get the finished mesh into Blender.
What You Need
Two model files cover both workflows in this guide. You only need to download the one for whichever workflow you run first.
Models Needed
hunyuan_3d_v2.1.safetensors~7.4 GBhunyuan3d-dit-v2-mv_fp16.safetensors~4.9 GBDownload hunyuan_3d_v2.1.safetensors from Hugging Face and hunyuan3d-dit-v2-mv_fp16.safetensors from Hugging Face, then place both in ComfyUI/models/checkpoints/.
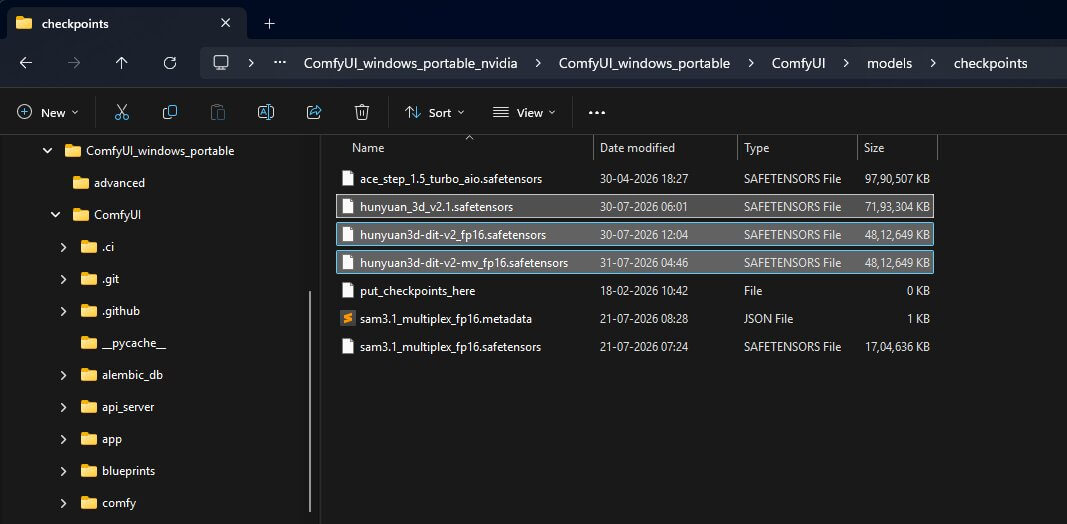
No custom nodes required — both workflows use nodes built into ComfyUI core. New to ComfyUI entirely? Start with the ComfyUI installation guide, and see the checkpoint models guide if "checkpoint" is a new term for you.
Which Version Should You Use?
Hunyuan3D is a family of 3D generation models from Tencent. It reads a 2D image and outputs a mesh — a 3D shape made of connected points and faces, the same kind of file a game engine or 3D printer expects.
| Version | Input | Runs Locally | Texture | Best For |
|---|---|---|---|---|
Hunyuan3D 2.1 | 1 image | Yes — free | Yes (PBR) | Fastest result, simple objects |
Hunyuan3D 2.0 Multi-View | 2–4 images | Yes — free | No (geometry only) | Furniture, vehicles, anything with back/side detail |
Hunyuan3D 3.0 | Text, image, or sketch | No — cloud API | Yes | Text-to-3D, part decomposition, UV unwrap |
Use single-image (2.1) when you only have one photo, or want a quick result with color and texture already applied. Use multi-view (2.0mv) when your subject has detail on more than one side — furniture, vehicles, anything that looks wrong if captured from the front alone. A single front photo of a chair gives Hunyuan3D no information about the backrest or side panels, so it has to guess. Four angles remove the guessing.
How to Turn One Photo Into a 3D Model (Hunyuan3D 2.1)
Skip the manual node-by-node build — download the ready-made workflow below and load it straight into ComfyUI.
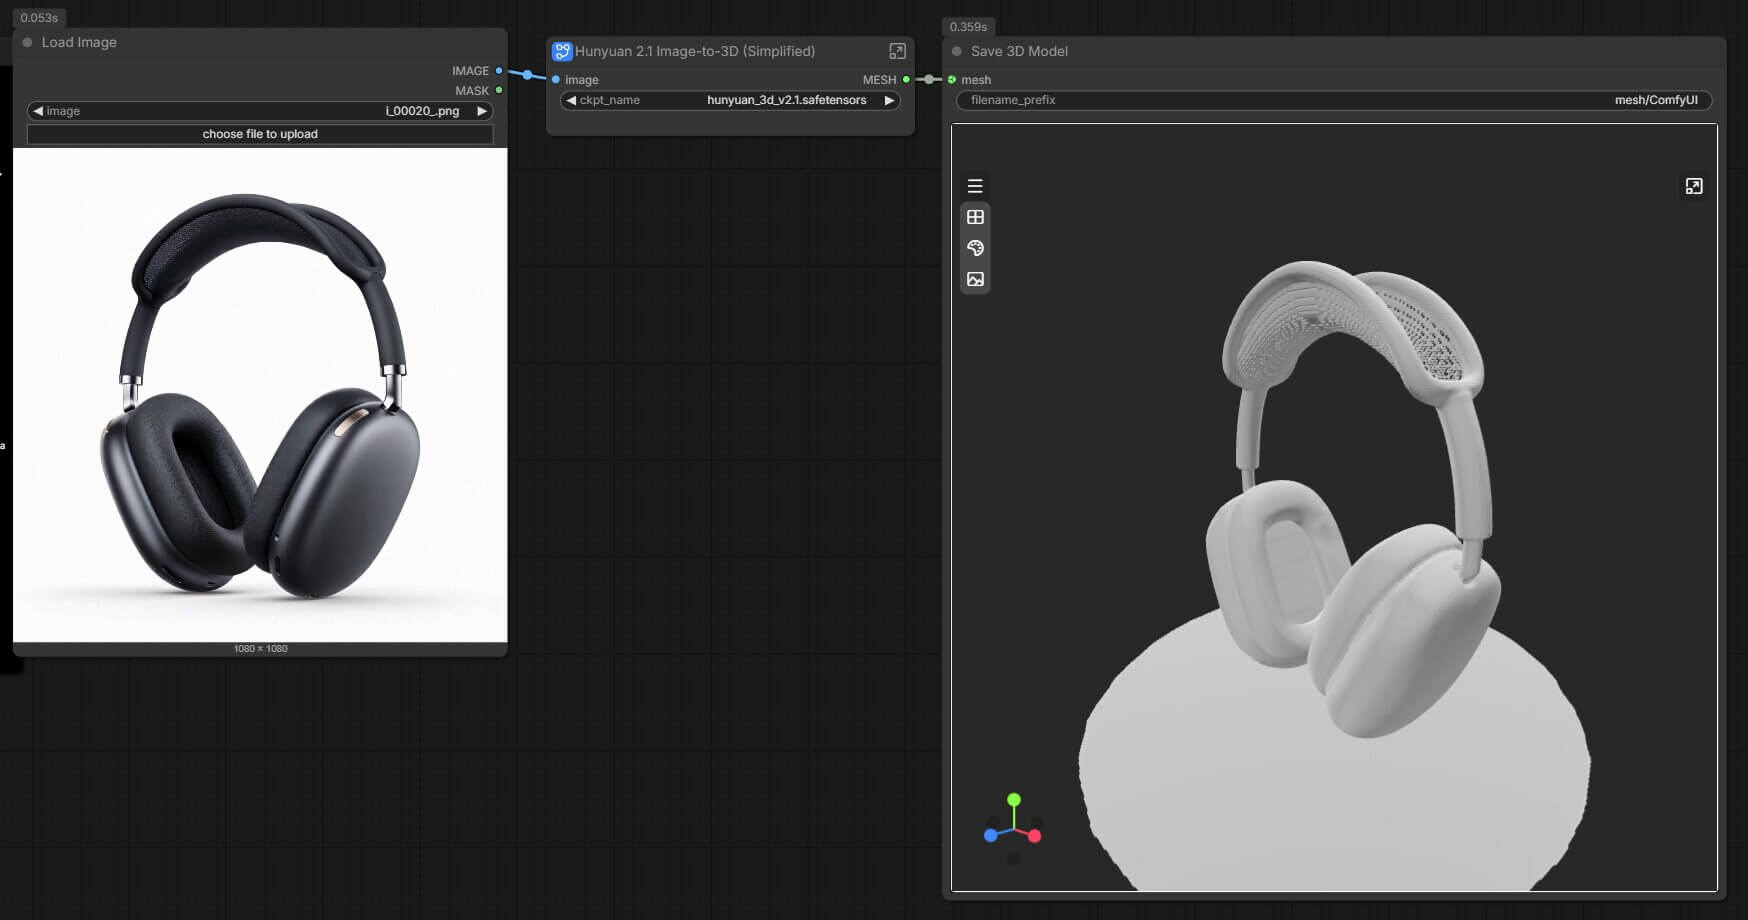
Download Workflow JSON(hunyuan3d-2-1-single-image.json)- Download the workflow JSON above, then drag it directly onto the ComfyUI canvas (or use Workflow > Open) to load it.
- Make sure
hunyuan_3d_v2.1.safetensorsis inComfyUI/models/checkpoints/— see the What You Need section above if you haven't downloaded it yet. - On the Image Only Checkpoint Loader node, select
hunyuan_3d_v2.1.safetensorsfrom the dropdown if it isn't already selected. - On the Load Image node, click the thumbnail and select your own photo.
- Click the orange Queue Prompt button. A 3D preview appears in the Save GLB node once generation finishes.
How to Turn 4 Photos Into a More Accurate 3D Model (Multi-View)
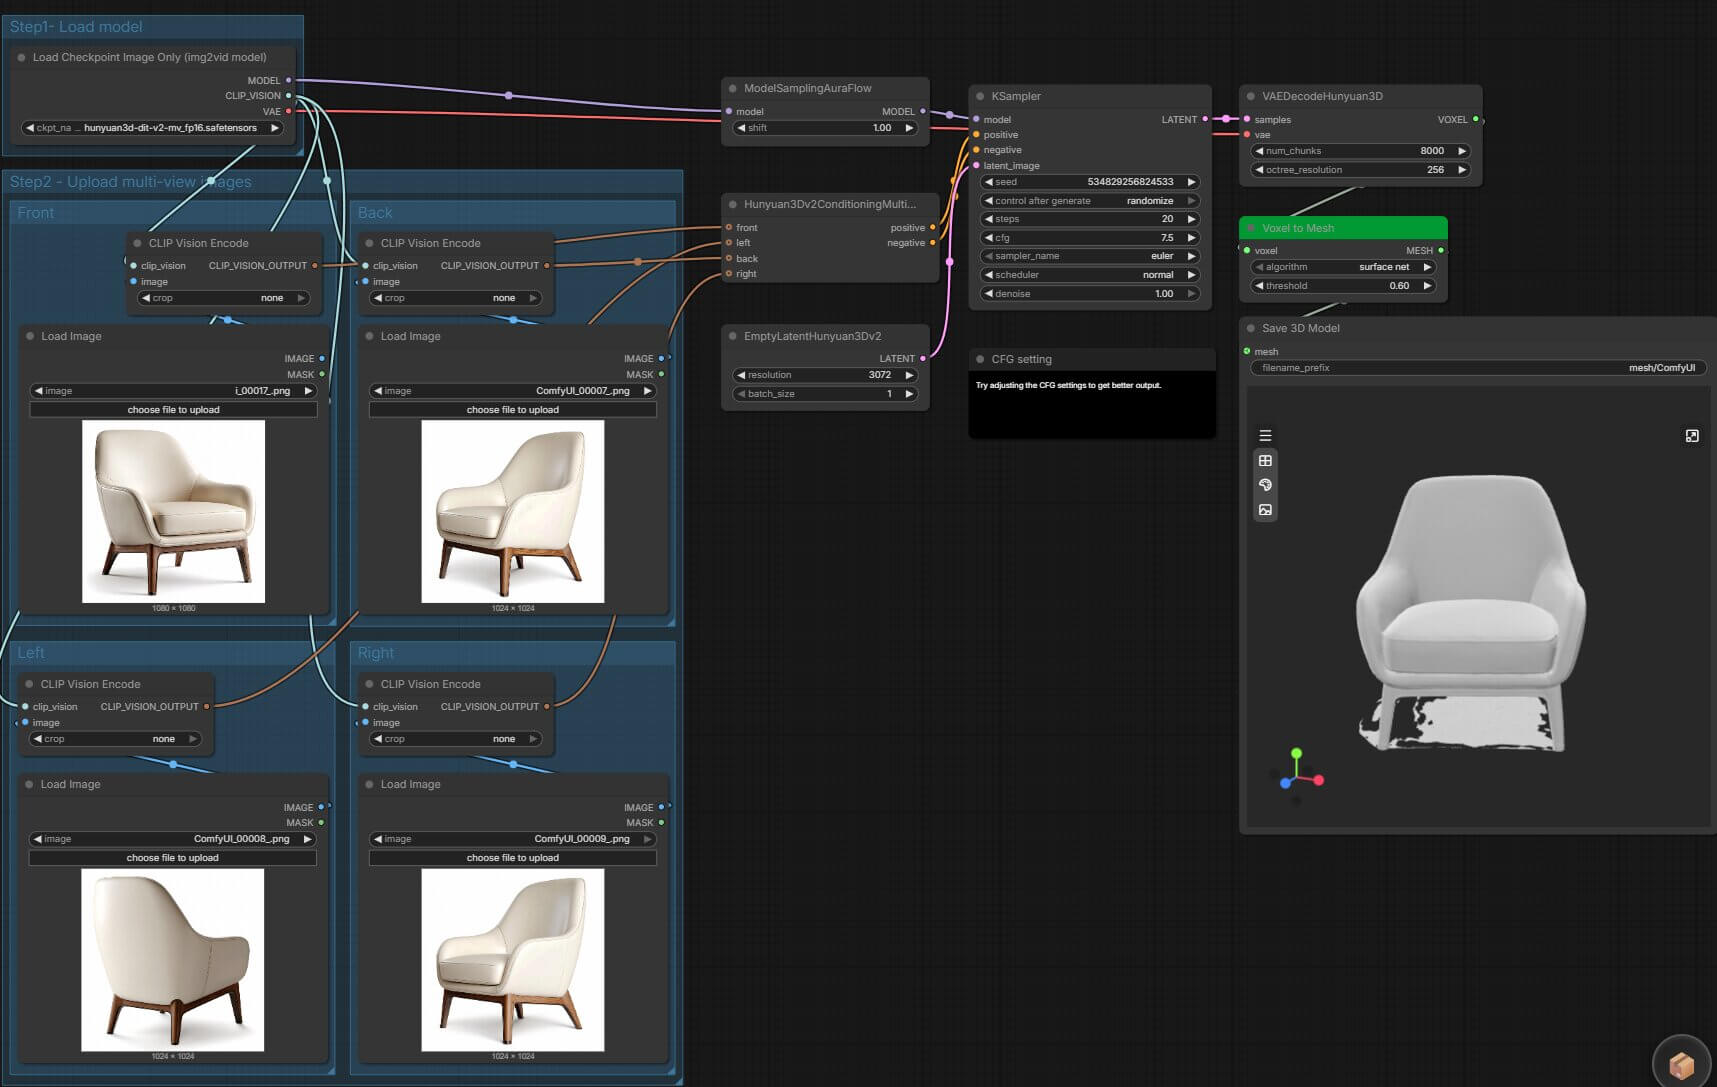
This example uses a chair — a good test case because a single front photo can't show what the backrest, armrests, or rear legs look like.
Same approach as the single-image workflow — download the ready-made multi-view workflow below instead of building it node by node.
Download Workflow JSON(hunyuan3d-multiview.json)- Gather four photos of the same chair: front, back, left, right. Keep the chair centered and roughly the same size in each shot, against a plain background.
- Download the workflow JSON above, then drag it directly onto the ComfyUI canvas (or use Workflow > Open) to load it.
- Make sure
hunyuan3d-dit-v2-mv_fp16.safetensorsis inComfyUI/models/checkpoints/. - On the Image Only Checkpoint Loader node, select
hunyuan3d-dit-v2-mv_fp16.safetensorsfrom the dropdown if it isn't already selected. - On the four Load Image nodes (labeled Front, Back, Left, Right), click each thumbnail and add the matching angle photo. Double-check each photo lands on its correctly labeled node.
- Click Queue Prompt. Compare the result to the single-image version — the backrest and side profile should match your actual chair instead of being guessed.
How to Export Your 3D Model to Blender
- In the Save GLB node, open the export menu on the left side of the node's 3D preview.
- Choose GLB and save it. If you're running ComfyUI locally, the file also saves automatically to
ComfyUI/output/3D/. - Open Blender, go to File > Import > glTF 2.0 (.glb/.gltf), and select the exported file. The mesh loads into your scene at its generated scale.
Hunyuan3D 3.0 — What's New (and Why It's Not in This Guide)
Hunyuan3D 3.0 runs through ComfyUI as a cloud-based Partner Node rather than a local checkpoint. It adds text-to-3D generation, part decomposition, and automatic UV unwrapping — none of which the local 2.1/2.0mv models do. The tradeoff is that it requires a Comfy account and runs on credits instead of your own GPU, so it doesn't fit a "download once, run free" guide.
Troubleshooting
"This node type does not exist" (red node in workflow)
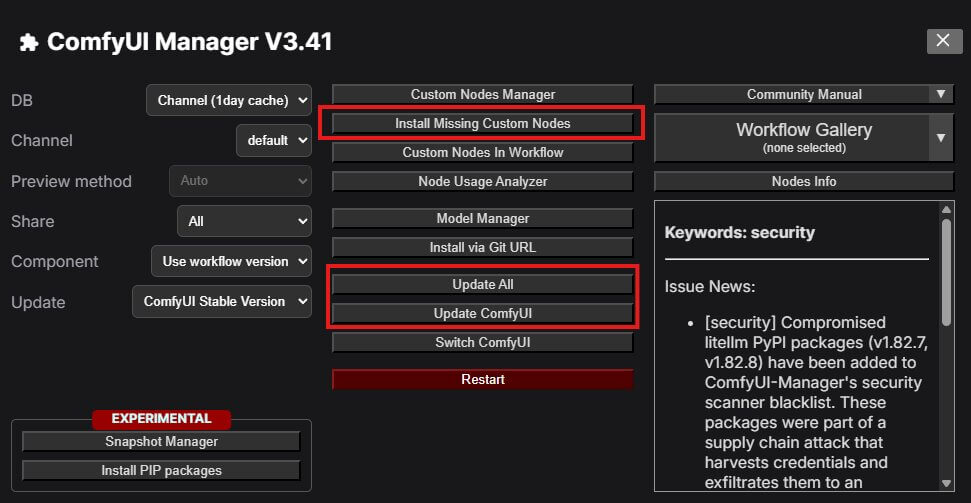
Every node in both workflows ships with ComfyUI core — this error means your ComfyUI install is out of date.
- Open ComfyUI Manager from the top menu.
- Click Update ComfyUI.
- Restart ComfyUI completely and reload the workflow.
The model file doesn't appear in the checkpoint dropdown
The .safetensors file isn't in the right folder, or it's misnamed.
- Confirm the file sits directly inside
ComfyUI/models/checkpoints/— not a subfolder. - Confirm the filename matches exactly:
hunyuan_3d_v2.1.safetensorsorhunyuan3d-dit-v2-mv_fp16.safetensors. - Click the refresh icon on the checkpoint loader node, or restart ComfyUI.
The output mesh is a blank or deformed blob
This almost always comes from the input image, not a settings problem.
- Check that your subject is on a plain, uncluttered background — busy backgrounds get read as part of the shape.
- Make sure the subject fills a reasonable portion of the frame — a tiny subject in a large image gives the model little to work with.
- For multi-view, confirm each angle is connected to its matching labeled input on the Hunyuan3Dv2ConditioningMultiView node.
Frequently Asked Questions
What to Do Next
Run the single-image workflow first, then move to multi-view.
Confirm your setup works with one clean photo, then try the four-angle workflow once you're comfortable with the node graph. For a structured path through the rest of ComfyUI's tools, see the full roadmap.
Published: 2026-07-31 · Last updated: 2026-07-31 · Model info verified against Comfy-Org Hugging Face repackaged checkpoints
Join the discussion
Sign in to leave a comment or reply
No comments yet
Be the first to share your thoughts!