
⚡ Quick Answer
SCAIL-2 transfers motion from a driving video onto a reference image, keeping the person's identity, clothing, and framing while making them perform the video's motion. The full checkpoint (SAM3.1-masked, wan2.1_14B_SCAIL_2_fp16.safetensors) needs 16GB+ VRAM. The quantized SCAIL-Preview GGUF version runs on 8–12GB but uses a different, pose-based pipeline.
SCAIL-2 is a ComfyUI workflow built around a checkpoint that takes two inputs — a reference image of a character and a video of someone moving — and outputs a video of that character performing the same motion. No pose rigging, no manual keyframing.
This guide covers both ways to run SCAIL-2 in ComfyUI: the full fp16/fp8 checkpoint and the low-VRAM GGUF version, with exact node settings for each.
Minimum VRAM: ~16GB for the full checkpoint, ~8–12GB for the GGUF version.
Tested on: RTX 4090 (24GB).
What Is SCAIL-2? (And How It's Different From SCAIL-Preview)
A checkpoint is the main AI model file — it controls what a model can generate and how. SCAIL-2 is a checkpoint built specifically for motion transfer: moving a subject in a still image according to a separate video's motion.
There are two versions in circulation, and mixing them up is the most common source of confusion:
SCAIL-2 (Full)
Uses SAM3.1 person tracking — it tracks the subject in your video and reference image directly with masks. No pose data needed at all.
SCAIL-Preview (GGUF)
The earlier, pose-driven model. Extracts a skeleton from the video, then applies that skeleton's motion to your reference image. Currently the only version with a GGUF release.
What the Output Looks Like
Before touching any nodes, here's what you're building toward. Each example uses one reference image and one driving video as input, and produces a video where the reference character performs the driving video's motion. Click any image to zoom, or use the player controls to watch the full clip.


GGUF (Low VRAM) Output Example
SCAIL-2_main.json) automatically builds a side-by-side comparison video for you — it uses an ImageConcatMulti node feeding a second VHS_VideoCombine node, saved separately from the main output. You don't need to build this comparison manually.What You Need Before Starting
Pre-flight checklist
Tested on: RTX 4090 (24GB VRAM). ComfyUI version: confirm your exact build before publishing — SCAIL2ColoredMask needs a recent nightly frontend.
Model Files — Full SCAIL-2
| Folder | File | Notes | Download |
|---|---|---|---|
| checkpoints | sam3.1_multiplex_fp16.safetensors | SAM3.1 — tracks the subject to build masks | ↗ Download |
| clip_vision | clip_vision_h.safetensors | Reads your reference image | ↗ Download |
| diffusion_models | wan2.1_14B_SCAIL_2_fp8_scaled.safetensors | The SCAIL-2 checkpoint itself | ↗ Download |
| loras | Wan21_I2V_14B_lightx2v_cfg_step_distill_lora_rank64.safetensors | Distill LoRA — lets you sample in 6 steps | ↗ Download |
| text_encoders | umt5_xxl_fp8_e4m3fn_scaled.safetensors | Reads your text prompt | ↗ Download |
| vae | wan_2.1_vae.safetensors | Decodes the output into pixels | ↗ Download |
Model Files — SCAIL-Preview GGUF
| Folder | File | Notes | Download |
|---|---|---|---|
| detection | vitpose-l-wholebody.onnx | Estimates body pose per frame | ↗ Download |
| detection | yolov10m.onnx | Locates the person before pose estimation | ↗ Download |
| diffusion_models | Wan21-14B-SCAIL-preview_comfy-Q3_K_S.gguf | Quantized SCAIL-Preview — use Q2 if still short on VRAM | ↗ Download |
| diffusion_models | wan2.1-i2v-14b-480p-Q3_K_S.gguf | Base I2V model this pipeline builds on | ↗ Download |
| loras | lightx2v_I2V_14B_480p_cfg_step_distill_rank32_bf16.safetensors | Distill LoRA for the GGUF pipeline | ↗ Download |
| text_encoders | umt5-xxl-enc-fp8_e4m3fn.safetensors | Use this exact file — don't use the bf16 version | ↗ Download |
| vae | wan_2.1_vae.safetensors | Decodes the output into pixels | ↗ Download |
| clip_vision | clip_vision_h.safetensors | Reads your reference image | ↗ Download |
Where to Place the Files
ComfyUI uses a specific folder structure inside its models/ directory. Each file type goes in a different subfolder. Placing a file in the wrong folder means ComfyUI cannot find it and the workflow fails to load.
nlf_l_multi_0.3.2.torchscript file downloads automatically on first run of the GGUF workflow — you don't need to fetch it manually, but the first run will pause while it downloads.Download the Workflow
Two workflow files are available — download the one matching your GPU's VRAM.
🎬 SCAIL-2 — Workflow Downloads
Download the ready-to-use ComfyUI workflow JSON. Drag it onto the canvas and generate.
How to Load the Workflow JSON into ComfyUI
- Download the .json file to your computer.
- Open ComfyUI in your browser — usually at http://127.0.0.1:8188.
- Drag the .json file directly onto the ComfyUI canvas. Drop it anywhere on the empty grey area.
- The workflow loads automatically. Several nodes will show red borders if custom nodes are missing.
- If you see red nodes, click Manager in the top menu, then Install Missing Custom Nodes, then restart ComfyUI completely.
How to Run the Full SCAIL-2 Workflow
This path uses SAM3.1 to track the person in your video and reference image, then applies the tracked motion directly — no pose skeleton involved.
Load Image
Click the image thumbnail and select your reference photo. This is the character whose identity and clothing stay fixed throughout the output.
VHS_LoadVideo
Upload your driving video — the clip whose motion you want transferred. Set to force_rate: 16, meaning it resamples your video to 16fps regardless of its original frame rate.
CLIPTextEncode → SAM3_VideoTrack
Both text-encode nodes feeding the SAM3_VideoTrack nodes are set to the word human — this tells SAM3.1 what to track in the frame. SAM3.1 finds and follows the tracked subject across every frame, producing masks instead of joint coordinates. Leave this as-is unless your subject isn't a person.
ResizeImageMaskNode
One instance is set to scale to multiple: 32. SCAIL-2 requires your working resolution to be divisible by 32 on both width and height — this node enforces that automatically.
WanSCAILToVideo
Confirm width 512, height 896, and length 201 frames. At 16fps, that's roughly 12.5 seconds of output. Lower the length if your GPU runs out of memory.
KSampler
steps: 6, cfg: 1, sampler euler, scheduler simple, denoise: 1, seed fixed at 123. Steps are low and cfg is set to 1 because this workflow uses the LightX2V distill LoRA at full strength — running at default cfg values (7–8) would overexpose and distort the output.
VHS_VideoCombine ×2
The first saves your output as an MP4 (h264, crf 19) with the filename prefix SCAIL-2. A second, separate instance saves the side-by-side comparison video automatically.
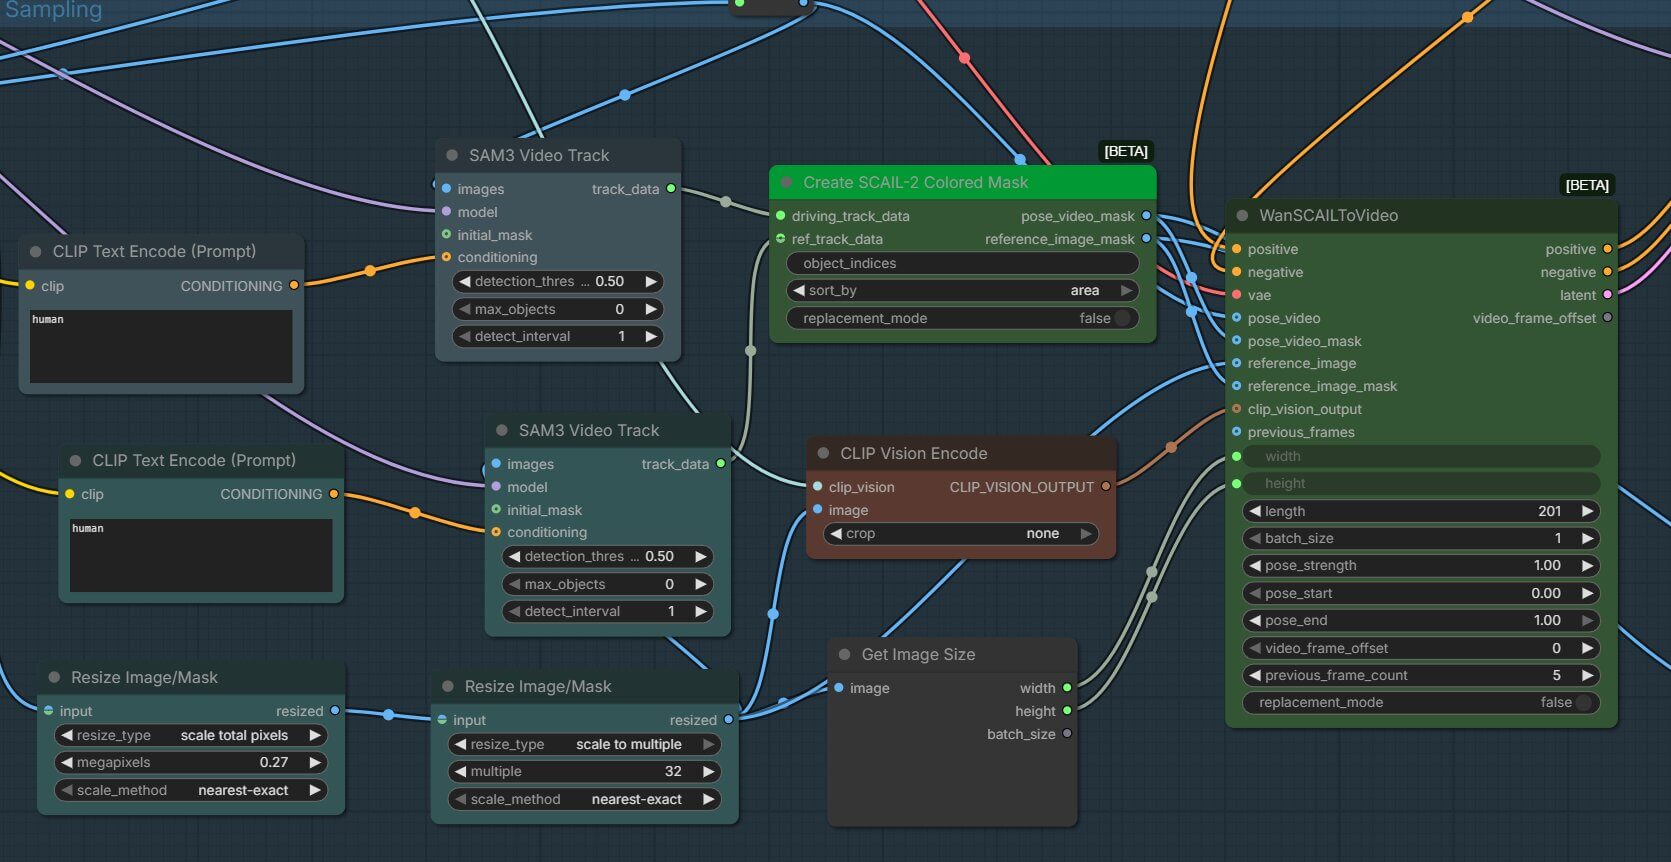
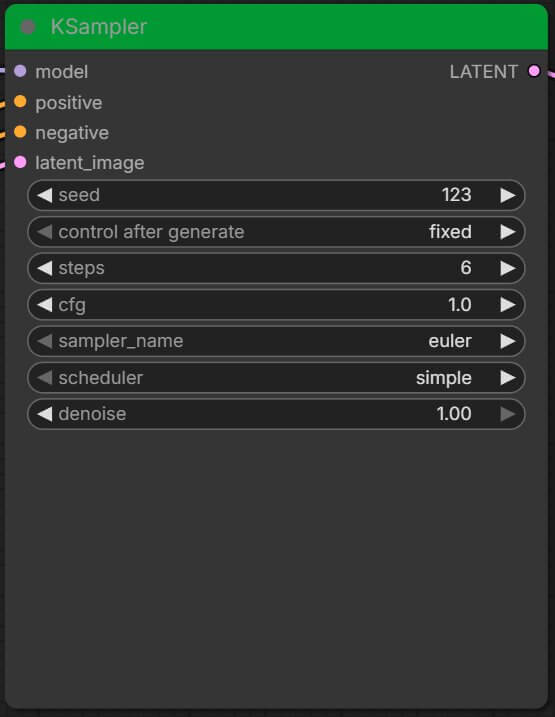
human tracking prompt. Editing the tracking prompt changes what SAM3.1 follows; editing the content prompt changes how the output looks.How to Run the SCAIL-2 GGUF (Low VRAM) Workflow
This path runs SCAIL-Preview, quantized to GGUF format, on Kijai's WanVideoWrapper pipeline. Unlike the full workflow, it extracts a pose skeleton from your video first, then applies that skeleton to your reference image.
Load Image
Upload your reference character image.
VHS_LoadVideo
Upload your driving video. Set to force_rate: 24 and frame_load_cap: 121 — caps your video at 121 frames (about 5 seconds at 24fps) to keep pose detection VRAM in check.
DownloadAndLoadNLFModel → OnnxDetectionModelLoader → NLFPredict → PoseDetectionVitPoseToDWPose → RenderNLFPoses
The pose pipeline, in order: OnnxDetectionModelLoader (vitpose-l-wholebody.onnx + yolov10m.onnx) locates the person in each frame, NLFPredict estimates their 3D pose, PoseDetectionVitPoseToDWPose converts that into a skeleton format the sampler understands, and RenderNLFPoses draws it as a pose image at your target resolution. On first run, the NLF model downloads automatically.
WanVideoModelLoader
Loads Wan21-14B-SCAIL-preview_comfy-Q3_K_S.gguf with attention_mode: sageattn. If you don't have SageAttention installed, switch to sdpa — slower, but works without the extra install.
WanVideoBlockSwap
Set to blocks_to_swap: 48. This offloads model layers between GPU and system RAM during sampling — raising this number lowers VRAM use further but slows generation down.
WanVideoEmptyEmbeds / WanVideoContextOptions
Resolution 480×832, length 65 frames. Context options: context_frames: 81, context_stride: 4, context_overlap: 8 — these control how the sampler processes long videos in overlapping chunks rather than all at once.
WanVideoSchedulerv2 / WanVideoSamplerv2
Scheduler: euler, steps: 6, shift: 7. Sampler: cfg: 1, seed fixed at 42.
VHS_VideoCombine ×2
Saves your final output with the prefix WanVideo_SCAIL at 24fps. A second instance saves the rendered pose skeleton video separately — check it before troubleshooting the final result.
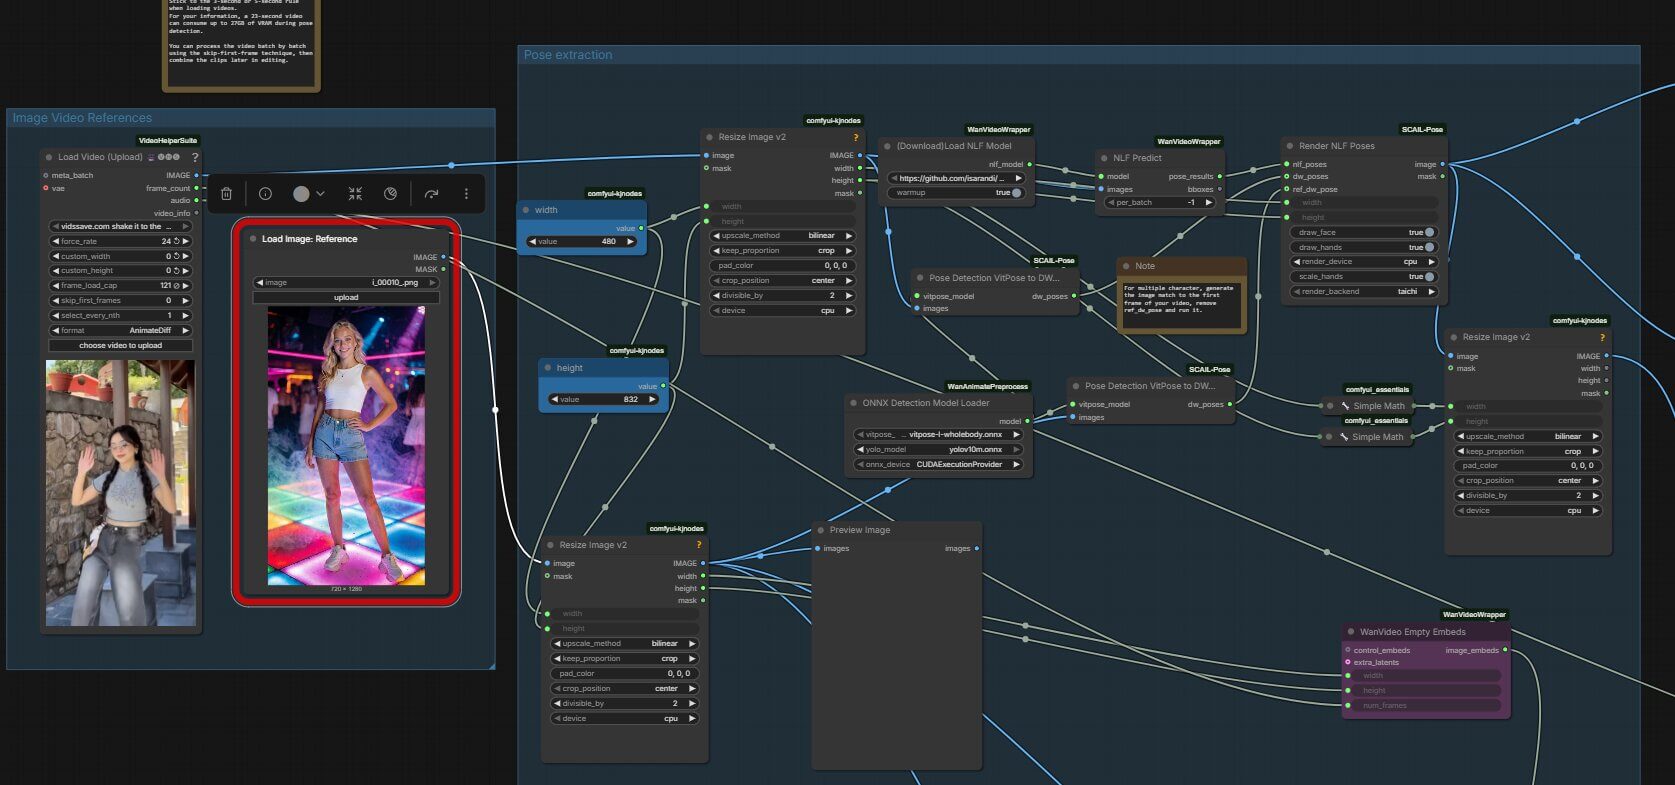
ref_dw_pose connection before running — this is noted directly in the workflow's built-in annotation.Full vs GGUF — Which Should You Use?
| Full SCAIL-2 | SCAIL-Preview GGUF | |
|---|---|---|
| VRAM needed | ~16GB+ | ~8–12GB |
| Pipeline | SAM3.1 masking, no pose | Pose extraction (NLF + ViTPose + YOLO) |
| Extra setup | None beyond model files | Pose models + WanVideoWrapper custom nodes |
| Video length | Up to 201 frames tested | Capped lower — long clips spike VRAM during pose detection |
| Best for | 16GB+ GPUs, best quality | 8–12GB GPUs, trading some quality for VRAM headroom |
"This node type does not exist" (red node in workflow)
The workflow uses a custom node you haven't installed yet.
- Click Manager in the top menu.
- Click Install Missing Custom Nodes.
- Restart ComfyUI completely — a browser refresh alone isn't enough.
If SCAIL2ColoredMask specifically stays red after this, update ComfyUI's core frontend, not just the custom node pack — it needs a recent nightly build.
CUDA out of memory
This happens most often on the GGUF workflow during pose detection, or on the full workflow at high frame counts.
- Lower frame_load_cap in VHS_LoadVideo to shorten your driving video (aim for 3–5 seconds).
- In the GGUF workflow, raise blocks_to_swap in WanVideoBlockSwap.
- In the full workflow, lower length in WanSCAILToVideo below 201.
- Switch to a lower GGUF quantization (Q2 instead of Q3_K_S) if you're still short on VRAM.
Output character doesn't match the reference image
This usually means SAM3.1 (full workflow) or the pose detector (GGUF workflow) locked onto the wrong subject in a busy frame.
- Check that your reference image has one clear, unobstructed subject.
- In the full workflow, confirm the tracking prompt in CLIPTextEncode actually matches your subject type ("human" for a person).
- In the GGUF workflow, check the rendered pose-skeleton output video before troubleshooting further — if the skeleton is wrong, the final output will be too.
Frequently Asked Questions
What to Do Next
Download whichever workflow matches your GPU, then run it with the defaults first.
Full SCAIL-2 for 16GB+, GGUF for 8–12GB. Once you get a successful result, swap in your own reference image and driving video, then adjust frame length and resolution to fit your hardware.
Published: 2026-07-22 · Last updated: 2026-07-22 · Tested on RTX 4090 (24 GB VRAM) · Models: wan2.1_14B_SCAIL_2_fp8_scaled.safetensors / Wan21-14B-SCAIL-preview_comfy-Q3_K_S.gguf
Join the discussion
Sign in to leave a comment or reply
No comments yet
Be the first to share your thoughts!