
⚡ Quick Answer
To run Wan 2.2 fast in ComfyUI, replace the standard 20+ step sampler with the Lightning (LightX2V) 4-step LoRA and Kijai's ComfyUI-WanVideoWrapper nodes. This drops a 480p, 5-second clip from around 40-50 minutes down to roughly 1-3 minutes on an RTX 4090, for both text-to-video and image-to-video. Minimum 12 GB VRAM, 24 GB recommended.
A standard Wan 2.2 render on the 14B model takes 40 to 50 minutes for a single 5-second clip on an RTX 4090. That is not usable for anyone testing prompts or producing content on a schedule. The Lightning LoRA fixes this — it compresses the sampler down to 4 steps per expert model and gets a similar-looking result in a fraction of the time.
This guide covers both directions of Wan 2.2 — text-to-video and image-to-video — using the same Lightning setup, since the workflows share almost every node. If you want the standard, non-accelerated install first, see our full Wan 2.2 ComfyUI install guide.
Minimum VRAM: 12 GB (with block swap enabled) — 24 GB recommended for full speed.
Tested on: RTX 4090 (24 GB), ComfyUI-WanVideoWrapper (Kijai).
What Is Wan 2.2?
Wan 2.2 does two jobs from one model family: text-to-video (T2V) — you write a prompt, it generates a clip from nothing — and image-to-video (I2V) — you give it a starting image plus a prompt, and it animates that image into a video. Wan 2.2 uses a MoE (Mixture of Experts) architecture — instead of one model handling the whole video, a high-noise expert handles the early, blurry denoising steps and a low-noise expert handles the later, detailed steps. That's why every download below comes in HIGH and LOW pairs.
Text-to-Video (T2V)
Generates a clip from a prompt alone — no starting image. Use this when the scene doesn't exist yet.
Image-to-Video (I2V)
Takes a reference image and animates it based on your prompt. Use this to bring an existing photo or generated image to life.
What This Workflow Produces
Two text-to-video examples below were generated at 832×480, 121 frames (~7.5s at 16fps), 8 steps split across the high and low noise experts, CFG 1.0. Click any clip to play, or click the poster to zoom. Copy the prompt to reproduce the result.

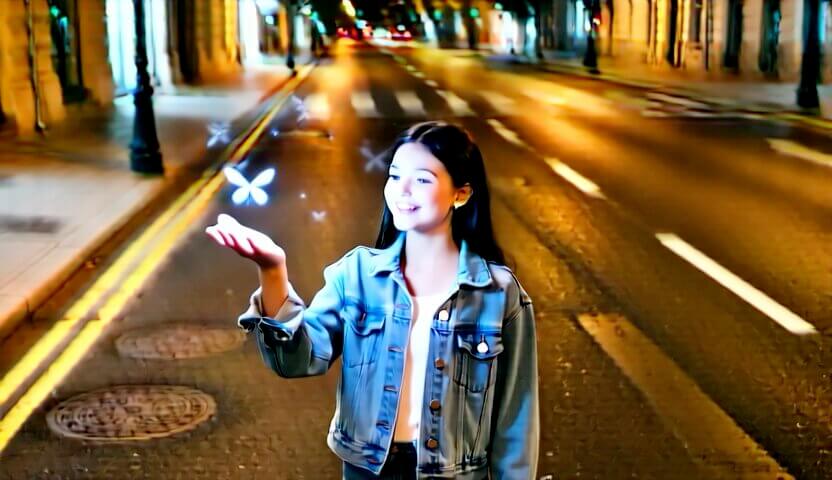
Image-to-Video Example
Both clips below were generated from the same reference image at 832×480, 81 frames (~5s at 16fps) — only the prompt differs between them.



What You Need Before Starting
Check your GPU VRAM before downloading anything. Open your graphics card software or check your system specs.
Pre-flight checklist
WanVideoModelLoader, WanVideoSampler, and so on), not the native ComfyUI Wan nodes (UNETLoader, KSamplerAdvanced). The two node sets are not interchangeable — a workflow built for one shows red, broken nodes if you're missing the other.Model & LoRA Files to Download
The VAE and text encoder are shared between both pipelines — download them once. Then grab the HIGH + LOW model pair and the matching HIGH + LOW Lightning LoRA pair for whichever mode you're building.
| File | Size | Needed for | Notes | Download |
|---|---|---|---|---|
wan_2.1_vae.safetensors | ~250 MB | T2V + I2V | Shared VAE — decodes the generated latent into pixel frames | ↗ Download |
umt5-xxl-enc-bf16.safetensors | ~11 GB | T2V + I2V | Shared text encoder — reads your prompt | ↗ Download |
Wan2_2-T2V-A14B_HIGH_fp8_e4m3fn_scaled_KJ.safetensors | ~15 GB | T2V only | High-noise expert model — text-to-video | ↗ Download |
Wan2_2-T2V-A14B-LOW_fp8_e4m3fn_scaled_KJ.safetensors | ~15 GB | T2V only | Low-noise expert model — text-to-video | ↗ Download |
Wan22_A14B_T2V_HIGH_Lightning_4steps_lora_250928_rank128_fp16.safetensors | ~600 MB | T2V only | Lightning LoRA for the T2V high-noise model | ↗ Download |
Wan22_A14B_T2V_LOW_Lightning_4steps_lora_250928_rank64_fp16.safetensors | ~300 MB | T2V only | Lightning LoRA for the T2V low-noise model | ↗ Download |
Wan2_2-I2V-A14B-HIGH_fp8_e4m3fn_scaled_KJ.safetensors | ~15 GB | I2V only | High-noise expert model — image-to-video | ↗ Download |
Wan2_2-I2V-A14B-LOW_fp8_e4m3fn_scaled_KJ.safetensors | ~15 GB | I2V only | Low-noise expert model — image-to-video | ↗ Download |
Wan_2_2_I2V_A14B_HIGH_lightx2v_4step_lora_260412_rank_256_fp16.safetensors | ~1.1 GB | I2V only | Lightning (LightX2V) LoRA for the I2V high-noise model | ↗ Download |
Wan_2_2_I2V_A14B_LOW_lightx2v_4step_lora_260412_rank_256_fp16.safetensors | ~1.1 GB | I2V only | Lightning (LightX2V) LoRA for the I2V low-noise model | ↗ Download |
File sizes above are approximate — always trust the size shown on the HuggingFace download page over these estimates.
New to LoRA in general? Read our ComfyUI LoRA guide first — it covers what a LoRA actually does to a base model.
Where to Place the Files
ComfyUI uses a specific folder structure inside its models/ directory. Each file type goes in a different subfolder. Placing a file in the wrong folder means ComfyUI cannot find it and the workflow fails to load.
text_encoders/ + vae/ — shared by T2V and I2Vdiffusion_models/ + loras/ — T2V pairdiffusion_models/ + loras/ — I2V pairmodels/checkpoints/. Wan 2.2's Kijai wrapper models use the diffusion_models folder specifically. If a file is in the wrong folder, the WanVideoModelLoader dropdown will be empty.Download the Workflow
Two workflow files are available — download the one matching what you want to make.
🎬 Wan 2.2 Fast — Workflow Downloads
Download the ready-to-use ComfyUI workflow JSON. Drag it onto the canvas and generate.
How to Load the Workflow JSON into ComfyUI
- Download the .json file to your computer.
- Open ComfyUI in your browser — usually at http://127.0.0.1:8188.
- Drag the .json file directly onto the ComfyUI canvas. Drop it anywhere on the empty grey area.
- The workflow loads automatically. You should see a set of connected nodes appear on the canvas.
- If you see only red error blocks, jump to the Troubleshooting section below.
How the Text-to-Video Workflow Is Built
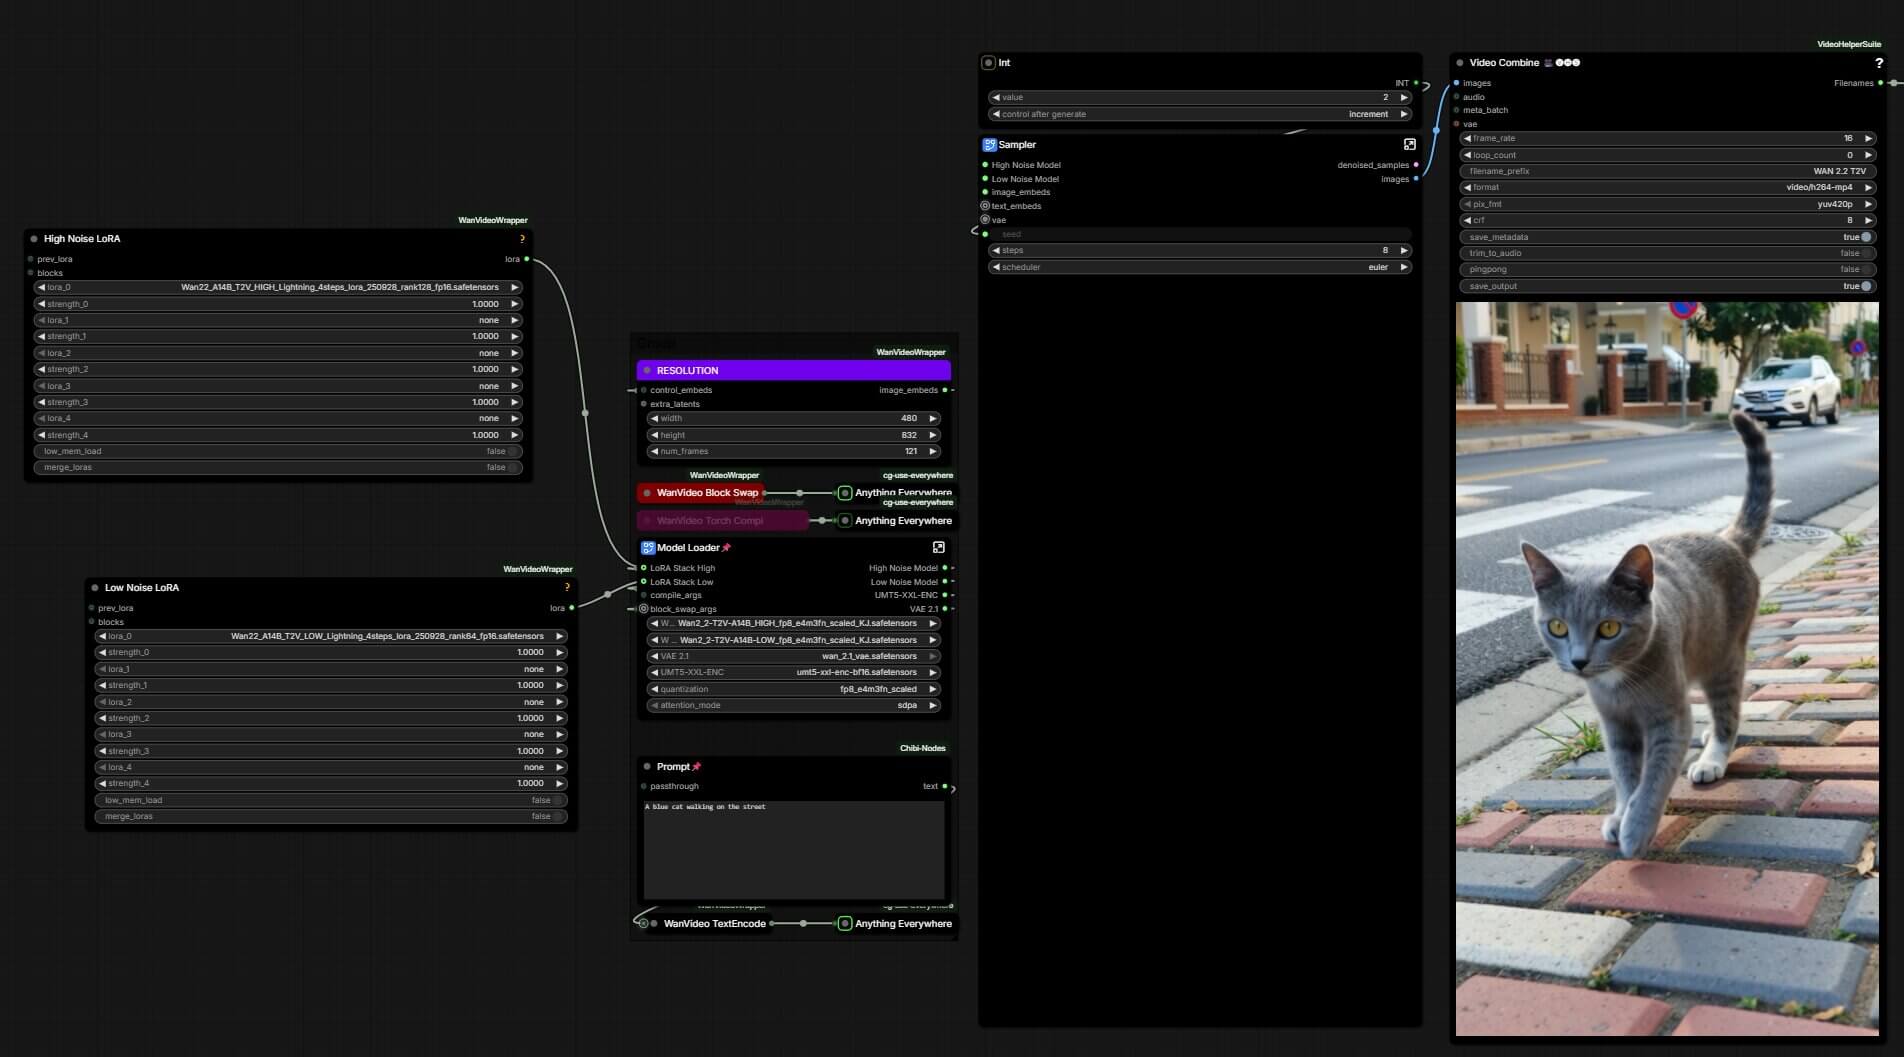
Here's the node-by-node breakdown of the tested T2V workflow, in the order signal flows through it.
WanVideoVAELoader
Loads wan_2.1_vae.safetensors. The VAE (this converts the AI's internal latent video into real pixel frames you can watch) is shared across every Wan 2.1/2.2 workflow.
LoadWanVideoT5TextEncoder
Loads umt5-xxl-enc-bf16.safetensors, precision bf16. This reads your text prompt.
WanVideoModelLoader (High Noise Model)
Loads Wan2_2-T2V-A14B_HIGH_fp8_e4m3fn_scaled_KJ.safetensors, base precision fp16_fast, quantization fp8_e4m3fn_scaled.
WanVideoModelLoader (Low Noise Model)
Same settings, loading Wan2_2-T2V-A14B-LOW_fp8_e4m3fn_scaled_KJ.safetensors.
WanVideoLoraSelectMulti (High Noise LoRA)
Connects into the HIGH model loader. Set to Wan22_A14B_T2V_HIGH_Lightning_4steps_lora_250928_rank128_fp16.safetensors, strength 1.0.
WanVideoLoraSelectMulti (Low Noise LoRA)
Connects into the LOW model loader. Set to Wan22_A14B_T2V_LOW_Lightning_4steps_lora_250928_rank64_fp16.safetensors, strength 1.0.
WanVideoTextEncode
Type your positive prompt here — for example, "a blue cat walking on the street." A text prompt for video benefits from motion words specifically — "walking," "turning," "camera panning" — not just a static scene description.
WanVideoEmptyEmbeds
Sets resolution and length: 832×480, 121 frames. At 16 frames per second, that's roughly a 7.5-second clip.
WanVideoSigmaToStep + WanVideoSampler ×2
One sampler runs on the high-noise model, one on the low-noise model. Steps: 8 total split across both, CFG: 1.0, scheduler euler. WanVideoSigmaToStep controls the exact handoff point from the high-noise expert to the low-noise expert.
WanVideoDecode → VHS_VideoCombine
Decodes the finished latent into frames using the VAE, then combines them at 16 fps and writes an h264 .mp4 to your output folder.
How the Image-to-Video Workflow Is Built
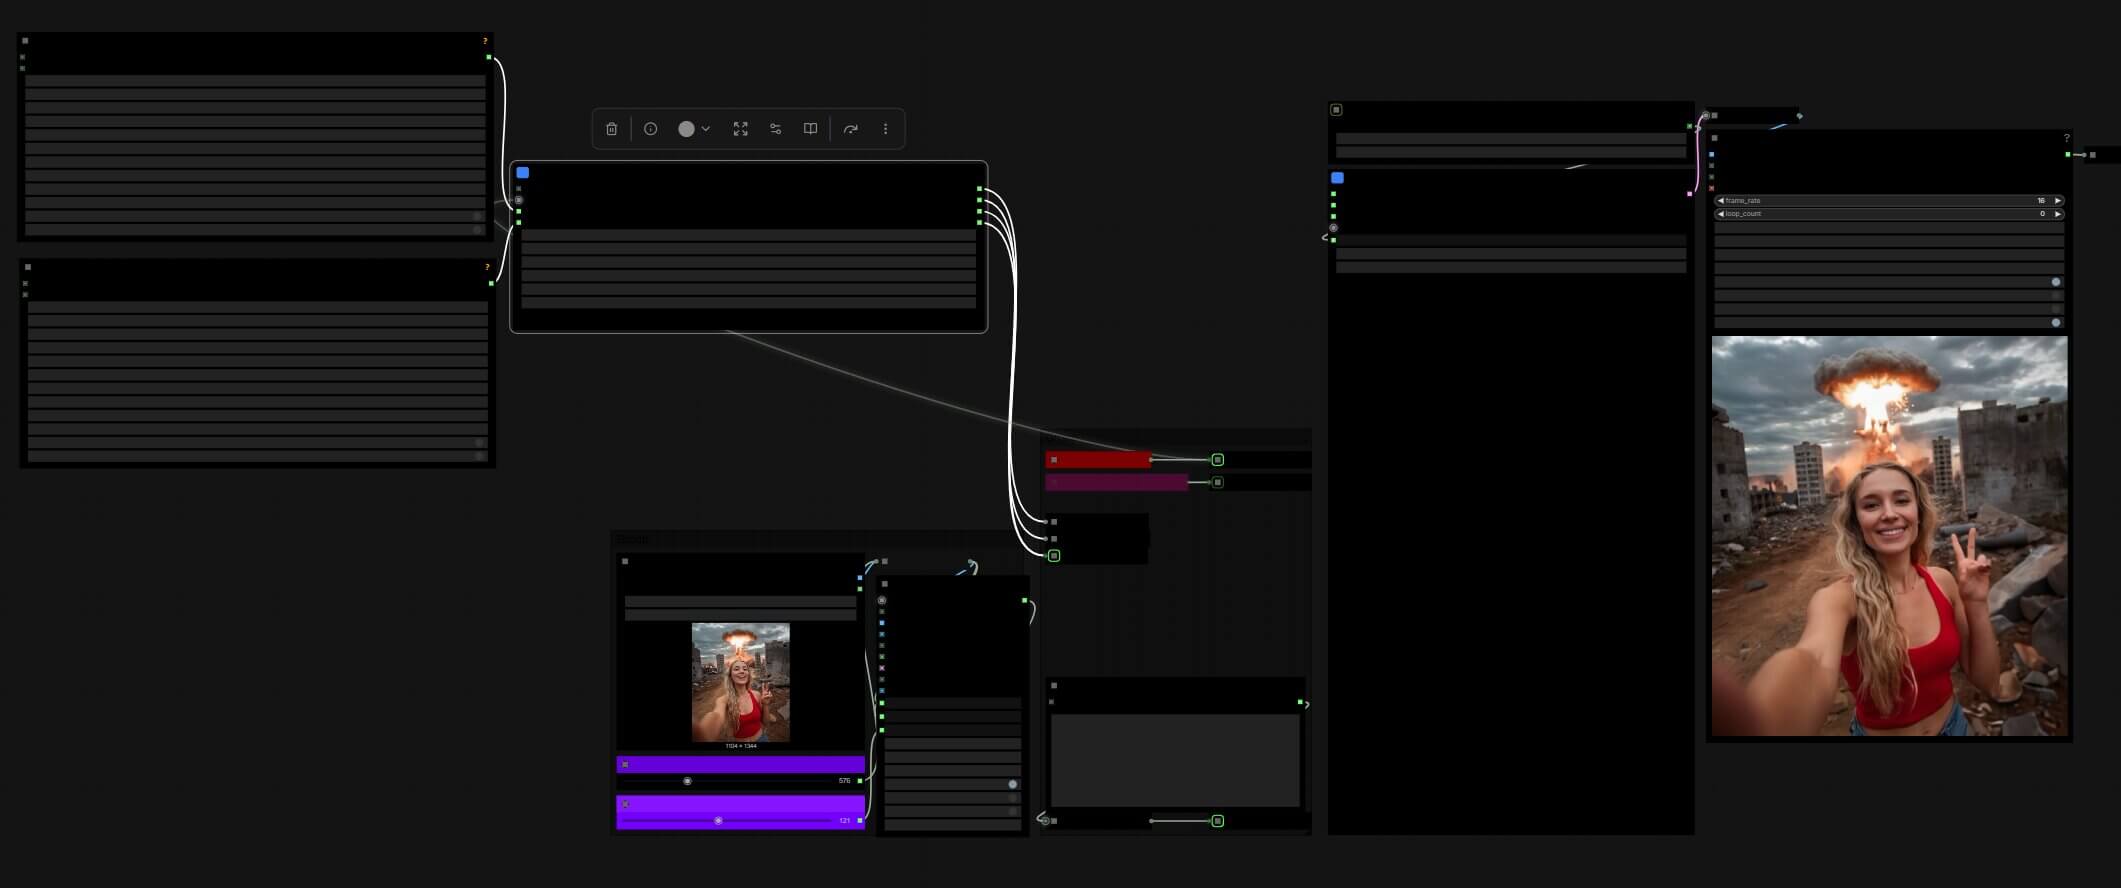
The I2V graph shares most of its nodes with T2V. Here's what's different.
WanVideoModelLoader + WanVideoLoraSelectMulti (I2V pair)
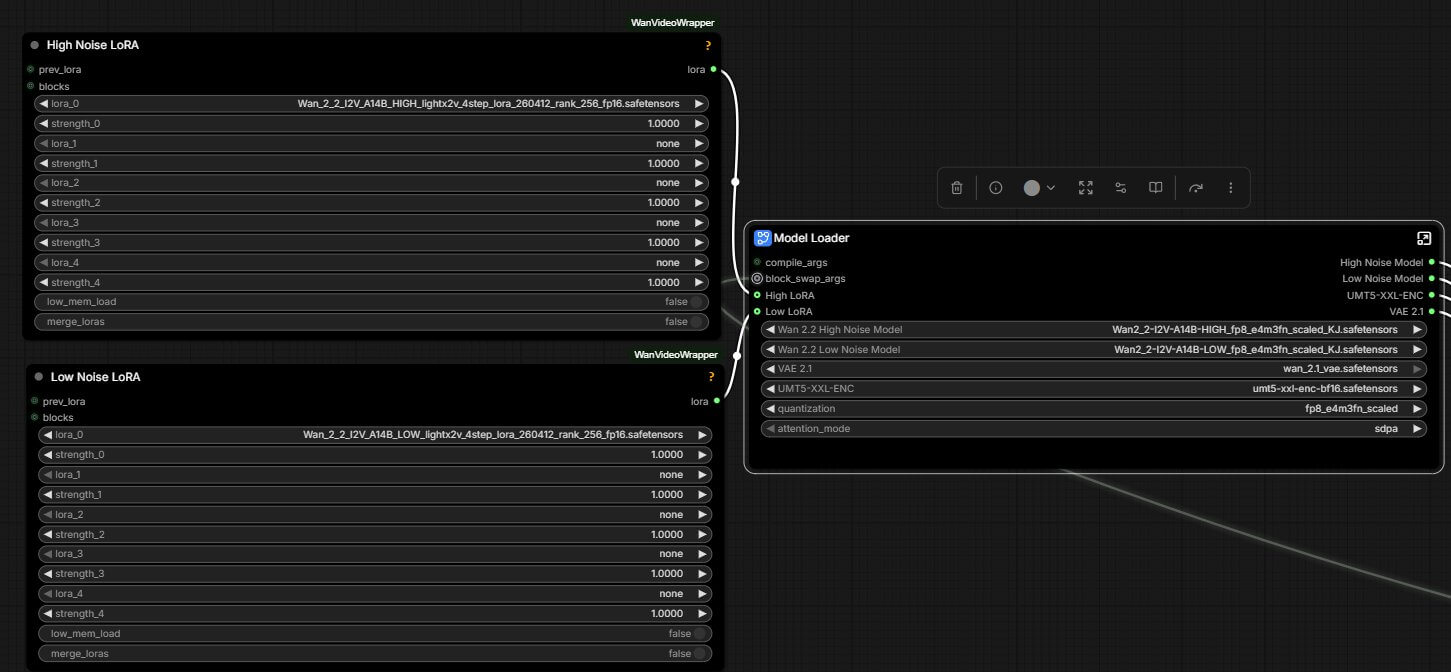
Repeat the model and LoRA steps from the text-to-video section, but load the I2V files: Wan2_2-I2V-A14B-HIGH_fp8_e4m3fn_scaled_KJ.safetensors / Wan2_2-I2V-A14B-LOW_fp8_e4m3fn_scaled_KJ.safetensors for the models, and Wan_2_2_I2V_A14B_HIGH_lightx2v_4step_lora_260412_rank_256_fp16.safetensors / Wan_2_2_I2V_A14B_LOW_lightx2v_4step_lora_260412_rank_256_fp16.safetensors for the LoRAs.
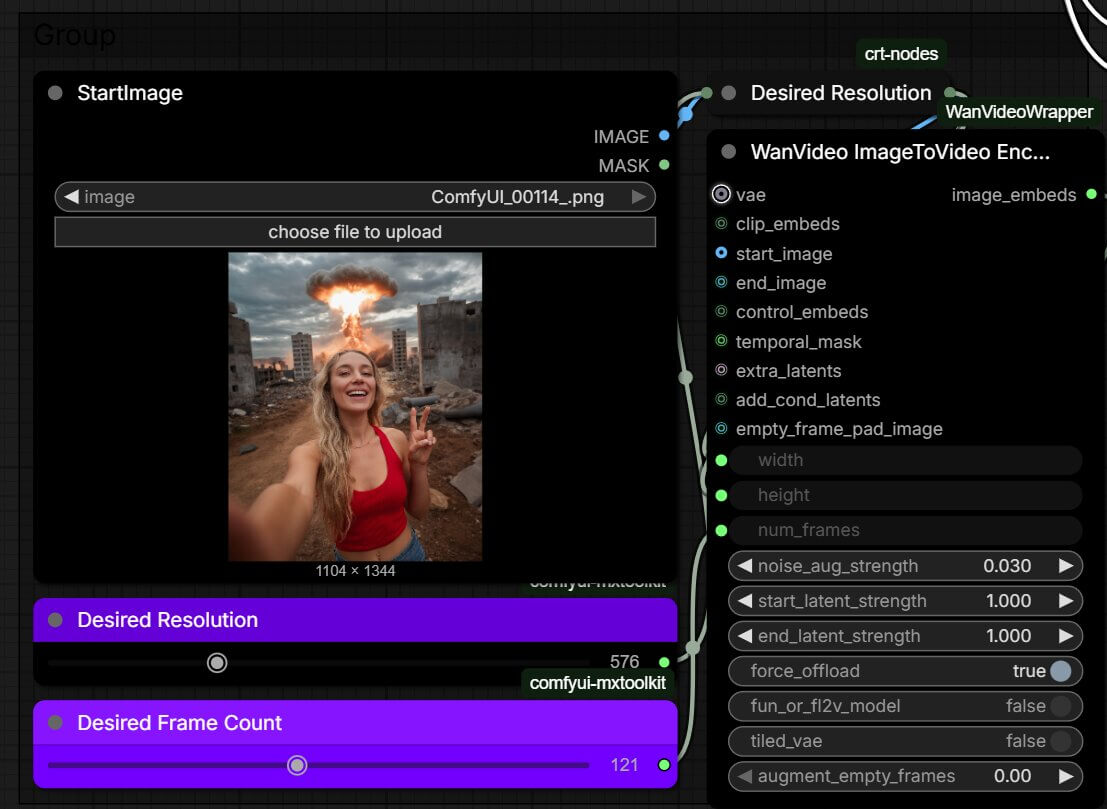
LoadImage (StartImage)
Click Choose file to upload and select the image you want to animate. A thumbnail preview appears directly on the node.
WanVideoImageToVideoEncode
Connect the LoadImage output and the VAE into this node. Set to 832×480, 81 frames (~5s at 16fps), noise_aug_strength 0.03 — a small amount of noise added to the starting frame that helps the model generate motion instead of freezing on the input image. Without this node, the sampler has no starting frame to animate from — it would behave exactly like the text-to-video workflow and ignore your image entirely.
WanVideoTextEncode
Describe the motion you want — for example, "a girl walking," or "the person turns their head and smiles, camera slowly zooms in." You don't need to redescribe the scene itself since the image already provides that.
WanVideoSigmaToStep + WanVideoSampler ×2
Same two-stage sampler setup as T2V, feeding in the image embeds instead of the empty embeds. Steps: 8, CFG: 1.0.
WanVideoDecode → VHS_VideoCombine
Identical to T2V from here — decode, then combine at 16 fps into an h264 .mp4.
What Do the Speed Settings Actually Do?
Two optional nodes control how much VRAM the workflow uses, separate from the models and LoRAs themselves.
WanVideoBlockSwap — moves some of the model's transformer blocks from GPU VRAM to system RAM during generation. Set blocks_to_swap to 15 if you're on a 12-16 GB card. On a 24 GB card, you can leave this at 0 for maximum speed, since nothing needs to be offloaded.
WanVideoTorchCompileSettings — pre-compiles the model for faster repeated generations. The first render after enabling this is slower (compilation overhead), but every render after that is noticeably faster. Skip this node entirely if you're only generating a handful of clips — the compile time isn't worth it for one-off renders.
| Setup | VRAM needed | Time for a 5s, 480p clip (RTX 4090) |
|---|---|---|
| Standard Wan 2.2, no LoRA, 20+ steps | ~20-24 GB | 40-50 minutes |
| Lightning LoRA, 4 steps per expert (this guide) | 12-24 GB (block swap scales it down) | 1-3 minutes |
| Lightning LoRA + block swap, 12 GB card | 12 GB | 3-5 minutes |
"This node type does not exist" (red node in the workflow)
You're missing the ComfyUI-WanVideoWrapper or ComfyUI-VideoHelperSuite custom node.
- Click Manager in the top menu.
- Click Install Missing Custom Nodes.
- Restart ComfyUI completely, not just a browser refresh.
For the full walkthrough with screenshots, see our guide to fixing missing/red nodes in ComfyUI.
CUDA out of memory during sampling
The models and LoRAs don't fit in your available VRAM.
- Add or increase WanVideoBlockSwap — try blocks_to_swap at 20 instead of 15.
- Lower the resolution in WanVideoEmptyEmbeds or WanVideoImageToVideoEncode from 832×480 to 640×384.
- Close other GPU-heavy applications (browser tabs with hardware acceleration, other ComfyUI instances) before queuing.
Video comes out with almost no motion
This is a known side effect of the Lightning LoRA — some prompts render as near-static frames or a slow-motion crawl.
- Confirm cfg is set to 1.0 on both WanVideoSampler nodes, not left at the default 5-7.
- Add explicit motion verbs to your prompt ("walking," "turning," "camera pans").
- If motion is still flat, drop the LoRA strength from 1.0 to 0.8 on both HIGH and LOW loaders — this trades some speed for stronger motion.
Frequently Asked Questions
What to Do Next
Download the workflow. Run the T2V version first. Go from there.
Run text-to-video first with the default prompt — once you have a successful, fast generation, adjust the prompt and try image-to-video with your own reference photo. If you hit red nodes before you get this far, check the missing-node guide below.
Published: 2026-07-17 · Last updated: 2026-07-17 · Tested on RTX 4090 (24 GB VRAM) · ComfyUI-WanVideoWrapper (Kijai) · Models: Wan2_2-T2V-A14B_HIGH/LOW_fp8_e4m3fn_scaled_KJ.safetensors, Wan2_2-I2V-A14B-HIGH/LOW_fp8_e4m3fn_scaled_KJ.safetensors
Join the discussion
Sign in to leave a comment or reply
No comments yet
Be the first to share your thoughts!