
⚡ Quick Answer
To keep a character consistent in ComfyUI with FLUX.1 Kontext Dev, load one reference photo, scale it with FluxKontextImageScale, encode it to a latent with VAEEncode, and merge that latent into your prompt's conditioning with ReferenceLatent. Kontext then generates the character in a new pose or setting while holding the face, hair, and outfit close to the original. Minimum 11 GB VRAM using the fp8 model.
Getting the same character to show up correctly across ten different images used to mean training a LoRA on that character first. FLUX.1 Kontext Dev changes this — hand it one reference photo and a text instruction, and it generates a new pose or scene while keeping the face, outfit, and hairstyle close to the source. No training required.
This guide walks through the exact workflow: which nodes to connect, what each setting does, and how to write instructions that keep identity intact instead of drifting into a different-looking person by the third generation.
If you're working with Qwen Image Edit or Krea 2 instead — including multi-character scenes with two or more people in one frame — see the general ComfyUI character consistency guide or the Krea 2 character consistency guide. This page is specific to the Kontext node chain, which is different from both.
Tested on: ComfyUI v0.3.42, RTX 4090 (24 GB VRAM).
Minimum VRAM: 11 GB (fp8 model).
How Identity Is Preserved
Kontext carries your reference photo into the sampler through a single path — and every node in that path has to be connected correctly, or identity breaks:
- FluxKontextImageScale — resizes and pads your reference photo to one of the resolution buckets Kontext was trained on. Feeding it an arbitrary resolution without this node produces warped or cropped identity in the output.
- VAEEncode — converts that scaled reference image into a latent.
- ReferenceLatent — merges the VAE-encoded reference latent into your positive conditioning, right before it reaches the sampler.
Your instruction (encoded through a standard CLIPTextEncode, using the T5-XXL + CLIP-L pair) still matters — it tells Kontext what to keep and what to change — but the latent path is what actually anchors the face.
Example: One Reference, Three Scenes
Below is one reference photo and three separate generations from that same reference — swap in your own screenshots here. Click any image to zoom.




What You Need
Kontext ships as separate model, text-encoder, and VAE files — ComfyUI does not bundle them into one checkpoint. Download these before you start.
| File | Size | VRAM | Notes | Download |
|---|---|---|---|---|
flux1-dev-kontext_fp8_scaled.safetensors | ~11 GB | 12 GB+ | Recommended for most users | ↗ Download |
flux1-kontext-dev.safetensors (full) | ~24 GB | 24 GB+ | Full precision — for 24 GB+ cards only | ↗ Download |
FLUX.1-Kontext-dev GGUF (Q4–Q8) | 4–12 GB | 6 GB+ | Needs the ComfyUI-GGUF custom node pack | ↗ Download |
t5xxl_fp16.safetensors | ~9.5 GB | Required | Text encoder, half of the pair | ↗ Download |
clip_l.safetensors | ~246 MB | Required | Text encoder, half of the pair | ↗ Download |
ae.safetensors | ~335 MB | Required | Decodes the finished latent to a PNG | ↗ Download |
Pre-flight checklist
Where to Place the Files
Each file type goes in a different subfolder under ComfyUI's models/ directory. A file in the wrong folder means the dropdown in that node stays empty.
diffusion_models/ — main model (pick one)clip/ — dual text encoder pairvae/ — image decodermodels/checkpoints/. This workflow loads it through UNETLoader, which only reads from diffusion_models/.models/text_encoders/ folder instead of models/clip/, place the t5xxl and clip_l files there instead — check whichever folder your DualCLIPLoader dropdown is actually pointing at.Download the Workflow
🔧 Flux Kontext Character Consistency — Workflow Download
Download the ready-to-use ComfyUI workflow JSON. Drag it onto the canvas, load your reference photo, and generate.
How to Load the Workflow JSON into ComfyUI
- Download the .json file to your computer.
- Open ComfyUI in your browser — usually at http://127.0.0.1:8188.
- Drag the .json file directly onto the ComfyUI canvas. Drop it anywhere on the empty grey area.
- The workflow loads automatically. You should see the Model Loaders, Size, and Sampling groups appear on the canvas.
- If you see only red error blocks, jump to the Troubleshooting section below.
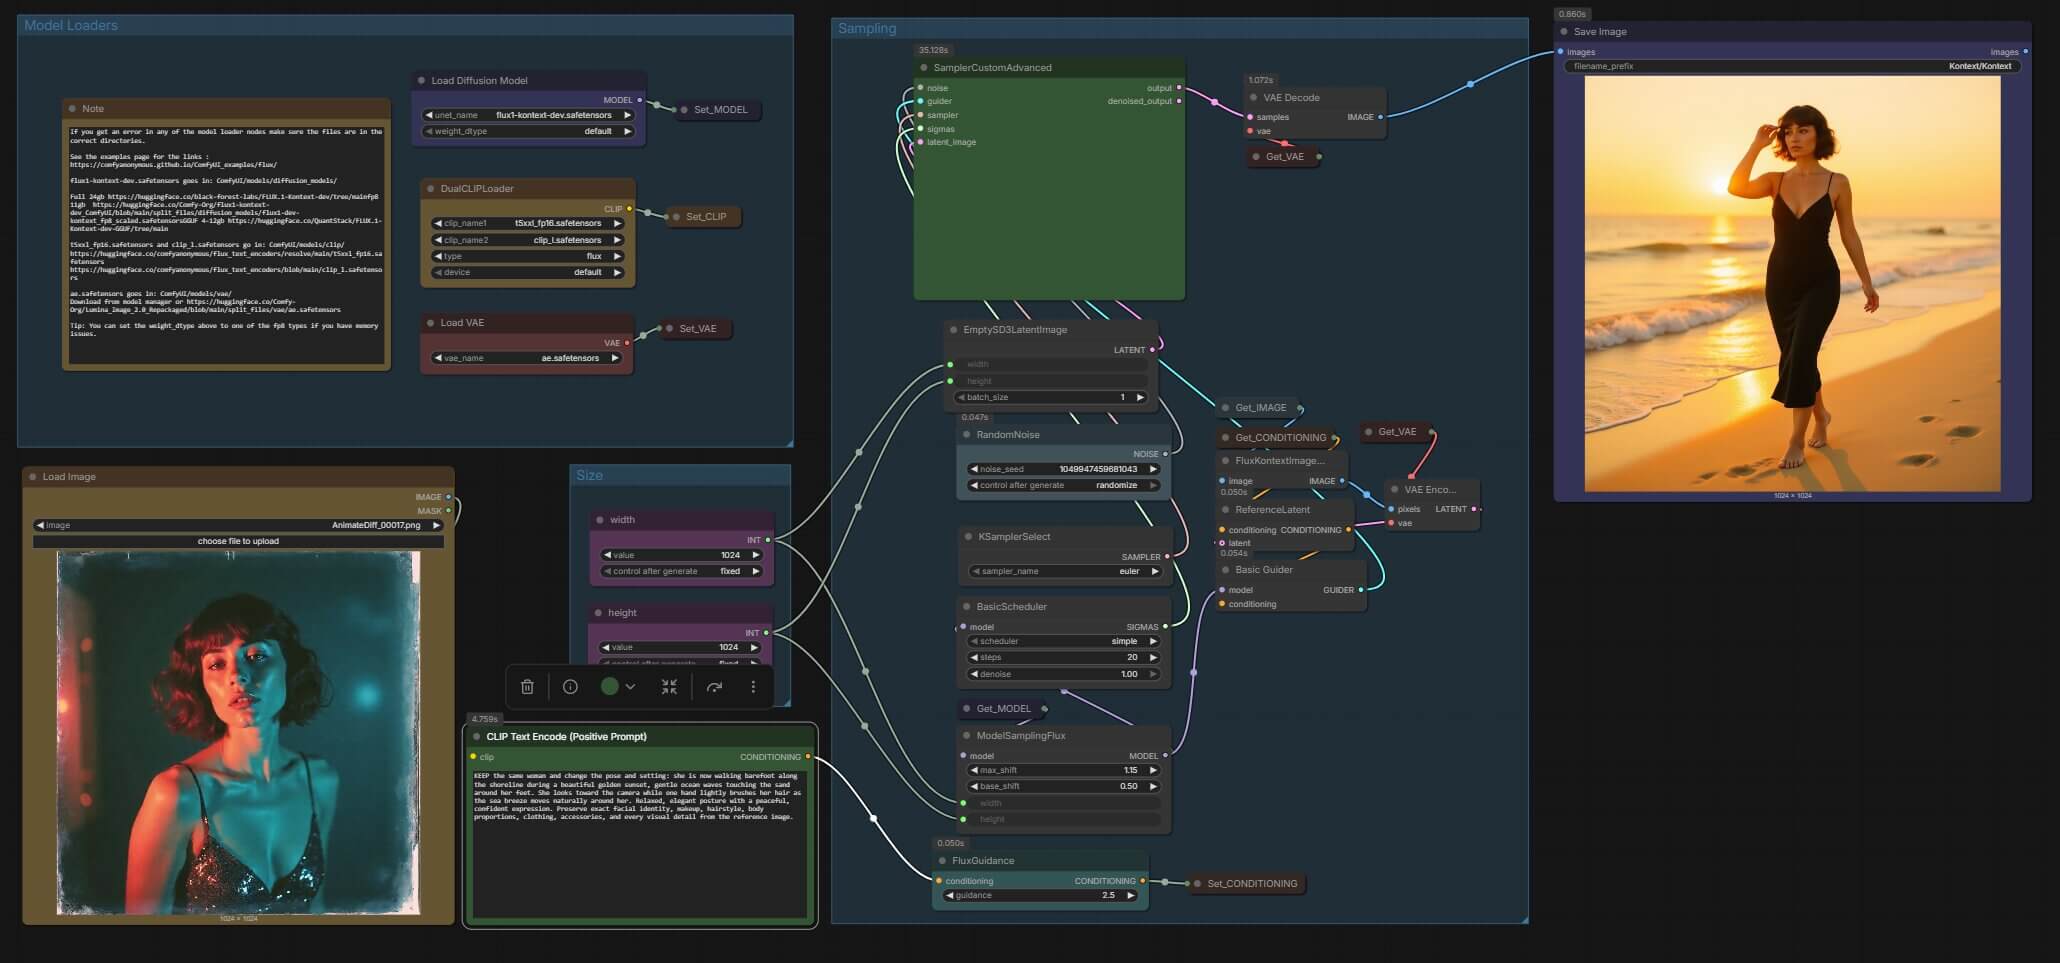
Workflow Structure: What Each Node Does
Here's what each node in the chain controls, left to right:
| Node | What it does |
|---|---|
LoadImage | Your reference photo of the character. Feeds FluxKontextImageScale. |
DualCLIPLoader | Loads the T5-XXL + CLIP-L text encoder pair, type set to "flux". |
VAELoader | Loads the VAE. Feeds both the final image decode and the reference-photo encode. |
UNETLoader | Loads the FLUX.1 Kontext Dev diffusion model — the model that generates the image. |
CLIPTextEncode | Your instruction — what to keep and what to change. |
FluxGuidance | Sets the guidance strength applied to your instruction (this workflow uses 2.5). |
FluxKontextImageScale | Resizes the reference photo to a resolution Kontext was trained on, before encoding. |
VAEEncode | Converts the scaled reference photo into a latent. |
ReferenceLatent | Merges the positive conditioning with the VAE-encoded reference latent — the node that keeps the face consistent. |
ModelSamplingFlux | Patches the model's noise schedule to match your output width and height. |
RandomNoise → KSamplerSelect → BasicScheduler → BasicGuider → SamplerCustomAdvanced | FLUX's native advanced sampling chain — five small nodes doing the job a single KSampler does on older models. |
EmptySD3LatentImage | Sets the output canvas size (1024×1024 by default), fed by the width/height nodes. |
VAEDecode → SaveImage | Converts the finished latent into a PNG and writes it to disk. |
Set_ / Get_ node pairs scattered around the canvas (from the KJNodes pack). These aren't extra logic — they're wiring shortcuts that carry a value like CLIP or VAE across the canvas without a visible line. Ignore them; connections still work the same underneath.Step-by-Step Setup
- In DualCLIPLoader, select
t5xxl_fp16.safetensorsandclip_l.safetensors, and confirm type reads flux. - In VAELoader, confirm
ae.safetensorsis selected. - In UNETLoader, select your Kontext model file. Set weight_dtype to
fp8_e4m3fnhere if you're on a card under 16 GB. - Click LoadImage and upload your reference photo. Use a clear, well-lit, front-facing shot — side profiles and heavy shadows make identity lock harder.
- Open the CLIPTextEncode node and write your instruction — see the next section for the exact structure.
- Confirm the width/height PrimitiveInt nodes feed both EmptySD3LatentImage and ModelSamplingFlux — this workflow defaults to 1024×1024.
- Click the orange Queue Prompt button. A progress bar appears below it. On an RTX 4090 at 20 steps, generation takes roughly 15–30 seconds.
How to Write the Instruction
Structure every instruction in two parts: what to preserve, then what to change. Lead with the preservation language — it carries more weight at the start of the prompt than buried at the end.
Worked example from this workflow:
There's no separate negative prompt in this workflow — Kontext's conditioning runs through ReferenceLatent alone, so unwanted patterns are usually fixed by adjusting the instruction itself rather than rejecting them in a negative field.
Settings That Matter
20— BasicScheduler; Kontext isn't distilled, so it needs more steps than Turbo-class models2.5— FluxGuidance; higher follows the instruction more literallyeuler— KSamplerSelect, the default this workflow ships withsimple— BasicScheduler, paired with euler1— full denoise from an empty latent1.15 / 0.5— ModelSamplingFlux; wired to width/height automatically1024×1024— default output canvas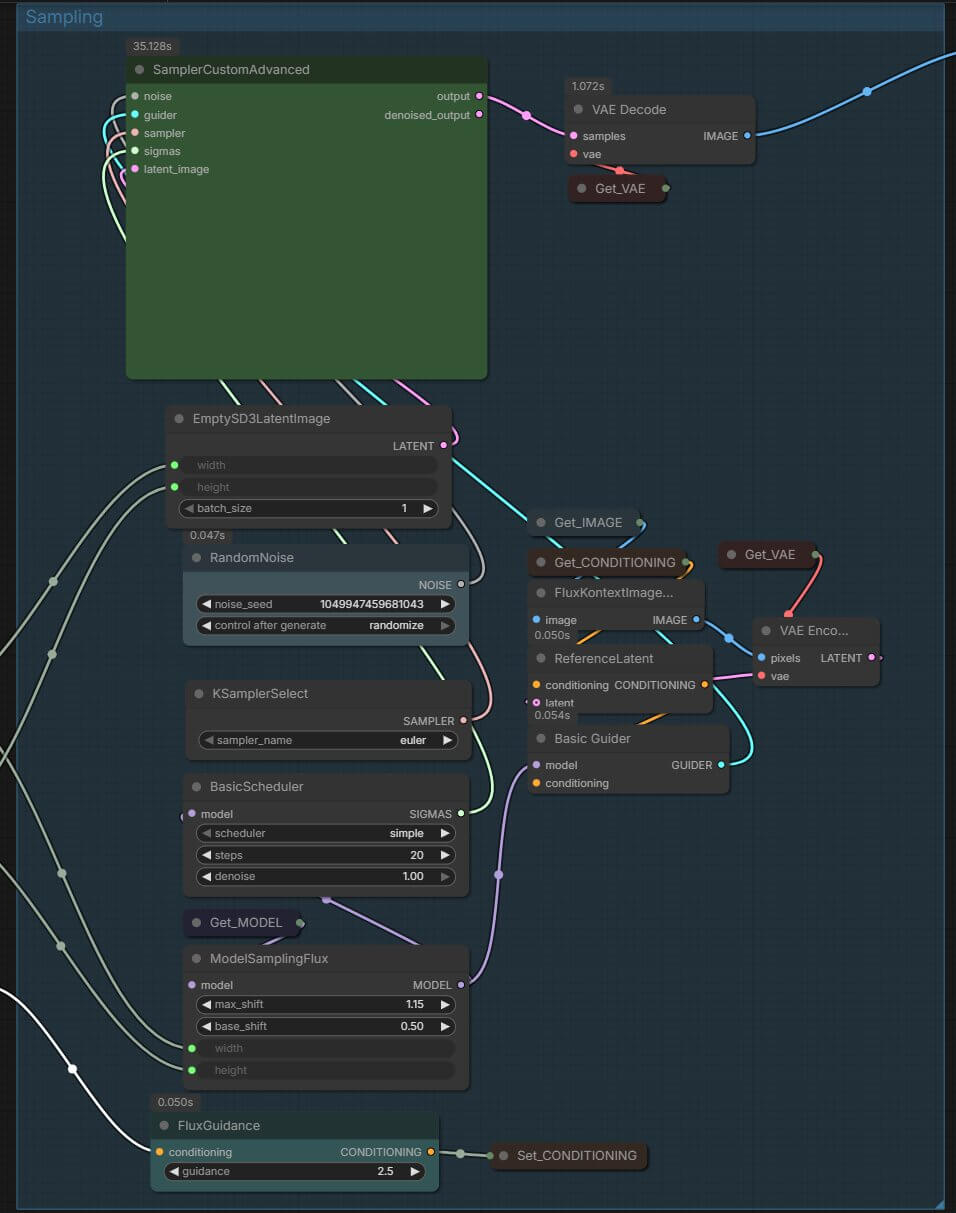
FLUX.1 Kontext Dev is a full, non-distilled model, so it needs more steps than a Turbo-class model like Krea 2. The max_shift and base_shift values in ModelSamplingFlux are wired to your width/height so the sampling schedule stays matched to your output resolution automatically — leave them unless you know you need to tune them.
Going Further: Stacking a Style LoRA
Once identity holds up reliably, you can stack a style LoRA on top of the Kontext model to push the output toward a specific look — cinematic grading, an illustration style, a particular photography aesthetic — without touching the reference-latent chain that holds the face.
Need multiple characters in the same frame instead of one at a time? That's a different node setup — see the multi-reference section of the general ComfyUI character consistency guide.
"This node type does not exist" (red node in workflow)
The workflow uses a custom or newer core node you haven't installed. FluxKontextImageScale, ReferenceLatent, and ModelSamplingFlux are relatively recent core additions.
- Click Manager in the top menu.
- Click Install Missing Custom Nodes.
- Restart ComfyUI completely.
If nodes still show red, update ComfyUI itself.
The character's face looks different in the output
This usually means the reference-latent chain isn't reaching the sampler correctly, or the reference photo is a poor angle for the model to lock onto.
- Confirm FluxKontextImageScale → VAEEncode → ReferenceLatent is fully connected, not left disconnected anywhere in the chain.
- Confirm ReferenceLatent receives both the positive conditioning and the VAE-encoded latent.
- Try a clearer, more front-facing reference photo.
- Make sure the KEEP instruction comes first in your prompt, not after the scene description.
Out of memory / CUDA error during generation
The full-precision model is roughly 24 GB and can exceed VRAM on cards under 24 GB.
- Switch to
flux1-dev-kontext_fp8_scaled.safetensors, or a GGUF quant if you're under 12 GB. - Set weight_dtype on the UNETLoader to
fp8_e4m3fnorfp8_e5m2. - Lower your output resolution (try 768×768 instead of 1024×1024).
- Close other GPU-heavy applications before queuing.
Frequently Asked Questions
What to Do Next
Download the workflow. Run one test scene. Compare it to the reference.
Once identity holds up on a clean generation, try the same reference photo across a few different settings and expressions — see the multi-angle guide below if you need a specific pose or camera angle rather than a full new scene.
Published: 2026-07-14 · Last updated: 2026-07-14 · Tested on RTX 4090 (24 GB VRAM) · ComfyUI v0.3.42 · Model: flux1-kontext-dev.safetensors
Join the discussion
Sign in to leave a comment or reply
No comments yet
Be the first to share your thoughts!