

ComfyUI Character Consistency: Keep Any Face Identical Across Images
If you've ever generated a character in ComfyUI and then lost that face the moment you changed the scene — this guide fixes that. Character consistency (sometimes called face consistency or consistent character workflow) lets you lock in a character's facial features so they stay the same no matter what background, lighting, or pose you generate next.
This guide uses the Qwen Image Edit 2511 workflow, which handles both single character reference images and multi-reference setups with two or more characters. You'll also find a free workflow JSON download and a best practices section pulled from real testing in 2026.
What Is Character Consistency in ComfyUI?
Character consistency in ComfyUI means generating multiple images where the same face, body proportions, and recognizable features appear every time — even across completely different scenes and lighting setups. You feed the model a reference photo, and it uses that as the "blueprint" for the character going forward.
Artists and creators use this for comics and story sequences with recurring characters, product shoots where a model needs to appear in multiple settings, and AI-generated content series where brand character identity must stay intact.
ComfyUI Face Consistency vs Character Reference: What's the Difference?
You'll see these two terms used interchangeably, but they describe slightly different things. Understanding the difference helps you choose the right approach for your project.
🧬 Face Consistency
- Focuses specifically on keeping facial features identical — eye shape, nose, jaw, skin tone.
- The goal is that even a stranger looking at two outputs would recognize them as the same person.
- Best for portrait-heavy content or close-up shots where the face is the main subject.
- In ComfyUI: controlled by the quality and framing of your reference image.
🖼️ Character Reference
- A broader concept — the reference image is the "source of truth" for everything about the character.
- Covers face, hair color, body type, clothing style, and overall silhouette.
- Best for full-body shots, story sequences, or scenes where the whole character appears.
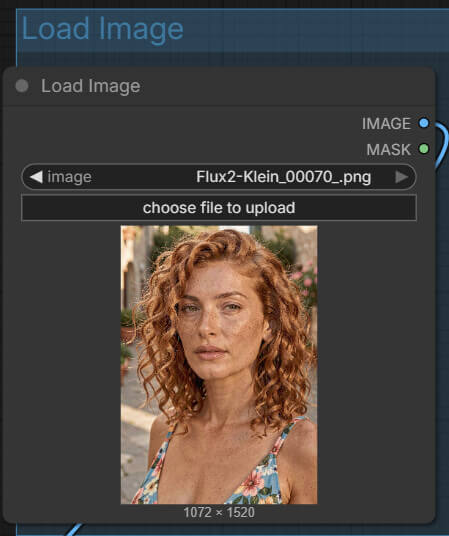
- In ComfyUI: the Load Image node is where your character reference gets connected to the workflow.
In practice, the Qwen Image Edit 2511 workflow handles both — it locks the face and uses the full character reference to maintain overall identity. For close-up work, use a portrait-style reference photo. For full-body scenes, use a standing reference shot that shows the character's complete look.
Example Output: Single Character Face Consistency
Below is one reference image fed into the Qwen Image Edit 2511 workflow. The character's face stays consistent across six completely different scenes, lighting setups, and environments. The prompts are shown under each image so you can see exactly what was used.
Character Reference Image

Generated Images — Same Face, Different Scenes






Multi-Reference: Keeping Multiple Characters Consistent
Multi-reference character consistency lets you keep two or more characters' faces and looks intact in the same generated image. Instead of one Load Image node, you connect multiple reference images — one per character — and ComfyUI uses all of them simultaneously.
This is the right approach for group shots, comic panels with multiple main characters, or any scene where two specific people need to appear together and both need to look recognizable.
- Story sequences and comic panels with multiple recurring characters
- Group portraits where each person's individual look must be preserved
- Relationship or friendship scenes — two consistent faces in one frame
- Brand content where multiple product characters appear together
Character Reference Images — Two Characters

Generated Images — Both Characters Consistent






Getting Started: Models, VRAM, and Setup
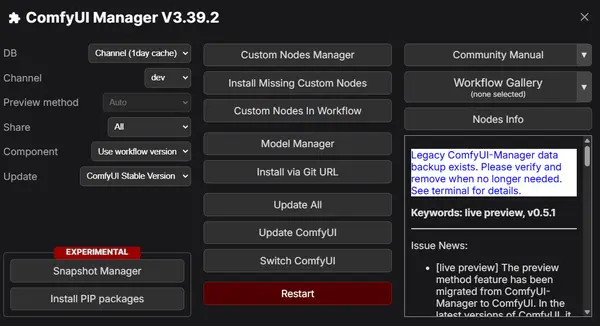
Step 1 — Update ComfyUI
Before loading this workflow, make sure ComfyUI and all its nodes are up to date. An outdated installation is the most common reason the workflow fails to load correctly.
Open the Manager panel in ComfyUI.
Click "Update All" so every node is current. This takes 1–2 minutes.
Restart ComfyUI after updating.
Close and reopen ComfyUI completely. A full restart is required — refreshing the browser tab is not enough.
Step 2 — Download the Four Required Model Files
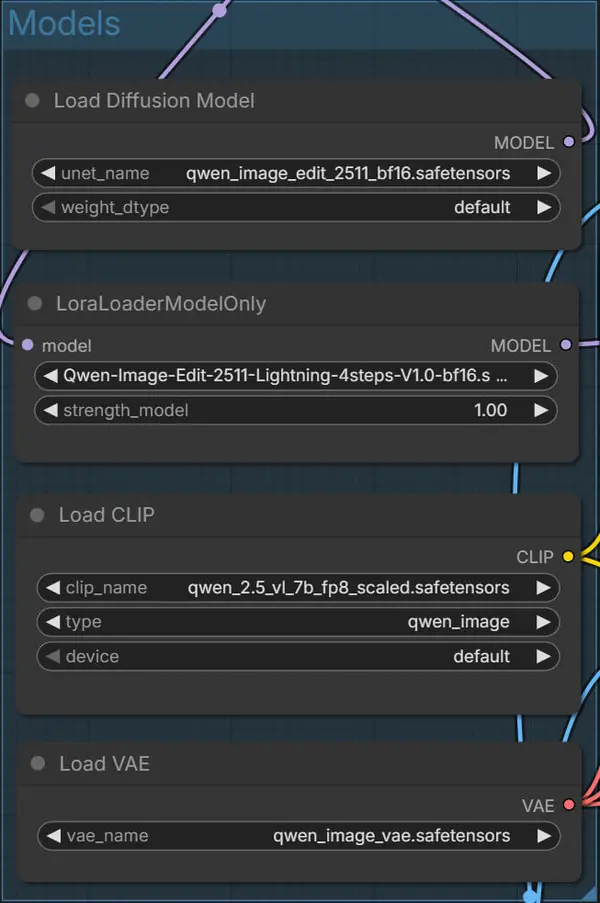
This workflow needs four files from HuggingFace. Download all four before loading the workflow — ComfyUI will show missing model errors if any are absent.
Where to Place the Model Files
Each file goes in a specific subfolder inside your ComfyUI installation. Putting a file in the wrong folder is a common mistake — the dropdown will show the model in the wrong category and the workflow will error.
📂 ComfyUI/
├── 📂 models/
│   ├── 📂 diffusion_models/
│   │      └── qwen_image_edit_2511_bf16.safetensors
│   ├── 📂 loras/
│   │      └── Qwen-Image-Edit-2511-Lightning-4steps-V1.0-bf16.safetensors
│   ├── 📂 text_encoders/
│   │      └── qwen_2.5_vl_7b_fp8_scaled.safetensors
│   └── 📂 vae/
│          └── qwen_image_vae.safetensors
Using the Workflow
Download the Free Consistent Character Workflow
Download the ComfyUI consistent character workflow JSON below. Once downloaded, open ComfyUI and drag the file directly onto the canvas — or use the Load button in the menu. The workflow will appear with all nodes pre-connected.
Download Free Consistent Character Workflow (JSON)Setting Up the Nodes
Select the correct models in each node.
Diffusion Model: qwen_image_edit_2511_bf16 · Text Encoder: qwen_2.5_vl_7b_fp8_scaled · VAE: qwen_image_vae · LoRA: Qwen-Image-Edit-2511-Lightning-4steps-V1.0-bf16. If a model doesn't appear in the dropdown, confirm the file is in the correct folder and refresh your browser.
Upload your character reference image in the "Load Image" node.
Use a clear photo with the character's face fully visible and well-lit. Front-facing portraits give the most consistent results. Avoid strong side lighting or heavy shadows on the face.
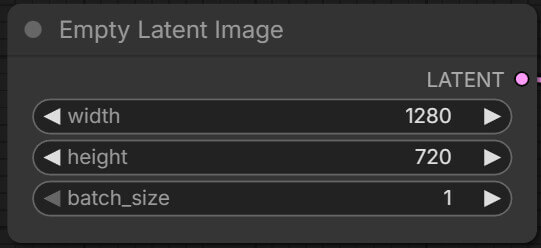
Set your output width and height.
Start at 1280×720 — this resolution works reliably on 12 GB VRAM. Going higher (e.g. 1440×810) increases VRAM usage significantly.
Writing Your Prompt
The prompt controls the scene — not the character. This is the most important rule for consistent face outputs. Never describe the face, hair color, eye color, or any physical features. The reference image handles all of that.
✓ Good prompt: A young woman sitting in a modern café, sunny day, casual outfit, wooden tables, warm lighting.
✗ Avoid: A young woman with blue eyes and short blonde hair smiling. (Describing facial features overrides the reference and breaks face consistency.)
Run the Workflow
Click "Run" (or Queue Prompt). The workflow will generate your character in the new scene with the face locked to your reference image. On an RTX 3060 12 GB, expect around 40–50 seconds per image. On an RTX 4080, around 15–20 seconds.
Multi-Reference Workflow: Two or More Characters in One Image
The multi-reference setup follows the same steps as the single-character workflow, with one addition: you load multiple character reference images at once. ComfyUI uses all of them simultaneously to keep every character consistent in the same output.
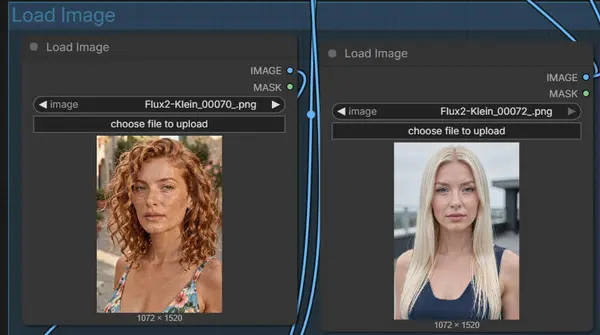
Add extra Load Image nodes — one per character.
In the workflow, connect your additional character references using the extra "Load Image" nodes shown below. Each node takes one reference photo.
Set resolution as usual.
1280×720 is the recommended starting point. Multi-character scenes don't require more VRAM than single-character ones at this resolution.
Write a scene prompt with no facial descriptions.
Describe what both characters are doing, the environment, and the mood. Do not mention any physical features — both faces are controlled entirely by their reference images.
Click "Run" to generate.
ComfyUI will output an image with both characters keeping their individual looks intact. If one character's face is drifting, check that their reference image is clear and front-facing.
ComfyUI Character Consistency Best Practices 2026
These are the practices that consistently produce the best face consistency results in 2026, based on real testing with Qwen Image Edit 2511 across different hardware setups and character types.
1. Use a portrait reference, not a full-body shot, for face-heavy content
For outputs where the face is the main subject (close-ups, headshots, portrait series), use a portrait-framed reference image. The model extracts more facial detail from a portrait than from a photo where the face takes up 20% of the frame.
2. Shoot or source your reference under neutral lighting
Heavy side lighting, colored lighting, or strong shadows in the reference photo will carry into your outputs. A reference shot under soft, even natural light gives the model the cleanest facial data to work with.
3. Keep your prompts short and scene-focused
Longer prompts increase the chance of accidentally including words that conflict with the reference. Aim for 2–3 sentences describing only the scene, environment, and action. The reference handles everything about the character.
4. Use 1280×720 as your baseline resolution
This resolution gives a strong balance between output quality and VRAM usage on a 12 GB card. Only go higher if you specifically need it — each resolution step up increases VRAM consumption noticeably.
5. For multi-character scenes, match the framing of both reference images
If Character 1's reference is a portrait and Character 2's is a full-body shot, the model gets inconsistent amounts of facial data for each. Use reference images with similar framing and similar lighting for the most consistent multi-character results.
6. Update ComfyUI nodes before each new workflow session
The Qwen nodes are actively developed. Nodes that were current two weeks ago may be behind a breaking update. Running "Update All" at the start of each session takes 60 seconds and prevents most "missing node" errors.
For a full structured learning path covering ComfyUI from install to advanced workflows, see the ComfyUI Roadmap — it covers Flux, HiDream, WAN 2.2, FramePack, and more advanced techniques beyond character consistency.
Troubleshooting Common Issues
Face changes too much between outputs — face consistency is breaking
Fix: Remove all facial detail from your prompt. Words like 'blue eyes', 'short hair', or 'smiling face' tell the model to override the reference image. Describe only the background, scene, and clothing. The reference controls the face.
Background doesn't match the prompt
Fix: Check your prompt for any accidental facial descriptions. Conflicting instructions cause the model to deprioritize scene details in favour of character appearance. Keep prompts short and scene-only.
Output image is blurry or low quality
Fix: Try a higher resolution (e.g. 1440×810 if your VRAM allows). Also confirm you've loaded qwen_image_vae.safetensors in the VAE node — using the wrong VAE is the most common cause of blurry or washed-out outputs.
Model files not appearing in the dropdown
Fix: Confirm each file is in the exact correct subfolder (see the folder structure above). After moving files, refresh your browser — ComfyUI only detects new model files after a page refresh, not automatically.
Out of memory error (CUDA OOM)
Fix: You're likely running below 12 GB VRAM or at too high a resolution. Drop back to 1280×720. If you're on 8 GB VRAM, this workflow may not run at all — the text encoder alone requires significant VRAM.
'Missing nodes' error when loading the workflow
Fix: Open the ComfyUI Manager, click "Update All", then fully restart ComfyUI. The Qwen nodes are frequently updated — an older installation is almost always the cause of missing node errors on this workflow.
Frequently Asked Questions
Join the discussion
Sign in to leave a comment or reply
No comments yet
Be the first to share your thoughts!