
⚡ Quick Answer
Portable: run update_comfyui.bat in the update folder. Manager: only updates custom nodes, not ComfyUI itself. Git install: run git pull then pip install -r requirements.txt. Desktop: updates automatically, or check manually via the ☰ menu → Desktop Settings → Update tab → Check for Updates.
Why Keep ComfyUI Updated
ComfyUI ships two kinds of updates, and it helps to know the difference before you start. Core code is new nodes, new model support, and new features. Core dependencies are separate packages — the frontend interface, workflow templates, and node help docs, shipped as comfyui-frontend-package, comfyui-workflow-templates, and comfyui-embedded-docs.
This is why "I updated but the feature still isn't there" is the most common update complaint. Updating one without the other leaves you with new node code but an old interface, or a new interface with no new nodes to match. Every method below updates both — but the git method requires you to run a second command manually, which is the step people skip.
Check Your Install Type First
Each method below only works for one install type. Before you do anything, figure out which one you're running:
| If you see this | Your install type | Jump to |
|---|---|---|
| A folder named ComfyUI_windows_portable with a run_nvidia_gpu.bat file | Portable | Go → |
| You launched a standalone ComfyUI.exe or ComfyUI.app icon with auto-updates | Desktop | Go → |
| You ran "git clone" yourself and start it with "python main.py" | Git / Manual | Go → |
| You just want to update custom nodes, not ComfyUI itself | Any — use Manager | Go → |
python_embeded means Portable. A .git hidden folder means a git install.Method 1: Updating ComfyUI Portable (Windows)
The Portable version bundles its own Python environment, so it doesn't need a virtual environment or terminal setup — just batch scripts. It currently only supports Windows, running on NVIDIA GPUs or CPU-only.
Update scripts live in the update folder inside your Portable install directory:
- Open File Explorer and navigate to your
ComfyUI_windows_portablefolder. - Open the
updatesubfolder. - Double-click update_comfyui.bat. A black command-line window opens and shows download progress. This updates both the ComfyUI core code and its core dependencies together — the officially recommended method.
- When the window shows "Update finished" and closes (or prompts you to press a key), the update is done.
- Go back one folder and double-click your usual launch file — run_nvidia_gpu.bat (or run_cpu.bat) — to start ComfyUI on the new version.
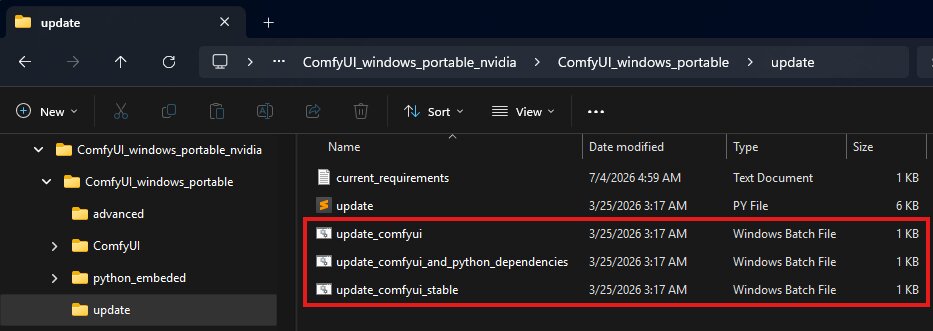
Want the latest stable release instead of nightly?
Double-click update_comfyui_stable.bat instead. This pulls the most recent tagged release rather than the newest (and less tested) development commits.
ComfyUI_windows_portable folder first, since this is the one script that can leave your install in a broken state if something goes wrong mid-download.python_embeded\python.exe -m pip install -r ComfyUI\requirements.txt manually. This re-syncs dependencies without the full reset.Method 2: ComfyUI Manager (Custom Nodes Only)
Manager is now built directly into recent ComfyUI builds, with a newer UI that adds pre-install previews, batch installs, and conflict detection between custom nodes.
- Open ComfyUI and click Menu → Help → Manage Extensions (or the plug icon in the toolbar, if visible).
- In the Manager panel, click Fetch Updates. This checks every installed custom node against its latest version and doesn't change anything yet — it just gathers the update list.
- Open Install Custom Nodes. Any node with an available update shows an Update button next to it. Click Update on each one, or use Update All if your Manager version shows that option.
- Once updates finish, restart ComfyUI completely and refresh your browser tab for the changes to take effect.
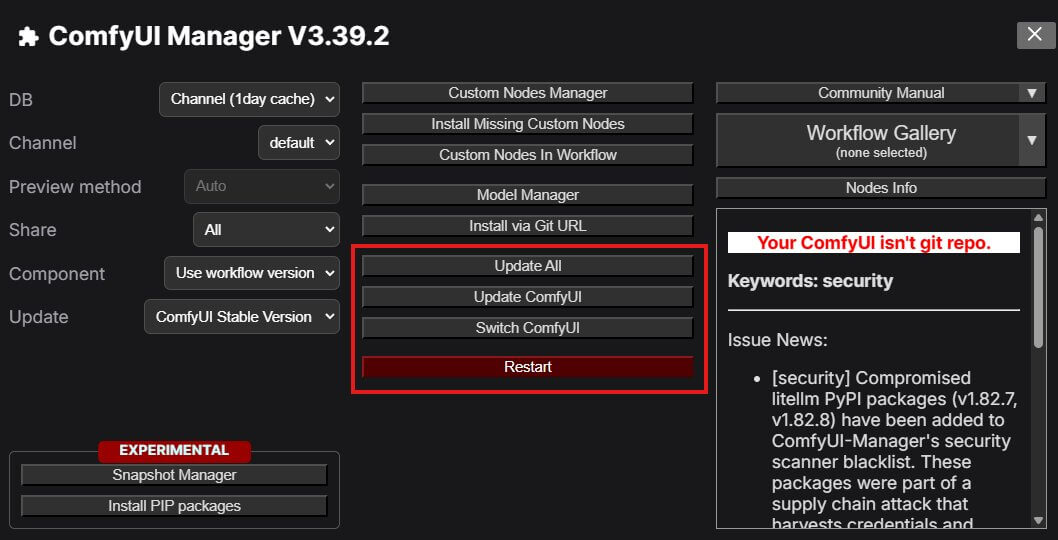
--enable-manager added to your launch arguments. Duplicate your run_*.bat file, add the flag, and use that copy going forward.Method 3: Git / Manual Install (Windows, macOS, Linux)
If you installed ComfyUI yourself with git clone into a Python virtual environment or conda environment, this is your method. It's the only approach that works identically on Windows, macOS, and Linux.
- Open a terminal and activate your environment.
- Navigate into your ComfyUI folder and pull the latest code.
- Update dependencies — this step is easy to skip and causes most "update didn't work" complaints.
- Restart ComfyUI.
git pull without pip install -r requirements.txt is the single most common git-update mistake. You'll get new core code with an outdated frontend — missing new UI elements, missing workflow templates, or missing node documentation. Always run both.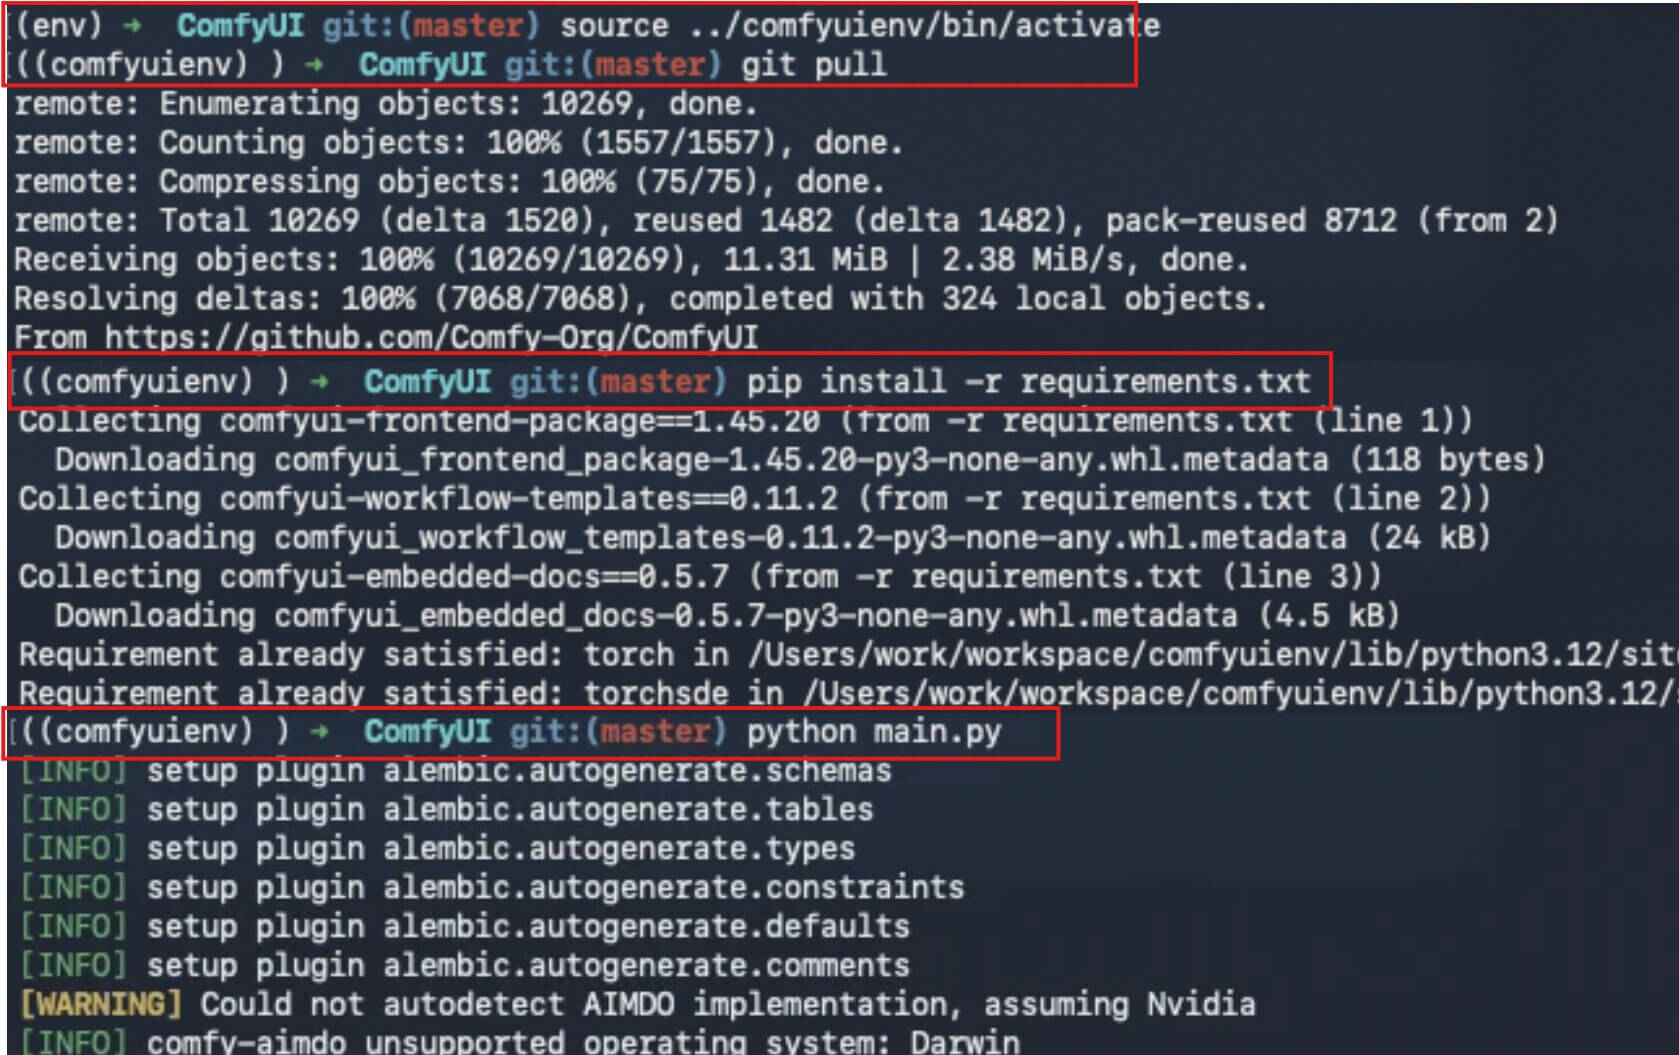
Rolling back to an older version
If an update breaks something, you can pin to any previous commit:
pip install -r requirements.txt — dependency versions can be tied to specific commits.Method 4: ComfyUI Desktop App
Desktop is the hands-off option — it's a standalone app currently in Beta for Windows and macOS (Apple Silicon), with no Linux build available yet. Updates are automatic by default.
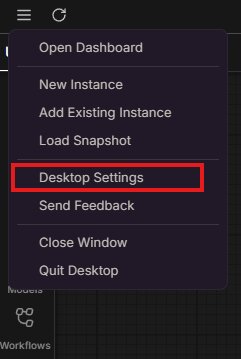
- Open ComfyUI Desktop and click the hamburger menu icon (☰) in the top-left corner of the window. A dropdown menu opens.
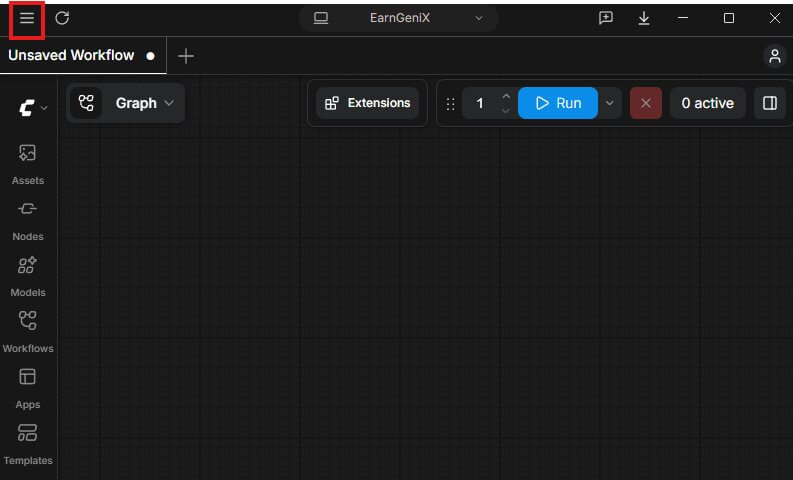
- In the dropdown, click Desktop Settings. The Settings window opens.
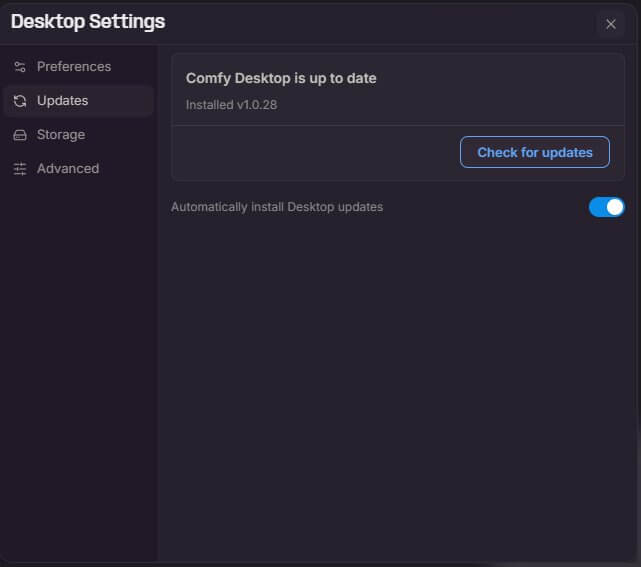
- Inside Settings, click the Update tab on the left side of the window.
- Click the Check for Updates button. If a new version is available, Desktop downloads it and prompts you to restart the app to finish installing it.
Which Method Should You Use?
| Install type | Best for | Update speed | Platform |
|---|---|---|---|
| Portable | Beginners on Windows who want the latest features | ~2 min, one script | Windows only |
| Desktop | Hands-off users who don't mind trailing a few weeks behind | Automatic | Windows, macOS (ARM) |
| Git | Anyone comfortable with a terminal, or non-Windows users | ~1 min, two commands | Windows, macOS, Linux |
| Manager | Updating custom nodes — not ComfyUI itself | Varies by node count | All |
Troubleshooting
"Update finished" but the new feature still isn't there
This almost always means the core code updated but the dependencies didn't. On git installs, re-run pip install -r requirements.txt. On Portable, run update_comfyui.bat again — it updates both together, so a single pass rarely misses this, but a second run resolves it if the first was interrupted. On Desktop, check whether the feature has actually reached the stable release track yet.
Portable update script does nothing or closes instantly
This is usually a GitHub connectivity issue — the script needs to reach GitHub to check for and download updates. Try again on a different network, or check whether your firewall or antivirus is blocking the command window. If you're on a restricted network, you may need a proxy for the git-based scripts to work.
"Update All" in Manager didn't bring the feature I wanted
This is expected — Manager's Update All only touches custom nodes. If you were expecting a core ComfyUI feature (like a new node type or UI change), use Method 1, 3, or 4 instead, matched to your install type.
pip install fails with a permissions or network error
On Windows, try running your terminal as Administrator. If the failure looks network-related, add a mirror to the install command, for example -i https://pypi.tuna.tsinghua.edu.cn/simple, which can help in regions where the default PyPI index is slow or blocked.
ComfyUI won't start after updating
Roll back first, then investigate. On git or Portable installs, use git log --oneline to find the previous working commit and git checkout <commit-hash> to return to it. Check the terminal output for the specific error — a missing package usually means a dependency update step was skipped.
Frequently Asked Questions
What to Do Next
Update ComfyUI, then check for missing nodes on your workflows.
After updating, reopen any workflow you use regularly. If you see a red "missing node" warning, that node was likely renamed or replaced in the update — search for it by name in ComfyUI Manager.
Published: 2026-07-07 · Last updated: 2026-07-07 · Covers ComfyUI Portable, Manager, Git, and Desktop installs
Join the discussion
Sign in to leave a comment or reply
No comments yet
Be the first to share your thoughts!