

Introduction
In this guide, you will learn how to install Stable Diffusion on a Mac with Apple Silicon (M1 or M2). Stable Diffusion is a powerful tool for generating AI art, and with the right setup, it runs smoothly on your Mac using Apple's Metal GPU acceleration.
Follow these steps in order and you will have a working Stable Diffusion installation ready to generate images by the end of this tutorial.
System Requirements
Before you begin, make sure you have the following:
Step 1: Install Homebrew
Homebrew is a package manager for macOS that makes it easy to install the tools Stable Diffusion needs. If you do not have it yet, install it now.
Copy the Homebrew install command
Copy the command below — you will paste it into Terminal in the next step.
/bin/bash -c "$(curl -fsSL https://raw.githubusercontent.com/Homebrew/install/HEAD/install.sh)"Open Terminal and paste the command
Open Terminal on your Mac (Applications → Utilities → Terminal), paste the command, and press Enter.
Enter your password and wait
You will be prompted for your Mac password. Enter it and let the installation process complete — it takes a few minutes.

Once Homebrew is installed, you will see instructions asking you to adjust your PATH. Copy the last three lines from your terminal output and paste them back into Terminal. They will look something like this:
==> Next steps:
- Run these commands in your terminal to add Homebrew to your PATH:
    echo >> /Users/YOUR_NAME/.zprofile
    echo 'eval "$(/opt/homebrew/bin/brew shellenv)"' >> /Users/YOUR_NAME/.zprofile
    eval "$(/opt/homebrew/bin/brew shellenv)"
Step 2: Install Required Packages
With Homebrew installed, run the following command to install all the packages that Stable Diffusion needs to run on your Mac — including Python 3.10, Git, cmake, protobuf, Rust, and wget.
brew install cmake protobuf rust python@3.10 git wget
Step 3: Clone the Stable Diffusion Repository
Create a folder for Stable Diffusion
Create a folder where you want to keep the installation — for example, a folder called AI_Art in your home directory.
Navigate to that folder in Terminal
Use the cd command to navigate into the folder you just created before running the clone command.
Clone the AUTOMATIC1111 repository
Run the command below to download the Stable Diffusion WebUI into your chosen folder.
git clone https://github.com/AUTOMATIC1111/stable-diffusion-webui
Step 4: Download and Add Model Files
Stable Diffusion needs a checkpoint model file to generate images. Download one from a trusted source and place it in the correct folder.
Download a Stable Diffusion 1.5 checkpoint
Download a .safetensors or .ckpt model file from Civitai or Hugging Face. DreamShaper is a popular beginner-friendly choice.
Move the model file to the correct folder
After downloading, move the .safetensors or .ckpt file into this folder inside your cloned repository:
stable-diffusion-webui > models > stable-diffusion
Step 5: Start the WebUI for Stable Diffusion
Now that everything is set up, you can launch the Stable Diffusion web interface. Navigate to the cloned folder first, then start the WebUI.
Navigate to the Stable Diffusion folder
In Terminal, change directory into your cloned repository folder:
cd stable-diffusion-webuiStart the WebUI
Run the launch script:
./webui.sh
Step 6: Generate Your First Image
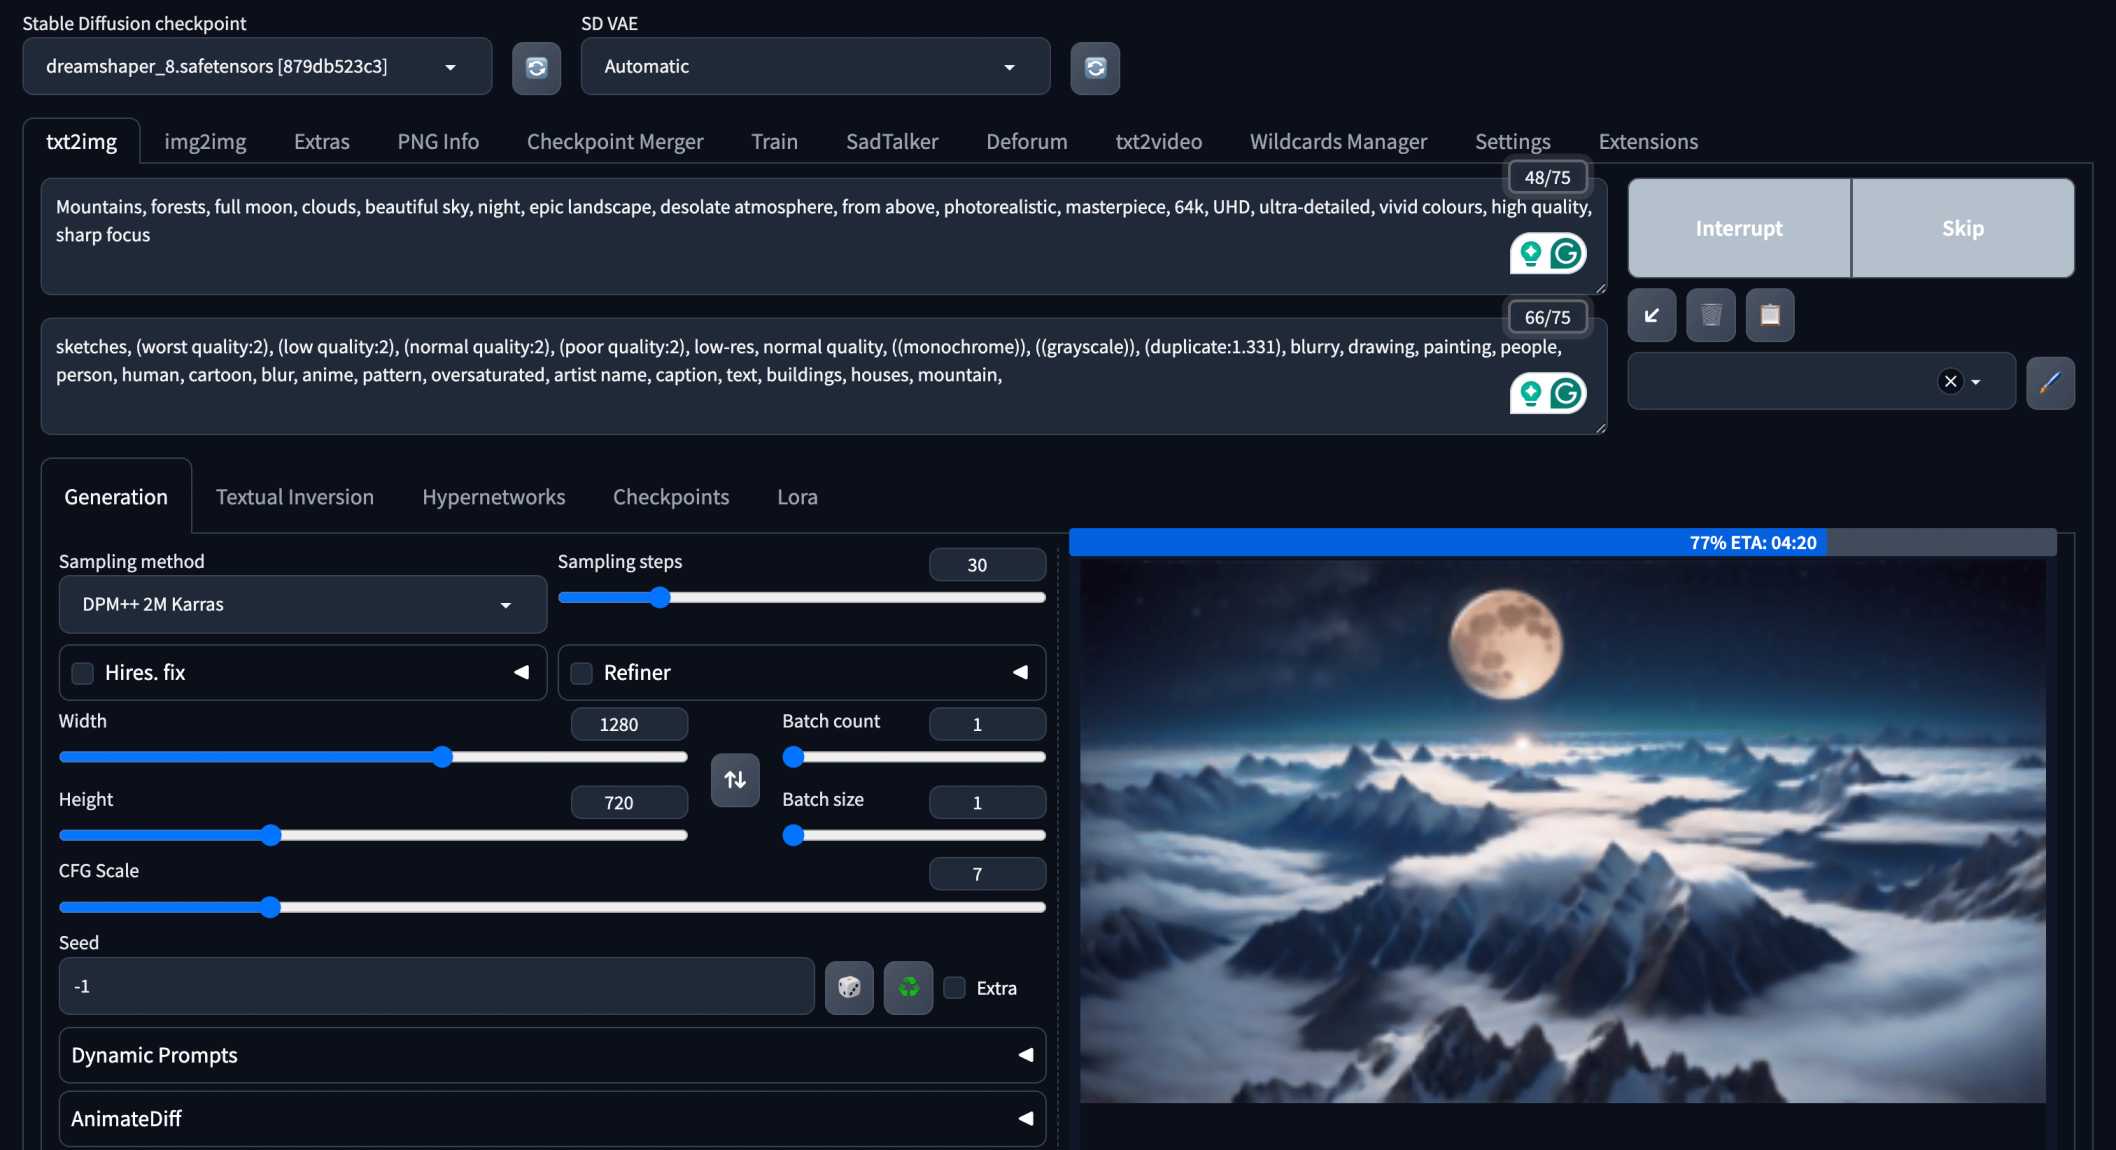
Once the WebUI opens in your browser, you are ready to generate your first AI image:
- Select the checkpoint model you downloaded in the model dropdown at the top.
- Type a prompt in the text box — for example: "a dog wearing a hat".
- Click Generate and wait for your image to appear.
Fixing Common Mac Errors
If you encounter a cross attention layer error or a blank output on M1/M2, restart the WebUI with the --no-half flag:
./webui.sh --no-halfIf the error persists, add debug logging:
./webui.sh --no-half --loglevel DEBUGIf you hit memory errors (MPS out of memory), limit the memory watermark:
PYTORCH_MPS_HIGH_WATERMARK_RATIO=0.7 ./webui.sh --no-half --loglevel DEBUG./webui.sh without any flags once the initial setup works correctly.Updating Stable Diffusion
To keep your installation up to date, pull the latest changes from GitHub. Navigate to your Stable Diffusion folder in Terminal and run:
cd stable-diffusion-webuigit pullThis fetches the latest commits from the AUTOMATIC1111 repository and updates your local installation to the most recent version of the WebUI.
Frequently Asked Questions
Conclusion
Installing Stable Diffusion on a Mac with Apple Silicon is straightforward once you have the right tools. Homebrew handles the dependencies, Git clones the WebUI, and the --no-half flag fixes most M1/M2-specific issues.
Now that you have a working setup, explore different checkpoint models on Civitai, experiment with prompts, and try LoRA models to control your image style. The AUTOMATIC1111 WebUI has dozens of extensions to extend what Stable Diffusion can do.
Join the discussion
Sign in to leave a comment or reply
No comments yet
Be the first to share your thoughts!