
⚡ Quick Answer
Qwen Image 2.1's GGUF files let it run on smaller graphics cards, but the standard ComfyUI-GGUF custom node throws an "Unknown model architecture!" error when you try to load it. Use the molbal/ComfyUI-GGUF fork instead — it loads Qwen Image 2.1 correctly. This tutorial walks through the exact files, node, and settings from a tested setup, plus the three most common errors you might hit.
Qwen Image 2.1 came out on September 20, 2026, and within a day the community had released GGUFversions of it — a compressed file format that shrinks an AI model so it fits in less VRAM (the memory on your graphics card). That's good news if your card can't run the full-size model. The catch: if you install the GGUF loader you already have from another workflow, Qwen Image 2.1 won't load, and you'll see a red error box instead of an image.
This guide shows exactly which files to download, which custom node actually works, and how to wire everything together — based on a workflow that's already been tested end to end, not a guess.
What Is a GGUF Version, and Why Use It?
GGUF is a file format that stores an AI model in a compressed, quantized form (shrunk down to use less memory, at a small cost to quality) — each number inside the model is stored using fewer bits than the original, which shrinks the file and lowers how much VRAM (the memory on your graphics card) it needs to run. The trade-off is a small amount of quality loss, which gets larger the more aggressively the model is compressed.
For Qwen Image 2.1, this means the difference between needing a high-end graphics card for the full-size model and running it on something far more modest — as long as you use a node that actually supports it, which is the problem this guide solves.
New to the model itself? What Is Qwen Image 2.1 covers the full picture — parameters, license, and how it compares to Nano Banana 2 — before you get into GGUF-specific setup here.
What You Need Before You Start
Gather these four files and one custom node before opening ComfyUI. Each filename below is exact — model files get renamed often, so typing it exactly as shown saves you a failed download.
The Diffusion Model (the GGUF File Itself)
This is the compressed version of Qwen Image 2.1 — the model that actually generates your images. You have two realistic options:
| File | Size | What It Is |
|---|---|---|
qwen-image-2.1-Q8_0.gguf | ~7.6 GB | Standard 8-bit quant — the safer default on the molbal fork, minimal quality loss |
Qwen-Image-2.1-Q4_K_M-HQv3.gguf | ~4.6 GB (verify against source repo) | Smaller "_K" quant — less VRAM, but see the warning below before using it |
Download either file from a GGUF repository such as Abiray/Qwen-Image-2.1-GGUF on Hugging Face and place it in:
ComfyUI/models/diffusion_models/— that folder is for the standard safetensors versions of Qwen Image 2.1 (int8/bf16), not the GGUF version. Putting a GGUF file there is the most common reason it won't show up in the loader dropdown.Note: unlike the text encoder and VAE below, these GGUF files are third-party community conversions hosted across several different repositories, not a single official Comfy-Org source — that's why they're linked as regular references here instead of direct download buttons.
The Text Encoder
This is the part of the model that reads your written prompt and turns it into something the image model can understand. File name: qwen3vl_8b_w4a8.safetensors
Place it in: ComfyUI/models/text_encoders/
The VAE
The VAE (the component that converts the model's internal, compressed representation of an image back into normal pixels you can see) file: qwen_image_2.1_vae_bf16.safetensors
Place it in: ComfyUI/models/vae/
Where Everything Goes
unet/ folder is specific to GGUF-format files loaded through the molbal fork. If you followed the main Qwen Image 2.1 guide or the 10 reference images guide first, those use the standard safetensors files in diffusion_models/instead — the two setups don't share a folder.Which ComfyUI-GGUF Fork Do You Actually Need?
If you already generate images with other GGUF models, you probably have a custom node (an add-on someone in the community built that adds new blocks you can use in ComfyUI) called ComfyUI-GGUFinstalled. Right now, three different versions of this node exist, and they don't all support Qwen Image 2.1:
- city96/ComfyUI-GGUF — the original version most people already have. It doesn't yet recognize Qwen Image 2.1 and shows an "Unknown model architecture!" error.
- leejet/ComfyUI-GGUF — an alternative fork some GGUF file creators recommend.
- molbal/ComfyUI-GGUF — the fork this tutorial's tested workflow actually uses. It loads Qwen Image 2.1 without errors.
This guide uses the molbalfork because it's the one confirmed working in the tested setup behind this tutorial.
How to Install the Fork (Remove the Old One First)
- Open the custom_nodes folder inside your ComfyUI installation. On Windows this is usually something like
ComfyUI\custom_nodes. - Look for a folder named ComfyUI-GGUF. If it exists, delete it completely before continuing — installing the new fork on top of the old one will cause conflicts, since they share the same folder name.
- Open a terminal (Command Prompt on Windows, Terminal on Mac) inside your custom_nodes folder and run the command below.
- Make sure your ComfyUI itself is on version 0.27.0 or newer — this fork requires it. Check your version in the ComfyUI Manager menu.
- Close ComfyUI completely and reopen it. The new node won't appear until you restart.
You should see text scrolling as the files download, ending with a message like Resolving deltas: 100%. That means it worked.

How to Build the Workflow
With your files downloaded and the node installed, here's how to connect everything. Each step explains why it matters, not just what to click.
(qwen_image_2_1_gguf_t2i.json)Step 1: Load the Diffusion Model
- Right-click an empty area of the ComfyUI canvas, choose Add Node, and look under the bootleg category (this is the category the molbal fork's nodes are grouped under — the unusual name is just the maintainer's choice).
- Select Unet Loader (GGUF). In its dropdown, choose your GGUF file —
qwen-image-2.1-Q8_0.ggufor your Q4_K_M file, from themodels/unet/folder. This node loads the compressed model into memory so the rest of the workflow can use it.
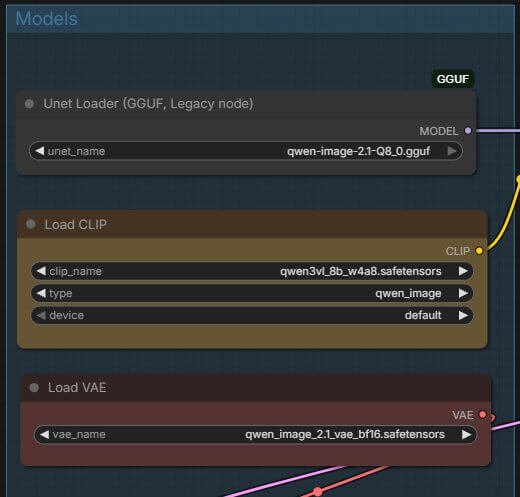
Step 2: Load the Text Encoder and VAE
- Add a CLIPLoader node. Set
clip_nametoqwen3vl_8b_w4a8.safetensors, and set thetypedropdown toqwen_image. This tells ComfyUI which format to expect from this text encoder — picking the wrong type here is a common reason prompts get ignored or produce broken images. - Add a VAELoader node and select
qwen_image_2.1_vae_bf16.safetensors. The VAE needs to be loaded separately from the main model — it isn't bundled inside the GGUF file.
Step 3: Add Your Prompt
- Add a TextEncodeQwenImage21 node and connect its
clipinput to the output of your CLIPLoader node. - Type your prompt into the
promptfield — describe the image you want in plain English. Leavenegative_promptblank unless you specifically want to describe things to avoid. - Set
resolutionto1024for a standard starting point.
Step 4: Set Your Resolution and Sampling Settings
- Add a ResolutionSelector node. This decides the shape and size of your output image. In the tested setup:
aspect_ratio=16:9 (Widescreen),megapixels=3.2,multiple=8. - Add an EmptyLatentImage node and connect its
widthandheightinputs to the outputs of the ResolutionSelector node. This creates a blank canvas at the size you chose, which the model fills in. - Add a KSampler node (the node that actually generates the image, step by step, from noise). Connect your model, positive/negative conditioning from TextEncodeQwenImage21, and your latent image. Use these tested values: seed 42, control after generate fixed, steps 25, cfg 1, sampler euler, scheduler simple, denoise 1.
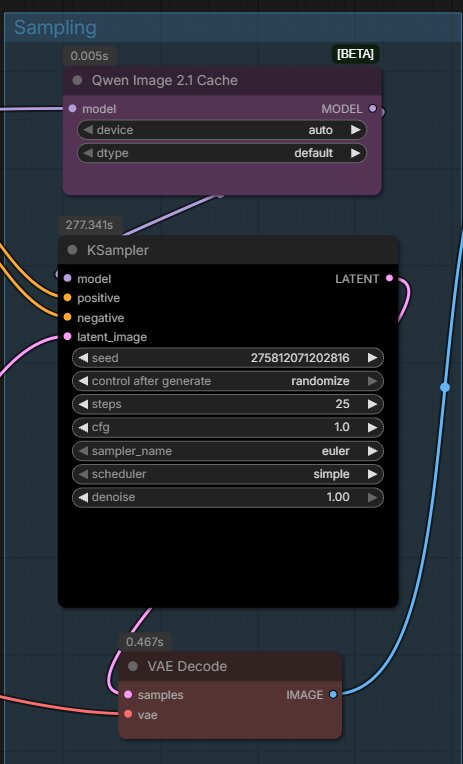
Step 5: Generate and Save Your Image
- Connect your KSampler's output to a VAEDecode node (connect the VAE from your VAELoader node too). This turns the model's internal output back into a normal image.
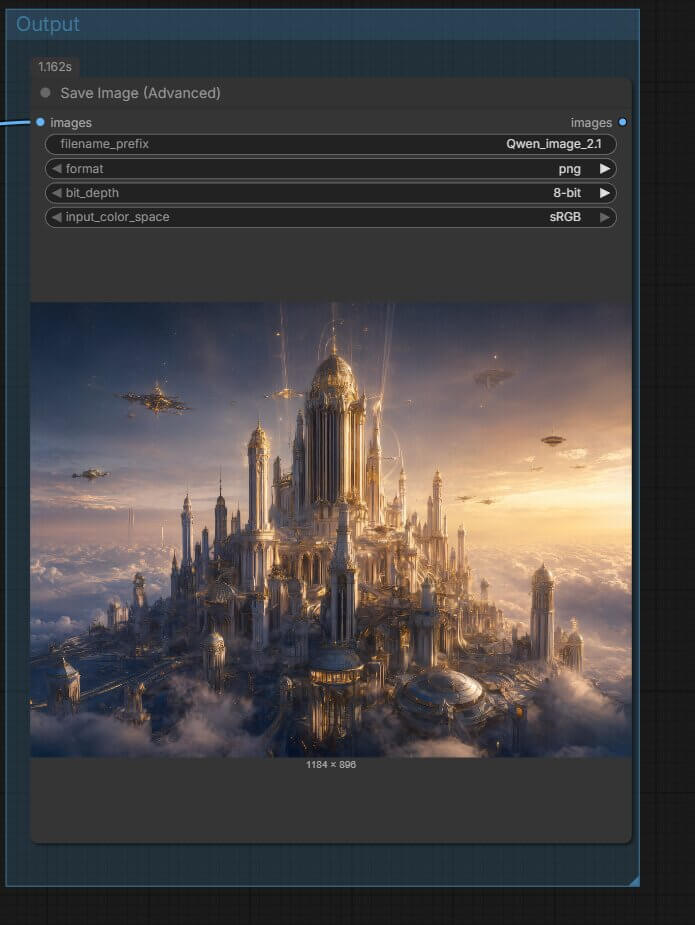
- Connect that to a SaveImageAdvanced node. Set the filename prefix to something recognizable, like
Qwen_image_2.1, format topng, bit depth to8-bit, and color space tosRGB. - Click the orange Queue Prompt button in the bottom-right of the screen. A progress bar appears above it, and your image saves automatically to ComfyUI's output folder once it finishes.
Troubleshooting
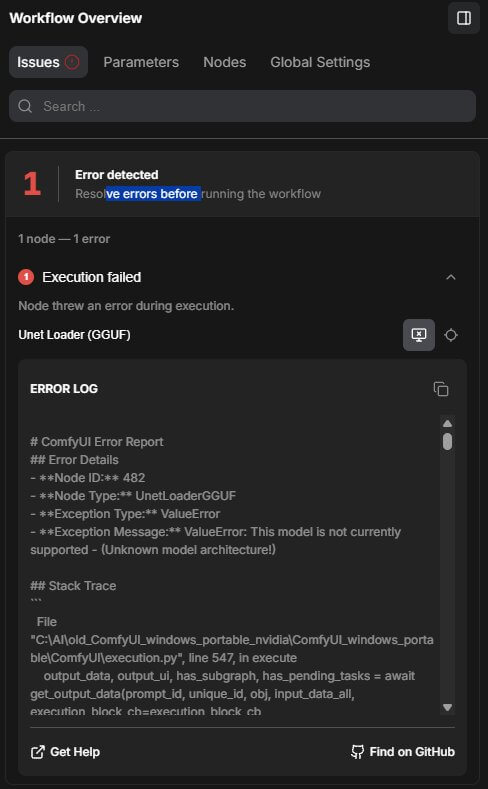
"Unknown Model Architecture!"
What causes it: you have the older city96/ComfyUI-GGUF node installed, and it doesn't recognize Qwen Image 2.1's file structure yet.
- Delete the existing
ComfyUI-GGUFfolder fromcustom_nodes. - Clone the
molbal/ComfyUI-GGUFfork instead, following the install steps above. - Restart ComfyUI completely.
Q8_0 Shows a Shape Mismatch Error
What causes it: some early Q8_0 conversions from certain community repositories have a reported mismatch (shown as something like [136] vs [128] in the error text). This has been reported by early adopters on at least one GGUF repository, though it doesn't affect every Q8_0 file from every source.
- Try downloading a Q8_0 file from a different repository — not every conversion has this issue.
- If it persists, fall back to a Q4_K_M, Q5_K_M, or Q6_K file instead, keeping in mind the slower-generation caveat below.
Generation Is Much Slower Than Expected
What causes it: the molbal fork doesn't fully support "_K" quantization types (like Q4_K_M) on the diffusion model itself — only on text encoders. A "_K"-quantized diffusion model can still load and generate, but much more slowly than a standard format like Q8_0.
- Switch to
qwen-image-2.1-Q8_0.ggufas your diffusion model if generation feels unusually slow. - Only use a "_K" quant like Q4_K_M if your GPU genuinely can't fit Q8_0 in memory, and accept it will run slower in exchange for the smaller file size.
Frequently Asked Questions
What to Do Next
Get Qwen Image 2.1 GGUF generating reliably, then try editing your own photos with it.
Once your first generation works, editing real photos — backgrounds, objects, outfits — is the fastest way to see what this model can actually do, including the claims it makes against Nano Banana 2.
Published: 2026-09-22 · Last updated: 2026-09-22 · Workflow structure verified against a tested ComfyUI setup using the molbal/ComfyUI-GGUF fork.
Join the discussion
Sign in to leave a comment or reply
No comments yet
Be the first to share your thoughts!