
⚡ Quick Answer
Qwen Image 2.1 is a new AI image model from Alibaba's Qwen team. It can create images from text and edit existing photos — including making backgrounds truly transparent — all with one model. You can download it and run it for free, but the license only allows research or evaluation use, not commercial use. On Qwen's own tests, it beats Nano Banana 2 in several categories.
If you've seen "Qwen Image 2.1" mentioned today and you're wondering what it actually is, whether it's free, and whether it's worth setting up in ComfyUI (the node-based interface for Stable Diffusion, where you build image-generation workflows by connecting blocks called nodes), this article walks through all of it in plain English.
What Is Qwen Image 2.1?
Qwen Image 2.1 is an AI image model released by Alibaba's Qwen team. "AI image model" here means software that turns a text description into a picture, or takes an existing picture and changes it based on your instructions. Qwen Image 2.1 does both jobs — generating new images and editing existing ones — inside one single model, instead of needing two separate downloads.
The model has 7 billion parameters(the internal numbers the model adjusts during training — think of them as the "settings" the model learned, not something you touch yourself) in the part that actually draws the image. That's small compared to a lot of AI image models, which is part of why it runs faster than you'd expect for its quality.
What's New in This Release?
Four things stand out in this release:
- It's lighter and faster. The architecture is built to deliver strong image quality without needing huge amounts of computing power.
- Native transparency. Qwen Image 2.1 can generate an image with a truly transparent background built in — no separate background-removal step needed. It can also pull a subject out of a normal photo onto a transparent layer.
- Up to 10 reference images. Feed the model up to 10 separate photos at once and it will combine them into one coherent image. We go much deeper on this in the combining up to 10 reference images into one photo tutorial.
- Better textures and typography. Text inside images, portrait lighting, and fine detail are all improved compared to the previous Qwen Image Edit release.
Is Qwen Image 2.1 Free to Use?
Yes and no — and this is the part most people are getting wrong right now.
You can download Qwen Image 2.1 and run it on your own computer at no cost. That part is free. But the license (the legal document that says what you're allowed to do with the model) only permits non-commercial use — meaning research or evaluation only. It does not give you permission to use the model for commercial projects, like a paid client project or a monetized product, without contacting Alibaba for a separate license.
model-business@notice.qwencloud.com. Whether this restriction extends to images the model produces, not just the model itself, isn't explicitly spelled out — worth emailing them directly if commercial use matters to you. This isn't legal advice.If you want to check the exact wording yourself, it's published as the Qwen Research License Agreement on Hugging Face.
What Changed From the Old Qwen-Image License?
The original Qwen-Image model (released back in 2025) used the Apache 2.0 license — a genuinely permissive license that allowed commercial use with basically no restrictions. A lot of older guides and comparison articles online are still describing Qwen models this way, which is where the confusion is coming from.
Qwen Image 2.1 is different. It's licensed under the Qwen Research License Agreement, which is a much more restrictive, non-commercial-only license. So if you read an article saying "Qwen Image is free to use commercially," check which version it's actually talking about — that claim is true for the original Qwen-Image, but not for Qwen Image 2.1.
Does Qwen Image 2.1 Actually Beat Nano Banana?
According to Qwen's own published comparison, yes — Qwen Image 2.1 outperforms Nano Banana 2 in several categories. Worth being upfront here: that's a self-reported benchmark from Qwen, not an independent third-party test. Self-reported numbers from the company that made the model are worth taking with a grain of salt — they tend to pick the comparisons that make their model look best.
It's also not a clean win across every category: Nano Banana 2 accepts more reference images per edit (14) than Qwen Image 2.1 does (10). That said, hands-on impressions from people already using it in ComfyUI back up the general claim in a practical sense: better identity preservation (keeping a person or product looking consistent across edits), stronger reference-image handling, and — because of native transparency — it removes an entire step (background removal) that used to need a separate tool. See editing real photos with Qwen Image 2.1 for real edit examples that put this to the test.
What Model Files Do You Need?
Qwen Image 2.1 doesn't use one single file the way older checkpoint models sometimes did — it needs three separate files, each going into its own ComfyUI folder. Get all three from the official Comfy-Org/Qwen-Image-2.1 repository:
- Hugging Face: Comfy-Org/Qwen-Image-2.1
- ModelScope: Comfy-Org/Qwen-Image-2.1 — use this if Hugging Face is slow or blocked from your region
The Diffusion Model
This is the part of the model that actually generates your images. You have two versions to choose from:
| File | Goes In | What It Is |
|---|---|---|
qwen_image_2.1_bf16.safetensors | diffusion_models/ | The full-quality version of the main model. Gives slightly better output than int8_convrot below, but needs noticeably more VRAM. |
qwen_image_2.1_int8_convrot.safetensors | diffusion_models/ | A compressed version using roughly half the memory of bf16, with a small, usually minor drop in quality. The safer default if you’re not sure which to pick. |
The Text Encoder
This is the part of the model that reads your written prompt and turns it into something the image model can understand.
| File | Goes In | What It Is |
|---|---|---|
qwen3vl_8b_bf16.safetensors | text_encoders/ | Reads your prompt and turns it into something the diffusion model can follow. Pairs with the bf16 diffusion model. |
qwen3vl_8b_int8_convrot.safetensors | text_encoders/ | The compressed version of the text encoder. Pairs with the int8_convrot diffusion model. |
The VAE
The VAE (the component that converts the model's internal, compressed representation of an image back into normal pixels you can see) is the same file regardless of which diffusion model you picked above:
| File | Goes In | What It Is |
|---|---|---|
qwen_image_2.1_vae_bf16.safetensors | vae/ | Converts the model’s internal output back into a normal image file you can actually see. Same file regardless of which diffusion model you pick. |
Model Storage Location
Once downloaded, your ComfyUI folder should look like this:
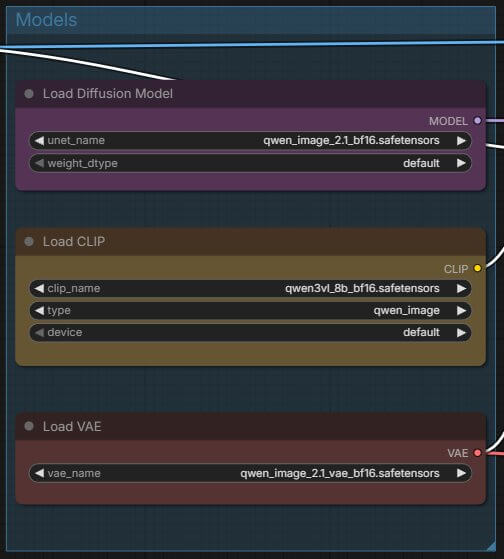
unet/, not diffusion_models/). See running Qwen Image 2.1 on a smaller GPU for the exact files and settings.There's no official minimum VRAM published for Qwen Image 2.1 yet. As a data point: sibling tutorials on this site tested comfortably on an RTX 4090 (24 GB) using these files. If you're on a smaller card, start with int8_convrot rather than bf16.
How to Generate Your First Image With Qwen Image 2.1 in ComfyUI
This is a quick-start to get one image out using text-to-image. For a deeper walkthrough of editing real photos, see editing real photos with Qwen Image 2.1.
Step 1: Get Your Model Files
Update ComfyUI through ComfyUI Manager first — Qwen Image 2.1's nodes won't appear on an older version. Then download the diffusion model, text encoder, and VAE files covered in the "What Model Files Do You Need?" section above, and place each one in its matching folder.
Step 2: Download This Workflow
Skip building anything from scratch — download the text-to-image workflow below and drag the file directly onto the ComfyUI canvas. It loads instantly with every node already placed and connected, pointed at the model files from Step 1.
(qwen_image_2_1_t2i.json)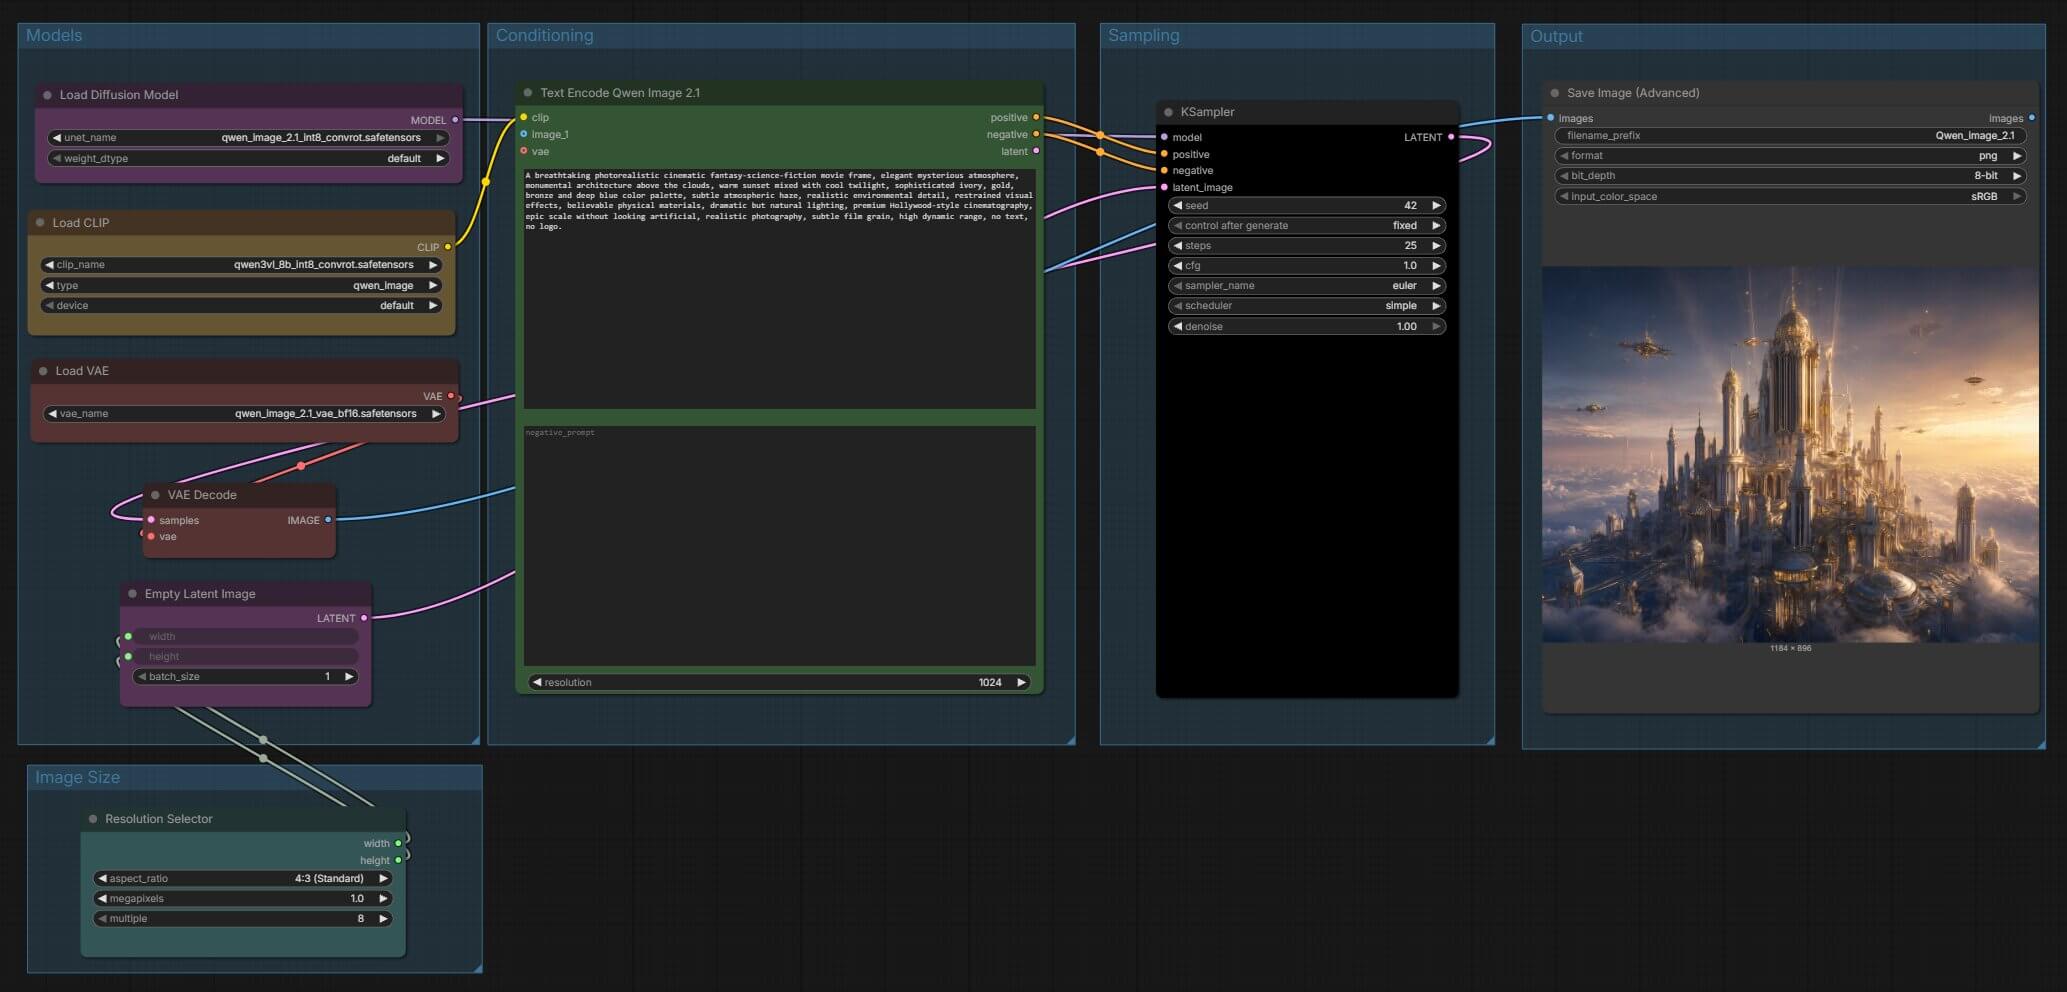
Step 3: Set Your Steps, CFG, and Sampler
The workflow above already ships with these values set, but here's what each one does:
- Steps: 25 — this controls how many passes the model makes while generating the image. More steps generally means more detail, but takes longer.
- CFG: 1 — this controls how strictly the model follows your prompt. Qwen Image 2.1 is tuned to work well at a low CFG value of 1, unlike a lot of older models that need it much higher. At this setting, the negative prompt box has no effect.
- Sampler: Euler — this is the specific method the model uses to build the image step by step. Euler is a solid, reliable default here.
Why these specific numbers? Qwen Image 2.1 doesn't have a "Turbo" speed-boosting add-on (called a LoRA— a small file that adjusts a model's behavior without retraining the whole thing) available yet at the time of writing. Once one is released, these settings will likely change to allow far fewer steps.
Step 4: Queue the Prompt and Read the Result
Click the Blue RUN button in the top-right corner of the ComfyUI screen. A progress bar will appear underneath it, and your image generates — expect somewhere around 30 seconds to a couple of minutes, depending on your resolution and hardware.

If you're generating a transparent image, make sure your prompt uses transparency-specific wording (describing the image as having an alpha channel and a transparent background), and double-check that your Save Image node is set to save as an 8-bit PNG — PNG is the file format that actually supports transparency; JPEG does not.
Troubleshooting
Missing Node: TextEncodeQwenImage21
What causes it: your ComfyUI installation is older than the version that added Qwen Image 2.1 support, so it doesn't recognize this node yet. This is extremely common right after a model's release day.
How to fix it: open ComfyUI Manager, click Update ComfyUI, restart it completely, and reload the workflow. Also double-check your model files are in the exact folders covered in the "What Model Files Do You Need?" section above.
CUDA Out of Memory
What causes it: you're using the bf16 (full-precision) version of the model, which needs more VRAM than the int8_convrot version.
How to fix it: switch to the int8_convrot diffusion model and matching text encoder instead of bf16. If you're still running out of memory, follow running Qwen Image 2.1 on a smaller GPU for GGUF settings built specifically for lower-VRAM cards.
Output Isn't Actually Transparent
What causes it: either your prompt didn't include the specific wording the model needs to trigger transparent output, or your Save Image node is saving as a format that doesn't support transparency.
How to fix it: make sure your prompt explicitly describes the image as having an alpha channel and a transparent background, and confirm your Save Image node is set to PNG, not JPEG.
Where Qwen Image 2.1 Goes Further: The Full Workflows
This article covers the basics — what Qwen Image 2.1 is, what's new, the license, the model files, and how to generate your first image. Three follow-up tutorials go much deeper into specific things this model can do.
Walks through using the model’s editing side on your own photographs — changing backgrounds, swapping outfits, and making local edits with masks or painted annotations, while keeping the original subject’s identity intact. This is the workflow that puts the "beats Nano Banana" claim to a real, practical test, with real before/after examples.
Built specifically for anyone whose graphics card can’t handle bf16 or even int8_convrot comfortably. Covers the GGUF version of the model, the specific node fork it needs, and the exact settings that make it run well.
Covers Qwen Image 2.1’s multi-reference feature in full — building a single coherent group photo from separate individual portraits, or assembling a complete outfit from separate shots of clothing, shoes, and accessories.
Frequently Asked Questions
What to Do Next
Download the model files and workflow above, then generate your first image today.
That's the fastest way to see it working on your own machine. Once it works, editing your own photos is the best way to see what all the Nano Banana comparisons are actually about.
Published: 2026-09-22 · Last updated: 2026-09-22 · License details verified against the Qwen Research License Agreement on Hugging Face.
Join the discussion
Sign in to leave a comment or reply
No comments yet
Be the first to share your thoughts!