
⚡ Quick Answer
Qwen Image 2.1 is a free, open-weight AI model that edits photos using plain-English instructions, right inside ComfyUI. Type what you want changed — a new background, a removed object, a different outfit — and it edits the photo in under a minute on a good GPU. It's brand new, and Qwen's own release benchmark claims it scores higher than Google's Nano Banana 2.0, though that hasn't been independently confirmed yet.
Qwen Image 2.1 dropped just a day or two ago, and it's already making noise: Alibaba's own release benchmark claims it beats Nano Banana 2.0 — Google's well-known photo-editing AI — on image quality. That's Qwen's number, not an independent test, so treat it as a strong claim worth checking yourself rather than a settled fact.
What isn't in question is that it's free, it's open-weight, and it runs directly in ComfyUI (a free, node-based program for running AI image and video models). This guide shows you exactly how to install it and run your first image edit, step by step, with zero assumed experience.
What Is Qwen Image 2.1?
Qwen Image 2.1 is Alibaba's new diffusion model (an AI system trained to build an image gradually, starting from random noise and refining it step by step until it matches a text description). For the full picture — its 7B parameters, its license, and real VRAM numbers — see what Qwen Image 2.1 is. For this tutorial, the two things that matter are: it edits an existing photo using a text prompt, and it can write a real transparent background directly into the result, with no separate cutout tool needed.
What You Need Before You Start
Before you touch ComfyUI, here's exactly what to download. Free tools only — nothing here costs money.
An Up-to-Date ComfyUI
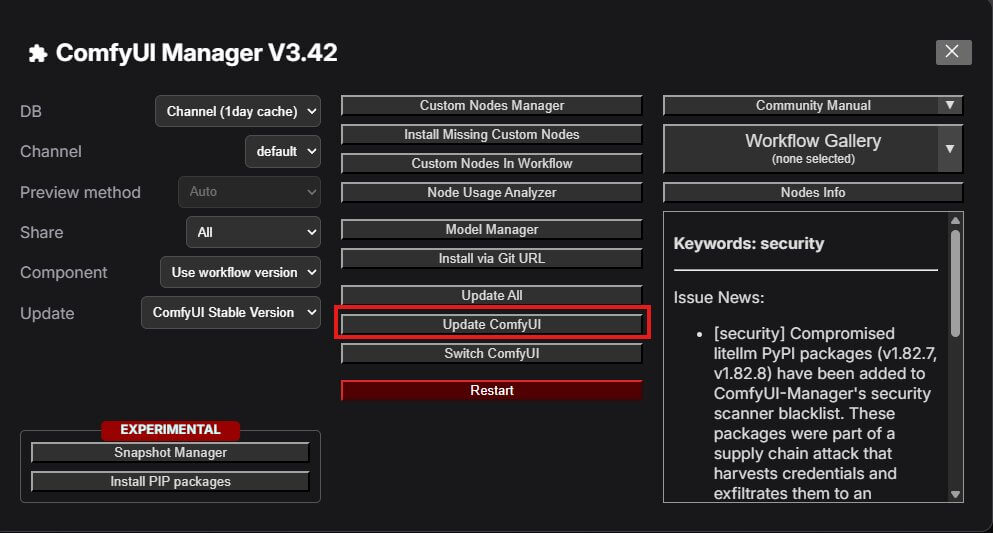
Qwen Image 2.1 support was added to ComfyUI very recently, so an older install won't recognize it. Open ComfyUI, click Manager in the top toolbar, then Update ComfyUI, then restart it.
The Three Model Files
Each of these goes in a different ComfyUI models folder. This guide uses the int8versions (a smaller, compressed version of the model — it uses roughly half the memory of the full-size "bf16" version with very little quality loss) so it runs on more graphics cards.
| File | Goes In | What It Is |
|---|---|---|
qwen_image_2.1_int8_convrot.safetensors | diffusion_models/ | The diffusion model itself — compressed to roughly half the memory of the full bf16 version, with very little quality loss. |
qwen3vl_8b_int8_convrot.safetensors | text_encoders/ | Reads your text prompt and turns it into something the image model can follow. |
qwen_image_2.1_vae_bf16.safetensors | vae/ | Converts the model’s internal image data back into an actual picture file, and back again. |
Get all three from the official Comfy-Org/Qwen-Image-2.1 page on Hugging Face.
(qwen_image_2.1_int8_convrot.safetensors)(qwen3vl_8b_int8_convrot.safetensors)(qwen_image_2.1_vae_bf16.safetensors)A quick word on terms in these filenames: Qwen Image 2.1 is a diffusion model, not a checkpoint (the older kind of single-file model ComfyUI used before this style became common) — it loads through a different node, covered in the next section. You'll also see VAE and safetensors used constantly in ComfyUI — the file table above defines both in plain terms.
A GPU With Enough VRAM
VRAM (video memory — the memory built into your graphics card, separate from your computer's regular RAM) is what actually holds the model while it runs. This was tested on an RTX 4090 (24 GB VRAM), and edits finished in under a minute. There's currently no official minimum-VRAM number published for Qwen Image 2.1 — if you're on a smaller card, start with the int8 files above rather than the full bf16 versions, since they need less memory.
If your card is tighter on VRAM and you want to try a heavily compressed GGUF (a further-compressed model format, generally the smallest option) version instead, see running Qwen Image 2.1 on a smaller GPU for exact files and tested settings.
Download and Load the Image Edit Workflow
Skip building anything from scratch — download the tested workflow below and drag the file directly onto the ComfyUI canvas. It loads instantly with every node already placed and connected.
(qwen_image_2_1_image_edit.json)Once it's loaded, you'll see the loader nodes, an image input, a prompt box, and a preview panel already wired together — the next section walks through pointing each one at your own files and photo.
How Do You Set Up Your First Edit? (Step-by-Step)
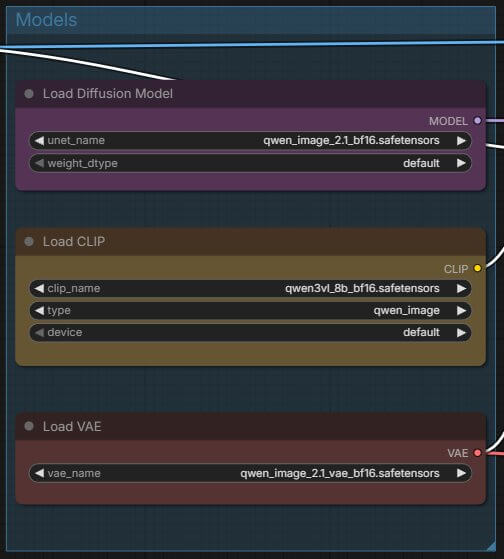
Load Your Model, Text Encoder, and VAE
The workflow comes with three loader nodes already placed — you just need to point each one at the right file.
- Find the node labeled Load Diffusion Model. Click the dropdown inside it and select
qwen_image_2.1_int8_convrot.safetensors. - Find the CLIPLoader node — this loads the CLIP (the part of the model that reads your text prompt and turns it into something the image model understands) model. Select
qwen3vl_8b_int8_convrot.safetensors. - Find the VAELoader node and select
qwen_image_2.1_vae_bf16.safetensors.
You should see each dropdown now show the filename you picked, with no red error border around the node.
Add Your Reference Image
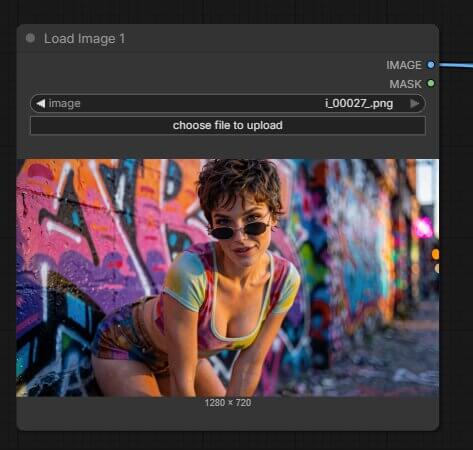
- Find the Load Image node connected to the input labeled image_1. Click the node, then click Choose File (or drag your photo directly onto the node).
- Select the photo you want to edit. It appears as a small thumbnail inside the node once loaded.
image_1 is always the photo being edited. If the workflow has extra image slots (image_2, image_3, and so on), those are for additional reference photos — for example, a second photo showing a jacket you want to add to the first photo's subject. To use all the way up to 10 reference photos at once, see combining up to 10 reference images into one photo.
Write Your Edit Prompt (and What <image1> Does)
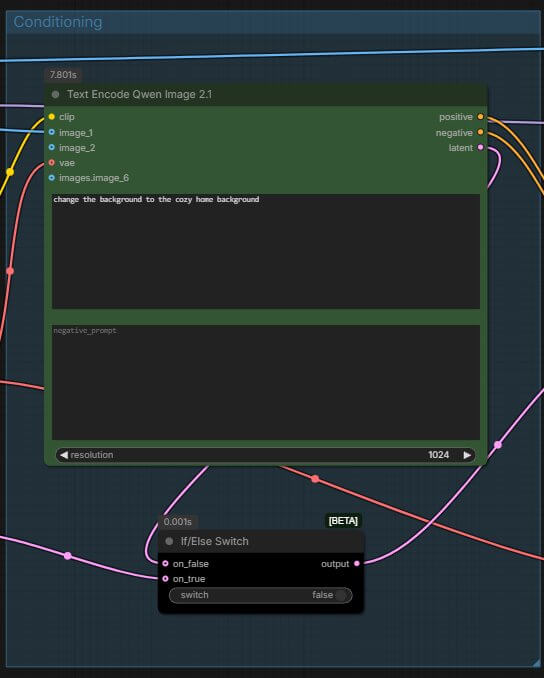
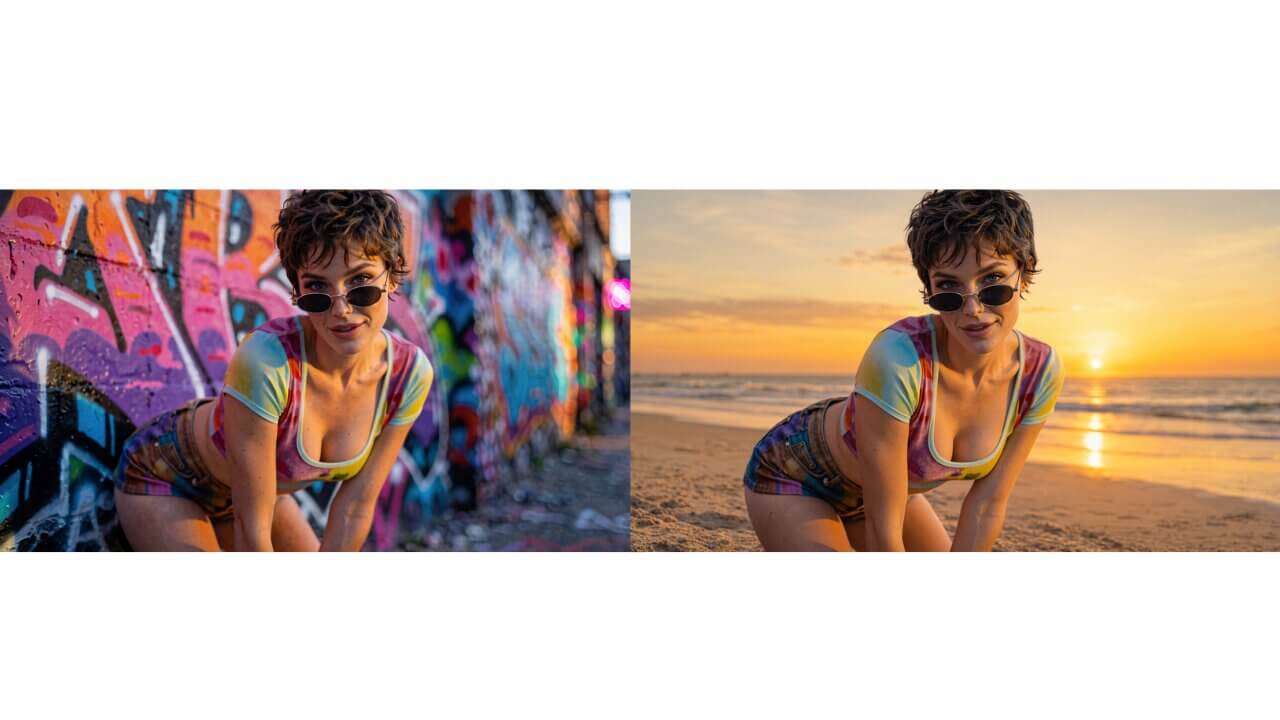
- Find the text box node labeled prompt (or Text Encode Qwen Image 2.1). Click inside it and type your instruction — for example: "Change the background to a sunset beach."
- If you're using more than one reference image, mention each one by number in your prompt using this format:
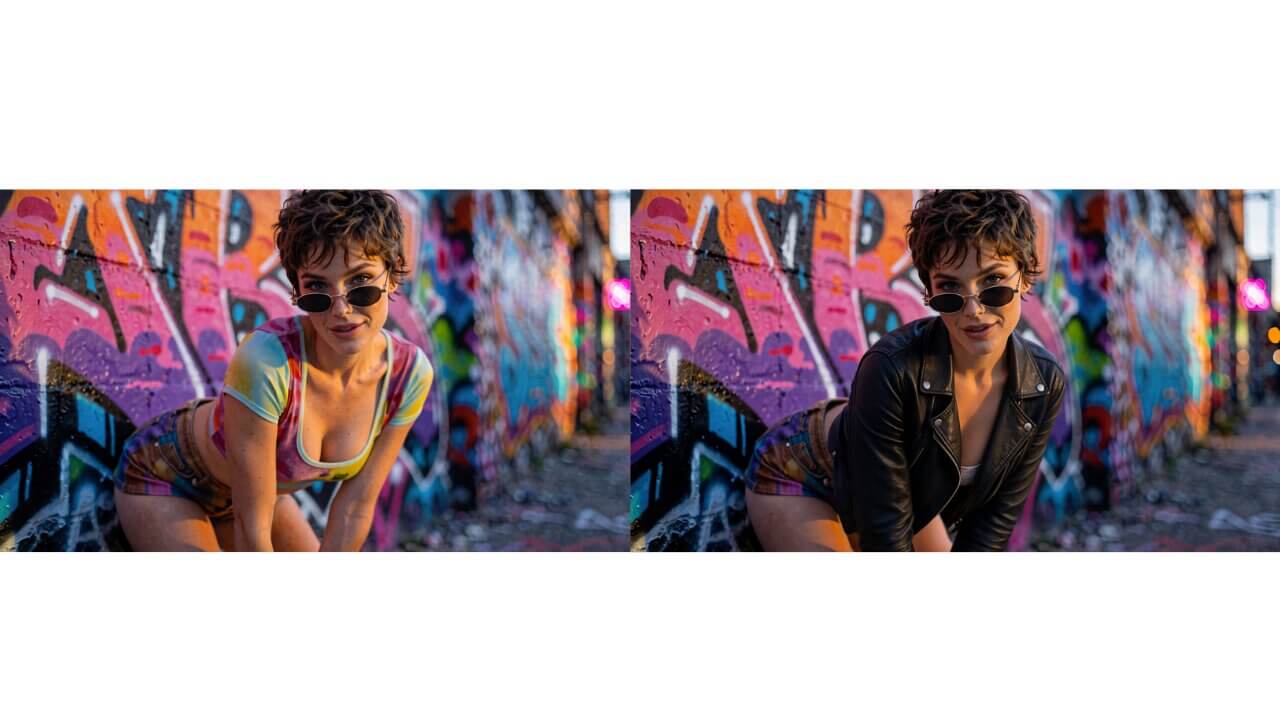
<image1>,<image2>, and so on — for example: "Put the jacket from <image2> onto the person in <image1>." With a single image, you don't need to add<image1>at all. - Leave the negative_prompt box empty. It's a place to list things you don't want in the result, but Qwen Image 2.1's official setup keeps cfg (a setting that controls how strictly the model follows your prompt) at 1, and at that setting the negative prompt has no effect.
What Does the Resolution Setting Actually Do?
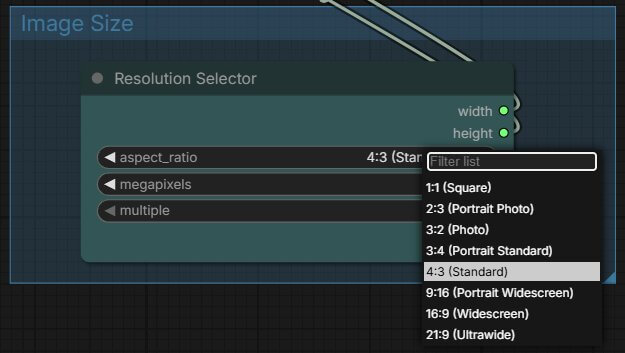
This one confuses a lot of people, so here's the plain version: resolution isn't a width or a height — it's a total pixel budget.
- Set to 0 (the default): the output keeps image_1's own size, rounded to the nearest multiple of 32 pixels. Nothing gets resized.
- Set to 1024: the output is resized toward roughly 1024×1024 pixels' worth of detail, while keeping image_1's original aspect ratio (so a tall photo stays tall — it doesn't get squashed into a square).
If your edited result looks shifted, cropped oddly, or has lost detail compared to your original, check this setting first. This matters even more once you start combining several reference photos at once — the 10 reference images guide covers exactly why the output always follows image_1, and what changes if you turn on a custom size.
Run It (Queue Prompt)
- Click the orange Queue Prompt button in the top-right corner of the screen.
- A progress bar appears below the button. On an RTX 4090, this finished in under a minute during testing — your time will vary depending on your card.
- Once it finishes, the edited image appears in the Preview Image node, ready to view or save.
Behind the scenes, this uses a KSampler (the node that actually generates the image, step by step) running 25 steps (the number of refinement passes the model makes — more steps generally means more detail, but takes longer) with the euler scheduler— you don't need to touch these unless you're troubleshooting.
Real Edit Examples
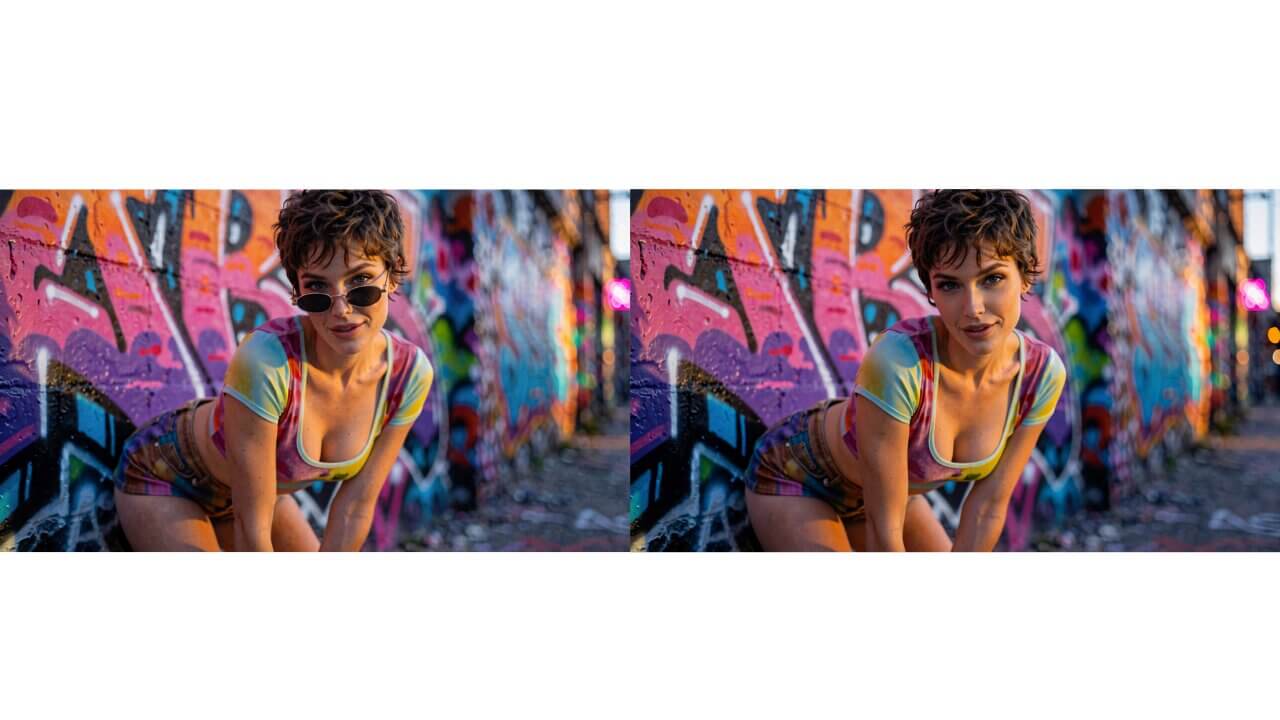
Three edits run with the exact setup above, each using a single prompt on the same base photo.
Background Swap
Object Removal
Clothing Swap
Does Qwen Image 2.1 Actually Edit Better Than Nano Banana?
Right now, the honest answer is: we don't fully know yet.The "beats Nano Banana 2.0" claim comes from Qwen's own release benchmark, not an independent lab. One thing that benchmark doesn't highlight: Nano Banana 2 accepts more reference images per edit (14) than Qwen Image 2.1 does (10), so it isn't a clean win across every category.
What Qwen Image 2.1 clearly does have going for it that Nano Banana doesn't: it's free, it's open-weight, and it runs entirely on your own computer with no per-image cost. For the numbers behind the claim itself, see what Qwen Image 2.1 is — here, the practical answer is that it's genuinely worth trying yourself rather than taking either side's word for it.
Common Qwen Image 2.1 ComfyUI Errors (And How to Fix Them)
"Unsupported Diffusion Model" Error
Some early users have reported seeing this error when trying to load Qwen Image 2.1's diffusion model file, even the official version. The reported cause is an outdated ComfyUI build.
- Open Manager and click Update ComfyUI.
- Restart ComfyUI completely and try loading the workflow again.
Missing Node: TextEncodeQwenImage21
If ComfyUI shows a red box on load saying a node is missing, and the missing node is named something like TextEncodeQwenImage21, this means your ComfyUI version doesn't yet include Qwen Image 2.1 support.
- Update ComfyUI the same way as above.
- Reload the workflow once the update finishes.
The Edit Doesn't Match What You Expected
If your result looks cropped, resized, or shifted compared to the original photo, check the resolution setting described above. A non-zero value resizes the output; a value of 0 keeps the original size.
Frequently Asked Questions
What to Do Next
Run one edit on a photo of your own using the steps above.
Once your first edit works, the ComfyUI roadmap lays out a structured path through everything else the tool can do.
Published: 2026-09-22 · Last updated: 2026-09-22 · Tested on an RTX 4090 using the official Qwen Image 2.1 Image Edit template.
Join the discussion
Sign in to leave a comment or reply
No comments yet
Be the first to share your thoughts!