
⚡ Quick Answer
Qwen Image 2.1's Text Encode node lets you plug in up to 10 reference images at once, using slots named image_1 through image_10. image_1 is always the photo that gets edited — the rest are references the model reads and blends in. This tutorial shows you how to wire up all 10 slots, write a prompt that points at each one, and avoid the one setting that quietly shifts your result.
Qwen Image 2.1 is a new open-weight AI image model from Alibaba's Qwen team, released on September 20, 2026. One of its headline features is that its editing node accepts up to 10 reference images in a single generation — far more than most other open image models. That means you can hand it a portrait, an outfit, a product, and a background in one go, and ask it to combine them into one photo.
The problem is that the default template ComfyUI ships with only shows twoimages loaded. If you've never used node-based software before, going from "2 images work" to "how do I actually wire up 10" isn't obvious. This tutorial walks through it slot by slot, in plain language, assuming you've never opened ComfyUI before.
What Can You Actually Do With 10 Reference Images?
The 10 image slots are not 10 copies of the same photo — they're 10 differentsources the model reads at once. Qwen's own examples show what this is for:
- Putting together a full outfit from five separate photos (a model, a top, shoes, a bag, and a hat)
- Building one group photo out of six individual portrait photos
- Swapping a piece of clothing from one photo onto the person in another photo
A reference image (a photo you feed into the model so it can copy a person, object, or style from it, rather than generate one from scratch) is different from your edit target — the one image you actually want changed. In Qwen Image 2.1's node, the edit target is always whichever image you plug into the first slot, called image_1. Every other slot (image_2 through image_10) is a supporting reference the model looks at but does not directly edit.
What You Need Before You Start
Before loading any images, you need three things ready: an updated copy of ComfyUI, the correct model files, and enough VRAM (the memory on your graphics card) to run them.
Update ComfyUI First
Qwen Image 2.1 was only added to ComfyUI on the same day it was released. If your ComfyUI is older than version 0.37.0, the node for this model won't exist yet, and you'll see a red error box instead (covered in Troubleshooting below). If you're brand new to ComfyUI entirely, start with our ComfyUI beginner's guide first, then come back here.
Download the Three Model Files
Qwen Image 2.1 doesn't use one single file the way older models sometimes did — it needs separate files, each going into its own folder inside ComfyUI. This is different from a regular checkpoint model; if you've used checkpoints before and want to understand the difference, see our checkpoint vs. diffusion model comparison.
| File | Goes In | What It Is |
|---|---|---|
qwen_image_2.1_int8_convrot.safetensors | diffusion_models/ | The compressed, lower-VRAM version of the main model. Good default unless you need maximum quality. |
qwen_image_2.1_bf16.safetensors | diffusion_models/ | The full-quality version of the main model. Needs noticeably more VRAM than the int8 file above. |
qwen3vl_8b_bf16.safetensors | text_encoders/ | Reads your prompt and your reference images together, and turns them into something the model understands. |
qwen_image_2.1_vae_bf16.safetensors | vae/ | Converts the model’s internal output back into a normal image file you can see. |
The text encoder (the part of the model that turns your words and reference images into a format the AI can use) here is Qwen3-VL, a vision-language model — it can "read" images, not just text, which is how it understands your reference photos. A safetensors file is just the standard, safe file format ComfyUI models are saved in — it's a container for the model's trained numbers, similar to how a .docx file is a container for a Word document.
Which File to Pick: int8_convrot or bf16?
There are two versions of the main model file. int8_convrot is a compressed version that uses less VRAM (the dedicated memory on your graphics card, separate from your computer's regular RAM) but may lose a small amount of quality. bf16 is the full-quality version and needs noticeably more VRAM.
int8_convrot — it's the lighter option and the one loaded by ComfyUI's own official template. Switch to bf16 only if you have a high-VRAM card and want the extra quality.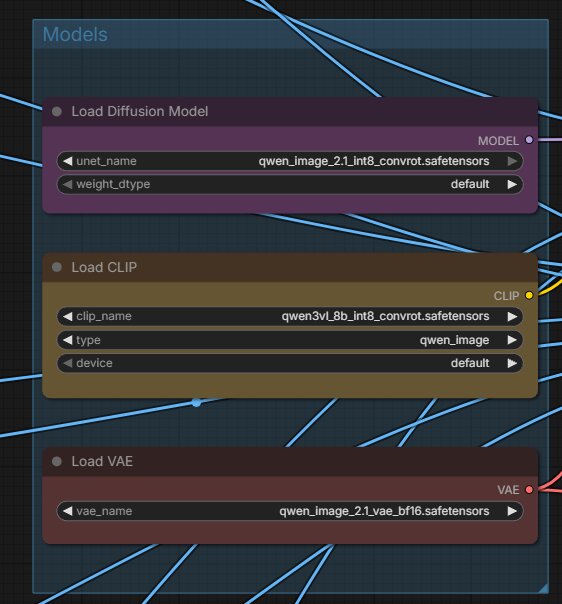
How Do You Load 10 Reference Images Into the Text Encode Qwen Image 2.1 Node?
Once your model files are in place, the next step is getting your actual photos into ComfyUI and connected to the right slots.
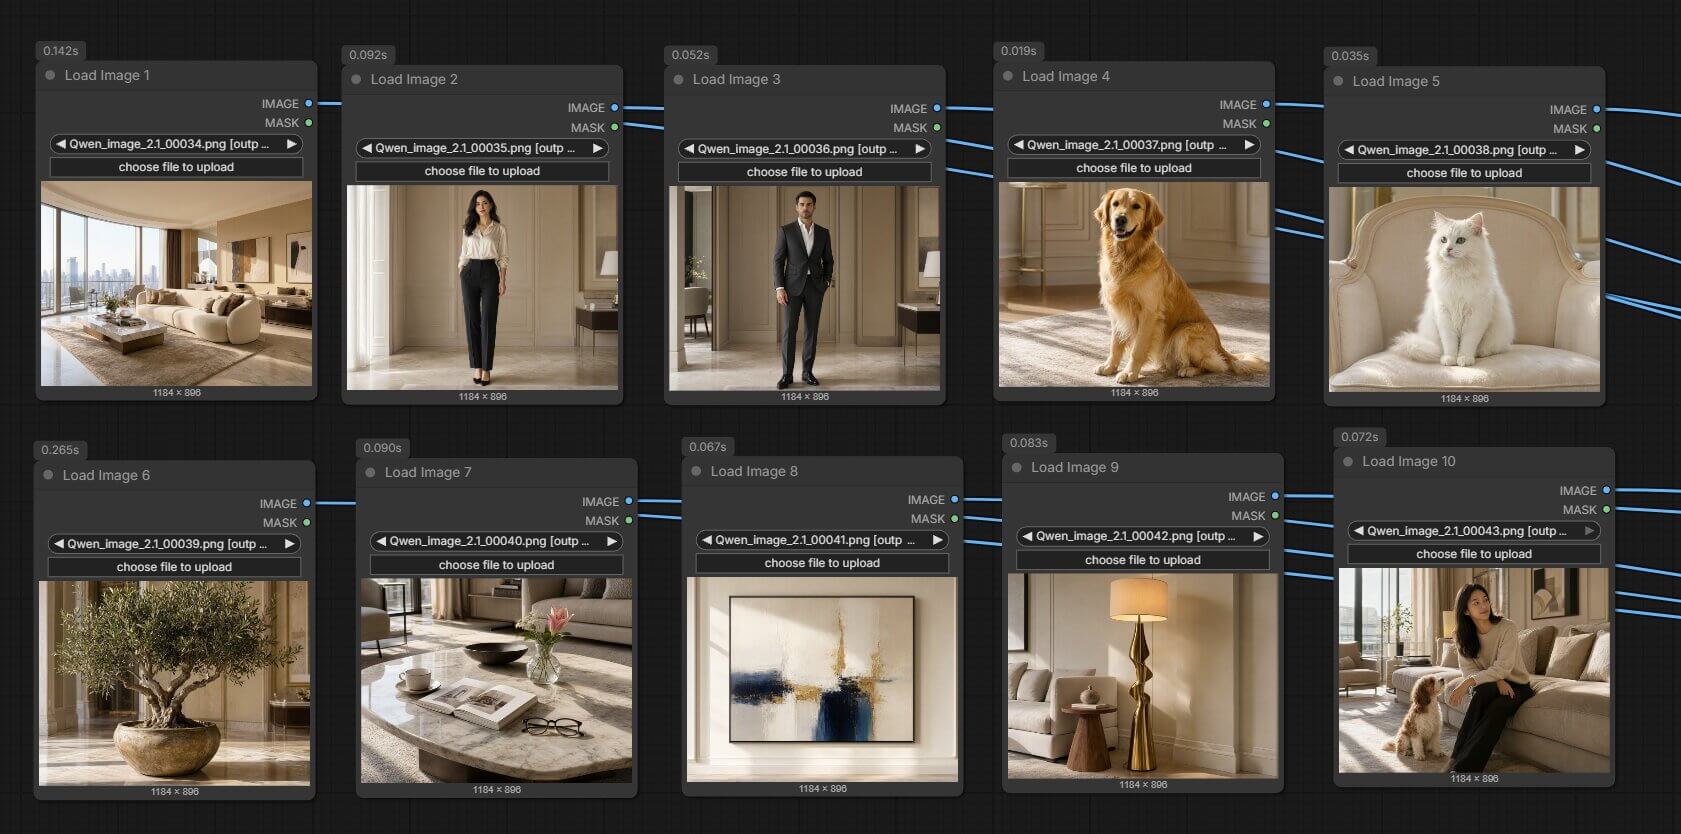
(qwen_image_2_1_10_ref_image_edit.json)Step 1: Add Your First Load Image Node (This Becomes image_1 — Your Edit Target)
- Right-click on an empty area of the ComfyUI canvas (the grey grid where your workflow lives).
- From the menu that appears, click Add Node, then find and click Load Image.
- A small box appears with an empty image thumbnail and an upload button. Click it and choose the photo you want to edit — this is the photo that will change based on your prompt.
- You'll see the photo appear inside the node once it uploads.
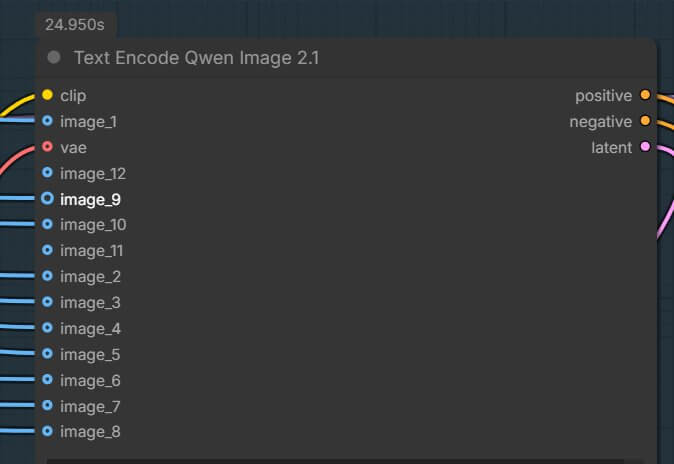
This first Load Image node needs to connect to the image_1input on the Text Encode Qwen Image 2.1 node — the node (a rectangular block that does one job) that reads your prompt and every reference image together. We'll wire that connection in Step 3.
Step 2: Add the Rest of Your Reference Images (image_2 Through image_10)
Repeat Step 1 for every additional reference photo you want to use — up to 9 more Load Image nodes, for a total of 10. You don't have to use all 10; if your idea only needs 3 references, add 3 Load Image nodes and stop there.
Each Load Image node works exactly the same way: right-click the canvas → Add Node → Load Image → upload your photo. To keep your workflow readable, drag each new node so it sits in its own space rather than stacking on top of the others.
Step 3: Connect Each Image to Its Matching Slot on the Text Encode Node
- Add the main Text Encode Qwen Image 2.1 node the same way: right-click → Add Node → search for and click TextEncodeQwenImage21.
- This node has a small circle (called an output "dot") on the right edge of every Load Image node, and matching circles on the left edge of the Text Encode node labeled
image_1,image_2,image_3, and so on. - Click and drag from the output dot on your first Load Image node to the image_1 dot on the Text Encode node. A line (called a "wire") will connect the two.
- Repeat for every other Load Image node, connecting each one to the next open slot in order — your second image goes to
image_2, your third toimage_3, and so on.
How Do You Write a Prompt That Uses All Your Reference Images?
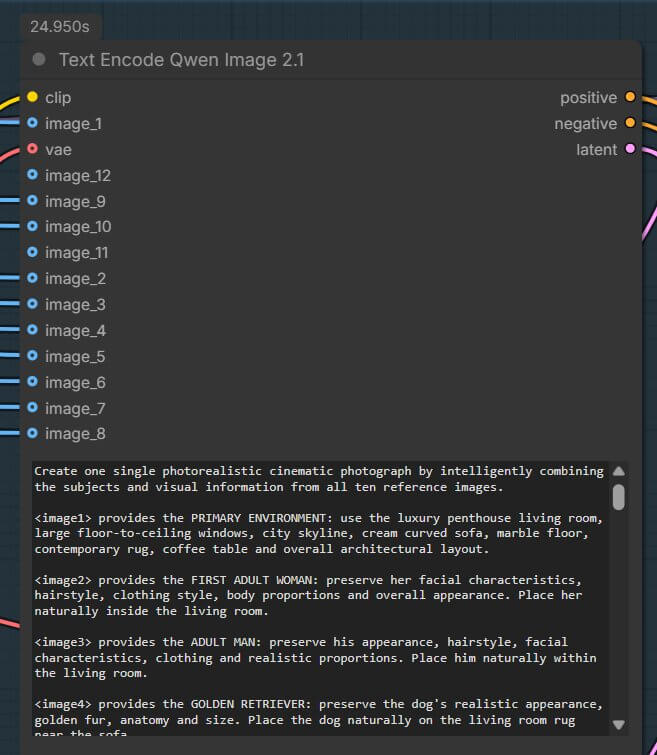
You can't describe your reference images in your prompt the way you'd describe them to a person — saying "the girl in the blue shirt" doesn't work, because the model doesn't identify photos that way. Instead, you refer to each image by its slot number, using the format <image1>, <image2>, and so on, matching the slots you connected in Step 3.
For example, if image_1 is a photo of a person and image_2 is a photo of a jacket, a prompt like this tells the model exactly what to do with each one:
If you're combining more images — say, up to <image10> for a group photo made from ten separate portraits — every image you connected needs to be mentioned somewhere in the prompt, or the model may ignore it.
Type your prompt into the prompt text box on the Text Encode Qwen Image 2.1 node itself.
Why Does the Output Size Follow image_1? (The Setting That Shifts Your Result)
This is the single most common mistake with this model, according to Qwen's own documentation for the ComfyUI template, so it's worth understanding before you hit run.
By default, the Text Encode node has a resolution setting. When it's set to 0, every reference image keeps its own original size (rounded slightly to fit the model's internal grid), and the final output size is based on image_1 specifically — not any of the other references, and not a fixed size you choose.
There's also a custom_size switch. When it's turned off (the default), the output canvas comes from image_1 automatically. When you turn it on, you instead set a specific width and height yourself using a separate node.
custom_sizeon doesn't closely match image_1's own resized dimensions, the edit can shift — meaning the model may move or distort parts of your image unexpectedly, because it's now trying to fit content into a canvas shape it wasn't expecting.This connects to what's called latent space(the model's internal, compressed way of representing an image while it's being generated, before it's converted back into a normal picture) — sampling at the wrong size shifts what the model does inside that space.
custom_sizeoff and resolution at 0. Only turn it on if you specifically need an exact width and height, and even then, keep it close to image_1's real size.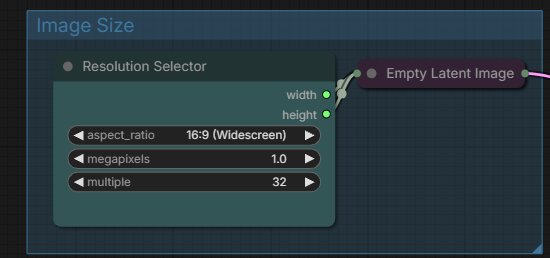
What Do the Sampler and Cache Settings Control?
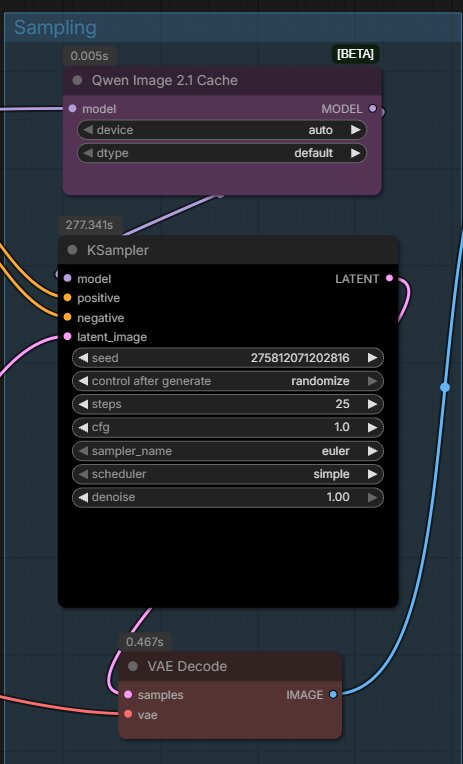
Two more nodes affect your final result: the KSampler and the Qwen Image 2.1 Cache node.
The KSampler (the node that actually generates the image, step by step, starting from random noise) has a few settings worth knowing:
- cfg (a number that controls how strictly the model follows your prompt versus how much creative freedom it takes) — for Qwen Image 2.1, keep this at 1. The model's negative prompt box is only used if you raise cfg above 1.
- steps — how many passes the model takes to build the image. Qwen's own official pipeline typically uses 40–50 steps. ComfyUI's ready-made template starts lower, at 25, since a lower step count is faster and still gives usable results for most prompts.
- seed — a number that controls the random starting point of the image. The same seed with the same settings will produce the same result again; changing it produces a different result.
- scheduler — controls the mathematical path the sampler takes between steps. The default that ships with the template works well for most cases.
The Qwen Image 2.1 Cache node has two settings, device and dtype, which control where the model stores repeated calculations (called the KV prefix cache) while working through multiple reference images — this is part of what makes handling 10 images at once faster than recalculating everything from scratch on every step. For a first run, leave these on their default values.
Troubleshooting
"Text Encode Qwen Image 2.1" Node Is Red or Missing
What causes it: your ComfyUI installation is older than version 0.37.0, so it doesn't know about this new node yet. This is extremely common right after a model's release day.
- Close ComfyUI completely.
- Update ComfyUI to the latest version (see our how to update ComfyUI guide if you're not sure how).
- Reopen ComfyUI and load your workflow again — the node should now load normally, without a red outline.
The Output Only Looks Like One Reference Image, Not a Blend of Several
What causes it: your prompt doesn't actually mention every image slot you connected. If you wired up image_1 through image_5 but your prompt only says <image1>, the model has no instruction telling it to use the other four.
- Open the Text Encode Qwen Image 2.1 node and check the prompt box.
- Make sure every connected slot (
<image1>,<image2>, and so on) is mentioned somewhere in the sentence. - Re-run the generation.
Out of Memory / ComfyUI Crashes When You Hit Run
What causes it: your GPU doesn't have enough VRAM to hold the model file you chose, especially if you loaded the full bf16 version instead of the smaller int8_convrot version.
- In the UNETLoader node, switch from
qwen_image_2.1_bf16.safetensorstoqwen_image_2.1_int8_convrot.safetensors. - Try generating again with fewer reference images loaded first (2–3), to confirm the model runs at all on your hardware.
- Gradually add more reference images back once the smaller test works.
Frequently Asked Questions
What to Do Next
Comfortable loading multiple references? Explore more image-to-image use cases next.
Once you're confident wiring up multiple images, our image-to-image guide covers other ways multi-image workflows get used beyond this specific model.
Published: 2026-09-22 · Last updated: 2026-09-22 · Qwen Image 2.1 is released under the Qwen Research License Agreement (non-commercial use only) — see the FAQ above for details.
Join the discussion
Sign in to leave a comment or reply
No comments yet
Be the first to share your thoughts!