
⚡ Quick Answer
To make a full AI music video in ComfyUI, generate your song first (Suno or the free ACE-Step 1.5), then generate a consistent AI character with Krea2 based on that song, then feed the character images and the audio into the LTX-2.3 workflow to produce lip-synced video clips, and stitch the clips together in a video editor. On an RTX 4090, each LTX-2.3 clip can run up to 40 seconds.
Making an AI music video isn't one generation — it's four separate steps chained together: song, character, synced video, edit. Get the order wrong (starting with the character before the song exists) and your character's mood, outfit, and performance style won't match the track. Here's the exact AI music video ComfyUI pipeline, tested end to end.
The full AI music video made with this exact pipeline.
What You Need Before You Start
RTX 409024 GB VRAM8 GBFP8 / GGUF builds available40 secper LTX-2.3 generation🅛🅣🅧 Gemma-3 Model Loader (pick one, based on your VRAM)
LTXV Audio Text Encoder Loader
LTX 2.3 Models
Other tools used across this pipeline: Krea2 for character image generation (free/local via ComfyUI), ACE-Step 1.5 (free, local) or Suno (paid, cloud) for the song, Claude or ChatGPT for writing prompts, and any video editor to combine clips — this guide uses DaVinci Resolve (free).
1. Generate the Song First
Start with the song, not the character. The song's mood, tempo, and lyrics decide what your character looks like, wears, and how she performs — building the character first means guessing, and you'll usually have to redo it once the track is done.
- Generate your track with Suno, or with the free local alternative, ACE-Step 1.5, running inside ComfyUI.
- Export the final audio file once you're happy with the take.
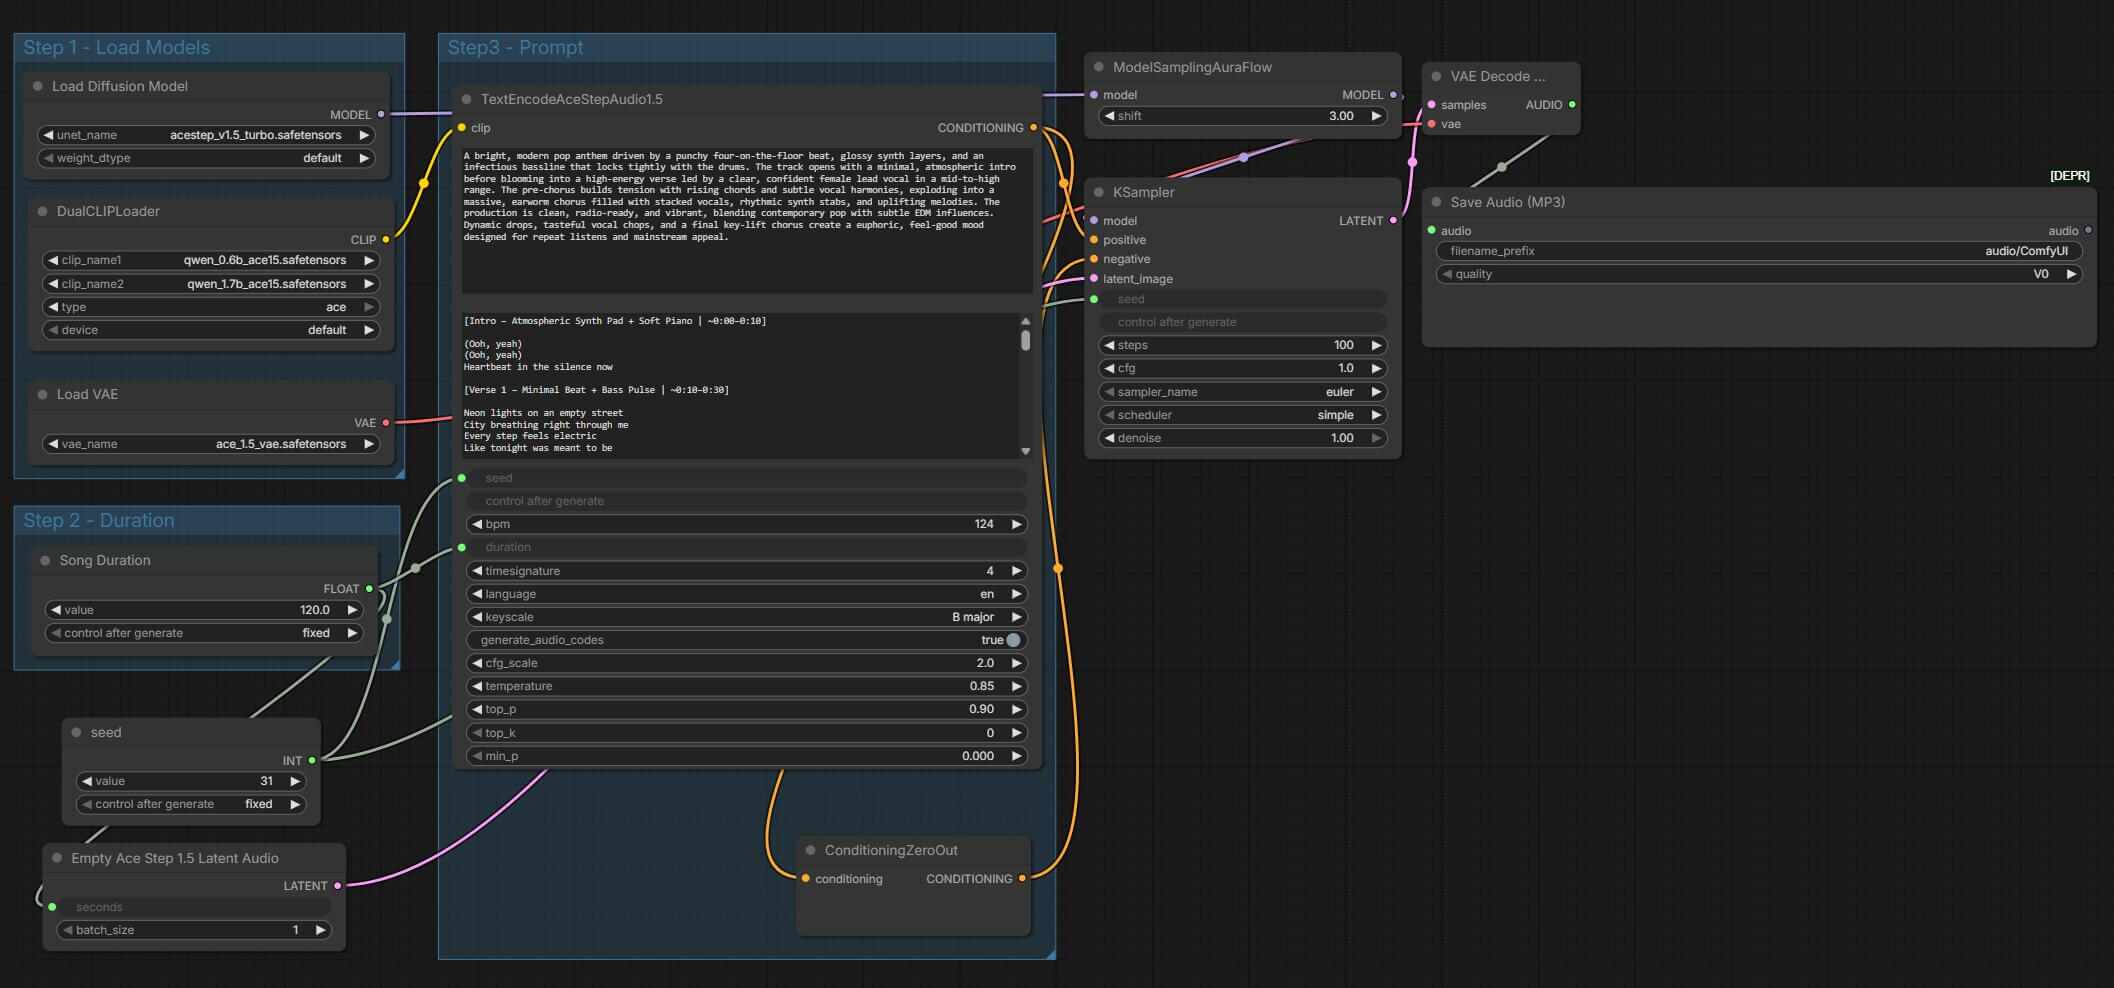
Full setup for the free option: ACE-Step 1.5: the best free Suno AI alternative. If you want background on how Suno itself works before deciding which to use, see What Is Suno AI? A Complete Guide.
2. Build a Consistent AI Character for the Song
With the song done, build the character who's going to perform it. This is two passes in Krea2: one to generate the character's look, and a second using Krea2's character consistency feature to produce multiple images of the same face for different shots in the video.
- Generate your initial character image (a singer) in Krea2, based on the mood of the song.
- Run that image through Krea2 character consistency to generate additional shots — different angles, outfits, or stage settings — while keeping the same face.

Character Consistency Outputs (Same Face, Different Shots)



Full setup guides: Krea2 in ComfyUI: full workflow · Krea2 character consistency in ComfyUI.
3. Write Your Prompts with Claude or ChatGPT
Both the character image prompts in Step 2 and the video-motion prompts in Step 4 came from Claude and ChatGPT rather than being written from scratch by hand.
- For text-to-image prompts: describe the singer's appearance, outfit, pose, and lighting, and ask the model to turn that into a single detailed Krea2 prompt.
- For image-to-video prompts: describe the performance you want (camera movement, expression, energy level matching a specific point in the song) and ask for a prompt LTX-2.3 can use alongside the audio.
4. Turn the Character Into a Lip-Synced Video with LTX-2.3
LTX-2.3 in ComfyUI is not a single-purpose "lip sync" workflow — it's one model that covers four different generation modes in the same node setup:
- Text-to-video — generate a clip from a prompt alone, no input image
- Image-to-video — animate a single still image
- First-and-last-frame — give it a starting and ending image and it fills in the motion between them
- Image + audio-to-video — the mode used here, which takes a character image and an audio file and generates lip-synced motion matched to the audio
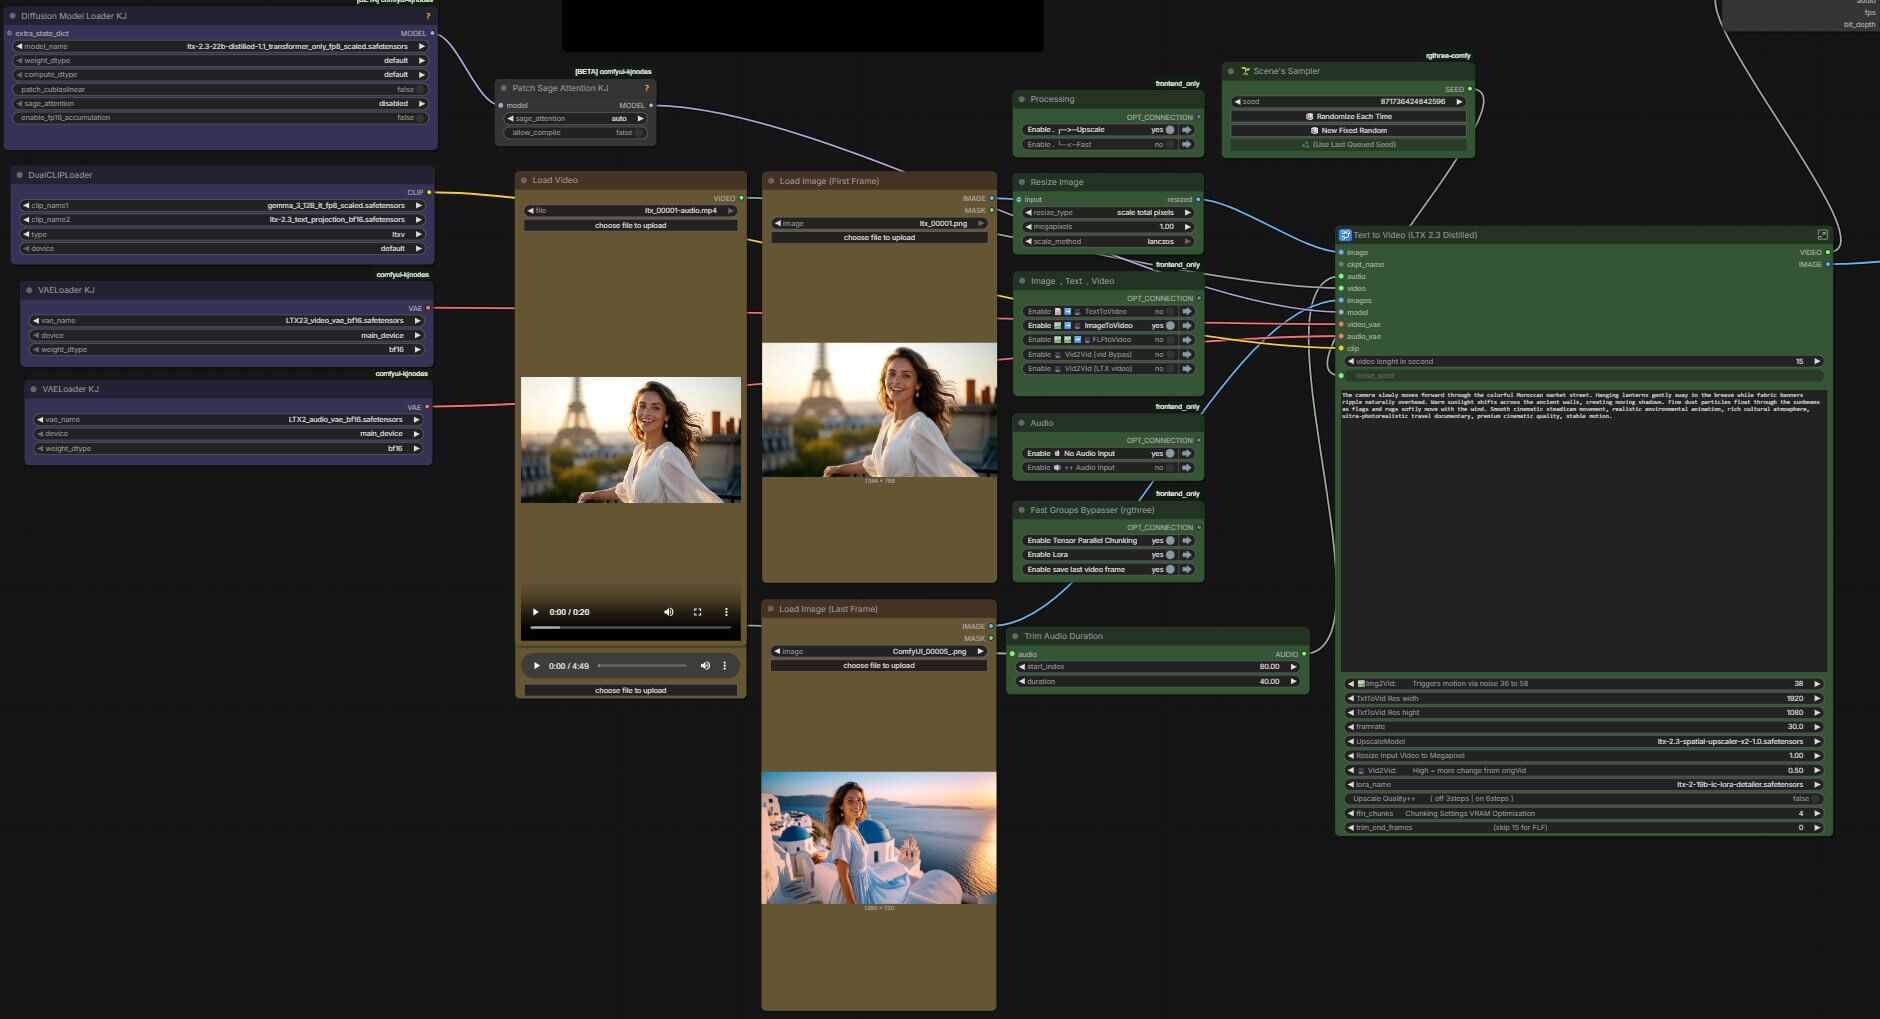
- Load a character image with LoadImage, and load the song (or a trimmed segment of it) with LoadAudio.
- Connect both to the LTX-2.3 audio-video generator node, along with your motion prompt from Step 3.
- Set your resolution and frame rate, then run the generation. A progress bar appears; generation time depends on clip length and your GPU.
- The output is an MP4 with the character's mouth and expression moving in time with the audio.
Output Examples — Lip Sync in Action
Broader LTX-2.3 setup reference (all four modes): LTX-2.3 in ComfyUI: full workflow guide. Official node repo: ComfyUI-LTXVideo on GitHub.
5. Edit the Clips Into a Full Music Video
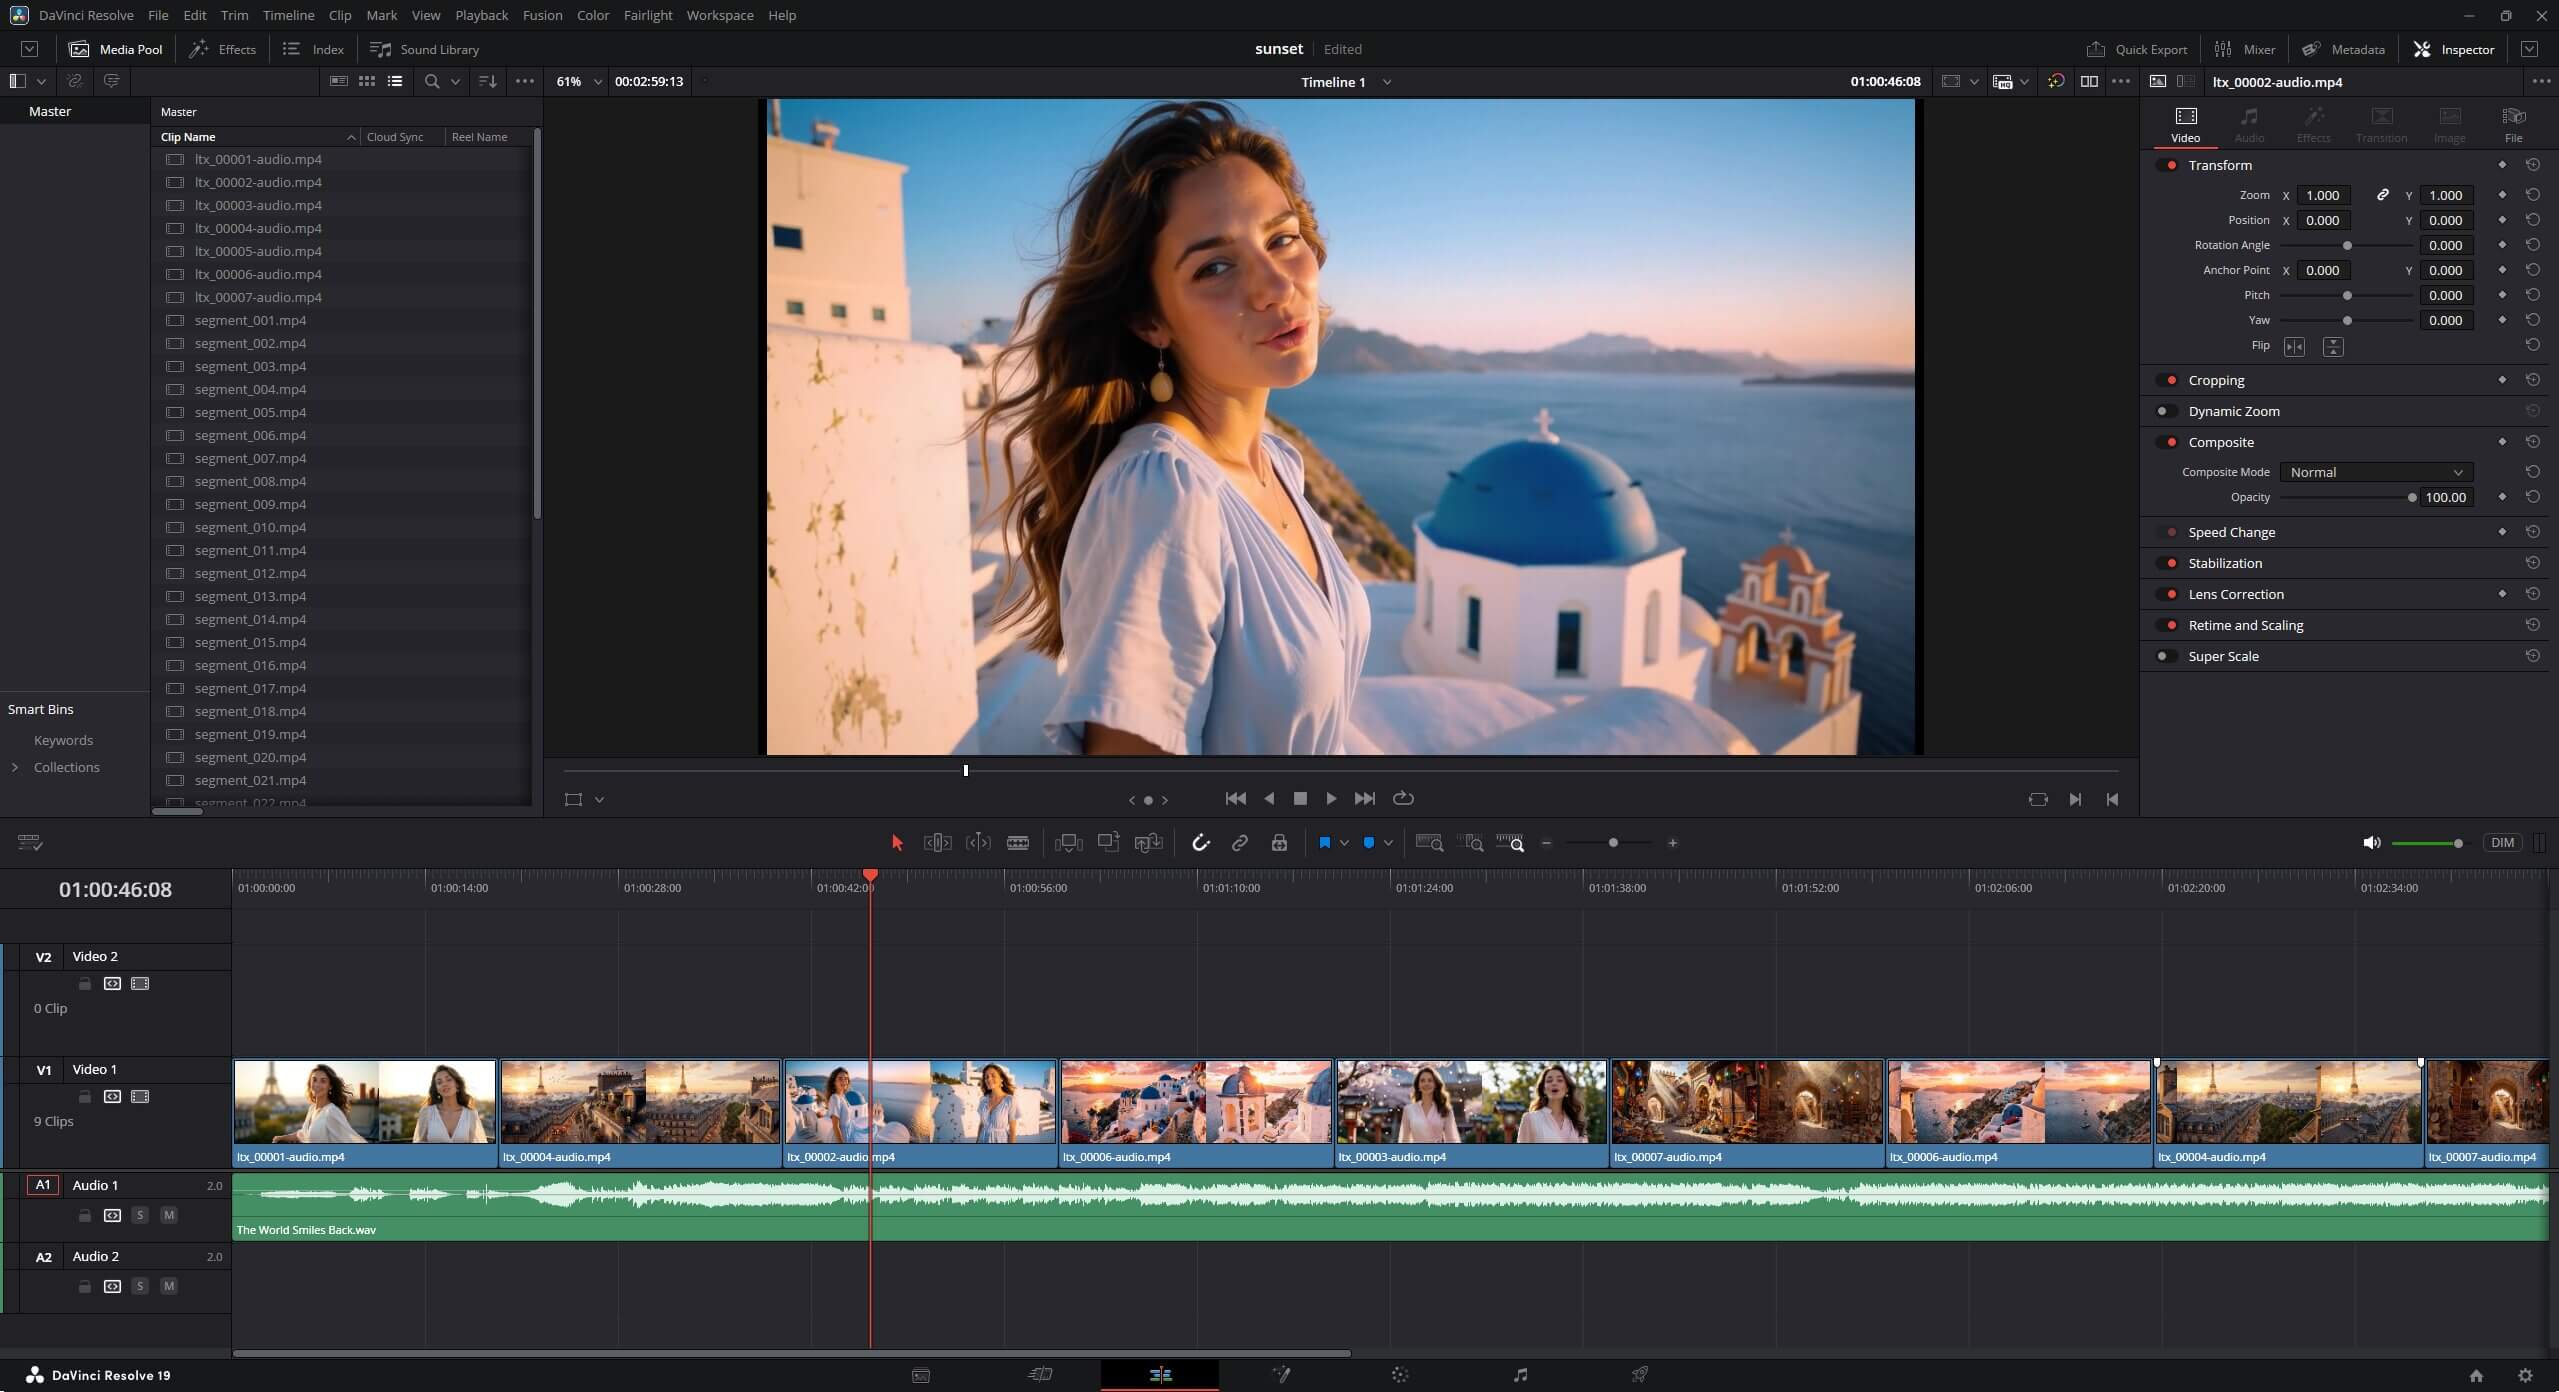
LTX-2.3 outputs individual clips, not a finished video — you still need an editor to arrange them in order, trim transitions, and sync clip boundaries to the song structure.
- Import all generated clips and the full song into your editor. This guide uses DaVinci Resolve, which is free.
- Line up each clip against the section of the song it was generated for (verse, chorus, bridge).
- Trim and crossfade between clips at natural cut points in the music.
- Export the final video.
Troubleshooting
"This node type does not exist" (red node in the LTX-2.3 workflow)
The workflow uses a custom node you haven't installed.
- Open Manager in the top menu.
- Click Install Missing Custom Nodes.
- Restart ComfyUI completely.
The character's mouth barely moves, or doesn't sync to the audio
This usually means the audio wasn't connected to the LTX-2.3 audio-video node, or a plain image-to-video mode was used instead of image + audio-to-video.
- Confirm LoadAudio is connected directly into the LTX-2.3 generator node, not just present on the canvas.
- Confirm you're running the audio-sync mode of the workflow, not the plain image-to-video mode.
Generation fails or crashes on longer clips
LTX-2.3 clips longer than your GPU can handle (around 40 seconds on an RTX 4090) will fail or run out of memory.
- Shorten the clip length and generate in segments.
- Stitch the segments together in your video editor instead of generating one long clip.
Frequently Asked Questions
What to Do Next
Download the workflow and run it with one existing character image.
Drag the audio-sync workflow JSON into ComfyUI and run it once with one of your character images and a short clip of your song to confirm everything connects correctly, then move on to generating your full set of clips.
Published: 2026-07-27 · Last updated: 2026-07-27 · Tested on ComfyUI, RTX 4090 (24 GB VRAM)
Join the discussion
Sign in to leave a comment or reply
No comments yet
Be the first to share your thoughts!