⚡ Quick Answer
Krea 2 Turbo runs locally in ComfyUI — no API key, no cloud. Download the FP8 model (13 GB) if you have 12–16 GB VRAM, or the BF16 model (26.3 GB) for 24 GB+ cards. You also need one text encoder file and one VAE file. This guide covers every file, every folder, workflow downloads for both model versions, and all four official style LoRAs.
Krea 2 went open-source on June 23, 2026. It is not based on Stable Diffusion or FLUX — it is a completely new architecture built by Krea AI. You can run it entirely on your own GPU, offline, with no usage limits.
This guide covers the complete setup: which files to download, exactly where they go, how to load the workflow, how to run any of the four style LoRAs, and 8 tested prompts to verify your setup is working.
Minimum VRAM: 12 GB (FP8 model). 16 GB recommended. BF16 requires 24 GB+.
Tested on: RTX 3060 (12 GB) and RTX 4080 (16 GB).
What Is Krea 2?
Krea 2 is an image generation model built from scratch by Krea AI. It is a 12-billion-parameter DiT (diffusion transformer — the same category of architecture used by FLUX and SD3). It uses the Qwen Image VAE for decoding images and the Qwen3-VL text encoder for reading your prompts.
Krea 2 RAW
The base model. Designed for LoRA training — not for everyday image generation. Produces diverse outputs. Requires 52 steps at CFG 3.0–3.5. Don't use RAW unless you're training LoRAs.
Krea 2 Turbo ← use this
The distilled model built on top of RL-optimized RAW. Generates in 8 steps at CFG 1.0. Produces high-quality results fast. This is the model this entire guide covers.
Krea 2 Turbo is not a fine-tune of another model. It has its own architecture, its own training data pipeline, and its own model files. That means the folder structure and node setup in ComfyUI are different from FLUX and SDXL — follow this guide's exact paths.
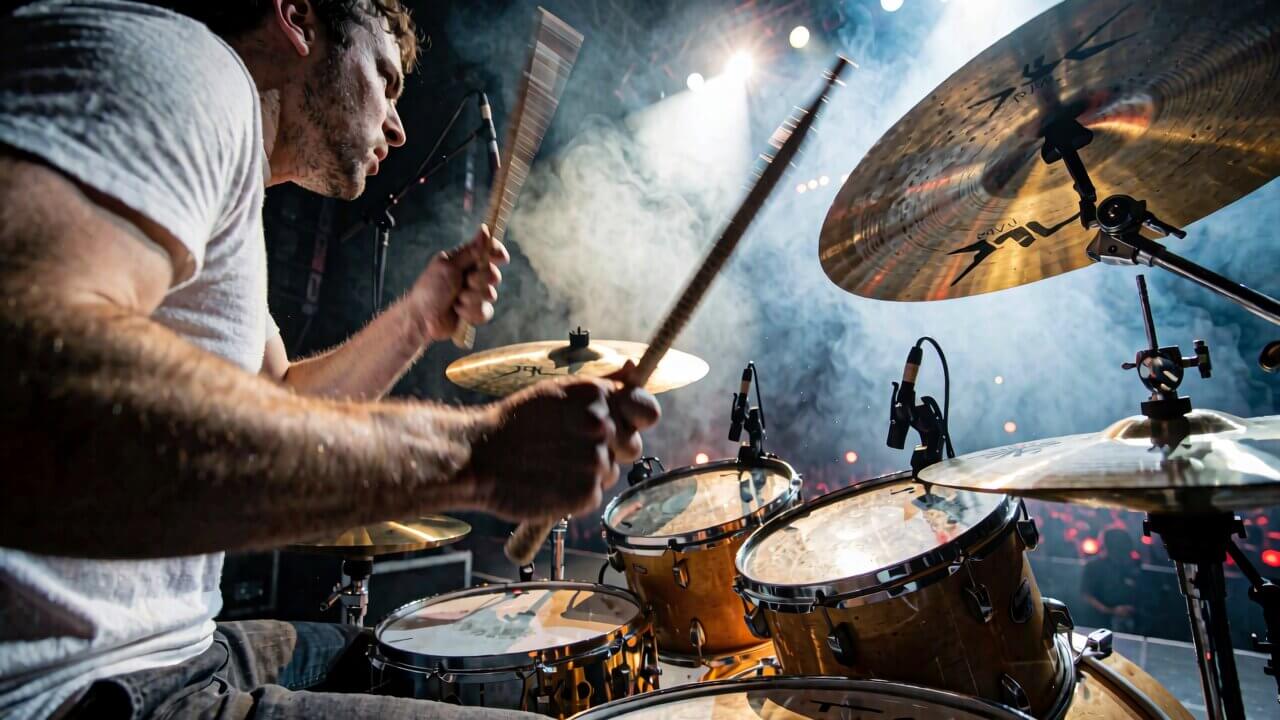
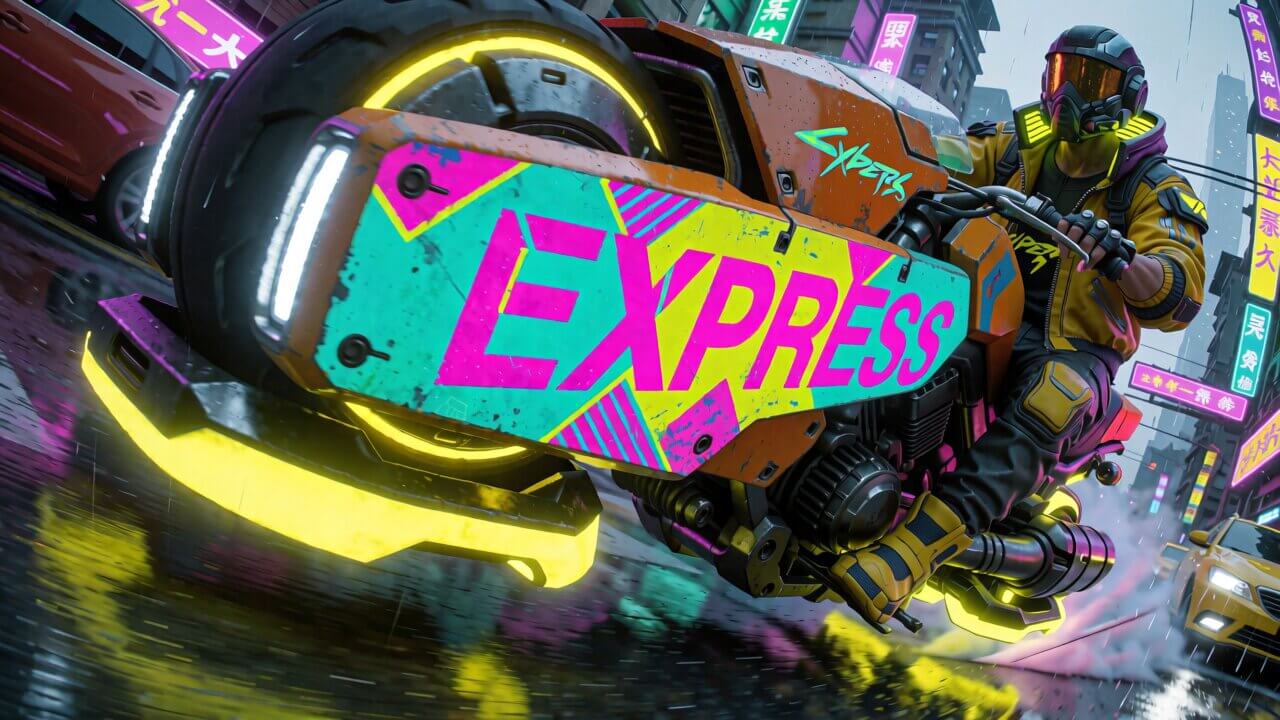
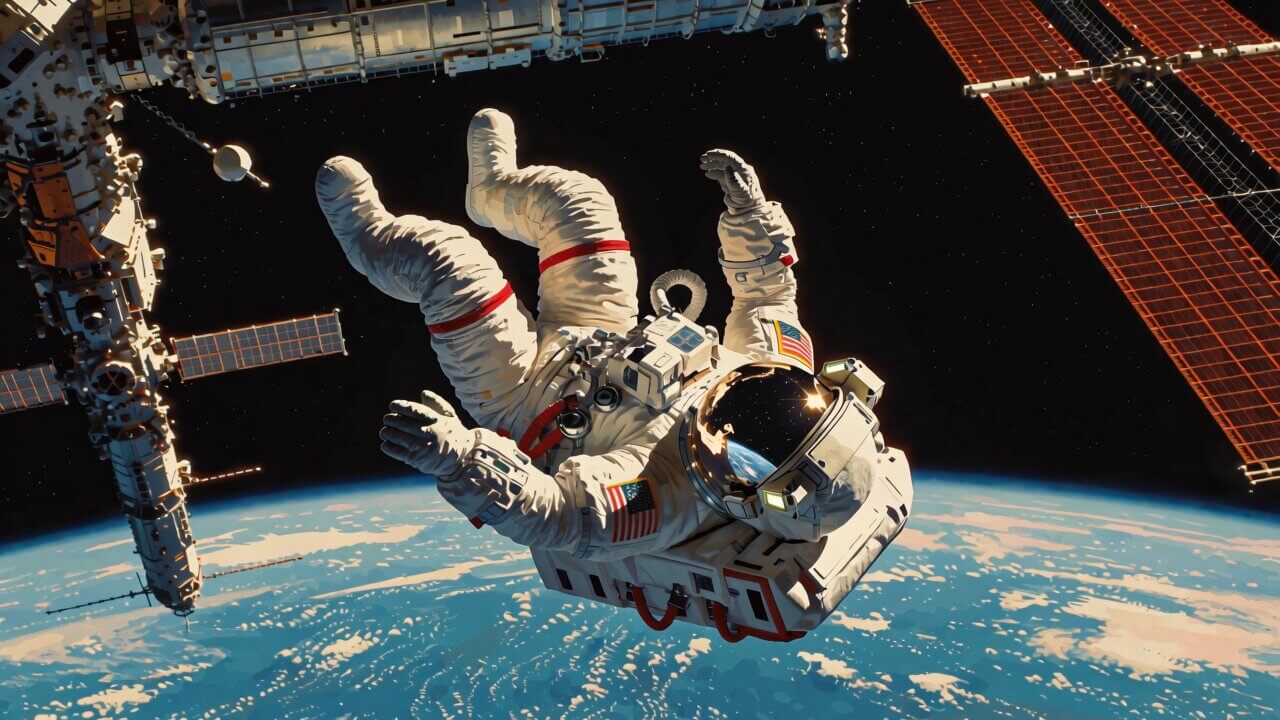
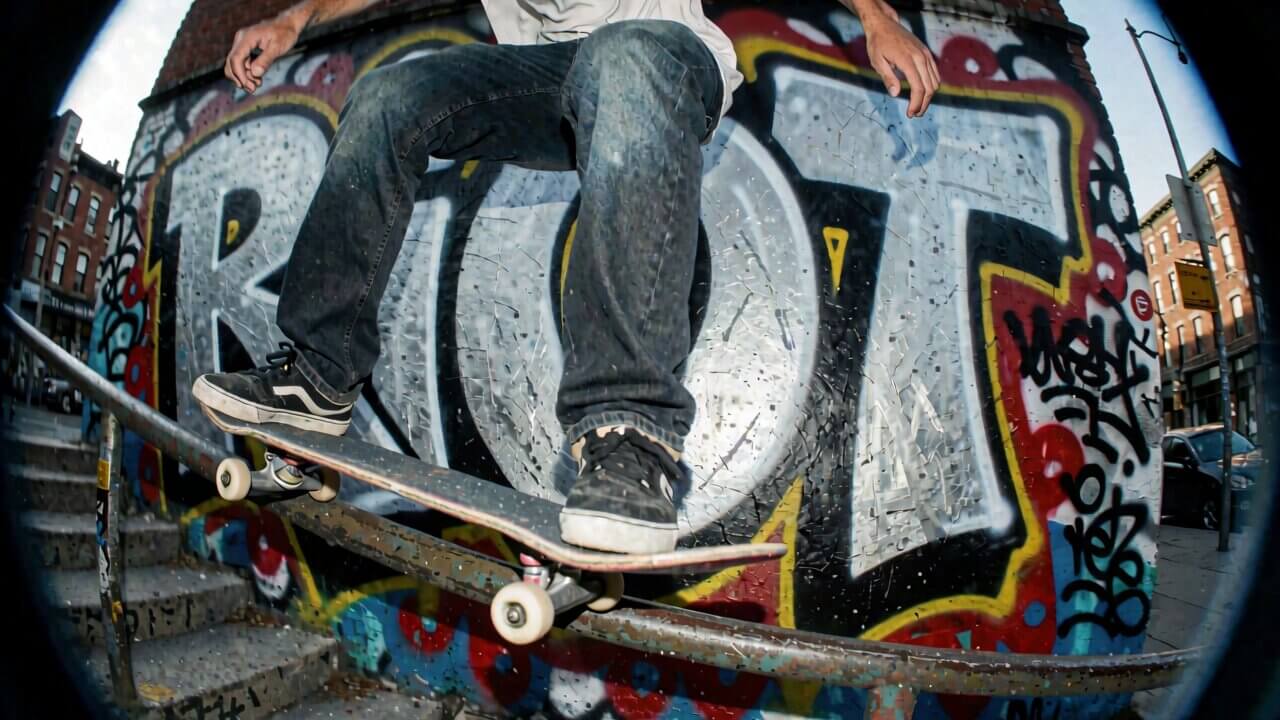
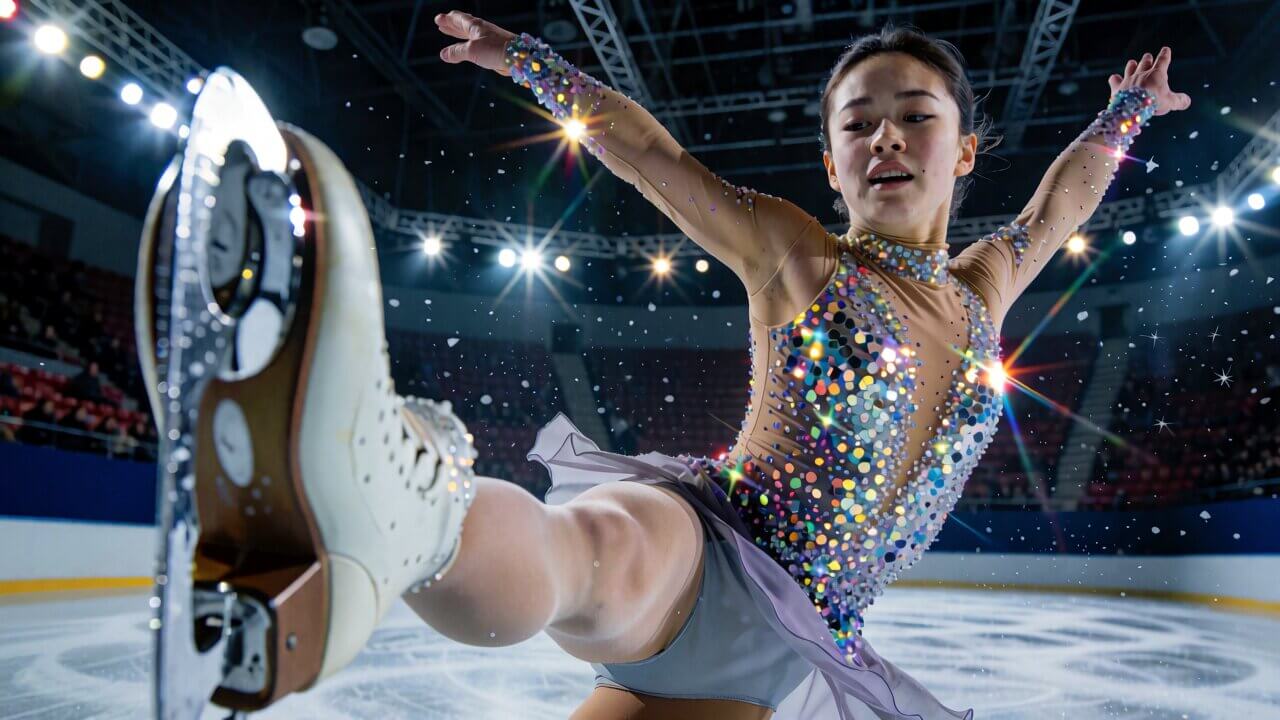
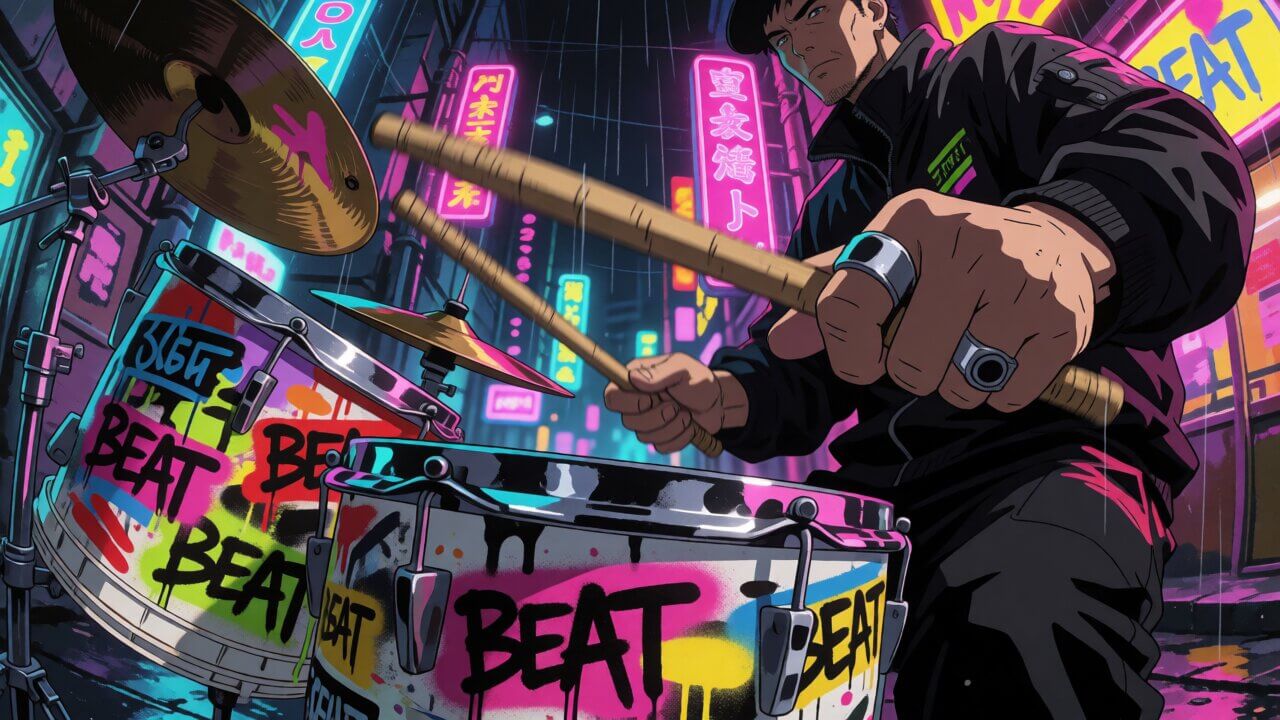
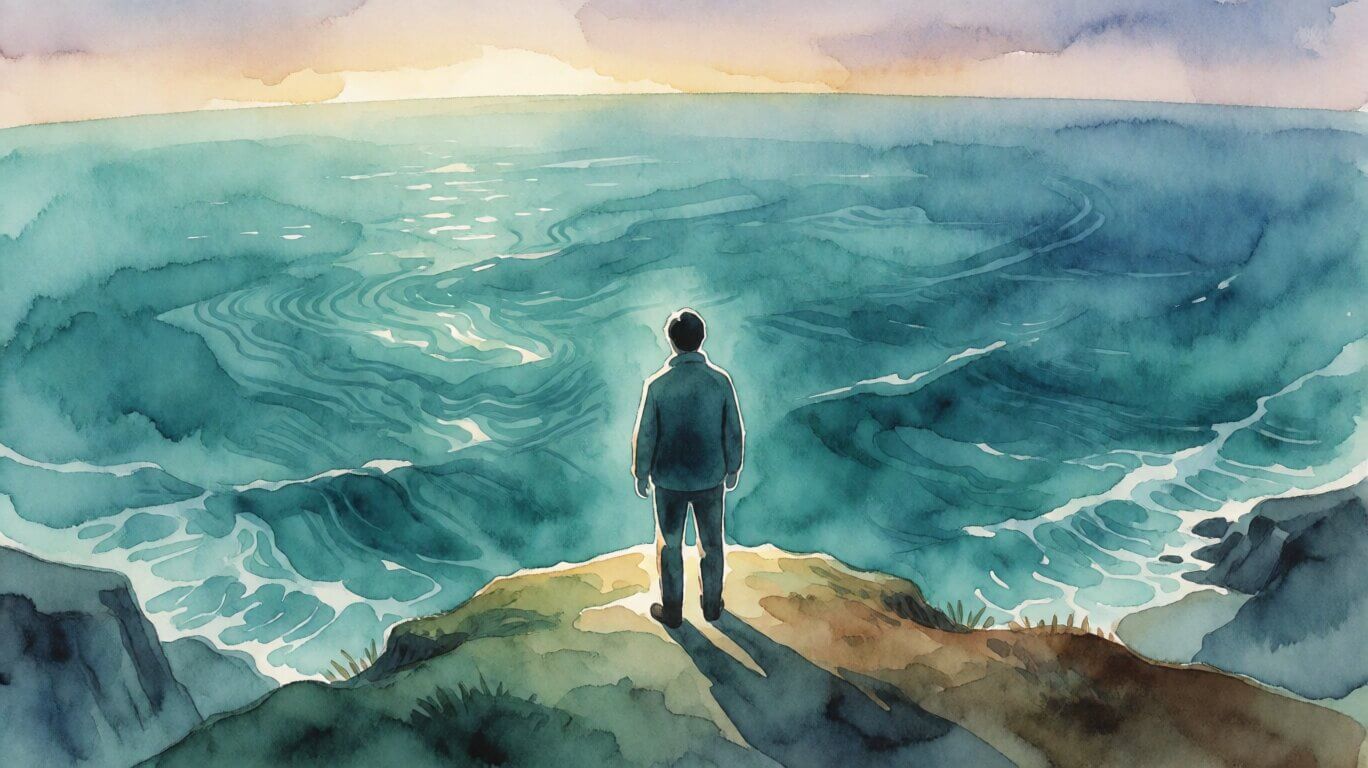
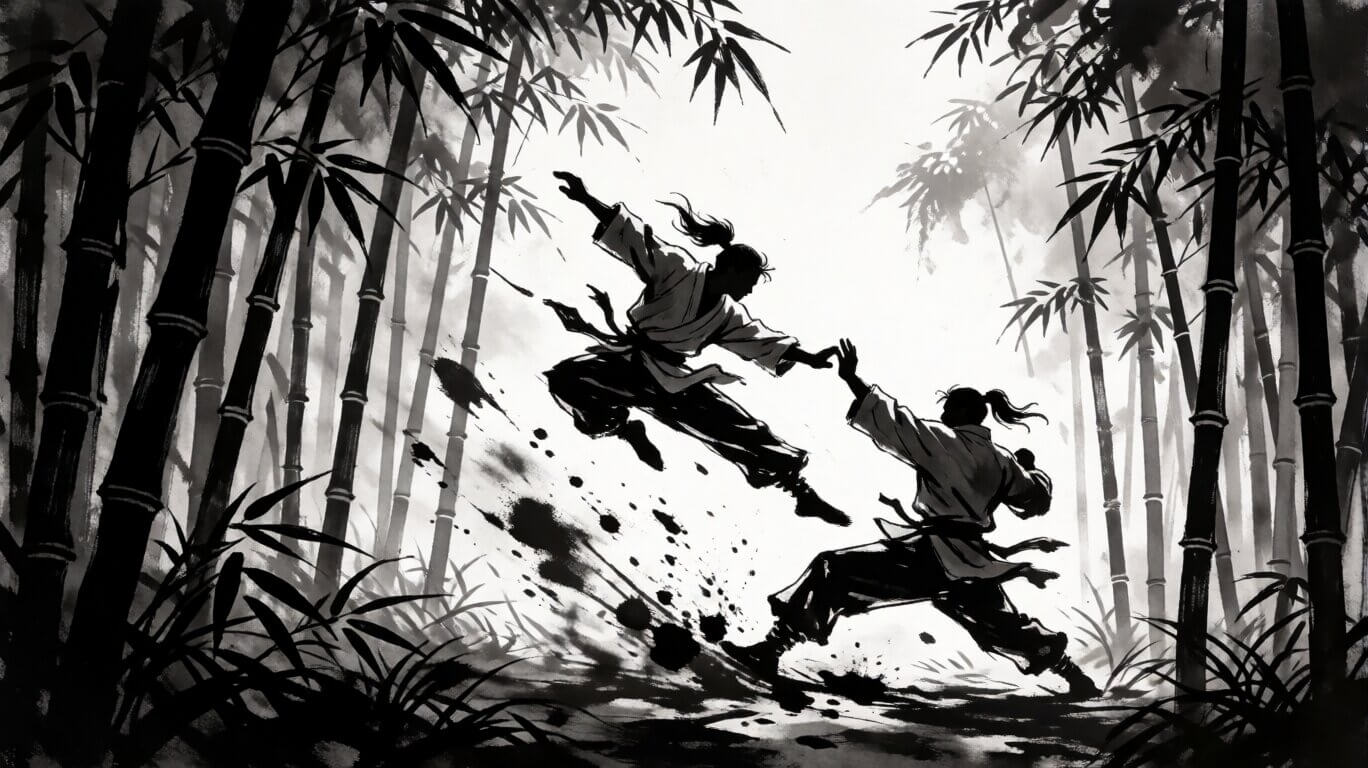
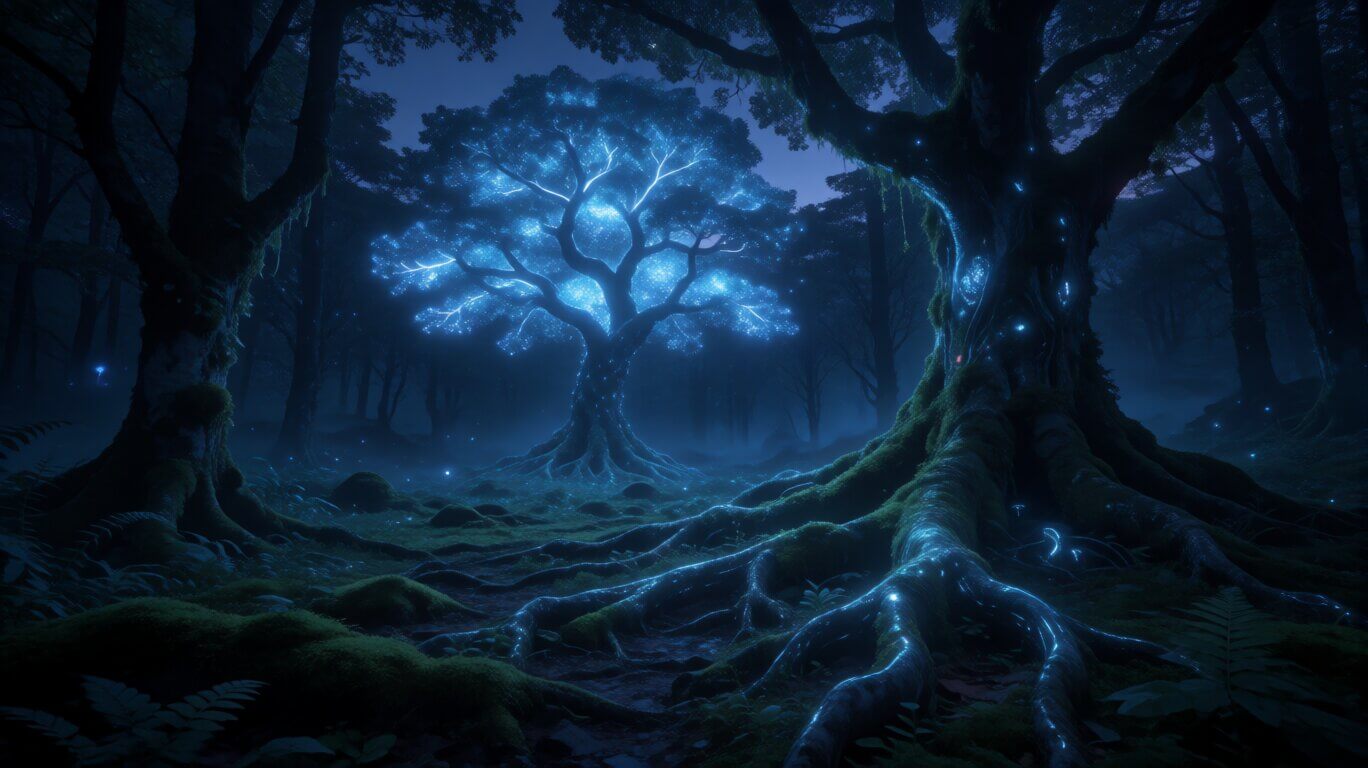
What Krea 2 Turbo Produces
These three images were generated on an RTX 3060 (12 GB) using the FP8 model at 1280×720, 8 steps, CFG 1.0. Click any image to zoom. Copy the prompt and paste it directly into your workflow to reproduce the result.


What You Need Before Starting
Check your GPU VRAM before downloading anything. Open your graphics card software or check your system specs.
Pre-flight checklist
Model Files to Download
You need four files to run the basic workflow. All are hosted on the official Comfy-Org/Krea-2 repository on HuggingFace. LoRA files are optional and covered separately below.
| File | Size | VRAM | Notes | Download |
|---|---|---|---|---|
krea2_turbo_fp8_scaled.safetensors | 13 GB | 12 GB+ | Recommended for most users | ↗ Download |
krea2_turbo_bf16.safetensors | 26.3 GB | 24 GB+ | Full precision — research only | ↗ Download |
qwen3vl_4b_fp8_scaled.safetensors | ~4 GB | Required | Text encoder — always use fp8 | ↗ Download |
qwen_image_vae.safetensors | ~1 GB | Required | Image decoder — required for output | ↗ Download |
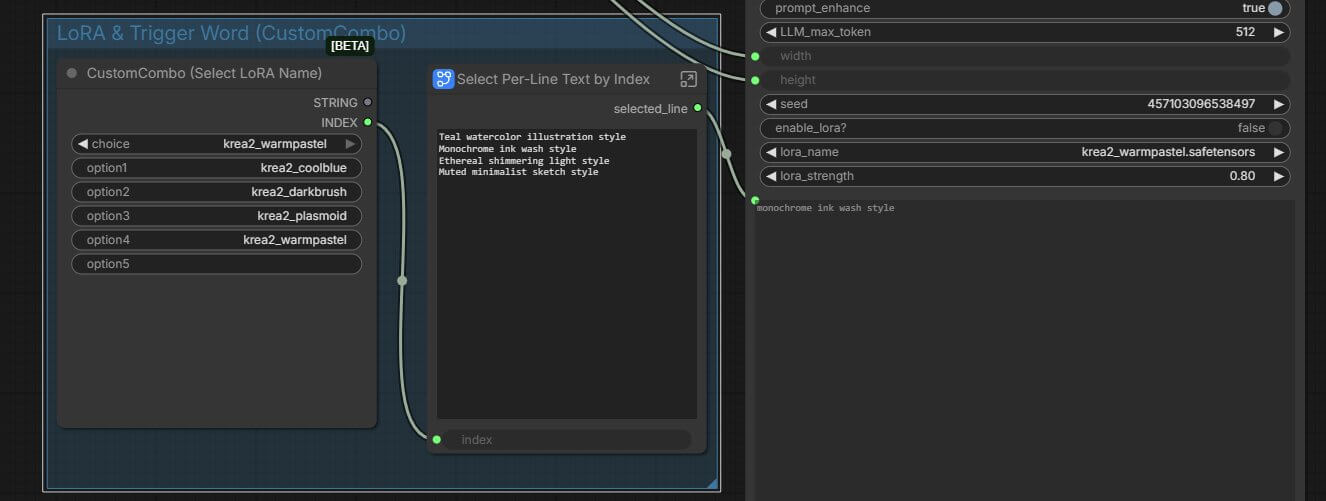
Optional: Style LoRAs
A LoRA (Low-Rank Adaptation) is a small add-on file that applies a specific visual style on top of the main model. You activate it with a trigger word in your prompt. Krea released four official style LoRAs — download whichever styles you want to try.
| LoRA file | Trigger word | Strength | Download |
|---|---|---|---|
krea2_coolblue | teal watercolor illustration style | 0.8 | ↗ Download |
krea2_darkbrush | monochrome ink wash style | 1.0 | ↗ Download |
krea2_plasmoid | ethereal shimmering light style | 0.8 | ↗ Download |
krea2_warmpastel | muted minimalist sketch style | 0.8 | ↗ Download |
Where to Place the Files
ComfyUI uses a specific folder structure inside its models/ directory. Each file type goes in a different subfolder. Placing a file in the wrong folder means ComfyUI cannot find it and the workflow fails to load.
diffusion_models/ — main modeltext_encoders/ — text encodervae/ — image decoderloras/ — style LoRAs (optional)models/checkpoints/. Krea 2 uses the diffusion_models folder specifically. If you place it in the wrong folder, the model dropdown in ComfyUI will be empty and the workflow will fail to load.Update ComfyUI to v0.26.0
Krea 2 requires ComfyUI version 0.26.0 or newer. Support for its architecture was only added in recent releases. If your ComfyUI is older than 0.25.0, the Krea 2 nodes will not exist and every node in the downloaded workflow will appear as a red error block.
git pull commands — incorrect updates can break your environment.See: ComfyUI Troubleshooting — Common Issues for step-by-step update instructions and what to check if your version number is wrong.
If you're using ComfyUI Desktop, it updates automatically. Check the version number displayed in the interface — it should read 0.26.0 or higher.
If any nodes are missing after updating, the install missing nodes guide covers how to find and add any nodes your workflow requires using ComfyUI Manager.
Download the Workflow
Three workflow files are available. Download the one that matches the model you chose. The LoRA workflow is a separate file with a Load LoRA node pre-connected.
🔧 Krea 2 Turbo — Workflow Downloads
Download the ready-to-use ComfyUI workflow JSON. Drag it onto the canvas and generate.
How to Load the Workflow JSON into ComfyUI
- Download the .json file to your computer.
- Open ComfyUI in your browser — usually at http://127.0.0.1:8188.
- Drag the .json file directly onto the ComfyUI canvas. Drop it anywhere on the empty grey area.
- The workflow loads automatically. You should see a set of connected nodes appear on the canvas.
- If you see only red error blocks, jump to the Troubleshooting section below.

Alternative: ComfyUI Built-in Template
ComfyUI 0.26.0 includes a built-in template for Krea 2 Turbo. Click the Templates button in the top menu, find Text to Image (Krea-2 Turbo), and click it. This loads the base workflow without LoRA support. Use the downloaded workflow files above if you want LoRAs.
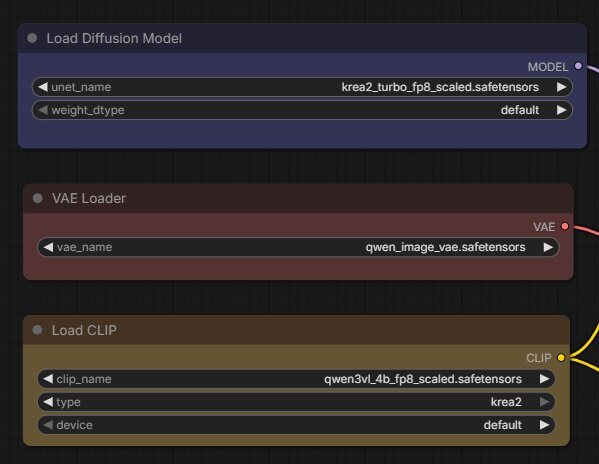
Workflow Structure: What Each Node Does
Once the workflow is loaded, you'll see four groups of nodes. Here's what each one controls and what to check before generating.
Model Section
This section loads the three required model files. After loading the workflow, check each node's dropdown to confirm the correct file is selected:
- Diffusion model node → set to
krea2_turbo_fp8_scaled.safetensors (or bf16 if you downloaded that version) - Text encoder node → set to
qwen3vl_4b_fp8_scaled.safetensors - VAE node → set to
qwen_image_vae.safetensors
If a filename does not appear in the dropdown, the file is in the wrong folder or named incorrectly. ComfyUI reads exact filenames — one misplaced character causes it to not appear.
Control Section — Resolution
This section sets the output resolution. The default is 1280×720 (HD). Higher resolutions require significantly more VRAM.
• 12 GB card (FP8): 1280×720 is the safe limit. Going higher will trigger a CUDA out-of-memory error.
• 16 GB card: 1280×1280 is stable.
• 24 GB+ card: Native 2K (1920×1080) generation is possible. Krea 2 can generate at native 2K without a separate upscaling step.
Prompt Section
This is where you type your image description. Write in full sentences — Krea 2 was trained on natural-language descriptions, not keyword lists. A negative prompt is not required when using Turbo. Leave the negative prompt field blank.
Sampling Section — Default Settings for Turbo
The KSampler node runs the actual image generation. The correct default settings for Krea 2 Turbo are:
8— optimized for Turbo, more steps won't improve quality1.0— raising above 1.5 causes oversaturationer_sde— required for Turbosimple— use with er_sde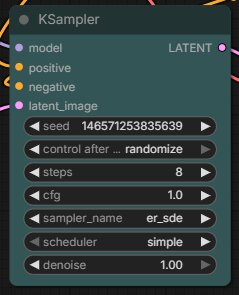
The 4 Official Style LoRAs
Krea released four official style LoRAs trained on Krea 2 RAW. Each applies a specific visual aesthetic on top of the main model when activated with a trigger word in your prompt. Without the trigger word, the LoRA has little or no visible effect even at full strength.
How to Load a LoRA
- Load the LoRA workflow file (downloaded above). It includes a Load LoRA node pre-connected between the diffusion model and sampler.
- In the workflow, find the Load LoRA node. It sits between the diffusion model node and the KSampler.
- Click the dropdown inside the Load LoRA node. Select the LoRA file you want (e.g. krea2_darkbrush.safetensors).
- Set the strength value — 1.0 for krea2_darkbrush, 0.8 for all others.
- In the Prompt section, include the trigger word for that LoRA at the start of your prompt.
- Click Queue Prompt. The LoRA style applies to the output.
What Each LoRA Produces
How to Write Prompts for Krea 2
Krea 2 prompts are built from short, comma-separated phrases — not full grammatical sentences. Skip old-style keyword stuffing ("masterpiece, 8k, best quality") and skip writing a full paragraph too. The format that actually works sits between the two: 3–6 short phrases, each naming something concrete — an action, a camera angle, a light source, a texture, a named art style.
✗ Vague filler (less effective)
a beautiful warrior in a dark forest, stunning, masterpiece, best quality, highly detailed, 8k✓ Concrete building blocks (more effective)
female warrior holding a spear, mid-stride through dense forest, low vantage point, golden hour backlight through canopy, raw film grain, monochrome ink wash styleNeither example above is a full sentence. Each is a stack of short phrases separated by commas — that's the format Krea 2 was actually trained to read.
The 6 Building Blocks
Stack these in roughly this order. You don't need all six in every prompt — two or three strong, specific phrases beat five vague ones.
- Subject + action — who or what, and what they're doing. Use an active verb: sprinting, pouring, rearing.
- Pose / body detail (optional) — a specific physical detail: contrapposto pose, mid-spin, one wing raised.
- Camera & framing — angle and shot type: low vantage point, wide angle, close-up.
- Lighting / atmosphere — a named light source, not a vague adjective: golden hour backlight, neon spill, foggy blue dusk.
- Material / texture cues (optional) — named surfaces: wet asphalt, chrome, raw film grain.
- Named style / medium tag — placed near the end: risograph poster style, monochrome ink wash, Pixar-style 3D render.
Short vs. Long Prompts — Both Are Correct
Krea 2 has a built-in prompt enhancer that fleshes out short prompts automatically. A short prompt — subject, action, one style tag, 6–12 words — works fine for most generations and is the right default.
Switch to a longer prompt — stacking four or more phrases across lighting, texture, and composition — only when you need precise control: a specific pose, an exact light source, in-image text, or a brand-accurate look. More phrases give more control, not more "quality."
Word Choice — Do This, Not That
Do
- Name concrete materials and light sources, not praise words
- Use real camera and cinematography terms
- Name an actual medium or art-historical style
- Keep phrases short, stack them with commas
- Wrap in-image text in quotes, keep it to a word or two
Avoid
- Filler words: "beautiful", "stunning", "masterpiece", "8k", "best quality"
- Full grammatically perfect sentences with conjunctions
- Stacking more than one named style, unless blending on purpose
- Negative prompting in the main prompt (e.g. "no blur")
Using LoRA Trigger Words
When using a style LoRA, place the trigger word at the very start of your prompt, followed by a period, then your scene built from comma-separated phrases.
The Prompt Enhancer
The default Krea 2 workflow template includes a Prompt Enhancer from the Krea team, enabled by default. It rewrites short prompts into longer, more detailed phrase stacks before generation. Disable it in the workflow only if you're writing a fully detailed long prompt yourself and want exact control over every phrase.
Get the Prompt-Writing Skill File
The building blocks above are packaged into a single skill file — a structured instruction set that teaches Claude or ChatGPT the exact Krea 2 prompt anatomy, the camera/lighting/style word bank, and the do's and don'ts. Download it once, paste it into a Claude Project or a custom GPT, and from then on you just describe your image idea in plain English — the AI returns a ready-to-paste Krea 2 prompt.
🧠 Krea 2 Prompt Writer — Skill File
A ready-made instruction file for Claude or ChatGPT — paste it in once, then just describe your idea.
8 Tested Prompts — Ready to Copy
These prompts were tested on the FP8 model at 1280×720 on an RTX 3060. Copy and paste any prompt directly into the prompt node to verify your workflow generates correctly.
🔧 Krea 2 Turbo — Workflow Downloads
Download the ready-to-use ComfyUI workflow JSON. Drag it onto the canvas and generate.
"Model not found" or red nodes after loading the workflow
The model file is in the wrong folder, or the filename does not match exactly.
- Open your file manager and navigate to
ComfyUI/models/. - Check that
krea2_turbo_fp8_scaled.safetensorsis insidediffusion_models/— not insidecheckpoints/orunet/. - Check that
qwen3vl_4b_fp8_scaled.safetensorsis insidetext_encoders/. - Check that
qwen_image_vae.safetensorsis insidevae/. - Restart ComfyUI after moving any files. It rescans model folders on startup.
CUDA out of memory error during generation
You are either using the BF16 model on a card with less than 24 GB VRAM, or the resolution is set too high.
- Switch to the FP8 model (
krea2_turbo_fp8_scaled.safetensors). - Set resolution to 1280×720 or lower in the Control section.
- Close any other applications using your GPU before generating — games, other AI tools, video editors.
- Restart ComfyUI and try again.
Images look washed out or distorted
The CFG value was changed from the default. Reset CFG to 1.0 in the Sampling section. For Turbo, any value above 2.0 produces flat, oversaturated results.
LoRA has no visible effect on the image
Two causes. First: the trigger word is missing from your prompt — add the exact trigger phrase from the LoRA table to the start of your prompt. Second: the LoRA strength is set too low — set it to at least 0.6. If the LoRA still has no effect, confirm the .safetensors file is inside ComfyUI/models/loras/.
Text encoder error or "unsupported encoder" warning
ComfyUI 0.25.0 added native support for the Qwen3-VL text encoder. If ComfyUI shows an error on the text encoder node, your ComfyUI version is too old. Update ComfyUI following the ComfyUI troubleshooting guide and restart.
All nodes load but generation produces a black image
The VAE file is either missing or in the wrong folder. Confirm qwen_image_vae.safetensors is inside ComfyUI/models/vae/. A missing VAE causes ComfyUI to output black frames.
Missing nodes after loading the workflow
If the workflow loads but some nodes appear as red error blocks with "missing node" labels, ComfyUI Manager can install them automatically. See the install missing nodes guide for step-by-step instructions.
Frequently Asked Questions
What to Do Next
Download the workflow. Run a test prompt. Go from there.
Once you get a clean image with default settings, try the style LoRAs one at a time. Once you're comfortable with Krea 2 outputs, the SeedVR2 upscaler takes them to 4K without additional model downloads.
Published: 2026-06-24 · Last updated: 2026-06-24 · Tested on RTX 3060 (12 GB VRAM) and RTX 4080 (16 GB VRAM) · ComfyUI v0.26.0 · Model: krea2_turbo_fp8_scaled.safetensors
Join the discussion
Sign in to leave a comment or reply
No comments yet
Be the first to share your thoughts!