

Flux-Krea Text-to-Image Workflow
Creating images from text is easier than ever with the Flux-Krea workflow for ComfyUI. Flux Krea (FLUX.1-Krea-dev) is a powerful text-to-image model that produces highly realistic, detail-rich results directly from natural language prompts. This guide walks you through every step — from downloading the workflow to running your first generation.
The setup takes about 10–15 minutes. Once the models are in place, generating images is as simple as typing a prompt and pressing run.
Step 1 — Download the Workflow File
First, make sure your ComfyUI is updated to the latest version. Then download the JSON workflow below and drag it directly into your ComfyUI canvas to load it.
Download flux-krea JSON WorkflowDrag the downloaded flux-krea.json file into your ComfyUI browser window to load the workflow automatically.
Step 2 — Download Required Models
Flux Krea requires three types of model files. Download each from Hugging Face and place them in the correct ComfyUI subfolders as shown in the folder structure below.
Diffusion Model
Choose one of the following — the fp8 scaled version is recommended for lower VRAM usage:
- flux1-krea-dev_fp8_scaled.safetensors (recommended — lower VRAM)
- flux1-krea-dev.safetensors (full precision — more VRAM required)
Text Encoders
You need both of the following text encoder files:
- clip_l.safetensors
- t5xxl_fp8_e4m3fn_scaled.safetensors (fp8 — recommended) or t5xxl_fp16.safetensors (fp16 — higher quality, more VRAM)
VAE
Required Folder Structure
Place each file in the correct subfolder. The filenames must match exactly:
📂 ComfyUI/
└── 📂 models/
    ├── 📂 diffusion_models/
    │   └── flux1-krea-dev_fp8_scaled.safetensors
    │       (or flux1-krea-dev.safetensors)
    ├── 📂 text_encoders/
    │   ├── clip_l.safetensors
    │   └── t5xxl_fp8_e4m3fn_scaled.safetensors
    │       (or t5xxl_fp16.safetensors)
    └── 📂 vae/
        └── ae.safetensors
Step 3 — Workflow Setup
Once the workflow is loaded and all model files are in place, configure each node to point to the correct file. In each node listed below, open the dropdown and select the matching filename:
flux1-krea-dev_fp8_scaled.safetensorsclip_l.safetensorst5xxl_fp8_e4m3fn_scaled.safetensorsae.safetensorsNext, enter your prompt. Here's a ready-to-use example to get started:
Starter prompt
A realistic young woman standing on the cracked platform of an old abandoned train station at sunset. Rusty steel beams, chipped paint, and overgrown grass between the tracks are rendered in high deta…
Run the workflow
Click the Queue Prompt button, or press Ctrl + Enter (Windows / Linux) or Cmd + Enter (Mac) to start generating your image.
Step 4 — Example Generations
Here are three example prompts with their outputs generated using Flux Krea in ComfyUI. Each prompt is ready to copy and use directly in your workflow.
Example 1 — Jungle beach scene, cinematic atmosphere
Prompt used:
At the lush boundary where a dense, humid jungle meets a sun-bleached beach, a beautiful woman seeks refuge from the heat. She wears a skimpy, leopard-print bikini that blends with the wild surroundin…
Output:
Example 2 — Cozy cat portrait, soft window lighting
Prompt used:
(photorealistic:1.4), (masterpiece:1.3), (intricate details:1.2), A charming orange and white domestic shorthair cat, with soft and fluffy fur, lying on a plush and cozy bed, gazing out of the window …
Output:

Example 3 — Muscular Doberman in fashion sunglasses, studio lighting
Prompt used:
(best quality, 8K, high resolution, masterpiece), ultra-detailed, hyper-realistic photography, cinematic lighting — a majestic, intensely muscular Doberman stands proudly against a deep matte black ba…
Output:
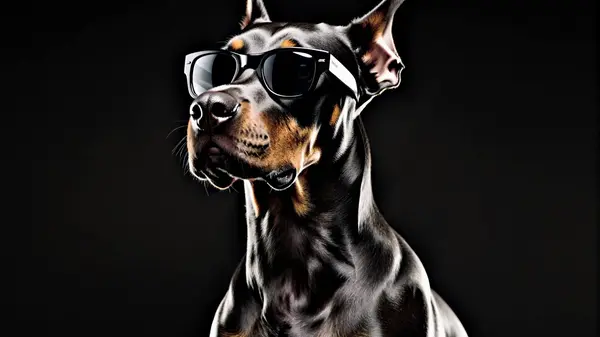
Note: In most cases, results closely match the prompt — realism and detail are impressive with Flux Krea. Your output may vary slightly depending on prompt clarity, CFG value, and step count.
Final Thoughts
Flux Krea is one of the most capable text-to-image models available for local use in ComfyUI. Once the models are in place, the workflow is straightforward — and the results speak for themselves across portraits, product shots, landscapes, and more.
- Setup is simple once model files are in the correct folders.
- Works best with clear, detailed, and well-structured prompts.
- The fp8 scaled model significantly reduces VRAM requirements without a major quality drop.
- Experiment with CFG and step count to balance speed and quality for your GPU.
Frequently Asked Questions
Join the discussion
Sign in to leave a comment or reply
No comments yet
Be the first to share your thoughts!