
⚡ Quick Answer
Flux.2 Klein is an image generation and editing model from Black Forest Labs that runs inside ComfyUI. It comes in two sizes: a 9B Base model for highest quality and a 4B Distilled model that generates in 4 steps.
For best results with the 9B model, write detailed natural language prompts of 100–400 words, set steps to 20–30 and CFG to 1.0. The 4B model works with the same prompts but runs at 4 steps.
This guide covers prompting best practices, all recommended settings, free workflow downloads, and full setup instructions. Minimum 8 GB VRAM required (16 GB recommended for the 9B model).
📋 Before You Start
Hardware
Minimum VRAM: 8 GB (4B model)
Recommended VRAM: 16 GB+ (9B model)
Software
ComfyUI: v0.3.x or later
ComfyUI Manager: required for node updates
Model Files Required
Diffusion models:
flux-2-klein-9b-fp8.safetensors
flux-2-klein-base-4b-fp8.safetensors
Text encoders + VAE:
qwen_3_8b_fp8mixed.safetensors
qwen_3_4b.safetensors
flux2-vae.safetensors
Download links for all files are in the Step 2: Download Models section below.
Introduction
Flux.2 Klein is one of the fastest image generation models you can run in ComfyUI right now. This guide covers how to prompt it effectively, which model size to pick for your use case, and how to use it for both text-to-image generation and image editing.
It's popular with artists, content creators, and workflow builders because it handles complex, detailed prompts without needing extensive parameter tweaking. The Qwen text encoder it uses understands natural language well — including multilingual input — so you can write prompts the way you'd describe a scene to a person, not as a list of tags.
What is Flux.2 Klein?
Flux.2 Klein is part of the Flux family of image models from Black Forest Labs. It supports both text-to-image generation and image editing via text prompts. There are two main versions:
| Model | Parameters | Speed | Best for |
|---|---|---|---|
| 9B Base (Undistilled) | 9 billion | Standard | Best quality, complex prompts, advanced workflows, image editing |
| 4B Distilled (4-step) | 4 billion | Very fast | Quick previews, real-time apps, rapid iteration |
Both versions share the same workflow structure and the same VAE file. The 9B Base model gives the best quality for detailed generations and complex edits. The 4B Distilled model is significantly faster — it generates in just 4 steps, making it ideal when speed matters more than maximum quality.
Flux.2 Klein Prompting: Key Rules for 4B and 9B
Flux.2 Klein uses a Qwen text encoder — a language model that reads your prompt as natural language, not as a list of tags. This changes how you need to write prompts compared to older Stable Diffusion models.
Write sentences, not tag lists
Describe your subject, setting, lighting, and style in full sentences. The Qwen encoder understands sentence structure and context — comma-separated keywords from SD1.5-era workflows produce flat, generic results here.
❌ Keyword list (less effective)
beautiful woman, portrait, studio lighting, bokeh, photorealistic, 85mm lens, sharp focus, professional
✅ Natural language (more effective)
A hyper-realistic portrait of a young woman photographed in a professional studio with a single softbox positioned above and to the left. Shot on an 85mm lens at f/1.4, background completely blurred. Sharp focus on her face, subtle rim light from behind.

Cover these four things in every prompt
- Subject — who or what, with specific detail (age, appearance, clothing, expression)
- Setting — where and when, with environmental context
- Lighting — name the light source, direction, and quality ("a single bare tungsten bulb casting hard shadows downward")
- Style — photography type, artistic reference, or visual language. Put this in the first half of your prompt so it gets full weight.
Recommended settings
The most common mistake is using the wrong step count with the 4B Distilled model. Keep 4B at exactly 4 steps — using more steps actively reduces quality because the model was specifically trained for 4-step generation.
| Setting | 9B Base Model | 4B Distilled Model |
|---|---|---|
| Steps | 20–30 | 4 |
| CFG Scale | 1.0 | 1.0 |
| Sampler | euler | euler |
| Scheduler | simple | simple |
| Resolution | Up to 1920×1080 | 1024×1024 recommended |
| Prompt length | 100–400 words | Under 150 words |
| Negative prompt | Optional | Optional |
📖 Full Prompting Guide
Want to master FLUX.2 prompting in depth?
The dedicated guide covers the 4-part formula, HEX color control, in-image text, JSON structured prompting, and more — with real examples.
Flux.2 Klein Prompt Examples: Text-to-Image (9B Base Model)
The following examples use the 9B Base model (flux-2-klein-9b-fp8.safetensors). Each prompt is ready to copy and use directly in your workflow. All generated at steps: 25, CFG: 1.0.
Example 1 — Cinematic portrait in a vintage bowling alley

Prompt used
A captivating young Japanese woman with delicate, distinctly East Asian facial features — soft oval face, smooth porcelain skin, large expressive dark brown eye…
Example 2 — Luxury skincare product advertisement

Prompt used
A beautiful product advertisement poster for the brand of RYXM skin care products, all-metal bottle, in the middle is a chrome-plated metal arc-all-metal bottle…
Example 3 — Cyberpunk night scene with neon signs

Prompt used
Ultra-detailed, cinematic photograph of a dark, abandoned car lying on its side on a wet, asphalt road, with its front wheel facing towards the right side of A …
Example 4 — Retro arcade purikura selfie

Prompt used
A young artistic Japanese woman with tousled bangs, smudged eyeliner, and a focused expression of creative absorption, dressed in a patchwork denim jacket over …
Example 5 — Hyper-realistic studio portrait

Prompt used
A hyper-realistic close-up portrait of a Swedish beauty, a fair-skinned young woman with golden-blonde hair cascading in soft, sun-kissed waves, captured from a…
Want to learn how to build prompts like these? Read the full FLUX.2 prompting guide for the complete breakdown — 4-part formula, HEX color control, JSON structured prompting, and more.
Fast Generation: 4B Distilled Model
The same prompts work with the 4B Distilled model (flux-2-klein-base-4b-fp8.safetensors). Quality may be slightly lower, but generation is significantly faster — making it ideal for iteration and real-time workflows.





Image Editing Examples
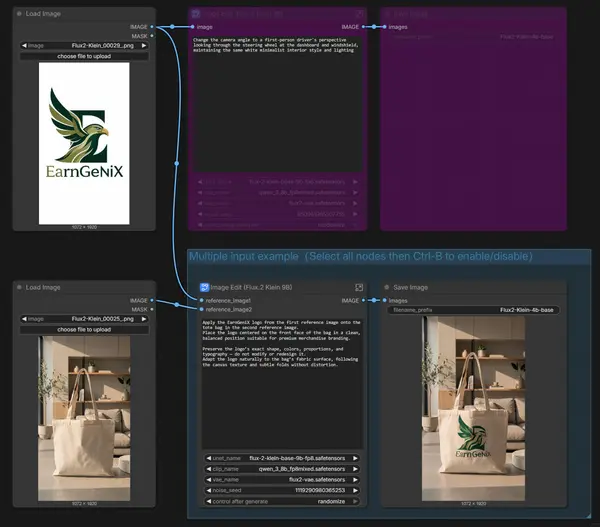
Flux.2 Klein also supports image editing. You can modify existing images using simple text prompts — change backgrounds, swap objects, adjust colors, apply styles, and more. Single or multiple reference images are both supported.
Editing Examples

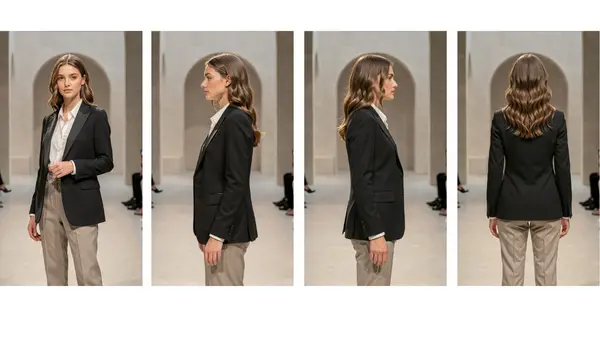

You can use one or more reference images for controlled, consistent edits. The multi-reference workflow is particularly useful for character consistency tasks. Learn how to build character consistency workflows in our character consistency guide.
How to Set Up Flux.2 Klein in ComfyUI: Step-by-Step
Setting up Flux.2 Klein requires two steps: updating ComfyUI and its nodes, then downloading and placing the model files in the correct folders. If you haven't installed ComfyUI yet, follow the ComfyUI installation guide first.
Step 1 — Update ComfyUI
Flux.2 Klein requires a recent version of ComfyUI. Running an outdated version causes node errors even when all model files are correctly placed. Update before installing the models.
Update ComfyUI core
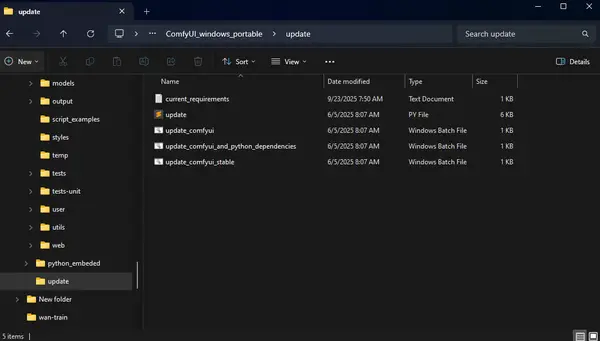
Open your ComfyUI installation folder. Open the update subfolder and run the update_comfyui file by double-clicking it. A terminal window opens and runs the update. You should see a 'Done' message when it completes — the terminal window then closes automatically.
Update all nodes via ComfyUI Manager
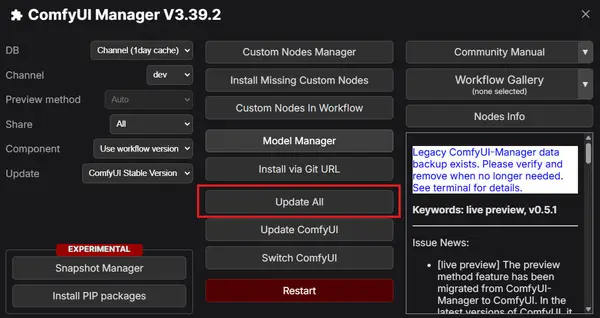
Start the ComfyUI server, open the Manager panel by clicking Manager in the top menu, and click "Update All". A list of nodes appears with progress indicators. Wait until all items show a green checkmark — this usually takes 1–3 minutes depending on how many nodes you have installed. Restart ComfyUI completely when it finishes.
Step 2 — Download and Place Model Files
Download the required model files and place them in the correct ComfyUI folders. Each file type has its own specific subfolder — putting files in the wrong folder is the most common setup error and causes the workflow to fail on the first run.
Diffusion Models → ComfyUI/models/diffusion_models/
- flux-2-klein-9b-fp8.safetensors — 9B Base model (best quality)
- flux-2-klein-base-4b-fp8.safetensors — 4B Distilled model (fast generation)
Text Encoders → ComfyUI/models/text_encoders/
- qwen_3_8b_fp8mixed.safetensors — required for the 9B workflow
- qwen_3_4b.safetensors — required for the 4B workflow
VAE → ComfyUI/models/vae/
- flux2-vae.safetensors — shared between both workflows. The VAE (Variational Autoencoder) converts the model's internal latent image into the final pixel image you see.
Required Folder Structure
📂 ComfyUI/
└── 📂 models/
    ├── 📂 diffusion_models/
    │   ├── flux-2-klein-9b-fp8.safetensors
    │   └── flux-2-klein-base-4b-fp8.safetensors
    ├── 📂 text_encoders/
    │   ├── qwen_3_8b_fp8mixed.safetensors
    │   └── qwen_3_4b.safetensors
    └── 📂 vae/
        └── flux2-vae.safetensors
Using the Workflows
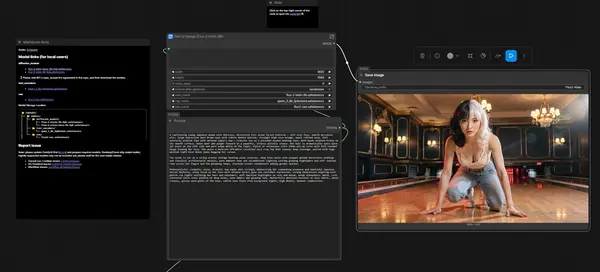
Text-to-Image Workflow
Download Text-to-Image Workflow- Download the workflow JSON file using the button above.
- Open ComfyUI in your browser. Drag the JSON file onto the canvas, or click the Load button in the top menu and select the file.
- The workflow loads and you see a node graph. If any nodes show red outlines, see the Troubleshooting section below.
- Click inside the text node and enter your prompt.
- Click the orange Queue Prompt button in the top-right corner. A progress bar appears below it.
Ctrl+B to enable it. Don't have SageAttention? Follow this install guide.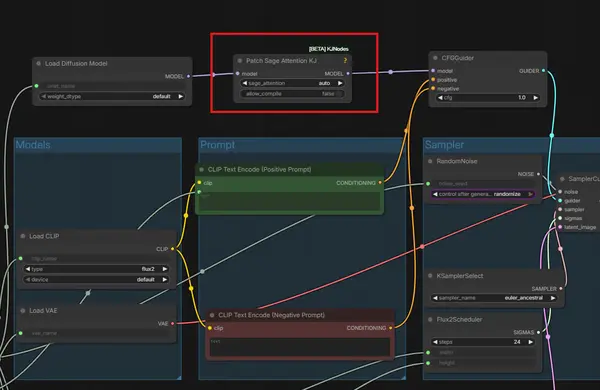
Image Editing Workflow
Download Image Editing Workflow- Load the image editing workflow into ComfyUI using the same drag-and-drop method.
- Find the image input node (labelled Load Image) and click the Upload button to select the image you want to edit. The image thumbnail appears inside the node.
- Enter your edit instruction as a text prompt. Start with the change you want, then describe the full intended result.
- Click Queue Prompt. You should see a progress bar and a preview of the edited image when generation completes.
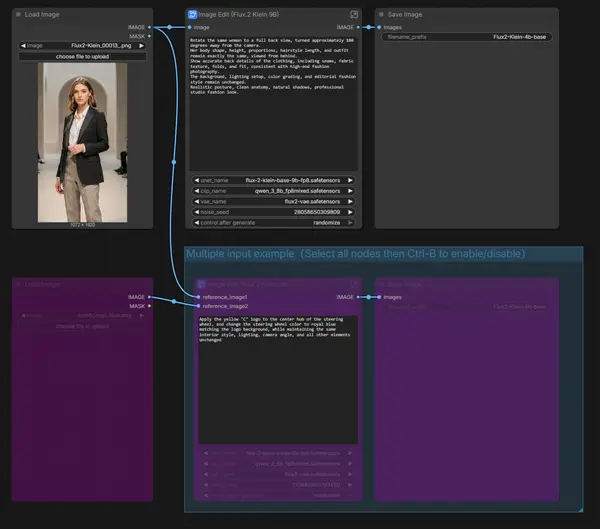
Ctrl+B. Adjust the megapixel setting to control output resolution.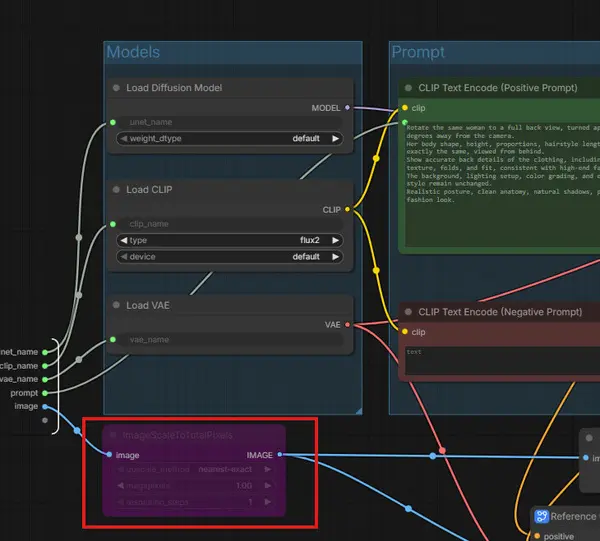
Multi-Reference Editing Workflow
Download Multi-Reference Workflow- Load the multi-reference workflow into ComfyUI.
- Upload your main image and one or more reference images using the Load Image nodes. Each node has an Upload button.
- Enter your editing prompt.
- Click Queue Prompt to run the workflow.
- Use the built-in image compare node to review the before/after difference — drag the slider to compare input and output.
Flux.2 Klein ComfyUI Troubleshooting: Common Errors and Fixes
If something isn't working as expected, check these issues first. The most common problems come from incorrect file placement, mismatched model/encoder pairs, and outdated nodes.
Missing model errors on startup
Fix: Double-check the folder structure above. Filenames must match exactly — including capitalisation. Diffusion models, text encoders, and VAE each go in separate subfolders. Do not place the text encoder in models/clip/ — it must be in models/text_encoders/.
Text encoder not loading or "model not found" for the encoder
Fix: Check that the encoder filename matches the workflow exactly. The 9B workflow requires qwen_3_8b_fp8mixed.safetensors — not the 4B version (qwen_3_4b.safetensors). Swapping them causes the workflow to fail silently or produce garbled output. Check the filename character by character.
Generation is slow
Fix: Try the 4B Distilled model first, or lower the output resolution. Enabling SageAttention (Ctrl+B on the SageAttend node) also provides a measurable speed improvement on supported GPUs. Make sure you are not running 20+ steps on the 4B Distilled model.
Images are blurry or low detail even with good prompts
Fix: Check that the text encoder matches the model — mixing the 4B encoder with the 9B model (or vice versa) causes quality degradation. Also verify your step count: 4B Distilled needs exactly 4 steps; using 20+ steps with 4B produces worse results, not better. If using 9B, confirm you have at least 16 GB VRAM available.
Edits are not following the prompt accurately
Fix: Rephrase your edit prompt to start with a direct command ("Change the background to...", "Replace the jacket with..."), then describe the full intended result. The 9B Base model handles complex editing instructions better than the 4B. Try reducing resolution if the model is running out of VRAM mid-generation.
ComfyUI nodes not showing up or red node errors in workflow
Fix: Make sure all nodes are updated via ComfyUI Manager (click Update All). If a node is still missing after updating, search for it by name in the Manager and install it manually. Clear your browser cache and restart ComfyUI completely after installing new nodes.
Frequently Asked Questions
What to Do Next
Download the text-to-image workflow above and drag it into ComfyUI. Run it with the default settings first — use one of the 5 prompts from this guide to confirm everything is working. Once you have a successful generation, try swapping to the 4B Distilled model to compare speed vs quality on your hardware.
To go deeper on prompting — including the full 4-part formula, HEX color control, in-image text rendering, and JSON structured prompting — read the FLUX.2 prompting guide.
Join the discussion
Sign in to leave a comment or reply
No comments yet
Be the first to share your thoughts!