
⚡ Quick Answer
The MiniMax H3 Turbo LoRA cuts MiniMax H3 generation from around 20 sampling steps down to just 8, using ComfyUI's built-in BasicScheduler, KSamplerSelect, and SamplerCustomAdvanced nodes instead of a custom third-party sampler. It works for all three MiniMax H3 modes — text-to-video, image-to-video, and reference-to-video, which MiniMax's own documentation doesn't confirm — and this guide shows the exact ComfyUI setup for each, tested on an RTX 4090.
MiniMax H3 is already one of the best local video models available in ComfyUI, but at roughly 20 steps per generation, it's slow. This guide covers the full MiniMax H3 Turbo LoRA ComfyUI setup for all three modes — text-to-video, image-to-video, and reference-to-video — using the checkpoint and settings tested for this article.
Hardware and versions used for this guide: the latest ComfyUI version, tested on Windows with an RTX 4090 (24GB VRAM). If you haven't set up base MiniMax H3 yet, start with the full MiniMax H3 setup guide first — this article assumes MiniMax H3 is already installed and running.
What to Expect: Example Outputs
Before you download anything, here's what the Turbo LoRA actually produces at 8 steps, straight out of ComfyUI.
Text-to-video (T2V) — 8 steps, no input image needed
Image-to-video (I2V) — 8 steps, animated from a starting image
What Is the MiniMax H3 Turbo LoRA?
A LoRA (short for Low-Rank Adaptation) is a small add-on file that changes how a base AI model behaves without replacing it. The MiniMax H3 Turbo LoRA is trained specifically to let MiniMax H3 produce good results in far fewer sampling steps — 8 instead of roughly 20 for the base workflow — which means noticeably faster generation on the same hardware.
What isn't documented anywhere else yet is whether the Turbo LoRA works with reference-to-video (R2V)— MiniMax's own documentation doesn't confirm this. This guide covers all three modes with a working setup for each.
What You Need Before You Start
You need the base MiniMax H3 install already covered in the full MiniMax H3 setup guide — ComfyUI itself and the required custom nodes. This guide adds three things on top of that: the Turbo LoRA file, two mode-specific diffusion checkpoints, and a couple of extra nodes for speed and upscaling.
Turbo LoRA File (Required for All Three Modes)
Three Turbo LoRA checkpoints exist. All three were tested for this guide — minimax_h3_turbo_v4_step600_ema.safetensors is the recommended default and the one used throughout this article. The two 4-step checkpoints run faster but produced noticeably weaker results in testing.
| File | Steps | What It Is |
|---|---|---|
minimax_h3_turbo_v4_step600_ema.safetensors | 8 | Recommended default — used throughout this guide, best balance of speed and quality in testing |
minimax_h3_turbo_4step_ema_ckpt850.safetensors | 4 | Faster, 4-step variant — tested for this guide, results were noticeably weaker than v4_step600 |
minimax_h3_turbo_4step_ema_ckpt500.safetensors | 4 | Faster, 4-step variant — tested for this guide, results were noticeably weaker than v4_step600 |
ckpt850 and ckpt500) were tested for this guide and produced noticeably weaker results than v4_step600 — softer motion and less consistent detail in side-by-side comparisons. They're listed here for completeness, but v4_step600 at 8 steps is the recommended setting for every workflow in this guide.Diffusion Checkpoints
minimax_h3_fl2va_pruned_int8_convrot.safetensors — used for text-to-video and image-to-video. Download from Comfy-Org's Hugging Face repo.
MiniMax_H3_Ref2VA_pruned_int8_convrot.safetensors — used for reference-to-video only, a different file from the one above. Download from Abiray's Hugging Face repo.
Extra Custom Nodes Used in These Workflows
SageAttention patches (MiniMaxH3MemoryEfficientSageAttentionPatch, PathchSageAttentionKJ) — install using the SageAttention installation guide. No separate download is needed beyond that.
RTXVideoSuperResolution — from Comfy-Org's Nvidia RTX Nodes for ComfyUI repository. Install through ComfyUI Manager by searching "RTX Video Super Resolution," or clone the repo directly into your custom_nodes folder.
MiniMaxChunkFeedForward and OTUNetLoaderW8A8load automatically once the Comfy-Org MiniMax H3 native support is installed as part of the base setup guide — no extra install needed for these two if you've already followed that guide.
git pull if you run ComfyUI from source. The native sampler path this guide uses relies on ComfyUI's built-in ModelSamplingAV support, which is only reliable on a current build.Download the Workflows
Download all three ready-to-load workflow files below instead of building them node-by-node. Drag any of these files directly onto the ComfyUI canvas to load the full workflow.
How to Set Up MiniMax H3 Turbo LoRA for Text-to-Video
This is the fastest of the three modes to set up because it doesn't need any input images — just a text prompt.
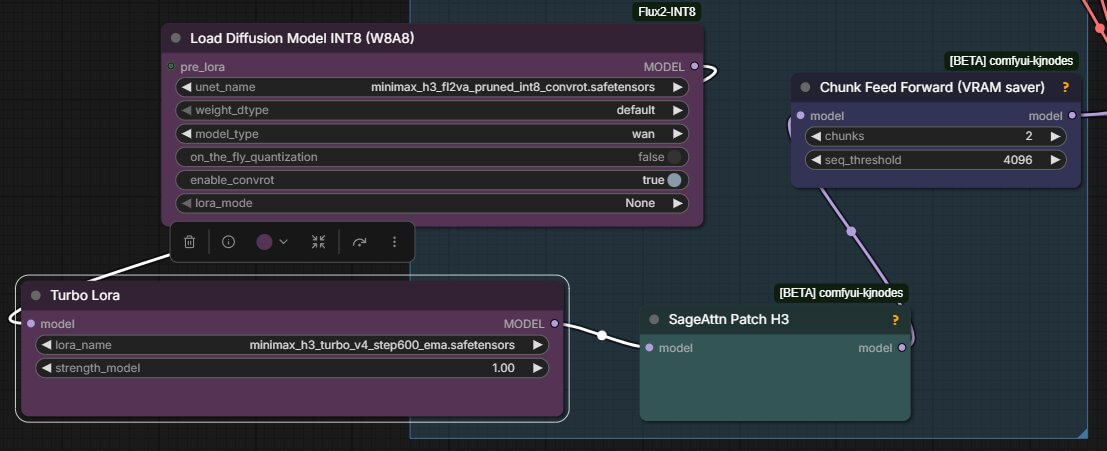
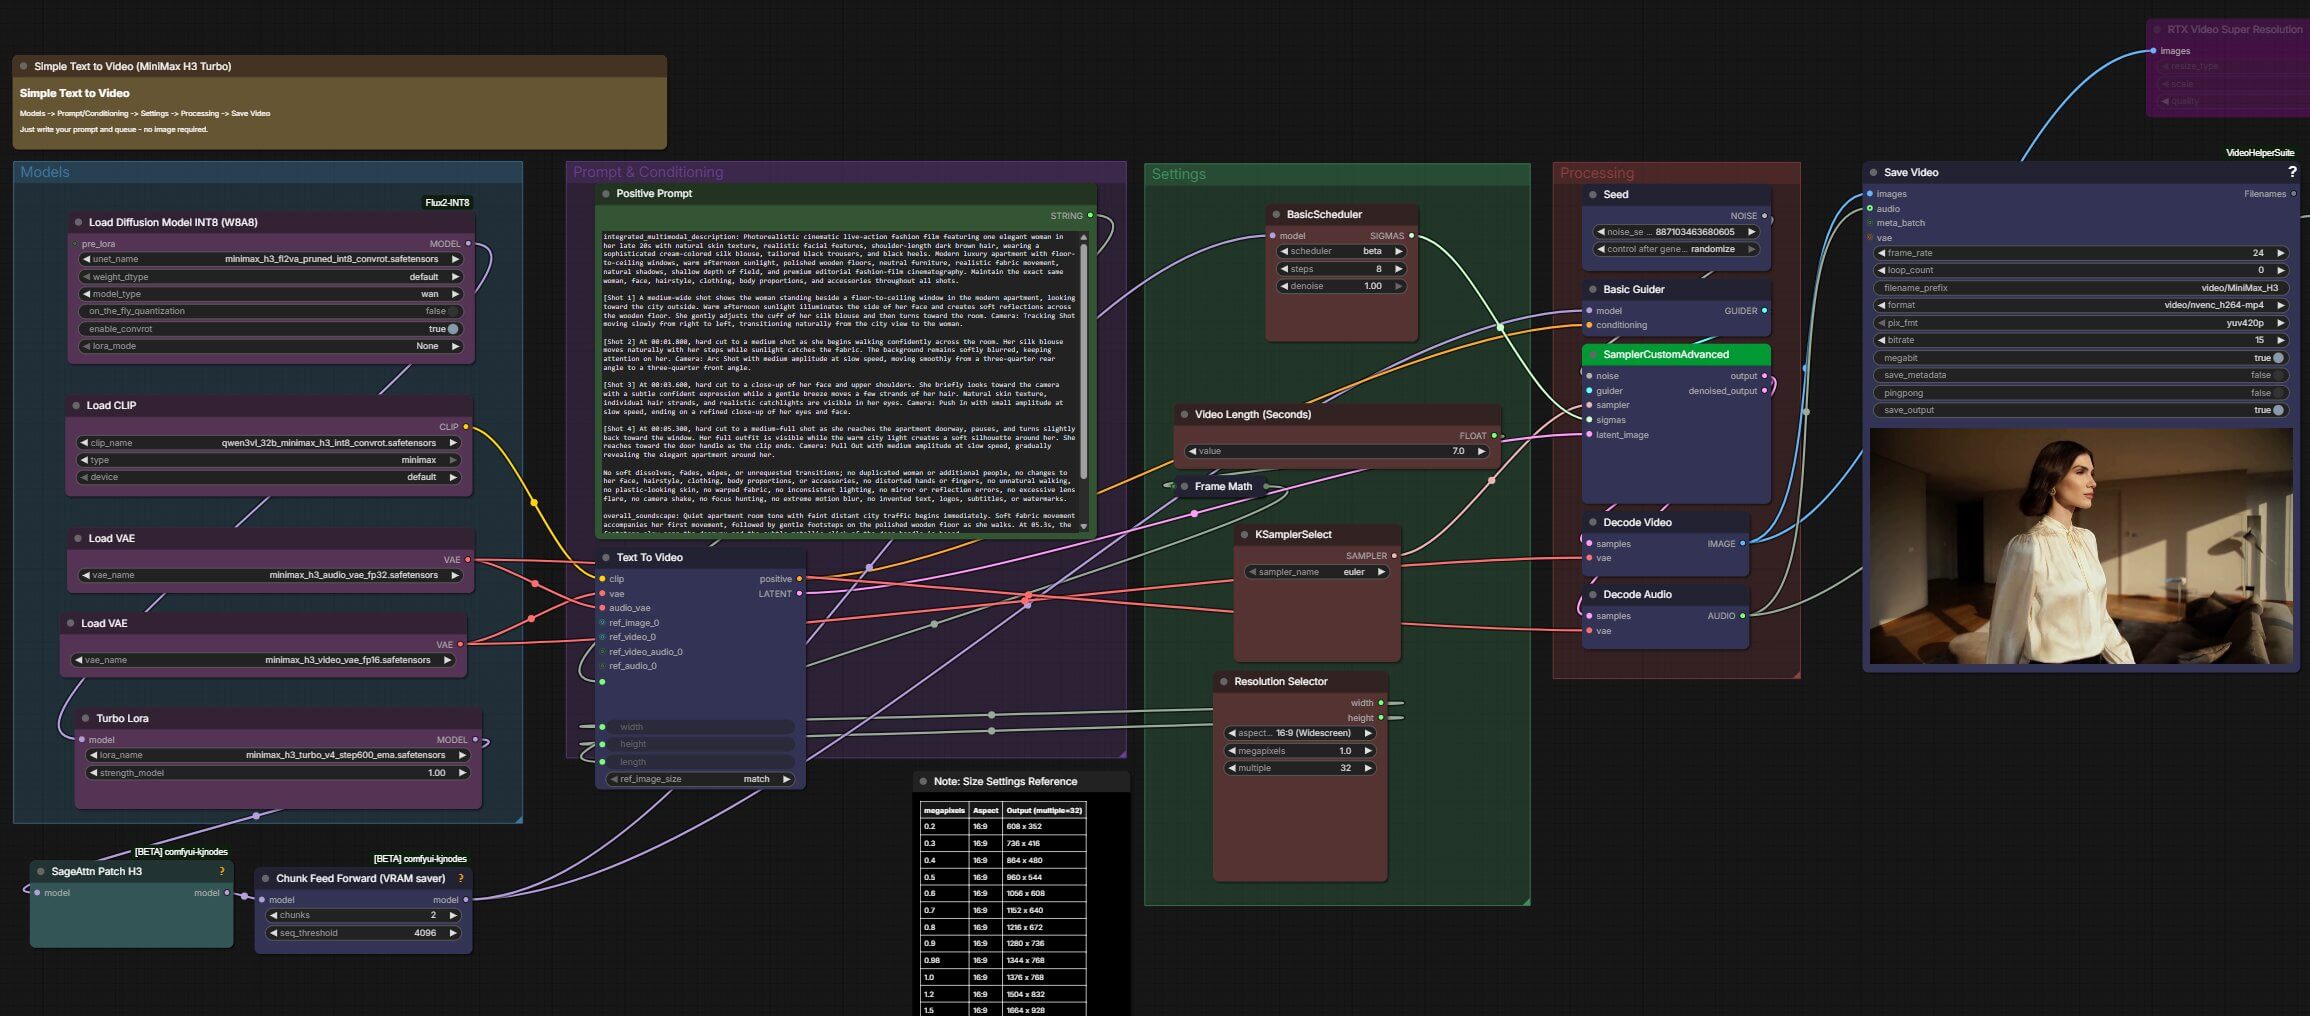
- Load the diffusion checkpoint. Add an OTUNetLoaderW8A8 node and set it to
minimax_h3_fl2va_pruned_int8_convrot.safetensors. This node loads the compressed (int8) version of MiniMax H3, which uses less VRAM than the full-precision model. - Add the Turbo LoRA. Add a LoraLoaderModelOnly node — this applies a LoRA directly to the model without needing a matching CLIP file. Set it to
minimax_h3_turbo_v4_step600_ema.safetensorswith strength 1.0, and connect the model output from your checkpoint loader into it. - Set up the sampler chain. Add these four nodes and connect them in order: BasicScheduler (set to
beta, 8 steps) — this decides how noise is removed at each step. KSamplerSelect (set toeuler) — this picks the sampling algorithm. BasicGuider — connects your model and your positive prompt together. SamplerCustomAdvanced — the node that actually runs generation. - Write your prompt. Add a CLIP Text Encode (Positive) node and type your prompt. See the MiniMax H3 prompt guide for prompt structure tips specific to this model.
- Set your resolution. In your latent video node, set resolution to 1280×736 (16:9) as a starting point. Higher resolutions increase both generation time and VRAM use — see the speed matrix below for other tested resolutions.
- Queue the generation. Click the orange Queue Prompt button in the top-right corner of ComfyUI. A progress bar appears below the button. At 8 steps, this is noticeably faster than the ~20-step base MiniMax H3 workflow.
What Do the SageAttention Patches Actually Do?
Two nodes in this workflow — MiniMaxH3MemoryEfficientSageAttentionPatch and PathchSageAttentionKJ— both modify how the model calculates attention (the mechanism that decides which parts of an image or video frame relate to each other). SageAttention is a faster, lower-memory way of doing this math compared to ComfyUI's default attention calculation.
The two nodes patch different parts of the model: one patches the main MiniMax H3 attention blocks, the other patches attention inside the KJ-nodes-compatible layers the workflow also uses. Both need to be connected for the speed and VRAM savings to apply across the whole model — using only one will patch part of the model and leave the rest running at default (slower) attention.
Full install steps are in the SageAttention installation guide.
Optional: Upscale Locally with RTX Video Super Resolution
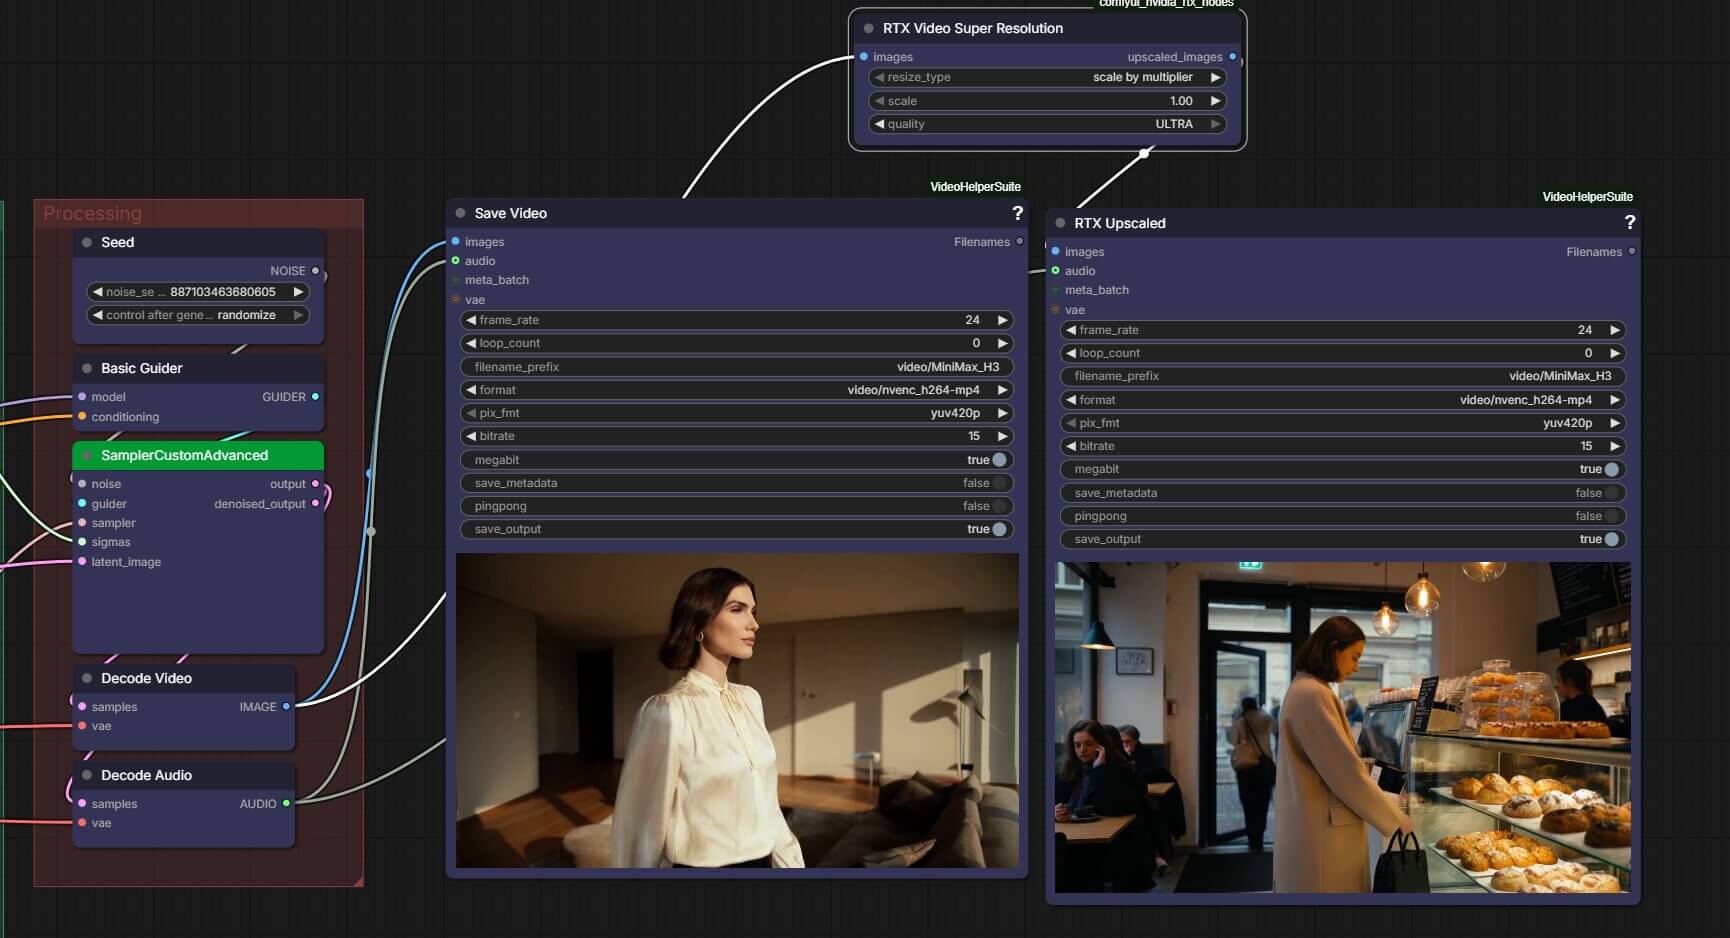
MiniMax H3's official 2K upscaling tool, H3-Regenerate-2K, isn't open source. The RTXVideoSuperResolutionnode is a local workaround: it upscales your generated video using your RTX GPU's dedicated hardware, without needing MiniMax's closed-source tool.
- Add an RTXVideoSuperResolution node after your video output.
- Set the quality mode to Ultra for the highest-quality upscale (slower), or a lower mode for faster processing.
- Connect it between your VAE Decode output and your final video save node.
How to Set Up MiniMax H3 Turbo LoRA for Image-to-Video
Image-to-video uses the same checkpoint, LoRA, and sampler chain as text-to-video, but adds a starting image (and optionally an ending image) that the video animates from.
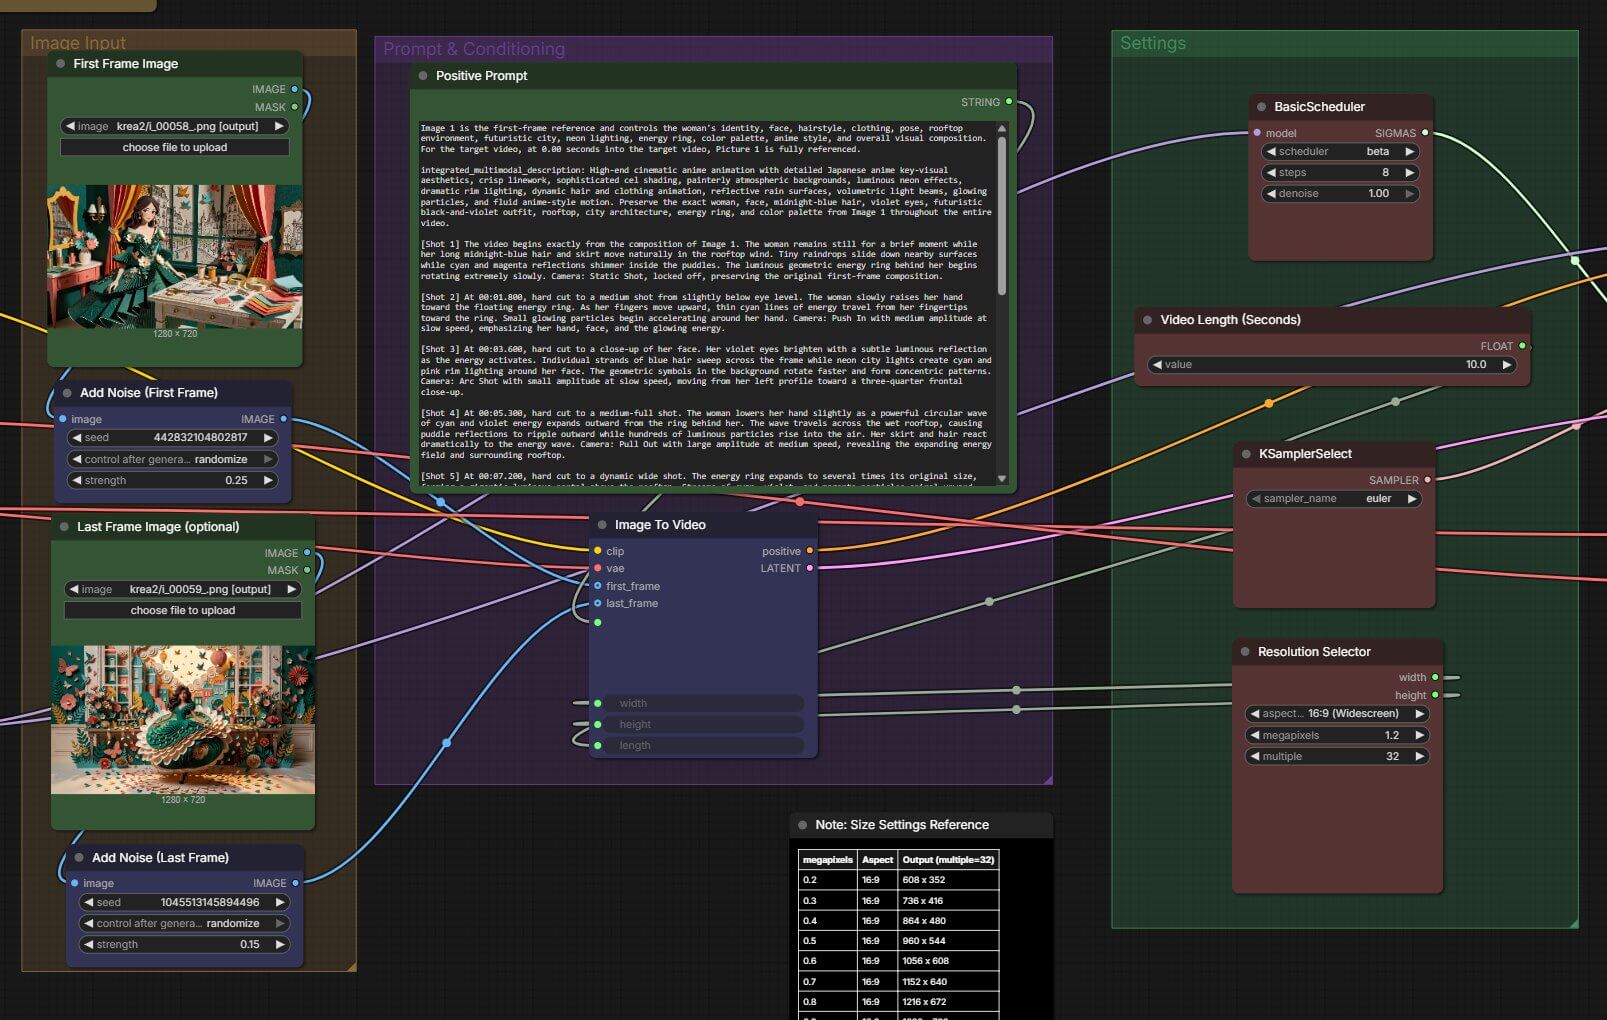
- Load your images. Add a LoadImage node for your first frame, and a second LoadImage node if you want to set a specific last frame too.
- Add noise to your input images. Connect each LoadImage node into an ImageAddNoise node. This slightly randomizes the input image before generation starts — without it, the model can lock too rigidly onto the exact pixels of your source image instead of generating natural motion around it. First frame: strength 0.25. Last frame (if used): strength 0.15.
- Connect to MiniMaxH3ImageToVideo. Feed both noised images into the MiniMaxH3ImageToVideo node, which combines them with your model and prompt into the video latent.
- Use the same sampler chain as text-to-video. Connect the same BasicScheduler (beta, 8 steps) → KSamplerSelect (euler) → BasicGuider → SamplerCustomAdvanced chain described above.
- Queue the generation. Click Queue Prompt and wait for the progress bar to complete.
How to Set Up Reference-to-Video (the Part Nobody Else Has Confirmed)
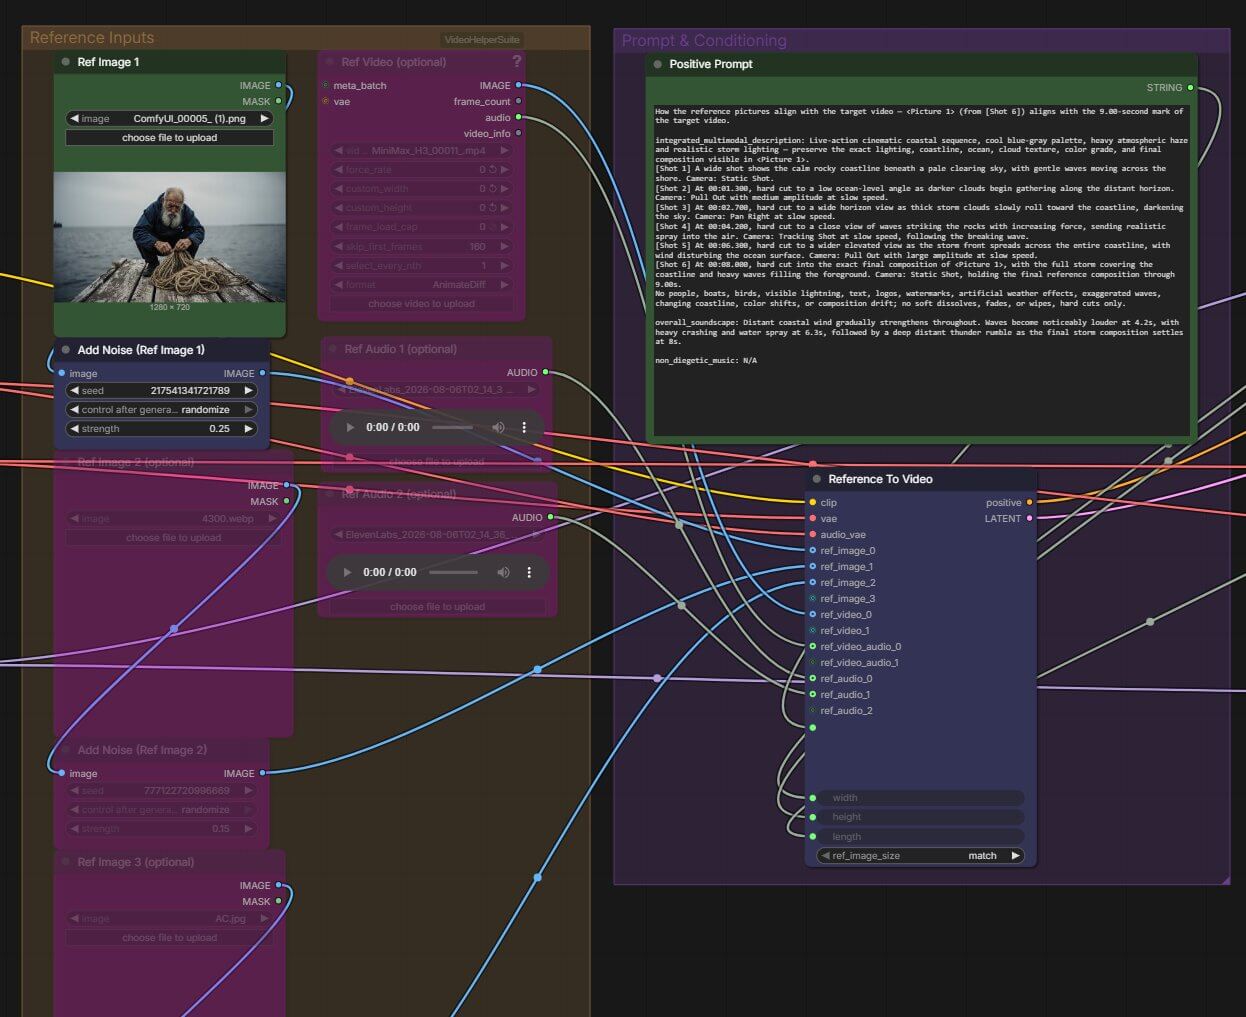
MiniMax H3's own documentation doesn't confirm that the Turbo LoRA works with reference-to-video (R2V) — the mode that generates video guided by a separate reference image, video, or audio input rather than just a single starting frame. This section shows a working setup.
- Load the R2V-specific checkpoint. Use an OTUNetLoaderW8A8 node set to
MiniMax_H3_Ref2VA_pruned_int8_convrot.safetensors— a different file from the T2V/I2V checkpoint, required for R2V mode specifically. - Add the same Turbo LoRA. Connect the same LoraLoaderModelOnly node with
minimax_h3_turbo_v4_step600_ema.safetensorsat strength 1.0 — no separate R2V version of the LoRA is needed. - Connect your reference inputs. Depending on what you're referencing, connect a reference image, reference video, and/or reference audio into the R2V node chain. Apply the same ImageAddNoise step to any reference image input, at strength 0.5.
- Use the same sampler chain. Connect the identical BasicScheduler (beta, 8 steps) → KSamplerSelect (euler) → BasicGuider → SamplerCustomAdvanced setup used in the other two modes.
- Queue the generation. Click Queue Prompt and wait for output.
Which Checkpoint Should You Use?
minimax_h3_turbo_v4_step600_ema.safetensors is the recommended default for all three workflows in this guide. The two 4-step checkpoints were also tested and are listed above for reference, but produced noticeably weaker results.
| File | Steps | What It Is |
|---|---|---|
minimax_h3_turbo_v4_step600_ema.safetensors | 8 | Recommended default — used throughout this guide, best balance of speed and quality in testing |
minimax_h3_turbo_4step_ema_ckpt850.safetensors | 4 | Faster, 4-step variant — tested for this guide, results were noticeably weaker than v4_step600 |
minimax_h3_turbo_4step_ema_ckpt500.safetensors | 4 | Faster, 4-step variant — tested for this guide, results were noticeably weaker than v4_step600 |
Speed on RTX 4090: 8 Steps Across Resolutions and Durations
Generation time was observed to be effectively the same across text-to-video, image-to-video, and reference-to-video for a given resolution and duration — so the matrix below applies to all three modes rather than needing a separate table for each.
| Duration \ Resolution | 1056×608 | 1152×640 | 1280×736 | 1367×768 |
|---|---|---|---|---|
| 5 sec | 99 sec | 101 sec | 119 sec | 133 sec |
| 7 sec | 128 sec | 147 sec | 213 sec | 205 sec |
| 10 sec | 174 sec | 189 sec | 267 sec | 308 sec |
| 15 sec | 279 sec | 345 sec | 520 sec | OOM |
| 20 sec | 405 sec | OOM | OOM | OOM |
For comparison, the base (non-Turbo) MiniMax H3 workflow takes roughly 200–250 seconds for a 5-second clip at 20 steps. At 8 steps, the Turbo LoRA cuts a large portion of that time off, on the same hardware.
Troubleshooting
Out of Memory Error
What causes it: MiniMax H3 is a large model, and running it at high resolution or with a longer video duration can exceed available VRAM — especially on GPUs with less than 24 GB.
- Lower your resolution — try 1056×608 instead of 1408×768.
- Reduce the video duration — for example, drop from 20 seconds to 10 or 5.
- Confirm the SageAttention patch nodes are connected — they reduce VRAM use as well as speeding up generation.
Audio Crackling or Noise
What causes it: Usually a ModelSamplingAV compatibility issue tied to running an outdated ComfyUI build.
How to fix it: Update ComfyUI to the latest version through ComfyUI Manager, then restart and re-queue the generation.
"Disco Lights" / Flickering Output
What causes it: Using a sampler/scheduler combination other than euler + beta — for example, res_multistep — produces unstable, flickering output with this Turbo LoRA setup.
How to fix it: Set KSamplerSelect to euler and BasicScheduler to beta, exactly as described in the setup steps above.
adaln_proj.linear.weight Shape Error
What causes it: Loading a checkpoint in the wrong format — for example, loading the T2V/I2V checkpoint into a node expecting the R2V version, or vice versa.
How to fix it: Double-check you're using the exact filename for your mode: minimax_h3_fl2va_pruned_int8_convrot.safetensors for T2V/I2V, or MiniMax_H3_Ref2VA_pruned_int8_convrot.safetensors for R2V.
Frequently Asked Questions
What to Do Next
Download the text-to-video workflow and run your first 8-step generation.
It's the simplest of the three setups — no input images required — and the fastest way to see the speed difference for yourself.
Published: 2026-08-11 · Last updated: 2026-08-11 · Tested on the latest ComfyUI version and an RTX 4090.
Join the discussion
Sign in to leave a comment or reply
No comments yet
Be the first to share your thoughts!