
⚡ Quick Answer
MiniMax H3 is an open-weight video model that generates video with synced stereo audio in one pass — the audio isn't added afterward, it's generated alongside the video. It runs natively in ComfyUI as of August 3, 2026. This guide covers the full text-to-video and image-to-video setup: which model files to download for your GPU, how to connect the nodes, and how to fix the most common errors.
MiniMax H3 just open-sourced, and if you've tried to figure out which of the six model files you actually need, you're not alone. This guide walks through the full MiniMax H3 ComfyUI workflow — text-to-video and image-to-video — using the free, official templates.
Hardware and versions used for this guide: ComfyUI 0.30.0+, tested on Windows with an RTX 4090 (24GB VRAM).
What to Expect: Example Outputs
Before you download anything, here's what MiniMax H3 actually produces in each mode.
Text-to-video (T2V) — you write a prompt, no image needed
Image-to-video (I2V) — you upload a starting image and the model animates it
What Is MiniMax H3? (And Why It's Different)
MiniMax H3 is an omni-modalmodel — this means one model can read text, images, video, and audio as input, and it outputs video with native stereo audio. "Native" is the important word here: the voice, sound effects, and music are generated in the same pass as the video, not layered on top afterward the way most AI video tools work.
The model has 33.1 billion parameters, generates up to 15 seconds of video at 24fps, and can output up to 2K resolution. For the text side, it uses Qwen3-VL-32B as its text encoder instead of a standard CLIP model — this is what lets it understand image and video references, not just plain text prompts.
What You Need Before You Start
Which MiniMax H3 Diffusion Model Should You Download?
Comfy-Org repackaged the diffusion model in three sizes — the same underlying checkpoint (see our checkpoint vs. diffusion model explainer if that distinction is new to you) at different levels of compression. All three work for both text-to-video and image-to-video. Download one, not all three.
| File | Size | What It Is |
|---|---|---|
minimax_h3_fl2va_bf16.safetensors | 66.3 GB | Full precision — no compression, the largest file, maximum quality |
minimax_h3_fl2va_int8_convrot.safetensors | 34 GB | Quantized to 8-bit — smaller file, close to full quality |
minimax_h3_fl2va_pruned_fp8_scaled.safetensors | 21 GB | The lightest option — non-essential weights are pruned out, then what’s left is quantized to FP8 |
"Pruned" doesn't mean a worse beginner version — MiniMax removed roughly 40% of the model's modulation weights and replaced them with a lookup table that reproduces the same math, so quality loss is minimal in community testing.
pruned_fp8_scaled. Have the space and want closer to full quality? int8_convrot. Have 70GB+ free and don't mind slower generations on smaller cards? bf16. If you're not sure, start with the smallest file — swapping later is just a dropdown change in UNETLoader.Which Text Encoder Should You Download?
The text encoder also ships in three sizes:
| File | Size | What It Is |
|---|---|---|
qwen3vl_32b_minimax_h3_bf16.safetensors | 51.5 GB | Full precision |
qwen3vl_32b_minimax_h3_int8_convrot.safetensors | 27.1 GB | Quantized to 8-bit |
qwen3vl_32b_minimax_h3_nvfp4_awq.safetensors | 15.7 GB | Quantized to 4-bit — the smallest file |
nvfp4_awq) is a reasonable default if you're downloading for the first time.VAE Files (Required for Both Video and Audio)
H3 needs two separate VAE files — one decodes the video, one decodes the audio: minimax_h3_video_vae_fp16.safetensors and minimax_h3_audio_vae_fp32.safetensors.
Where Everything Goes
ComfyUI must be updated to 0.30.0 or later for native MiniMax H3 node support. If you've never updated ComfyUI before, open ComfyUI Manager (the puzzle-piece icon in the top toolbar) and click Update ComfyUI — or see our full guide to updating ComfyUI if anything goes wrong.
How to Set Up the MiniMax H3 Text-to-Video Workflow
The full node graph looks busy the first time you open it, but you only need to touch four things: your prompt, the duration, the resolution, and confirming your model files are loaded. Everything else in the graph runs automatically once those four are set.
(video_minimax_h3_t2v.json)- Load the official template. Open ComfyUI and click Workflow in the top menu, then Browse Templates, then Video. Select the MiniMax H3 (Text to Video) template. The full node graph appears on your canvas.
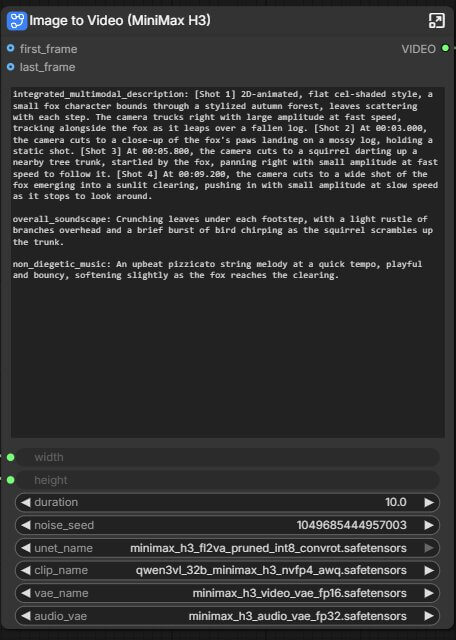
- Write your prompt. In the MiniMax H3 node's text box, describe your shot: the subject, the action, the camera movement, and — since this model generates audio too — what the viewer should hear. For example: "A golden retriever runs along a sandy beach at sunset. Slow tracking shot from the side. Waves crash gently, seagulls call in the distance."
- Set your duration. Still in the MiniMax H3 node, set how many seconds of video you want. As covered below, this gets rounded to the model's required frame count, so don't worry if the final clip runs a fraction of a second longer than what you typed.
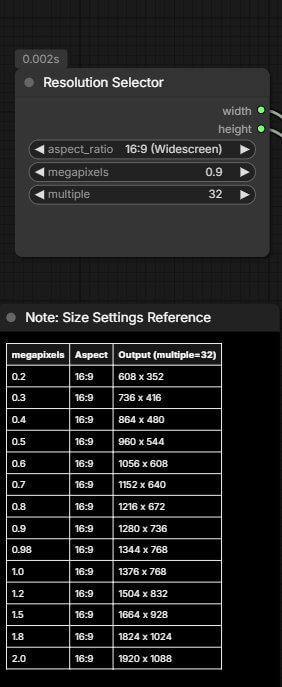
- Set your resolution. Find the Resolution Selector node. It has an aspect ratio dropdown (e.g. 16:9) and a megapixel value. Higher megapixel values mean higher resolution and slower generation. Start at 0.4 megapixels (864×480) for your first test.
- Confirm all four model files are loaded. Before you generate, check each of these loader nodes has a file selected in its dropdown — not blank, and not a file from a different model: UNETLoader (diffusion model), CLIPLoader (text encoder), VAELoader (video VAE), and the second VAELoader (audio VAE). If a file doesn't appear in a dropdown, it's in the wrong folder — double-check the folder structure above.
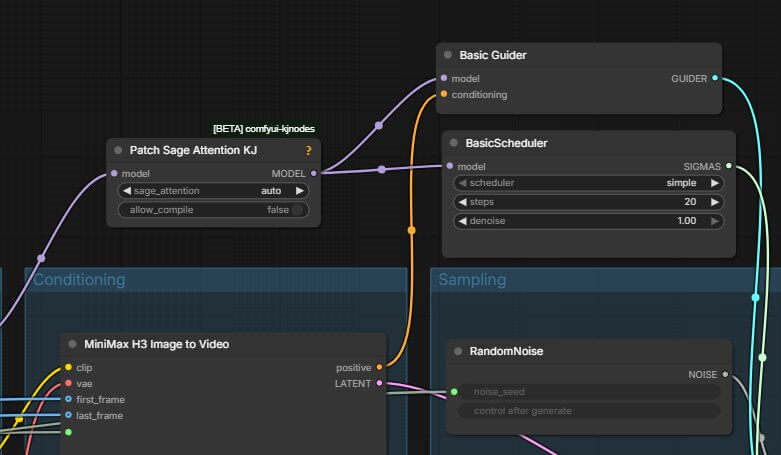
- Queue the prompt. Click the orange Queue Prompt button in the top-right of the screen. A progress bar appears below it. On an RTX 4090, a 5-second clip at 0.4 megapixels takes a few minutes — the model runs 20 sampling steps by default, and there's currently no distilled/fast-mode version, so don't expect near-instant results.
How to Write Prompts for MiniMax H3
Prompt quality makes a bigger difference on this model than most — because it's generating audio, camera movement, and action together, a vague prompt tends to produce vague results across all three at once.
Weak prompt example
Strong prompt example
The short version: name the subject and action, give the camera a specific move (tracking shot, push-in, static wide), and describe what the viewer should hear, not just see — MiniMax H3 generates picture and audio together, so an unwritten soundscape or music field doesn't stay silent, it just gets filled in with whatever the model guesses.
We've written a full breakdown of MiniMax H3's prompt structure — the 4-part field format, the alignment instruction for reference images, a full camera-movement cheat sheet, and 10 example prompts with real outputs — in a separate guide: MiniMax H3 Prompt Guide: The 4-Part Formula for ComfyUI.
How Does Video Length Actually Work in This Workflow?
Setting "5 seconds" in this workflow doesn't always produce exactly 5 seconds of output. MiniMax H3 generates video in blocks of 17 frames, so the workflow uses a Math Expression node to round your requested duration up to the nearest valid frame count:
You don't need to understand this formula — just know that it takes your duration in seconds, converts it to frames at 24fps, then snaps upward to the model's required grid. This is why a 5-second request might render as 5.2 or 5.5 seconds instead.
How to Set Up Image-to-Video (and First/Last Frame Control)
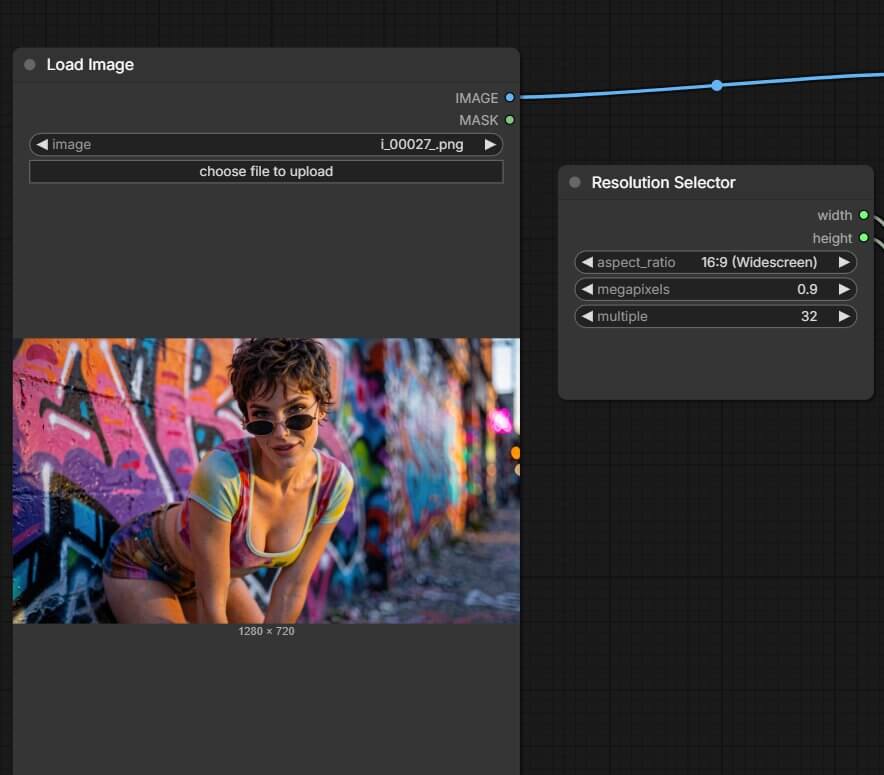
The same MiniMaxH3ImageToVideo node handles image-to-video — it just needs an image connected to its first_frame input. Connect an image to both first_frame and last_frame, and the model generates the motion between them instead of animating freely from a single starting point.
- Load the I2V template: Workflow → Browse Templates → Video → MiniMax H3 (Image to Video).
- Upload your starting image. Click the LoadImage node and select your image file.
- Let the workflow scale your image correctly. The template routes your image through GetImageSize and ImageScaleToTotalPixels before it reaches the MiniMax H3 node. This resizes your image to fit the model's megapixel budget without stretching or distorting it — don't bypass this step by connecting your raw image directly.
- Write a motion-focused prompt. Since the image already sets the subject and style, focus your prompt on what changes: camera movement, action, lighting shifts, and audio.
- Queue the prompt the same way as the text-to-video workflow above.
Once first/last-frame control feels reliable, the natural next question is how MiniMax H3 actually stacks up against the other local video models out there — we compared it against the current field here.
MiniMax H3 VRAM and Speed on RTX 4090 (Real Numbers)
These times are from the pruned model (minimax_h3_fl2va_pruned_fp8_scaled.safetensors) with both SageAttention and EasyCache enabled — together they cut generation time to roughly 1.5x faster than running with neither — on an RTX 4090 (24GB VRAM):
| Duration | Resolution | Generation Time |
|---|---|---|
| 5 sec | 864 × 480 | ~200–250 sec |
| 10 sec | 864 × 480 | 4–5 min |
| 10 sec | 1280 × 736 | 14–15 min |
Can You Run MiniMax H3 Commercially? (License and Region Limits)
MiniMax released H3 under a Community License that excludes commercial use in the US, EU, UK, and South Korea, citing the faster-moving regulatory picture around generative video and ongoing copyright litigation in those regions. This doesn't mean you can never use it — MiniMax's own documentation frames it as "not yet, not not ever," and offers two paths if you're in an excluded region: apply for a separate license through their repository, or use their hosted API instead, which operates under a different legal agreement and remains globally available.
Troubleshooting Common MiniMax H3 ComfyUI Errors
Running into something not covered below? Our general ComfyUI troubleshooting guide covers the errors that show up across every workflow, not just this one.
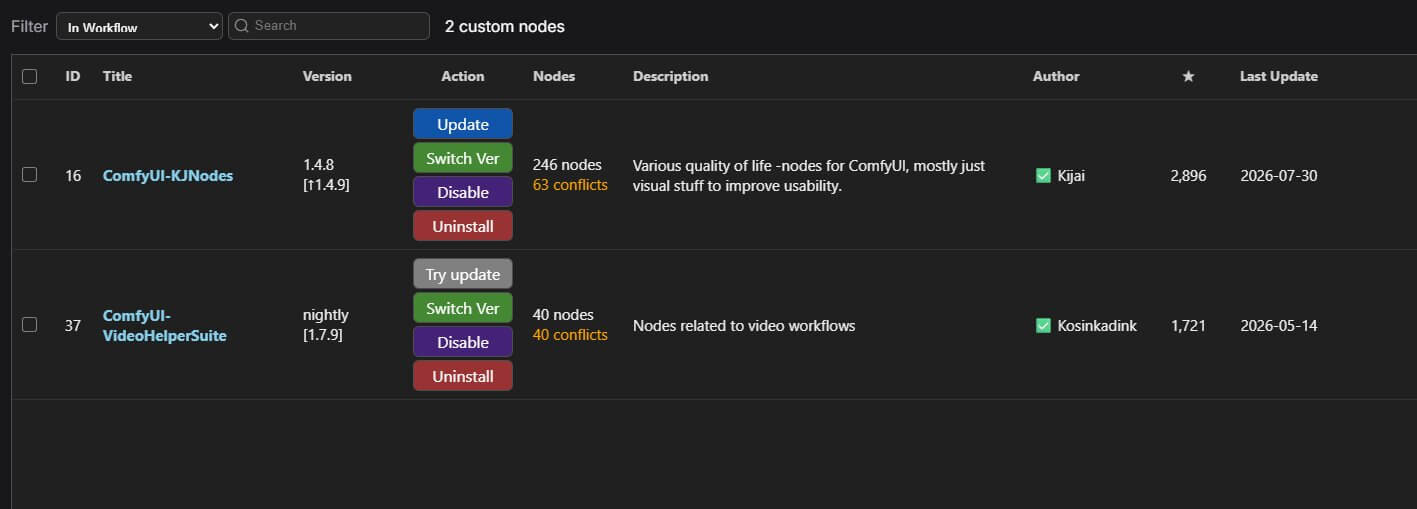
"This node type does not exist"
What causes it: Your ComfyUI installation is older than version 0.30.0, so it doesn't recognize the MiniMax H3 nodes yet.
How to fix it: Open ComfyUI Manager and click Update ComfyUI. Restart ComfyUI completely after updating — node definitions only load on startup.
Out of memory / CUDA out of memory during sampling
What causes it: Your GPU and system RAM combined don't have enough room for the file you picked, plus your chosen resolution and duration on top of it.
- Switch to a smaller diffusion model file —
pruned_fp8_scaled(21 GB) is the lightest option. - Lower your Resolution Selector megapixel value and shorten your duration.
- Close other GPU-heavy applications before generating, since offloading also competes for system RAM.
Generated video has no audio track
What causes it: The audio VAE (minimax_h3_audio_vae_fp32.safetensors) isn't loaded, or it's connected to the wrong VAELoader node.
How to fix it: Check both VAELoader nodes — one should point to the video VAE, the other to the audio VAE. Confirm a VAEDecodeAudio node is present and connected through to SaveVideo.
Frequently Asked Questions
What to Do Next
Try image-to-video with first-and-last-frame control.
Once your first generation works, it's the fastest way to see how much control MiniMax H3 gives you over a shot's ending, not just its start. For a structured path through the rest of ComfyUI's video tools, see the full roadmap.
What to Read Next
If you got this workflow running, the two guides worth reading next are the prompt guide, since prompt structure matters more on this model than most, and our comparison of local video models if you're deciding whether H3 is the right one for your project. Running into VRAM issues? The troubleshooting guide covers the most common ones.
— Written as a personal recommendation from the Earngenix team.
Published: 2026-08-04 · Last updated: 2026-08-04 · Workflow structure verified against the official MiniMax H3 ComfyUI templates.
Join the discussion
Sign in to leave a comment or reply
No comments yet
Be the first to share your thoughts!