
⚡ Quick Answer
ComfyUI LoRA Manager is a free extension that adds a visual library for your LoRA files — with preview images, trigger words, and one-click sending to your workflow. Install it through ComfyUI Manager, search for lora-manager, restart ComfyUI, and open it from the new button in your menu bar. No coding required, and it works on any GPU that already runs ComfyUI.
If you have more than a handful of LoRA files, you already know the problem: ComfyUI's native Load LoRA node only shows you a filename. flux_anime_style_v3.safetensors tells you nothing about what the LoRA actually does, what trigger words it needs, or what strength works best — so you end up guessing.
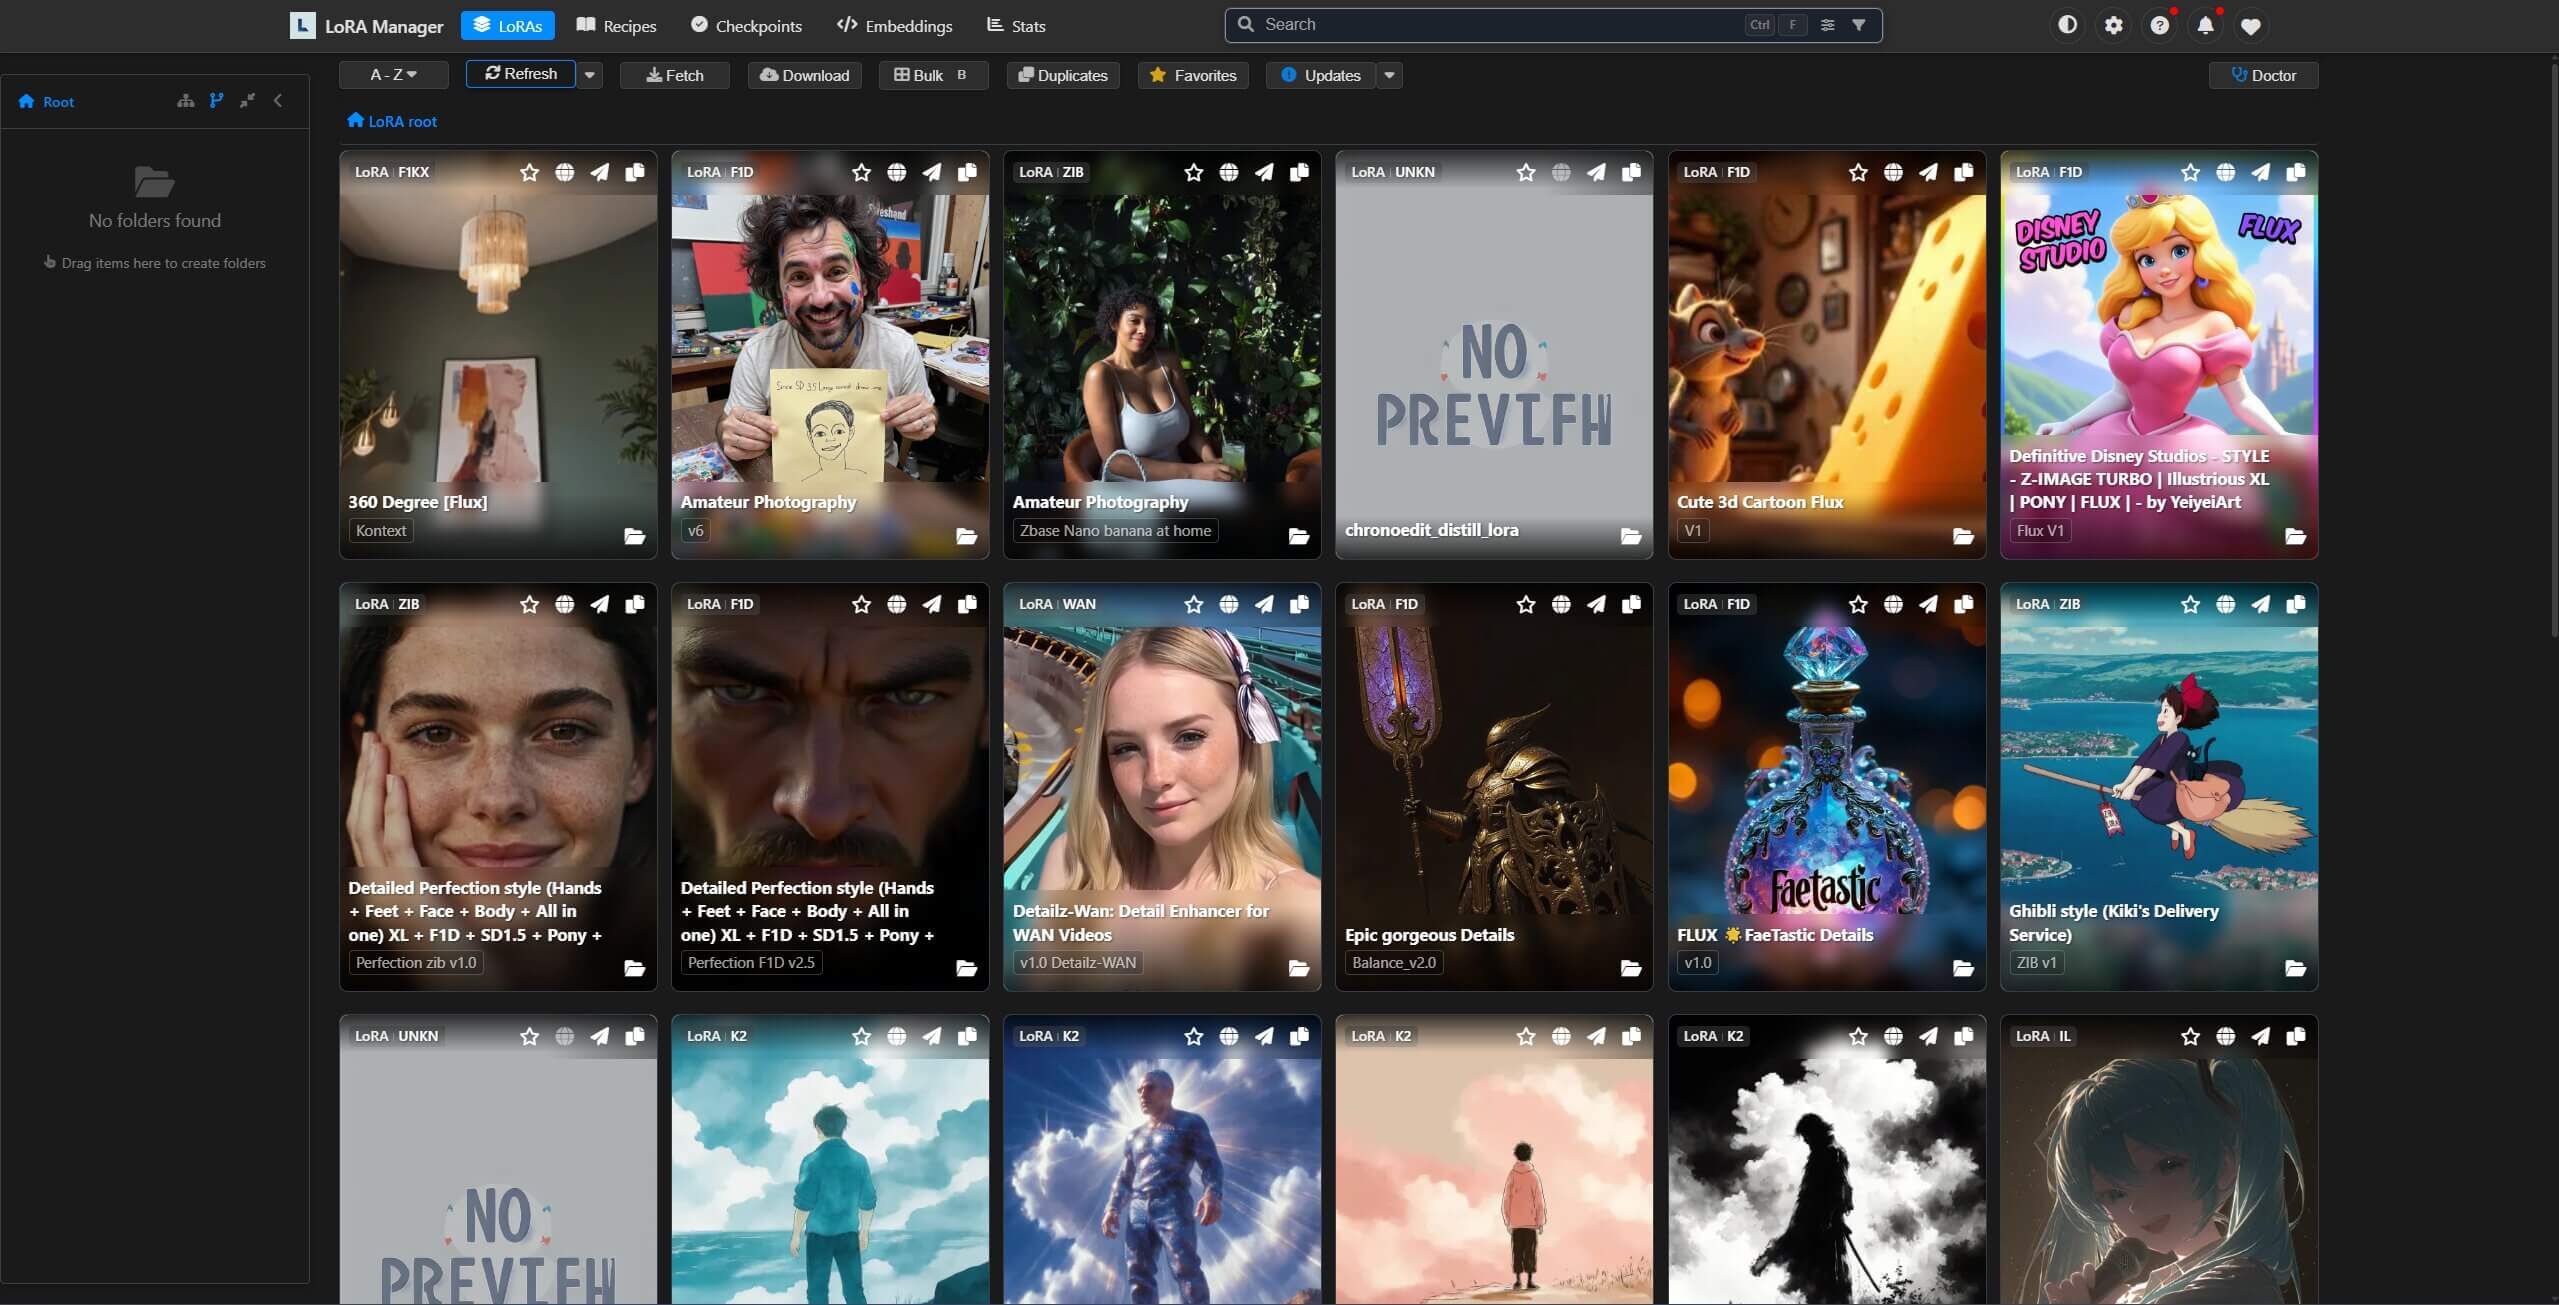
ComfyUI LoRA Manager fixes this by giving every LoRA and checkpoint a visual card with a preview image, description, trigger words, and notes — pulled automatically from Civitai. This guide covers installing it, organizing your models, using trigger words correctly, and building recipes so you never lose a LoRA combination that worked.
What You Need Before You Start
Checklist
- ✓ComfyUI: Already installed and running
- ✓LoRA files: At least one file in ComfyUI/models/loras
- ✓Extra VRAM: None — LoRA Manager runs alongside ComfyUI without touching your GPU
- ✓Civitai account: Free, optional — only needed for automatic preview and metadata fetching
Haven't installed ComfyUI yet? See our ComfyUI installation guide first.
How to Install ComfyUI LoRA Manager
There are three ways to install it. Use Option 1 unless you have a specific reason not to.
Option 1: Install Through ComfyUI Manager (Recommended)
- Open ComfyUI.
- Click Manager in the top menu bar.
- Select Custom Node Manager.
- Type
lora-managerinto the search bar and click Install on the ComfyUI-Lora-Manager result. - Restart ComfyUI completely — close the terminal window or process, then relaunch it. A browser refresh alone won't reload the extension.
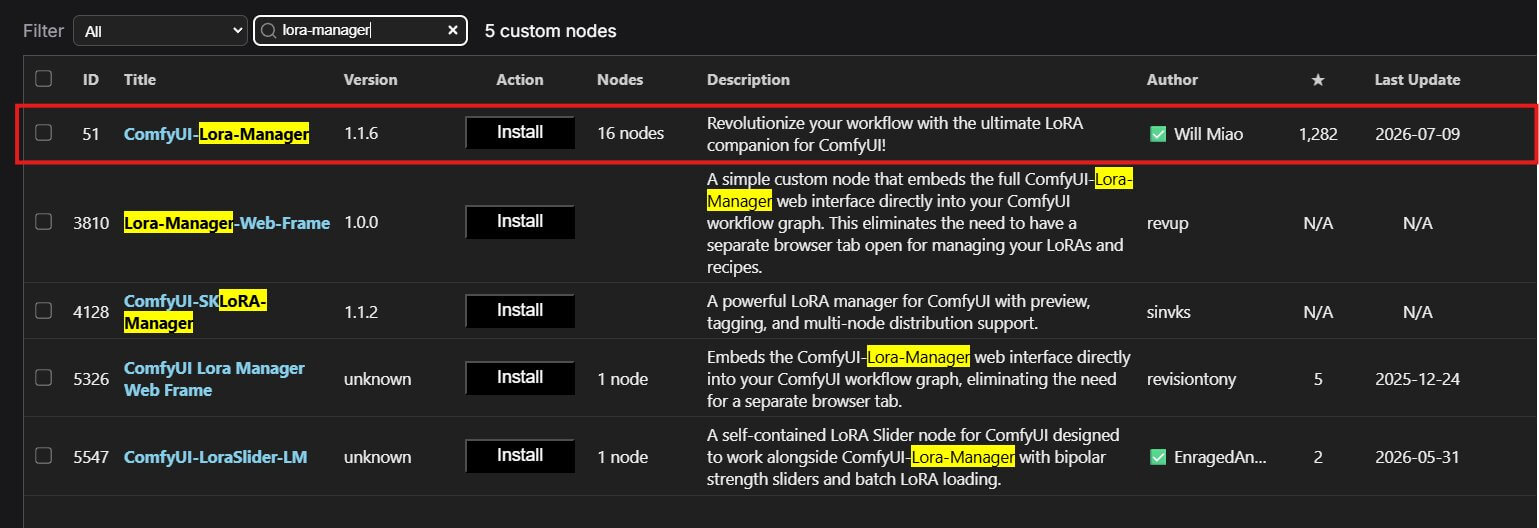
After restarting, a new button appears in your ComfyUI menu bar. Clicking it opens LoRA Manager in a new browser tab.
loras and checkpoints folders and computes a hash for each file. With a large collection this can take a few minutes, but it runs in the background — you can keep using ComfyUI normally while it finishes.Option 2: Manual Installation with Git
Use this if you don't have ComfyUI Manager installed, or you want a specific version.
- Open a terminal and navigate to your
ComfyUI/custom_nodesfolder. - Run:
Now install the required Python packages. This is the step most people get wrong. If you installed ComfyUI as a portable or desktop build (the most common setup on Windows), it does not use your system's Python — it has its own copy bundled inside a folder called python_embeded. Running a plain pip install installs the packages into the wrong Python and LoRA Manager will fail to load.
python_embeded\python.exe directly instead of a bare pip command. Otherwise the extension installs its dependencies somewhere ComfyUI can't see, and it won't work after restarting.A typical portable ComfyUI folder looks like this:
From inside the ComfyUI-Lora-Manager folder, that's three levels up to reach python_embeded, so the install command looks like this:
..\ depends on your own folder structure — it needs to match how many folders sit between ComfyUI-Lora-Manager and python_embeded. Open your file explorer, locate your python_embeded folder, and count how many folder levels separate it from where you're running the command — then adjust the number of ..\ to match.If you installed ComfyUI manually into your own Python environment (not the portable build), a standard pip install -r requirements.txt works fine, as long as you run it from the same environment ComfyUI itself uses.
Once the install finishes, restart ComfyUI.
Option 3: Standalone Mode (No ComfyUI Required)
If you use Forge, A1111, or just want to organize your model collection without opening ComfyUI at all, LoRA Manager can run on its own.
- Download the standalone portable package from the GitHub releases page.
- Copy
settings.json.exampleto a new file namedsettings.json. - Open
settings.jsonand set the correct paths to your existing model folders. - Run
run.bat(Windows) to launch it.
How to Organize and Preview Your LoRAs
Once installed, open LoRA Manager from the menu button. Every LoRA and checkpoint appears as a card with a thumbnail, name, and base model tag.
For everything else, you'll want a free Civitai API key so LoRA Manager can fetch preview images, descriptions, and trigger words automatically.
How to Add Your Civitai API Key
- Log into Civitai in your browser.
- Click your avatar in the top-right corner, then Account Settings.
- Scroll to the bottom and click Add API Key.
- Copy the generated key.
- In LoRA Manager, open Settings and paste the key into the Civitai API Key field.
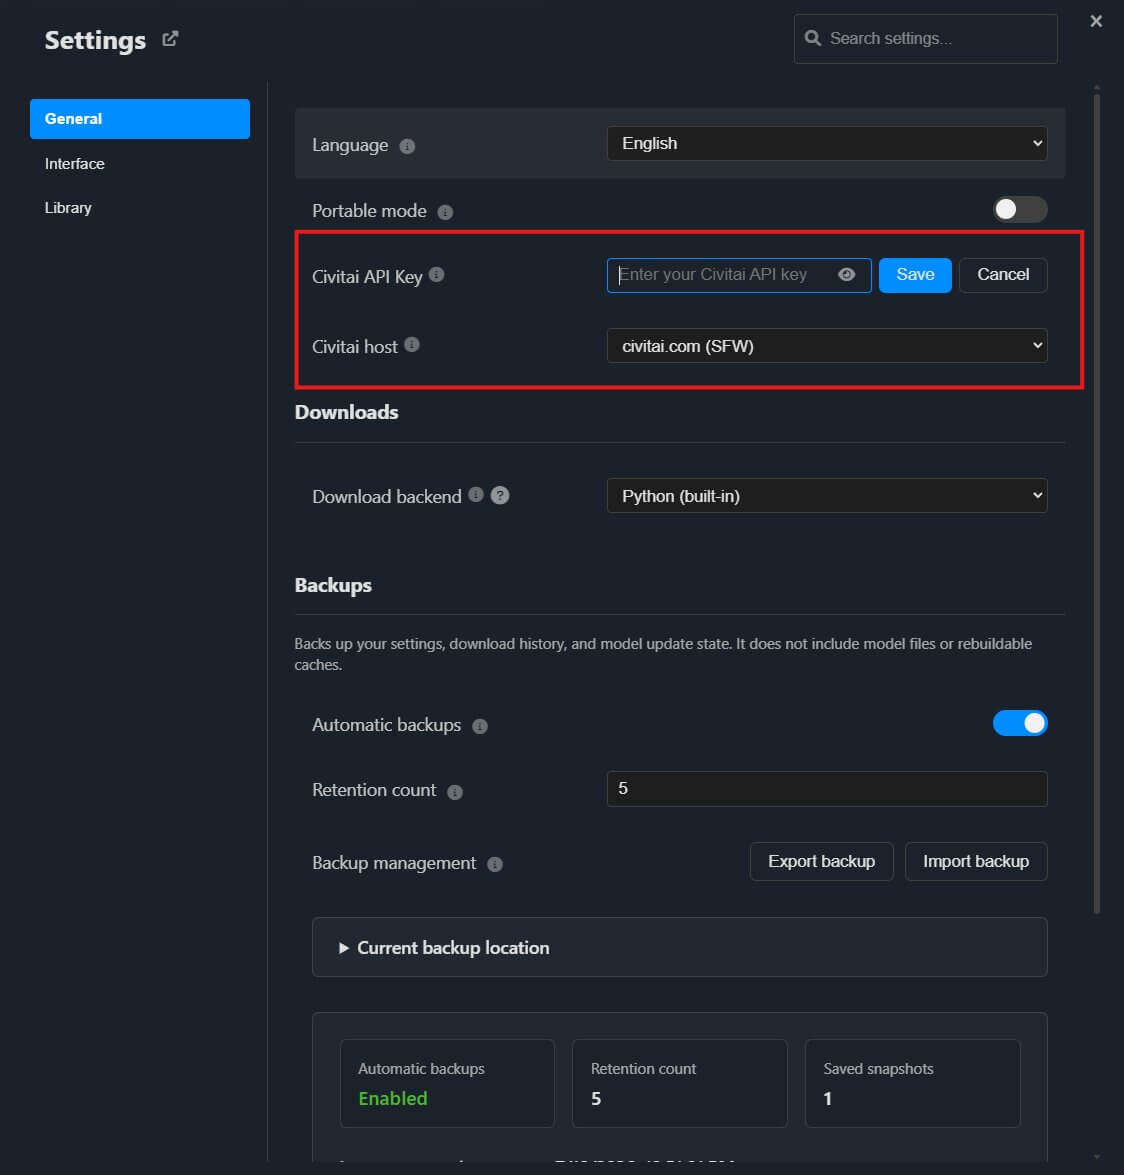
With the key added, click the fetch button on any model card that's missing a preview or metadata. LoRA Manager downloads the preview image (or video), description, and trigger words automatically.
Finding Models Fast
- Type into the search bar to match by filename, model name, or tag.
- Use folder tags to filter by directory.
- Use the dropdown filters to narrow by base model (SDXL, FLUX, Illustrious, and so on) or tag.
- Use the alphabetical index bar on large collections to jump straight to a letter.
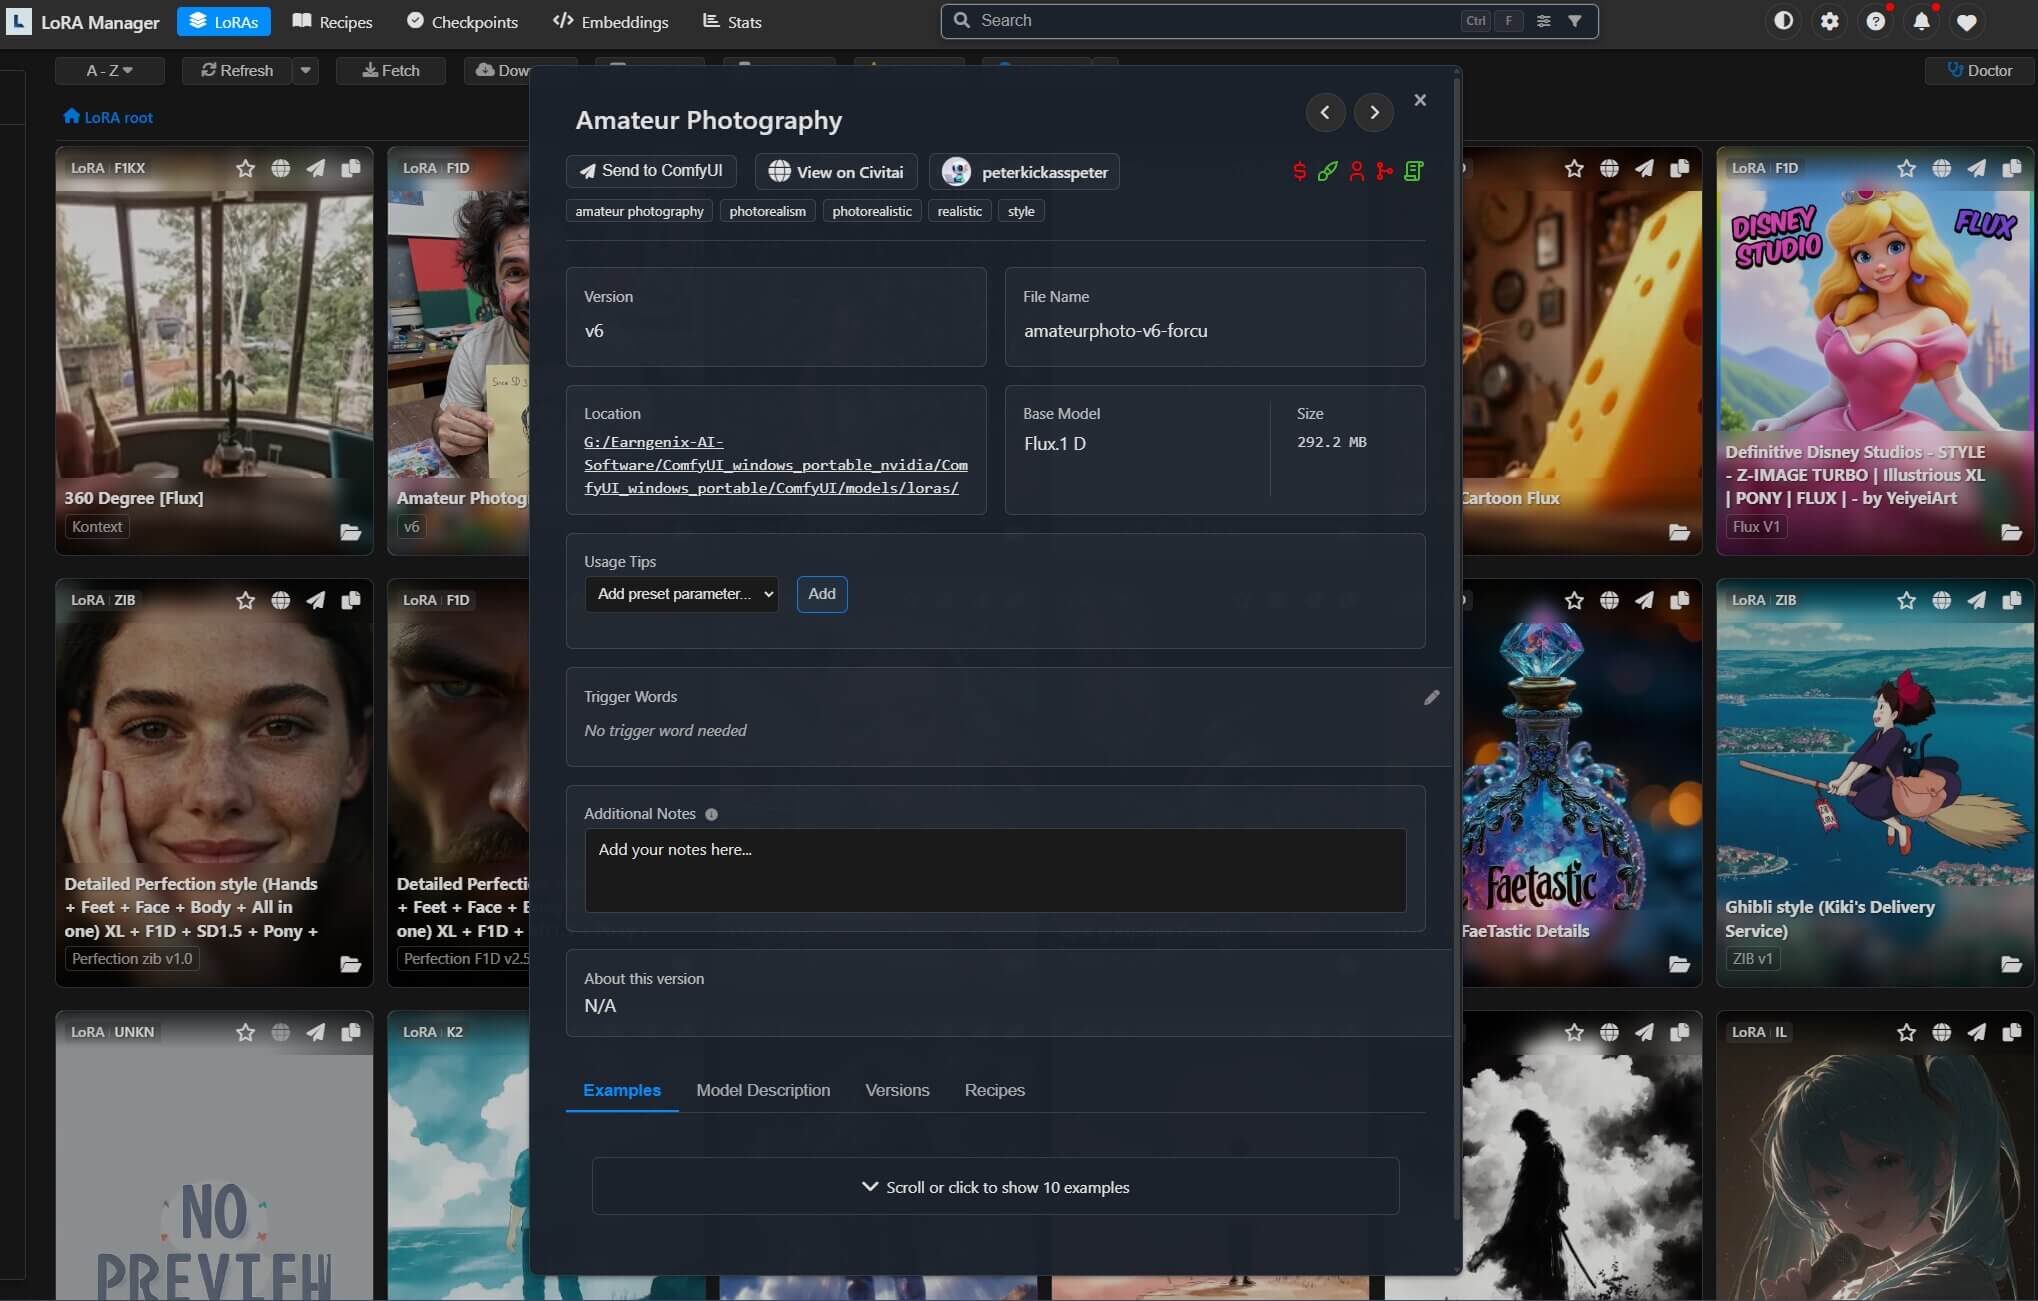
Click any card to open its detail view — this shows the full description, example images with their generation settings, and a notes field where you can write your own reminders (for example, "best at 0.7 strength, works well with realistic checkpoints").
How to Use Trigger Words in ComfyUI LoRA Manager
A trigger word is a specific word or phrase a LoRA's creator used during training. Including it in your prompt tells the model when to apply what the LoRA learned — without it, many LoRAs produce a much weaker effect or none at all.
LoRA Manager pulls trigger words from Civitai's metadata automatically and displays them on the model's detail page. They're fully editable, which matters if you're using a LoRA that didn't come from Civitai and has no listed trigger words — you can add your own based on the training data or documentation.
⬇ Download Example Workflows
The easiest way to understand trigger words is to see them working. Download either workflow below, drag it onto your ComfyUI canvas, and follow along with the steps underneath.
Lora Manager Basic is the bare minimum setup — one Lora Loader connected to a TriggerWord Toggle node, so you can see exactly how the two nodes talk to each other. FLUX.1-dev + Lora Manager is a full working example built on the FLUX.1-dev checkpoint, showing how trigger words fit into a real generation workflow from prompt to finished image.
Step 1 — Add the Two Nodes You Need
You need two nodes on your canvas: the Lora Loader node (loads your LoRA) and the TriggerWord Toggle node (shows and manages the trigger words). If you downloaded one of the workflows above, both nodes are already there and connected — you can skip to Step 3. If you're adding them to your own workflow, follow the steps below.
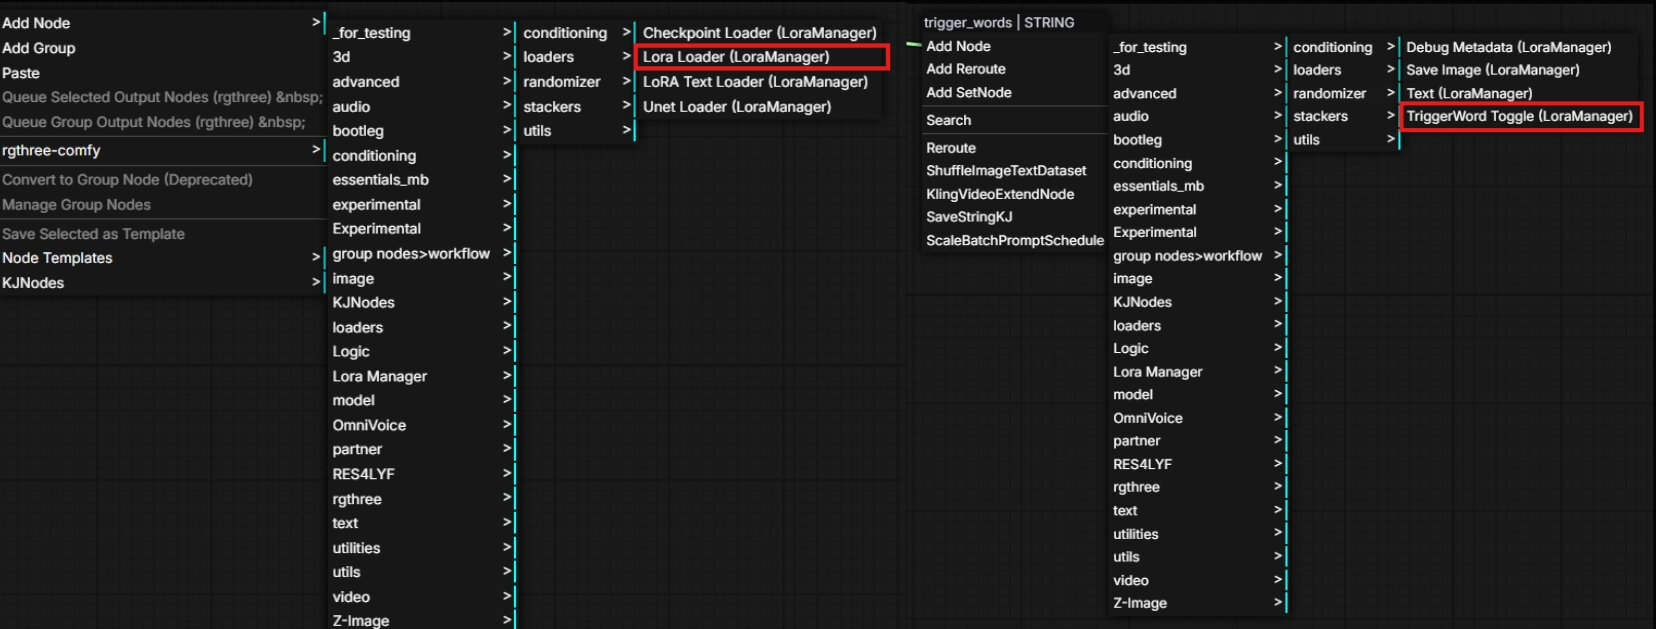
- Right-click an empty area of the canvas. A menu appears.
- Go to Add Node > LoraManager > Lora Loader and click it. A new node appears on the canvas.
- Right-click the canvas again and add a second node: Add Node > LoraManager > TriggerWord Toggle.
Step 2 — Connect the Two Nodes Together
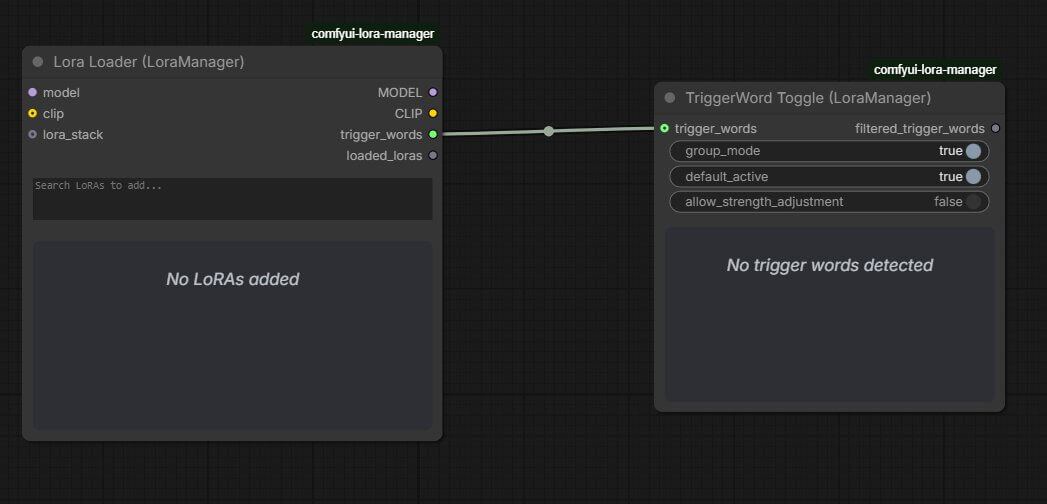
- On the Lora Loader node, find the small dot labeled trigger_words on the right-hand side. This is an output — it sends information out of the node.
- Click and drag a line from that dot to the TriggerWord Toggle node. A wire now connects the two nodes.
- Finally, connect the TriggerWord Toggle node's output to a Join Strings node, and combine that with your main prompt text before it reaches your CLIP Text Encode node (the node that turns your prompt into something ComfyUI understands).
Step 3 — See and Control the Trigger Words
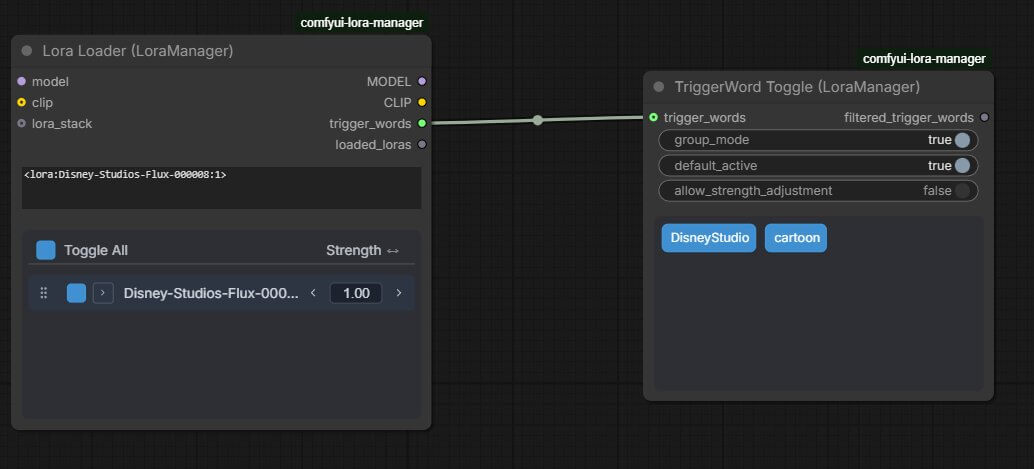
Once a LoRA is loaded, the TriggerWord Toggle node fills in with every trigger word for that LoRA. Click a word to turn it on or off — words you turn off won't be added to your prompt. This updates automatically every time you change which LoRAs are loaded, so you never have to look up or retype a trigger word yourself.
Sending a LoRA From the Manager to Your Workflow
You don't have to manually add a LoRA to your Lora Loader node every time. LoRA Manager can send it there for you with one click.
- Find the LoRA you want in LoRA Manager's card view.
- Click the send button on that card. It's added to your currently open Lora Loader node in ComfyUI, without you having to switch tabs and search for it manually.

Switch back to ComfyUI and you'll see the LoRA has appeared inside your Lora Loader node, ready to use:
A few more useful shortcuts on the same send button:
- Hold Shift while clicking send to replace everything already in the loader node, instead of adding to it.
- To change how strong a LoRA's effect is, drag the strength number on the loader node left or right, or click it and type an exact number.
- Double-click a LoRA inside the loader node to reveal a second strength control just for CLIP (this affects how the LoRA changes your prompt's meaning, separately from how it changes the image style).
What Is a LoRA Recipe (and How to Use One)
A recipe in LoRA Manager is a saved combination of LoRAs with their exact strength settings, plus the prompt and generation parameters that produced them. Recipes matter because you rarely use just one LoRA — and combinations that work well together often need different strengths than each LoRA would use on its own. Without a recipe, that specific combination is easy to lose.
Importing a Recipe From Civitai
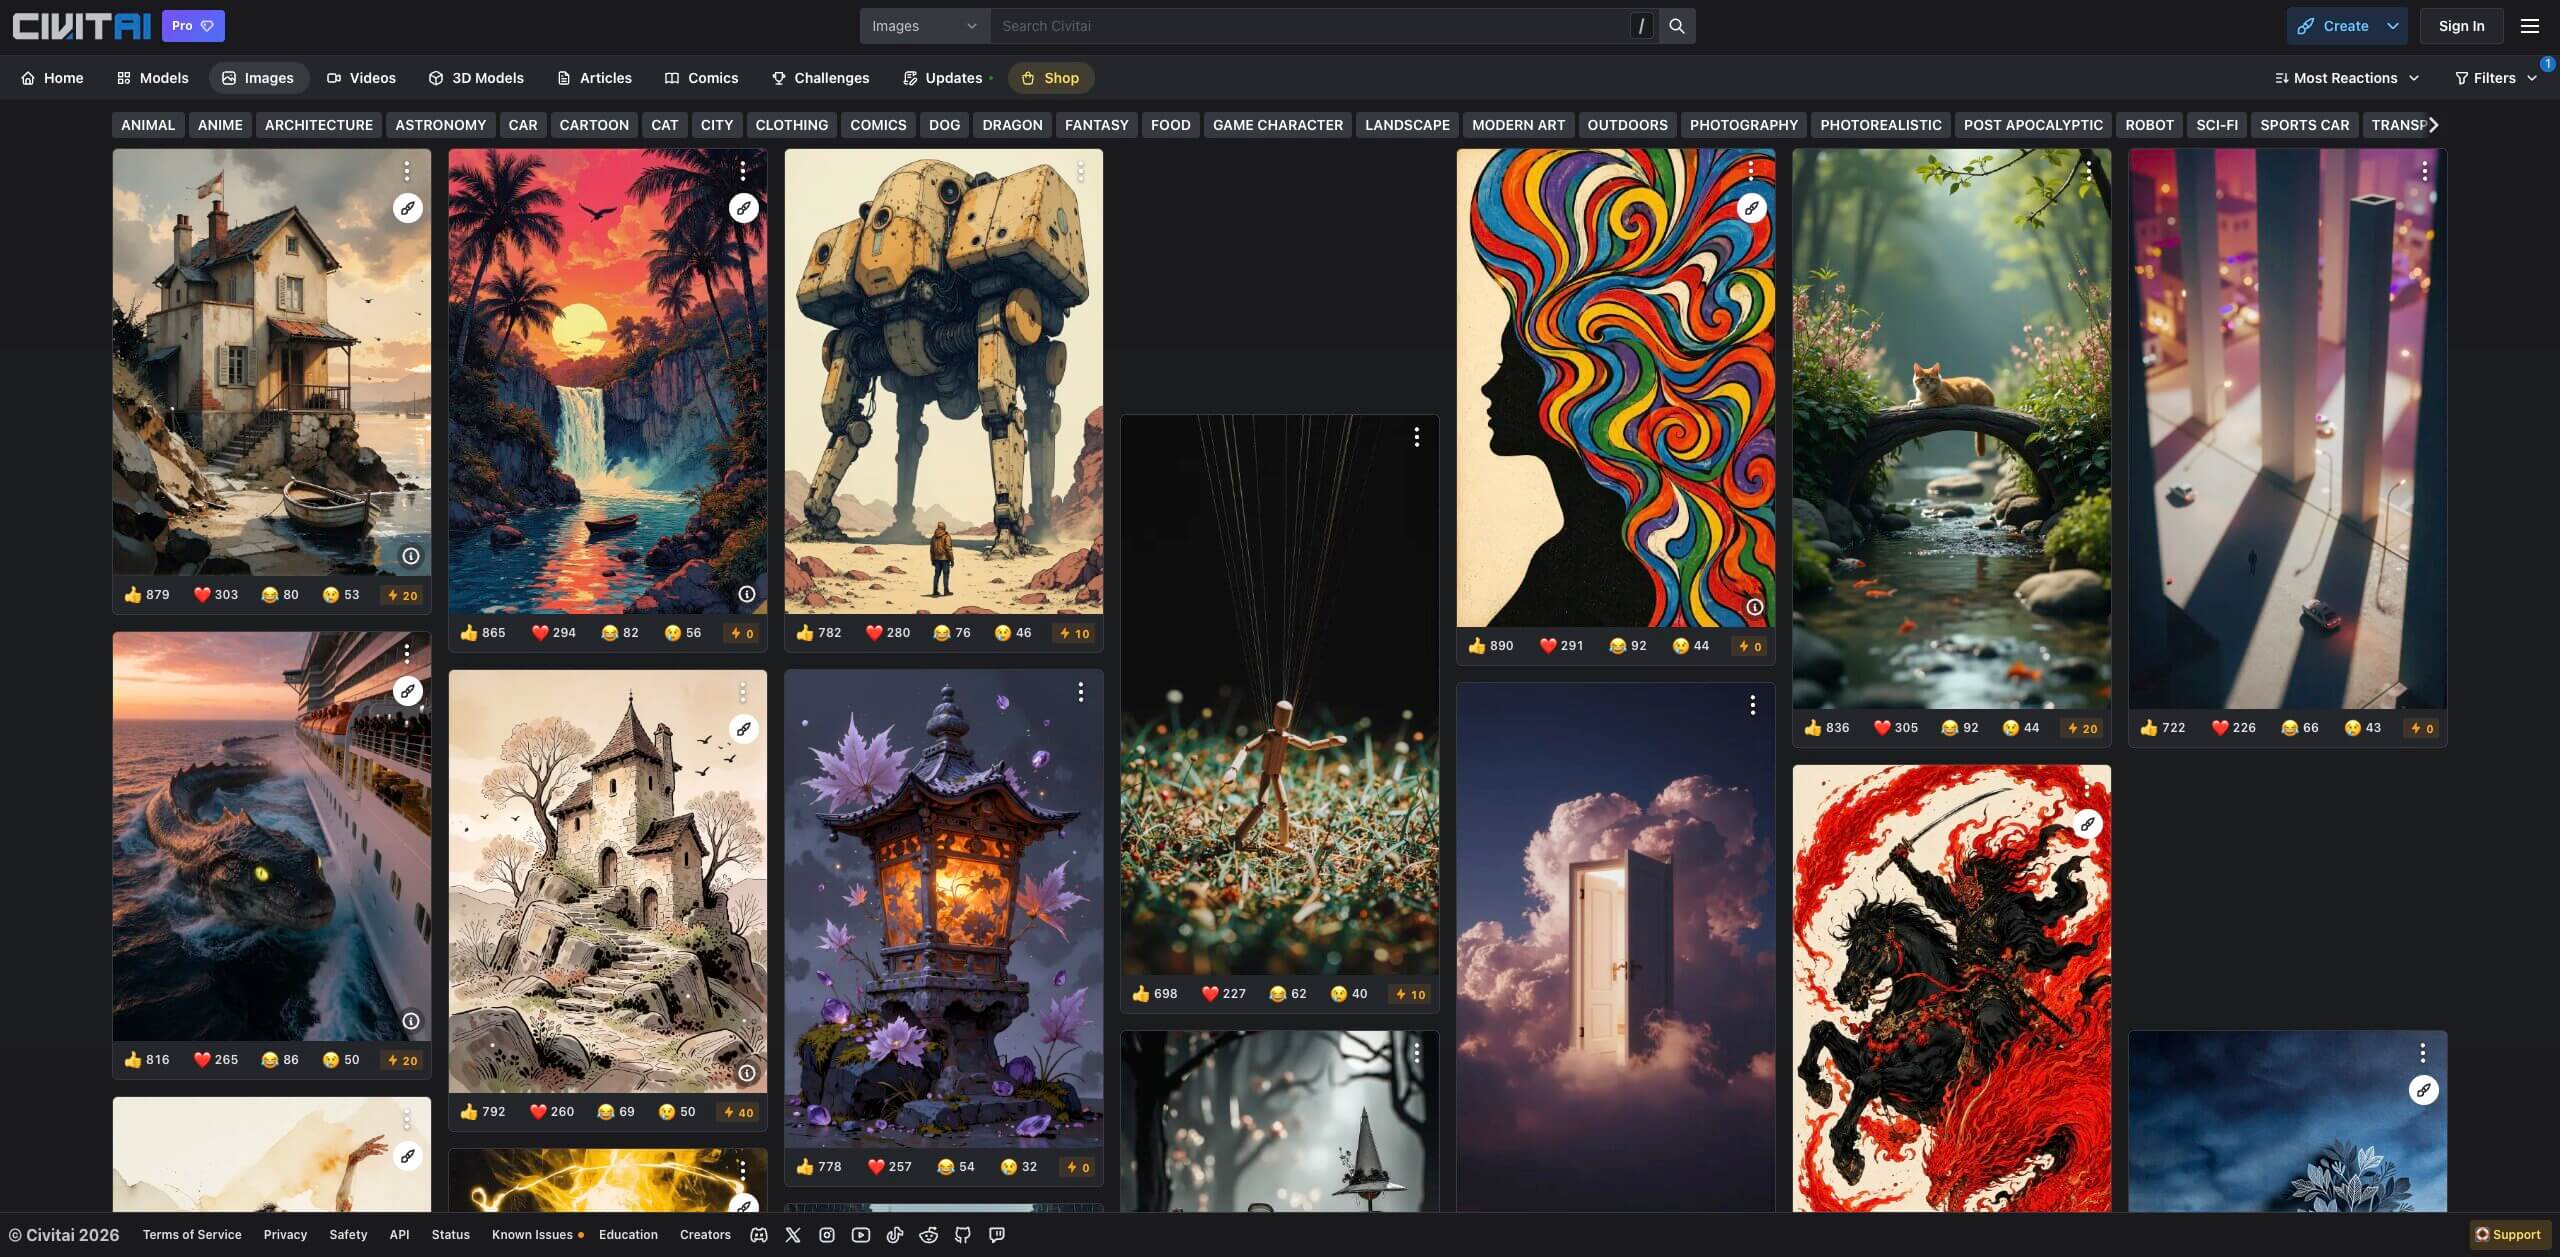
Every image on Civitai can carry hidden generation data — the exact LoRAs, weights, and prompt used to create it. LoRA Manager can read that hidden data straight from the image and turn it into a recipe automatically.
- In LoRA Manager, open the Recipes tab and click Import.
- Paste the link above (or a link to any Civitai image you like) and click Fetch Image.
- LoRA Manager reads the hidden data from the image and lists every LoRA it used, along with the weight each one was set to.
- Click Download Missing LoRAs, pick a folder, and LoRA Manager downloads any of those LoRAs you don't already have installed.
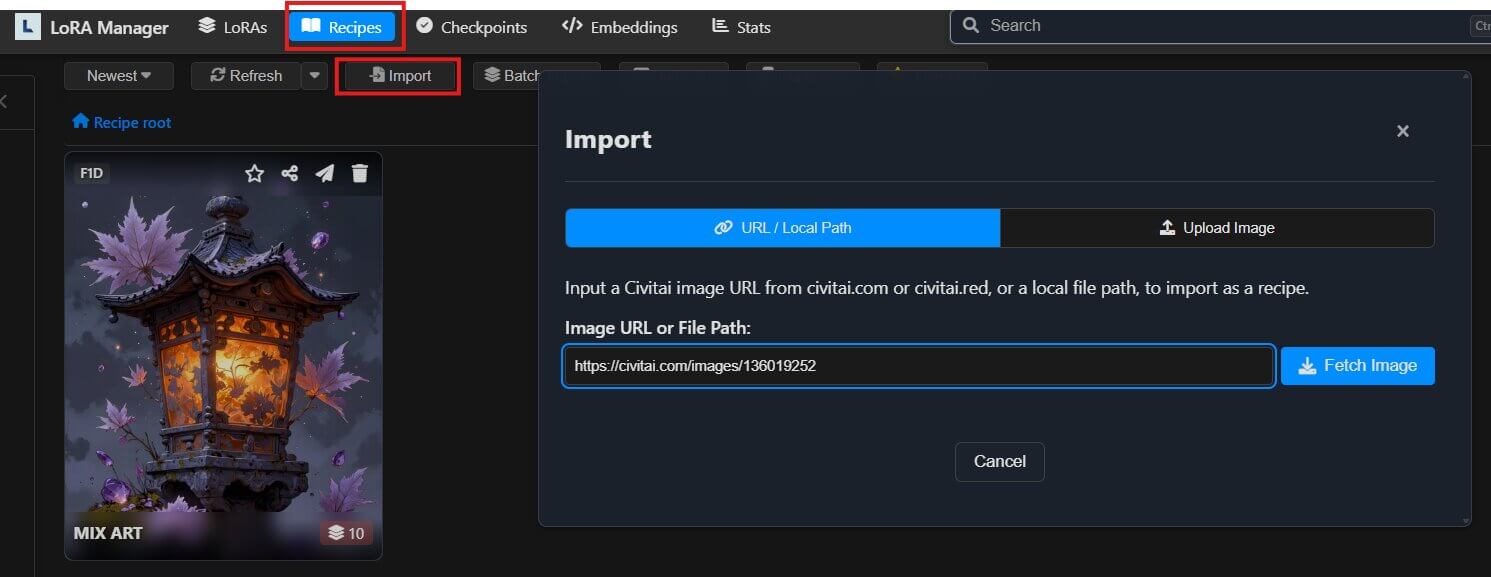
You can also import from a local image file the same way — just upload the file instead of pasting a link.
Saving Your Own Recipe
Found a LoRA combination that works well during a generation session?
- Right-click any LoRA inside your active Lora Loader node.
- Select Save Recipe.
- LoRA Manager saves the current LoRA names, weights, and generation metadata as a new recipe card.
Sending a Recipe to Your Workflow
Click the send button on any recipe card to load every LoRA in that recipe — with its saved weights — directly into your active Lora Loader node in one click. Shift-click to replace the loader's current content instead of appending to it.
Handling Deleted LoRAs in Recipes
If a LoRA used in an imported recipe has since been removed from Civitai, it shows up with a deleted badge but the recipe still works. If you already have the file locally, click the deleted badge and paste in the correct filename or LoRA syntax to reconnect it.
Finding Duplicate Recipes
Multiple Civitai images sometimes share the exact same LoRA combination and weights, which creates duplicate recipes as you import. Use the Find Duplicates button in the Recipes tab to group matching recipes together for quick bulk cleanup.
Troubleshooting ComfyUI LoRA Manager
"This node type does not exist" (red node in your workflow)
This means a workflow you loaded uses a LoRA Manager node you haven't installed, or your extension is out of date.
- Click Manager in the ComfyUI menu.
- Click Install Missing Custom Nodes.
- Restart ComfyUI completely.
If the node still shows as missing, update ComfyUI-Lora-Manager to the latest version through Custom Node Manager and restart again. See our guide to fixing missing nodes in ComfyUI for more detail.
Preview Images or Trigger Words Aren't Loading
This is almost always a missing or invalid Civitai API key — remember, this key is optional, but required for automatic previews.
- Confirm you've added your key under LoRA Manager's Settings page.
- Check that the key hasn't been revoked on Civitai's account settings page.
- Click the fetch button on the individual model card to force a retry.
LoRA Manager Button Doesn't Appear After Installing
- Confirm the extension installed without errors — check your ComfyUI terminal window for red error text during startup.
- Make sure you fully restarted ComfyUI rather than just refreshing the browser tab.
- Clear your browser cache and reload the ComfyUI page.
"ModuleNotFoundError" After Manual Installation
This means the required Python packages were installed into the wrong Python environment.
- Locate your ComfyUI installation's
python_embededfolder if you're on a portable or desktop build. - Re-run the install command using
python_embeded\python.exe -m pip install -r requirements.txtfrom inside theComfyUI-Lora-Managerfolder, adjusting the number of..\to match your folder depth. - Restart ComfyUI.
Frequently Asked Questions
What to Do Next
Install LoRA Manager and organize your five most-used LoRAs first.
That's enough to see the workflow speed-up immediately. Once you're comfortable with previews and trigger words, start saving recipes for any LoRA combination that gives good results, so you never have to reconstruct it from memory.
Published: 2026-07-10 · Last updated: 2026-07-10 · Extension source: willmiao/ComfyUI-Lora-Manager
Join the discussion
Sign in to leave a comment or reply
No comments yet
Be the first to share your thoughts!