
Tested on a Windows PC with an RTX 4090 (24 GB VRAM), Comfy Desktop · Prices checked September 20, 2026
⚡ Quick Answer
What is ComfyUI? It is a free, open-source app (its code is public) that makes AI images, video, music and 3D models by connecting small blocks called nodes, where each block does one job, such as loading a model or saving a picture. The software costs $0, but running it needs a graphics card with enough VRAM (the memory on that card that holds the AI model while it works) or paid cloud credits, and some models come with separate licenses.
You heard ComfyUI is free, so you installed it. Then the first video crashed with a memory error, or the cloud option asked for a credit card, or a model page mentioned a license you had not read. The software itself costs nothing. The costs sit around it, and most guides skip them.
This guide explains what ComfyUI is, what it can make, and what it costs to run in 2026: graphics card, cloud credits, paid models, licenses and disk space. Prices come from Comfy's own pricing page, checked on September 20, 2026.
What Is ComfyUI, in Plain English?
ComfyUI is an app for making AI images, video, audio and 3D models. It runs on your own computer or in the cloud. Instead of one prompt box, it shows the whole process as a chain of nodes.
Each node does one job. One node loads the AI model, one reads your prompt (the text description you type), one generates the image, and one saves it. You connect the nodes with wires. The complete chain is a workflow (a saved set of connected nodes that produces a result).
ComfyUI is the app, not the AI. The AI is a diffusion model (a type of AI that starts from random noise and removes it step by step until a picture appears). Stable Diffusion (a popular family of open image models) and FLUX are examples. ComfyUI loads a model and runs it, like a workbench that holds whichever tool you clip onto it.
Older articles describe ComfyUI as an interface for Stable Diffusion. That description is out of date. Comfy's own description now covers images, video, 3D models and audio.

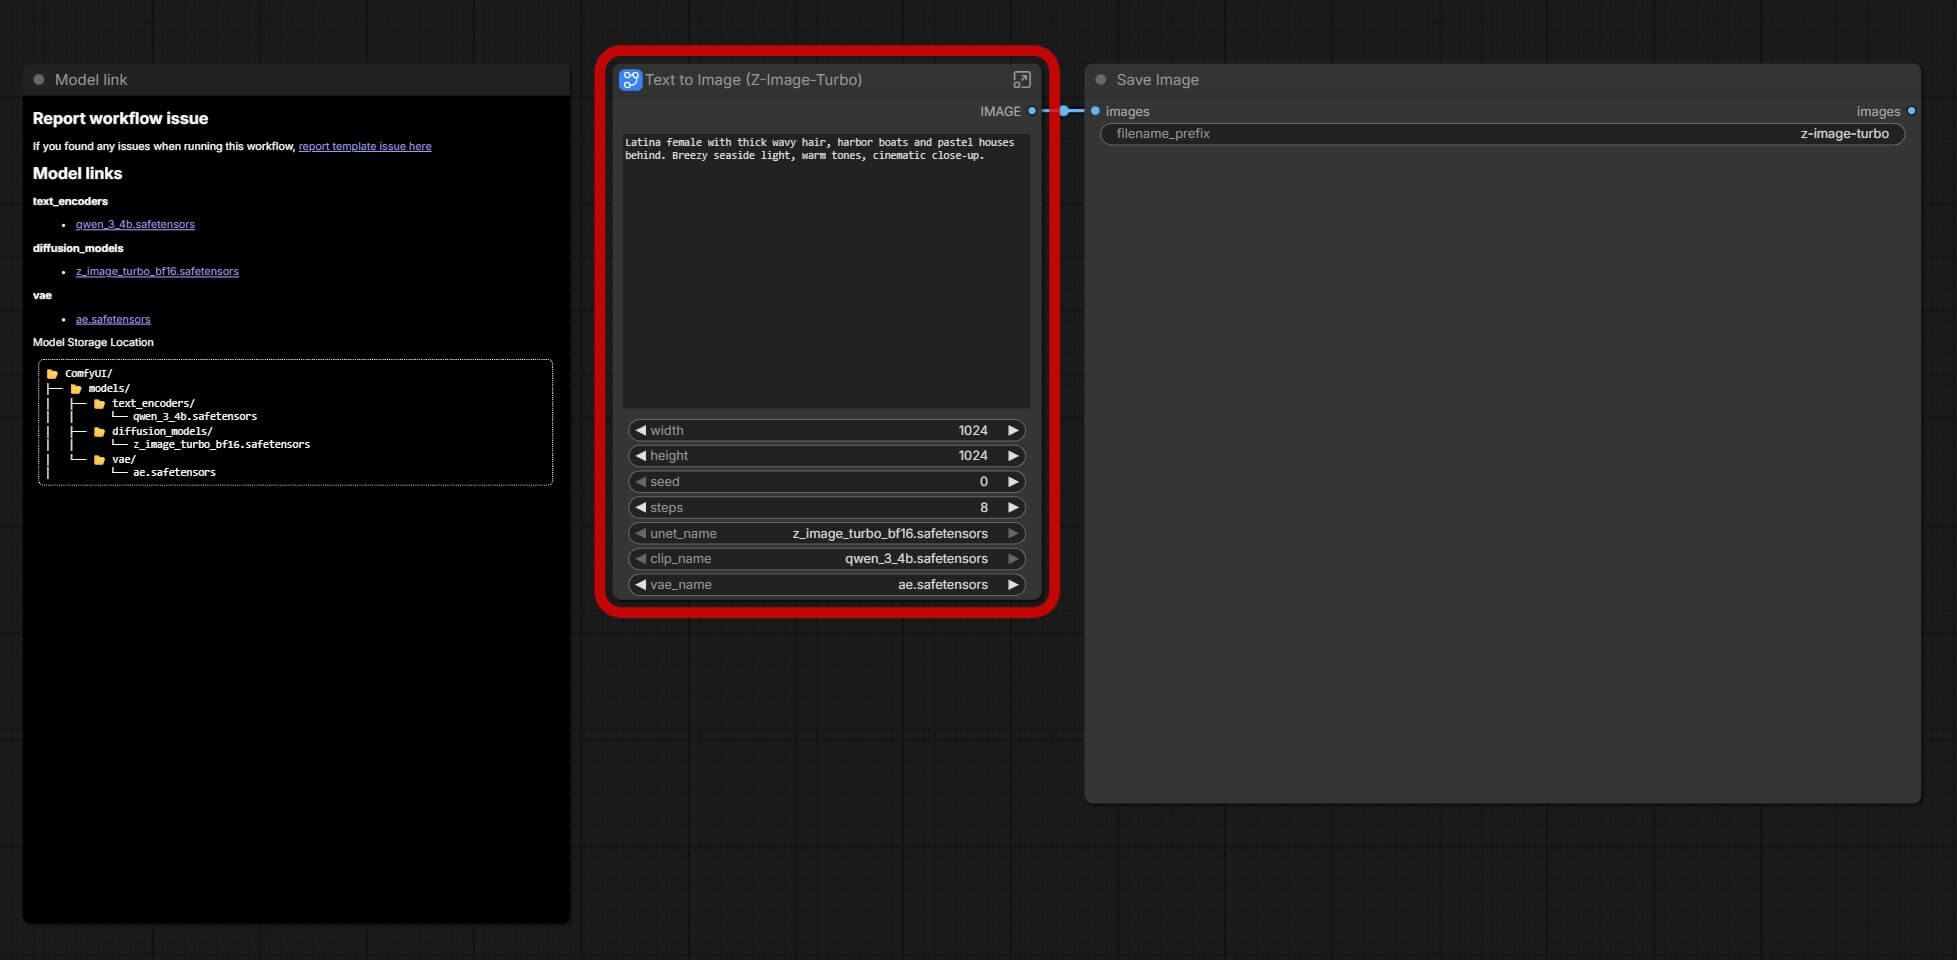
You do not build workflows from scratch on day one. ComfyUI includes ready-made templates. Open Workflow, then Browse Workflow Templates, pick one, change the prompt or the input image, and run it.
If you expect a single text box like Midjourney has, the first screen will look wrong. That reaction is normal.
Is ComfyUI Really Free? What It Costs to Run in 2026
The software is free. Running it is where money can go. These are the costs in the order beginners usually meet them.
Is the software itself free?
Yes. ComfyUI is open-source software under the GPLv3 license (a license that lets anyone use, change and share the code). Comfy's pricing page also states that Comfy Desktop, the app most beginners install, is free. You pay no subscription to run ComfyUI on your own computer.
What do you pay for instead?
Five things around the free app can cost money or time:
- A graphics card with enough VRAM
- Comfy Cloud credits, if you have no graphics card
- Paid models, called Partner Nodes
- Licenses, if you sell what you make
- Disk space and learning time
Cost 1: A graphics card
ComfyUI runs the AI model on your graphics card (also called a GPU, the chip that does the heavy math). If you already own a recent NVIDIA card or an Apple Silicon Mac, this cost is $0. If you do not, try the free cloud options below before you buy hardware. The hardware section later in this guide shows how much VRAM different jobs need.
Cost 2: Comfy Cloud credits, if you have no graphics card
Comfy Cloud runs ComfyUI on Comfy's own machines and shows it in your browser, so you install nothing. Building and editing a workflow costs nothing. You spend credits only while a workflow runs on the GPU.
| Plan | Monthly price | Per month, billed yearly | What changes |
|---|---|---|---|
| Free | $0 | n/a | 5 free runs on real GPUs, no credit card |
| Standard | $20 | $16 | 30-minute limit per run; you cannot import your own models |
| Creator | $35 | $28 | Adds importing your own models from CivitAI or Hugging Face |
| Pro | $100 | $80 | Runs can last up to 1 hour |
| Team | $700 | $630 | Shared credit pool for up to 50 members |
According to Comfy, a 5-second video on its Wan 2.2 video template at default settings uses about 11 credits. Plan credits reset each billing cycle and do not roll over. Top-up credits stay valid for one year.
Cost 3: Paid models inside ComfyUI (Partner Nodes)
Partner Nodes are nodes that call paid, closed-source models (models whose files are not public, so they run on the company's servers) from inside your workflow. Nano Banana is one example. They draw from the same credits as Comfy Cloud, and those credits also work in Comfy Desktop.
You never need Partner Nodes to follow this guide. Open-source models run locally at no cost.
Cost 4: Free to run is not always free to sell
Licenses differ a lot. Our YuE2 install guideflags a non-commercial license (CC BY-NC 4.0). That is fine for personal projects and not for monetized videos or client work. Comfy's pricing page also lists paid commercial licenses for running MiniMax models locally, starting at $5,000 per month, and says Comfy Cloud already includes commercial use.
Every model in this guide is summarized in the license table in the "What Can ComfyUI Do?" section. Before you sell anything, open the model's download page and read the license line. If it says non-commercial or "NC", do not sell the output. This is not legal advice.
Cost 5: Disk space and learning time
Model files are large. One model can be many gigabytes, and a folder of several models reaches tens of gigabytes. Plan for 50–100 GB of free SSD space (a fast drive) to start.
Time is the other cost. Following a tutorial, most people generate a first image in 15–30 minutes. Feeling comfortable changing a workflow takes a few hours.
Which is the cheapest path for you?
| Your situation | Cheapest path | Cost |
|---|---|---|
| Recent NVIDIA graphics card | Comfy Desktop on your PC | $0 |
| Apple Silicon Mac | Comfy Desktop on your Mac | $0 |
| No graphics card, trying it out | Comfy Cloud free runs | $0 for 5 runs |
| No graphics card, free but limited | Google Colab (a Google service that lends you a cloud computer), free tier | $0, with session limits |
| No graphics card, regular use | Comfy Cloud Standard, or renting a GPU | From $20 per month; one 2026 roundup lists rented RTX 3090 GPUs from about $0.22 per hour, and prices change |
How Does ComfyUI Actually Work?
Every basic image workflow follows one path, left to right. The default workflow uses seven nodes. Read them in order and you understand the whole idea.
- Load Checkpoint loads the checkpoint (the main AI model file — it controls what style your images have).
- The top CLIP Text Encode (Prompt) reads your prompt. It uses CLIP (the part of the model that turns your words into numbers the AI can use).
- The second CLIP Text Encode (Prompt) holds the negative prompt (a list of things you do not want in the image, such as "blurry" or "watermark").
- Empty Latent Image sets the image size and creates the empty starting canvas. That canvas lives in latent space (the compressed format the AI works in before it makes a visible picture).
- KSampler (the node that generates the image by removing noise from the starting canvas, one step at a time) does the main work.
- VAE Decode uses the VAE (the part that converts the AI's internal image into pixels you can see) to make the picture visible.
- Save Image saves the result.
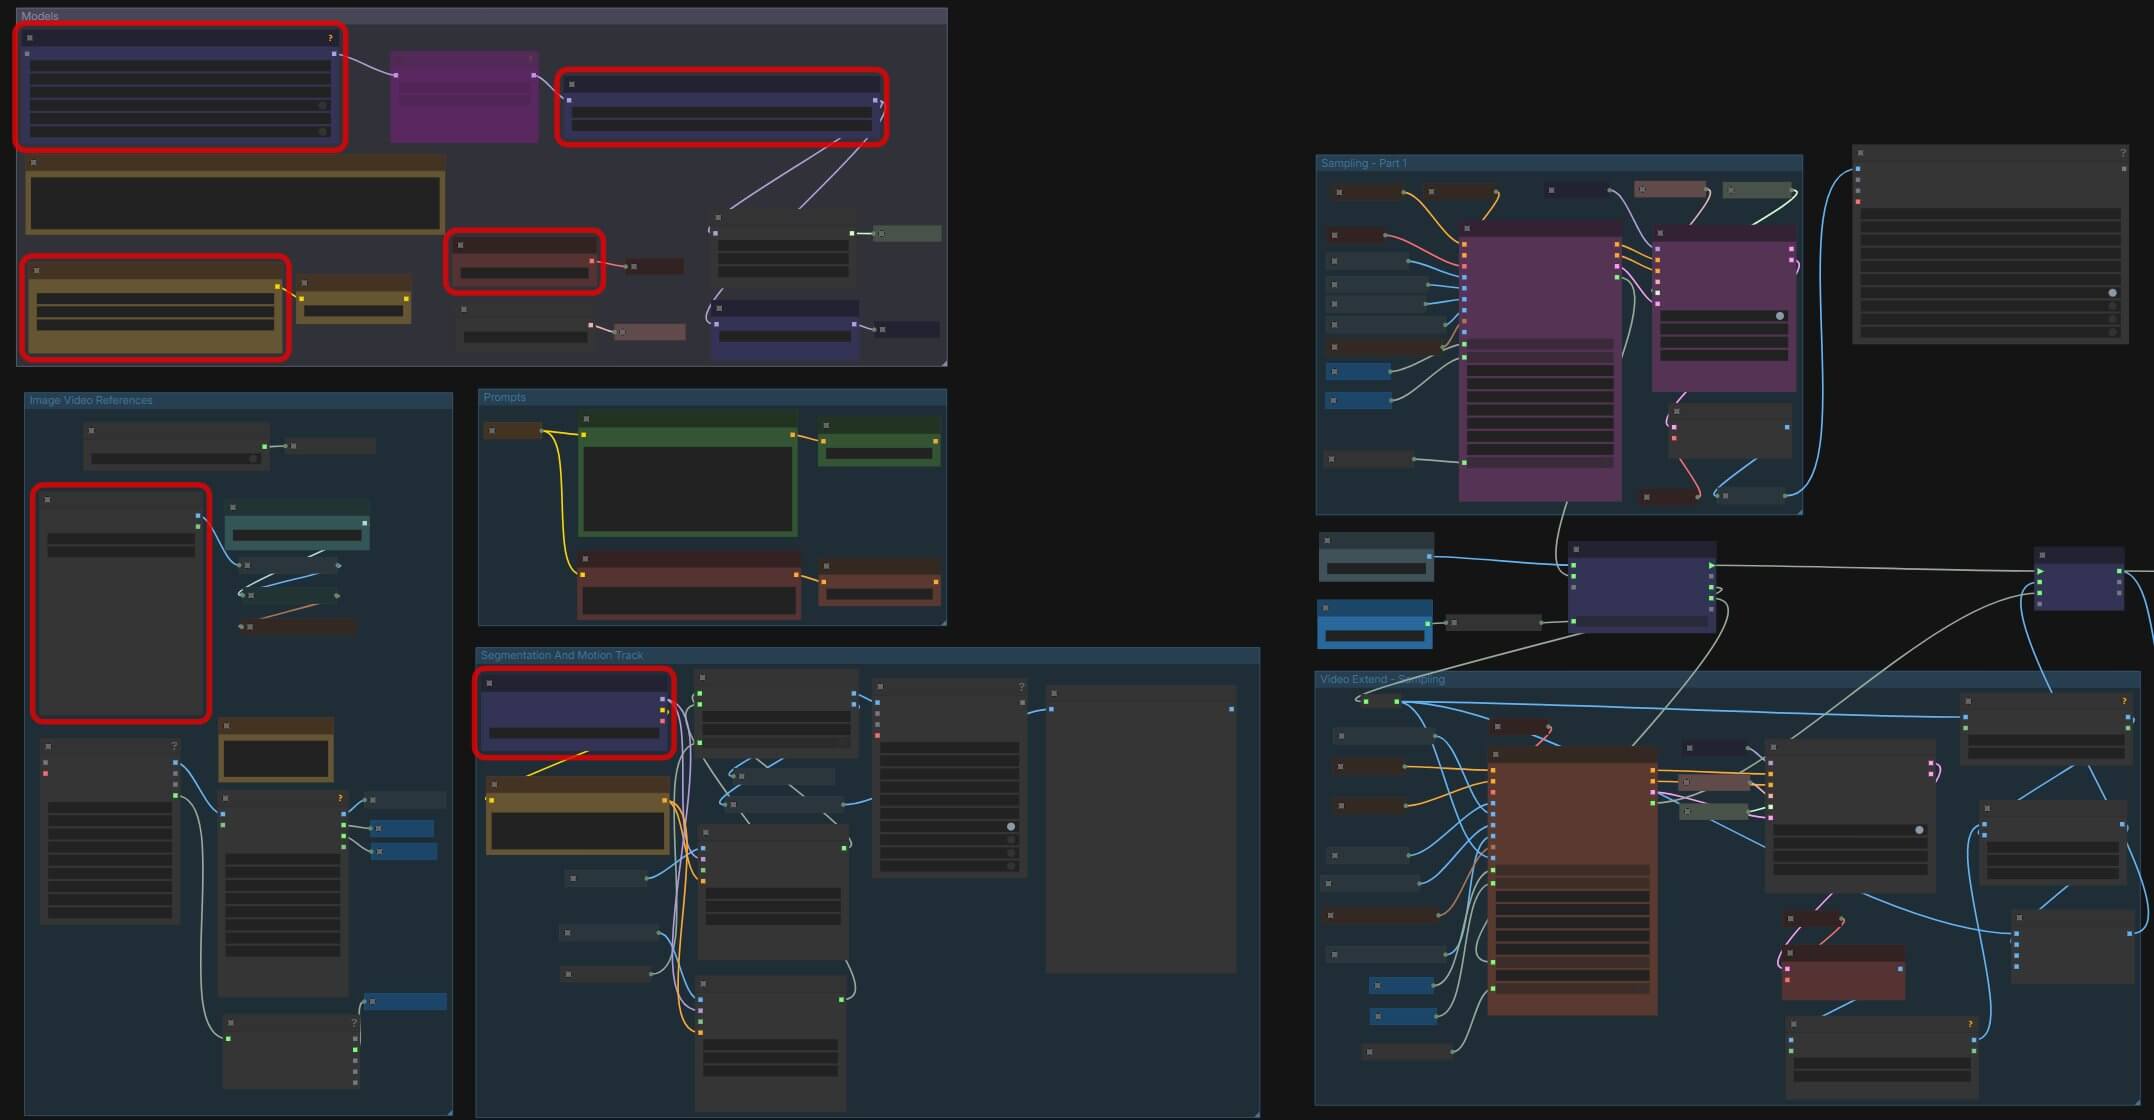
You start a run with the Queue Prompt button (the button that runs the workflow). The finished picture appears in the Save Image node.
Four things are worth knowing:
- Wires connect only matching types. If a wire will not attach, the two ends are different types.
- ComfyUI saves the workflow inside every PNG it makes. Drag a generated PNG onto the canvas and the full workflow returns, including the seed (the number that sets the random starting noise).
- ComfyUI re-runs only the nodes whose inputs changed, so small changes finish faster.
- The community adds extra nodes. These custom nodes (add-on nodes that give ComfyUI features it does not include by default) install through ComfyUI Manager (a tool inside ComfyUI for installing and updating add-ons). Read the safety section before you install any.
What Can ComfyUI Do? 7 Things You Can Make With It
ComfyUI is not limited to still images. Each item below has a short explanation and a link to the full guide. Start with the first one and treat the rest as a menu.
1. Turn a text description into an image
This is where most people start. You type a description, and ComfyUI makes a matching picture. That is text-to-image (generating an image from written words). A specific prompt gets a specific result: "a golden retriever sitting on a wooden porch at sunset, warm lighting, photorealistic" produces that scene, not a random dog.
If your first image comes out blurry or generic, the prompt is usually the cause, not the model. Write a full descriptive sentence instead of search-style keywords like "dog, park, happy". Name the subject, the style (photorealistic, illustration, 3D render) and the lighting. Use the negative prompt box for what you want left out.
Different models read prompts differently. FLUX models handle longer, natural sentences better than short keyword lists, so read the Flux 2 prompting guide once you know which model you use. The prompt engineering principles guide covers the general rules.
Ideogram 4 is a strong choice when the image must contain readable text, which many models still get wrong. The Ideogram 4 install guide sets it up.


Follow the full text-to-image walkthrough for your first image, including which nodes to check.
2. Edit photos you already have
ComfyUI can start from a photo instead of a blank canvas. You upload an image, describe the change, and the model edits it. That is image-to-image (using an existing image as the starting point). There are three main methods.
Describe the change
You write the change in plain language, such as "change the background to a beach", "add sunglasses" or "make it nighttime". Models such as Qwen-Image-Edit-2509 and FLUX.1 Kontext apply it without you marking anything on the image.


See more use cases in the image editing workflow guide.
Fix or replace one area (inpainting)
Inpainting (regenerating only a marked area of an image) works differently. You paint a mask (a painted overlay that marks the exact area to change) over the spot, and only that area is regenerated. Use it to remove an object, fix a distorted hand or replace one item while every other pixel stays identical.


Extend an image past its borders (outpainting)
Outpainting (generating new content outside the original edges) works the opposite way. It turns a square photo into a wide banner, or shows more of a scene than the camera captured. The new area matches the style and lighting of the original.


The inpainting and outpainting guide has the exact node connections and mask settings.
3. Keep the same character across many images
By default, every image shows a different person, even with the same prompt. ComfyUI follows your description. It does not remember a face.
Two methods fix this. A LoRA (a small add-on file that teaches the model a specific face, character or art style) makes the same character appear in different outfits, poses and scenes. Some newer models, such as Krea 2, keep character consistency (keeping the same face and look across many images) from a single reference photo with no LoRA training.




Learn the LoRA method in the ComfyUI LoRA guide, or read about dedicated character consistency techniques.
4. Sharpen and enlarge images (upscaling)
Images from most workflows are fairly small and can look soft up close. Upscaling (enlarging an image while an AI adds back fine detail, instead of stretching the pixels you already have) fixes that.

The full walkthrough is in AI upscaling in ComfyUI.
5. Make video, including talking characters
ComfyUI makes short video clips too. Text-to-video (a clip generated from a written description) needs no starting image. Image-to-video (a clip that animates a photo you already have) adds motion and camera movement around it.
MiniMax H3 is one option. It generates synced sound in the same pass as the picture, so the audio is produced alongside the video instead of added afterward. Comfy's pricing page lists a paid commercial license for running MiniMax models locally, so read the cost section above before you use its clips for paid work. The MiniMax H3 workflow guide has the model files and both workflows, and the MiniMax H3 prompt guide helps you write stronger prompts.
Text-to-Video
Image-to-Video
A single photo can also become a character. WAN 2.2 Animate turns one photo into a full character performance. WAN 2.2 S2V makes a lip-synced speaking avatar from an audio track you provide. See animating a photo into a full performance and generating a speaking, lip-synced avatar.
WAN 2.2 Animate
6. Generate music and voice
ComfyUI can write full songs with vocals from a text description, and it can turn written text into speech for voiceovers. You need no recording equipment or singing ability.
ACE-Step 1.5 is a free, open-source option for songs with vocals. The ACE-Step 1.5 guide covers it. MiniMax Music 3 generates a complete song of up to 5 minutes, with vocals, instruments and structure such as verse and chorus, from a description of genre, mood and lyrics. See the MiniMax Music 3 guide.
MiniMax Music 3 Example
For narration, Kokoro converts written text into natural-sounding speech inside ComfyUI. The Kokoro text-to-speech guide has the setup.
Kokoro Voice Example
7. Turn a photo into a 3D model
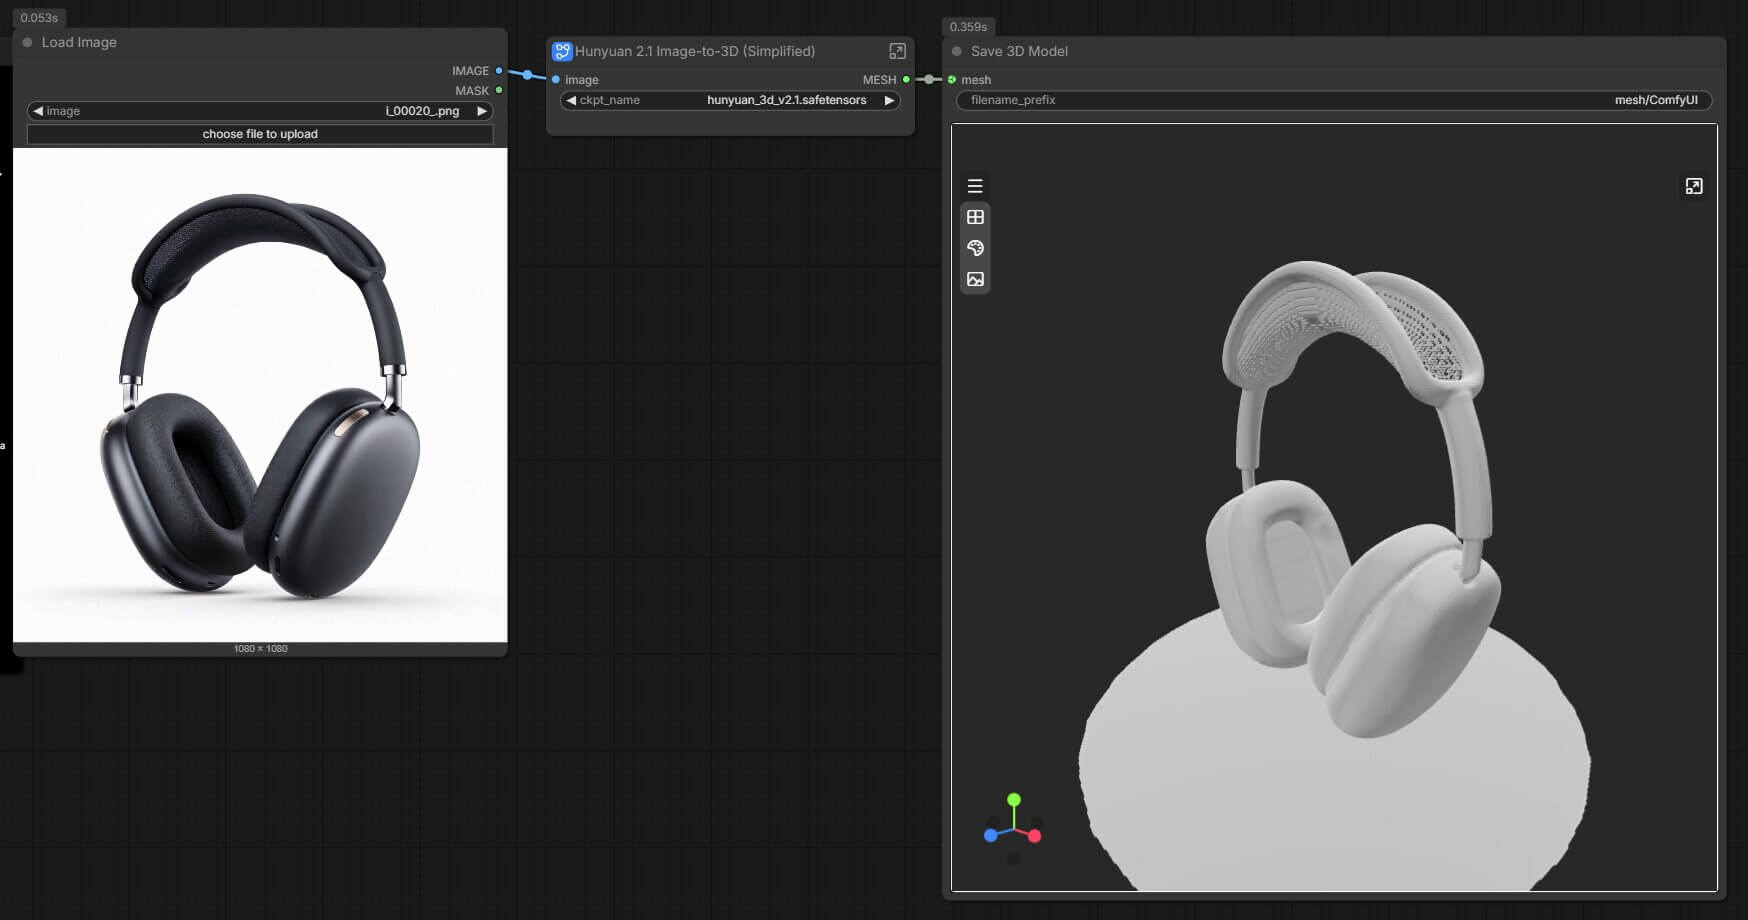
ComfyUI can build a textured 3D model from one 2D photo. People use this for game assets, 3D-printing references and product previews. Hunyuan3D 2.1 is the model our guide uses. See image to 3D in ComfyUI.
Hardware at a glance
| What you make | Model in our guide | VRAM we tested |
|---|---|---|
| Text to image | Ideogram 4 | [FILL] |
| Photo editing | Qwen-Image-Edit-2509 | [FILL] |
| Consistent character | Krea 2 | [FILL] |
| Video with sound | MiniMax H3 | [FILL] |
| Animated character | WAN 2.2 Animate | [FILL] |
| Music | ACE-Step 1.5 | [FILL] |
| Music | MiniMax Music 3 | [FILL] |
| Voice | Kokoro | [FILL] |
| 3D | Hunyuan3D 2.1 | [FILL] |
Licenses: can you use each model for paid work?
Each model has its own license, and the terms differ a lot. This table summarizes the ones in this guide.
| Model | License | What it means for paid work |
|---|---|---|
| Ideogram 4 | Ideogram 4 Non-Commercial | Not allowed without a paid license. One article says commercial use is fine, but the official model card lists non-commercial. |
| Qwen-Image-Edit-2509 | Apache 2.0 | Allowed. |
| Krea 2 | Krea 2 Community License | Allowed only if your company's yearly revenue is under $1M, per §2.3 of the license PDF. |
| MiniMax H3 | MiniMax H3 Community License | Excludes the US, EU, UK and South Korea. Elsewhere it's free for commercial use under $20M revenue, with "MiniMax H3" shown on the product. |
| WAN 2.2 Animate | Apache 2.0 | Allowed. |
| ACE-Step 1.5 | MIT | The model card says generated music can be used commercially. |
| MiniMax Music 3 | MiniMax-Music3 Community License | Allowed with "MiniMax-Music3" displayed. Above $20M revenue you need MiniMax's written approval. No territory exclusion. |
| Kokoro | Apache 2.0 | Allowed. |
| Hunyuan3D 2.1 | Tencent Hunyuan 3D 2.1 Community License | Doesn't apply in the EU, UK or South Korea. Above 1M monthly users you need Tencent's license. |
What Do You Need to Run ComfyUI on Your Own Computer?
You need three things: a graphics card with enough VRAM, free disk space, and a supported operating system.
| Your computer | Works? | Notes |
|---|---|---|
| Windows PC with an NVIDIA graphics card | Yes, best supported | One install guide calls 8 GB of VRAM a comfortable start for most image work. Another lists 4 GB as the bare minimum. |
| Windows or Linux PC with an AMD or Intel graphics card | Yes | Supported, but the download and setup differ. Check the install guide. |
| Mac with Apple Silicon | Yes | ComfyUI uses Apple's Metal graphics support (through PyTorch's MPS backend), according to the official docs. |
| No graphics card | Works, slowly | The official CPU mode works on any machine. Images that take seconds on a GPU can take many minutes. |
Video and high-resolution work need more VRAM than basic image generation. Check the official system requirements and our VRAM and hardware guide before you pick a large model.
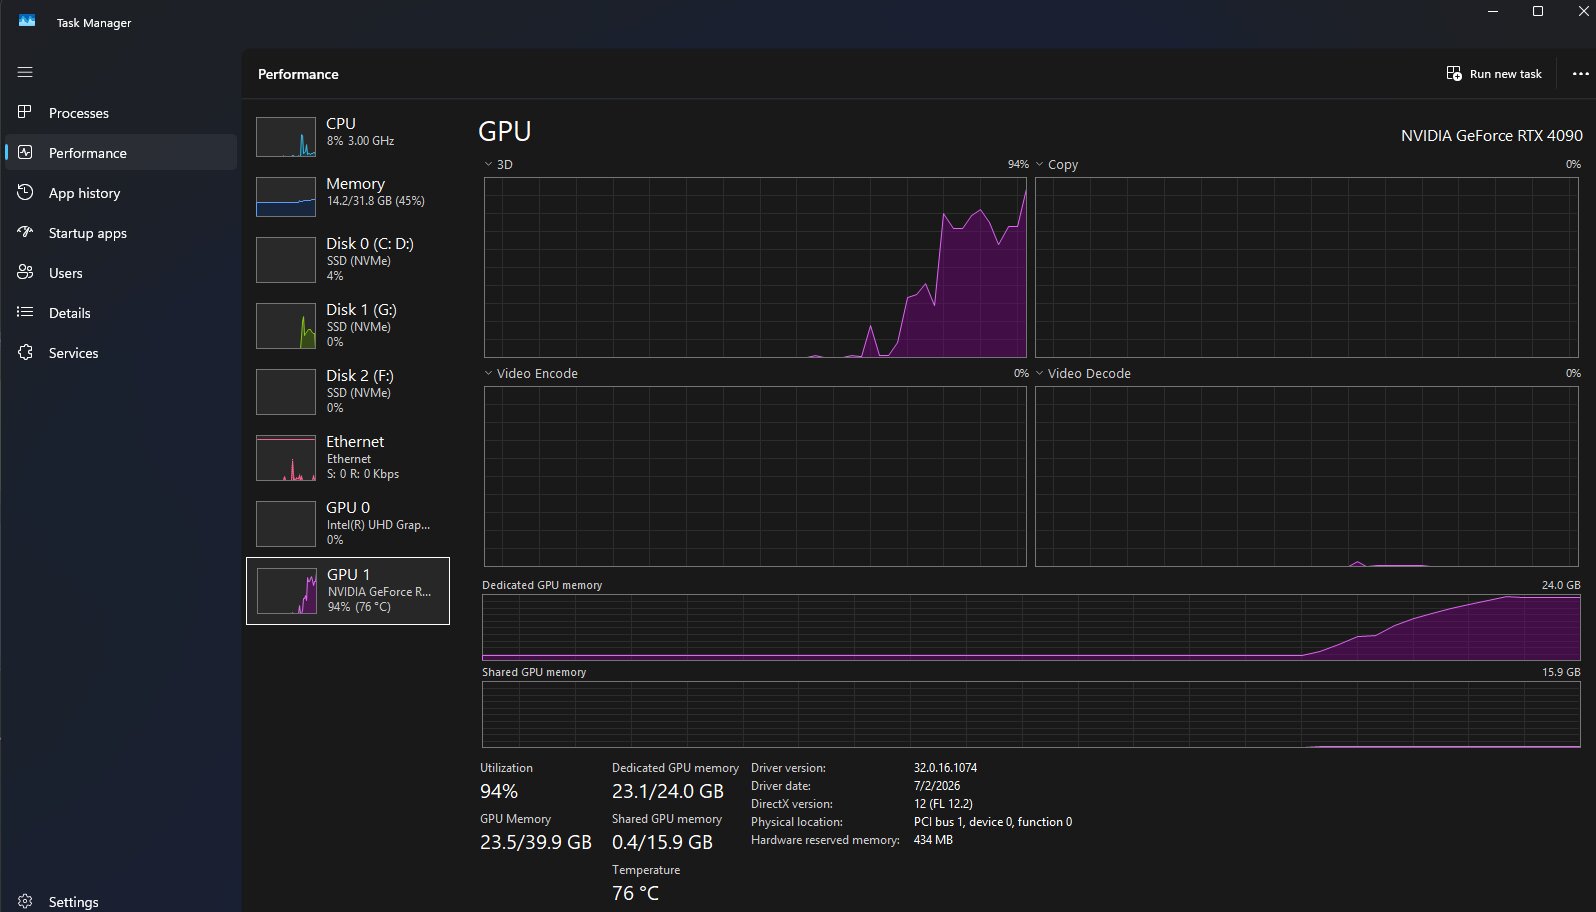
Find your VRAM on Windows
- Press Ctrl + Shift + Esc to open Task Manager. If you see a small window, click More details.
- Click the Performance tab on the left.
- Click GPU in the list. You should see Dedicated GPU memory with a number such as 24.0 GB. That number is your VRAM.
If your card has less VRAM than a model needs, look for a quantized model (a compressed copy of a model that uses less VRAM, with a small loss in quality). Many come as GGUF files (one common file format for compressed models).
What's the Difference Between ComfyUI, Comfy Desktop, Comfy Cloud and App Mode?
These names confuse almost every beginner. The company is Comfy Org, and its website now uses the short name "Comfy". The app is still called ComfyUI in its docs and code repository.
| Name | What it is | Cost | Best for |
|---|---|---|---|
| ComfyUI | The open-source app itself | Free | Everyone. Every option below runs it. |
| Comfy Desktop | The installer-style app for Windows and macOS | Free | Most beginners. The official README calls it the easiest and best way for new users. |
| Portable build | A zip file for Windows that runs on NVIDIA graphics cards or the CPU | Free | Advanced users. The README does not recommend it for regular users. |
| Comfy Cloud | ComfyUI in your browser, running on Comfy's GPUs | 5 free runs, then $20–$100 per month | People with no graphics card |
| App Mode | A simplified view of a workflow, with a prompt box and a button | Free, part of ComfyUI | Beginners who want to skip the node view. You can switch back to the node graph at any time. |
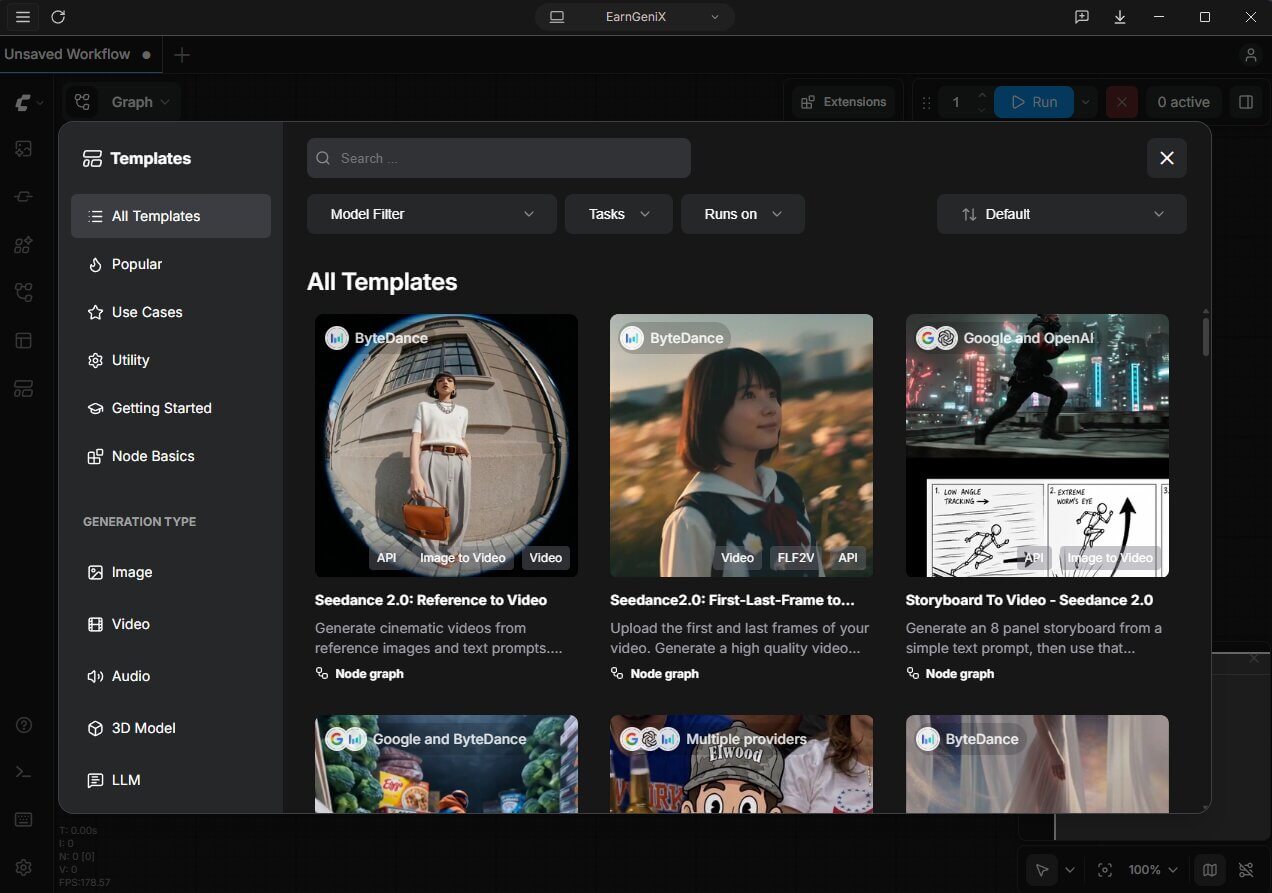
"ComfyUI Desktop" was renamed "Comfy Desktop" in June 2026. If a tutorial or video says ComfyUI Desktop, it means the same app. The ComfyUI 2026 updates article covers what else changed.
Should You Use ComfyUI or an Easier Tool?
ComfyUI trades ease for control. Here is how it compares with three common tools.
| ComfyUI | Automatic1111 | Fooocus | Midjourney | |
|---|---|---|---|---|
| Control | Every step is visible | Tabs and sliders | Simplified and automated | A prompt box |
| Learning curve | Steepest | Moderate | Easiest of the local tools | Easy |
| Cost | Software free; hardware or cloud credits | Software free; hardware | Software free; hardware | Monthly subscription |
| Runs where | Your PC or the cloud | Your PC | Your PC | Midjourney's servers |
| New models | Usually first | Often later | Limited | Only Midjourney's own models |
The ComfyUI vs Fooocus comparison and the ComfyUI vs Midjourney comparison break down each trade-off.
Who Should Use ComfyUI, and Who Should Skip It?
Use ComfyUI if you:
- want control over every step of how an image or video is made
- want to try new models soon after they release
- want to save a whole process as one file and reuse or share it
- want images, video, audio and 3D in one tool
- are willing to spend a few hours learning
Skip ComfyUI, for now, if you:
- want one good image in a minute with nothing to learn (try Fooocus or Midjourney)
- have no graphics card and do not want to pay for cloud credits
- do not want to read model licenses before you sell your work
Even good models make mistakes. Expect garbled text on signs, extra fingers or limbs, and faces that look alike unless you guide the model. Better prompts and the right model reduce this, but they do not remove it.
Start with the default workflow, not a 40-node workflow you downloaded. Most people who quit in the first week start with a complicated download. Our is ComfyUI hard to learn? guide has real time estimates.
How Do You Start Using ComfyUI as a Complete Beginner?
Follow these five steps. Each one has a clear check so you know it worked.
- Pick your path. With a Windows PC and an NVIDIA graphics card, or a Mac with Apple Silicon, install Comfy Desktop, which is free. The full Windows and Mac install guide walks through it. With no graphics card, open Comfy Cloud and use the 5 free runs. You should end up with ComfyUI open in a window or a browser tab.
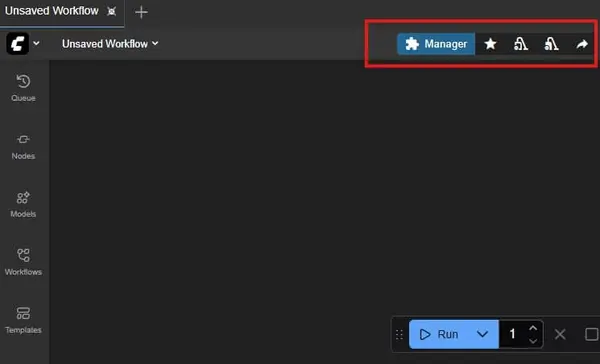
- Check that Manager works. Look for a Manager button in the top bar. It installs the add-ons that many workflows need. If it is missing, see the Manager error in the troubleshooting section.
- Open a template. Click Workflow, then Browse Workflow Templates, and choose a basic image template. You should see the seven nodes from earlier, joined by wires.
- Pick a model. Click the model name in the Load Checkpoint node and choose one from the list. If the list is empty, you need to download a model first. This tells ComfyUI which AI to run.
- Type a prompt and run it. Click into the top CLIP Text Encode (Prompt) box, type a description, then click the run button (labeled Queue Prompt in some versions). A progress bar appears. On a recent graphics card the image usually shows up in the Save Image node in under a minute. On older cards or the CPU it takes longer.
Is ComfyUI Safe? What to Check Before Installing Custom Nodes
The core app is safe when you get it from an official source: comfy.org or the ComfyUI GitHub repository. The core does not download anything unless you ask it to.
The risk is custom nodes. They are code written by other people, and they run on your computer. In June 2024, security researchers reported that a ComfyUI extension named ComfyUI_LLMVISION had been used to steal browser data, passwords and crypto wallet information. That was a malicious extension, not a flaw in ComfyUI itself. It is a reminder to check what you install.
Before you install any custom node:
- Install it through ComfyUI Manager, not from a zip file a stranger sent you.
- Open the node's GitHub page. Look for recent updates, an active maintainer and real activity in the issues list.
- Search the node's name together with the word "malware" or "issue".
- If a downloaded workflow asks for a node you do not recognize, check what that node does before you install it.
Which Beginner Errors Should You Expect?
Red box: "When loading the graph, the following node types were not found"
What causes it: The workflow uses a custom node (an add-on node not included by default) that you have not installed.
How to fix it:
- Click Manager in the top menu.
- Click Install Missing Custom Nodes.
- Install the packs it lists.
- Close ComfyUI completely and reopen it.
- Reload the workflow. The red box should be gone.
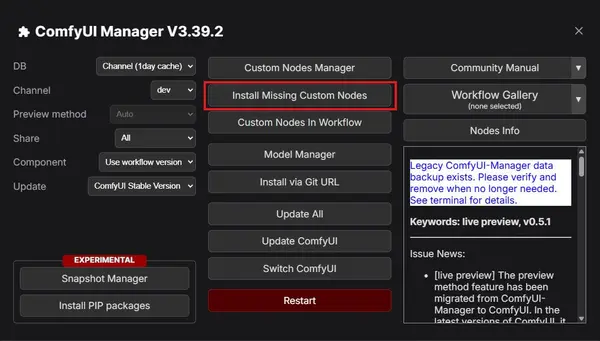
If Manager refuses the install and shows This action is not allowed with this security level configuration., the Manager security level is blocking it. The missing-nodes fix shows how to change it.
The ComfyUI Manager button does not appear
What causes it: Manager is not installed or not switched on. When you install Manager by hand, it usually fails because Git (a program that downloads and updates software) is missing. In some newer builds, Manager is built in but needs a launch option.
How to fix it:
- Install Git from git-scm.com.
- Reinstall ComfyUI Manager and restart ComfyUI.
- Follow the Manager install guide if it still does not appear.
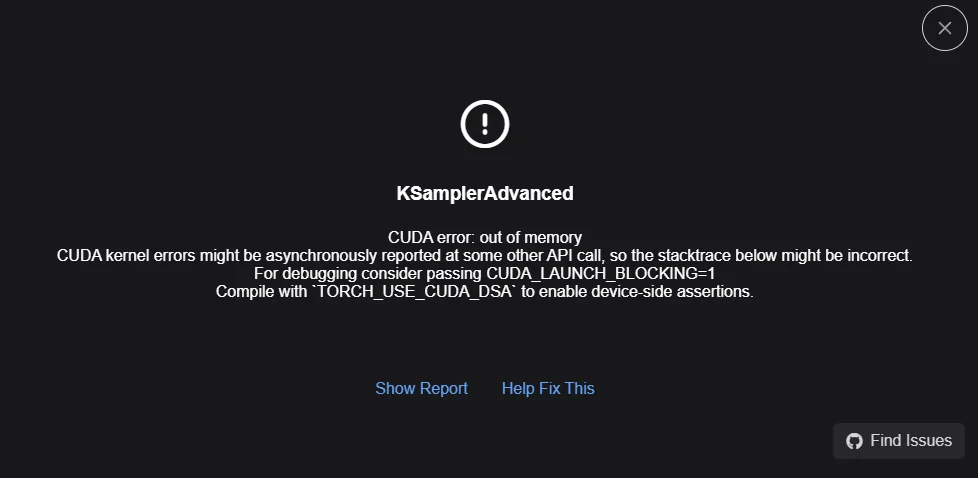
"Out of memory" or "Allocation on device" when generating
What causes it: Your graphics card does not have enough VRAM for the model, resolution or video length you chose.
How to fix it:
- Switch to a smaller or quantized version of the model.
- Lower the image resolution or video length, then run it again.
- Close other programs that use the graphics card.
The ComfyUI troubleshooting guide covers more errors.
Frequently Asked Questions
What to Do Next
Install Comfy Desktop and generate one image from the default template.
The install guide walks you through it, and the ComfyUI roadmap shows what to learn after that.
Published: 2026-09-02 · Last updated: 2026-09-20
Join the discussion
Sign in to leave a comment or reply
No comments yet
Be the first to share your thoughts!