
⚡ Quick Answer
You train a Krea 2 LoRA by creating a dataset in AI Toolkit, auto-captioning it with the built-in Qwen3-VL captioner, adding your trigger word by hand, and running the job on Krea 2 Raw— never Turbo. Most usable LoRAs finish between 1,000 and 2,000 steps, and once you've downloaded a checkpoint, you drop it into ComfyUI's models/loras folder to start generating.
If you've trained a LoRA before and it came out blurry, off-model, or just wrong, the most common cause with Krea 2 is a single wrong dropdown choice — not your dataset or your settings. This guide covers the full path to train a Krea 2 LoRA with AI Toolkit: building the dataset inside AI Toolkit, captioning it correctly, the exact training settings that produce a clean result, and how to load your finished LoRA into ComfyUI and start generating. You can also download a real, fully trained LoRA further down if you just want to see what a finished result looks like first.
What You Need Before You Start
This guide assumes three things are already in place. If any of them aren't, follow the linked guide first, then come back here.
- AI Toolkit installed and running — either locally or on a rented GPU. If you haven't set this up yet, see how to install Ostris AI Toolkit.
- A folder of training images. If you don't have a dataset yet, see where to source your training images first.
- A dataset that's already been checked for quality — right image count, correct resolution, real variety. Run through the dataset quality checklist before uploading anything — this matters more for your final result than any setting covered below.
Step 1: Create Your Dataset Inside AI Toolkit
With your images already sourced and quality-checked, the next step is loading them into AI Toolkit itself, where the training job will actually read them from.
- In the AI Toolkit web UI, click Datasets in the left-hand navigation, then click the New Dataset button. A small panel opens asking for a name.
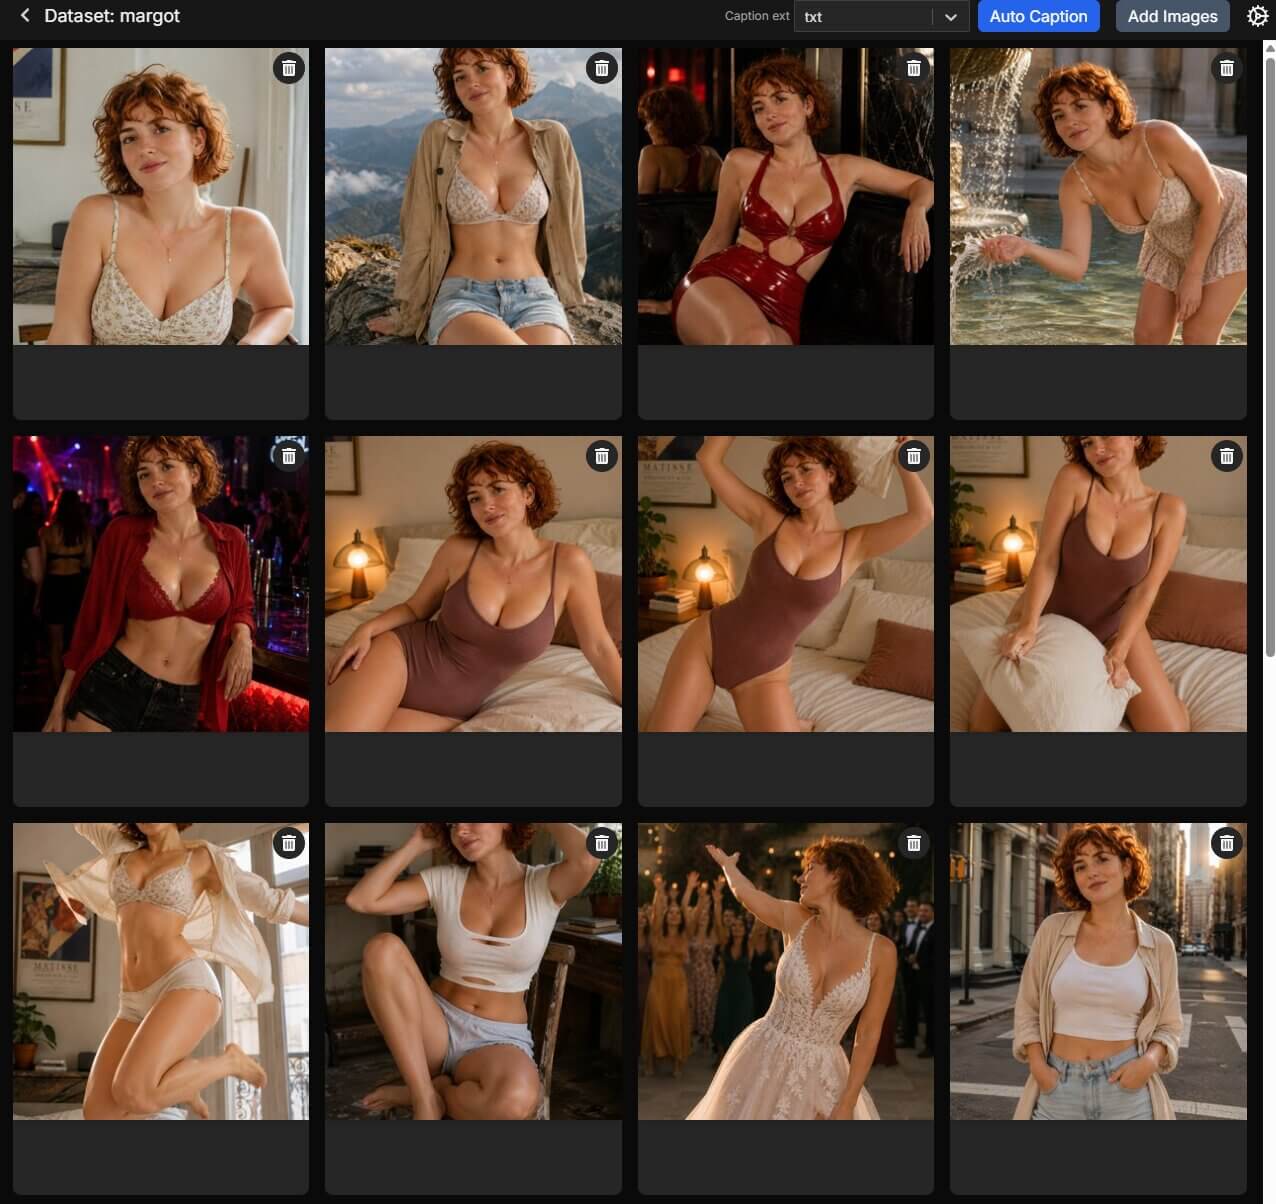
- Type a name for your dataset — use your subject's name or trigger word here so you can find it again later (for example, margot). Click Create. AI Toolkit opens an empty dataset page.
- Click Add Images, then drag and drop every image from your prepared folder into the upload area. Once the upload finishes, you'll see every image as a thumbnail grid on the page.
Step 2: Caption Your Images With AI Toolkit's Default Captioner
Every training image needs a caption — a short text description telling the trainer what's in that image. AI Toolkit can write these automatically using a built-in vision model called Qwen3-VL, so you don't need to type a caption for every image by hand.
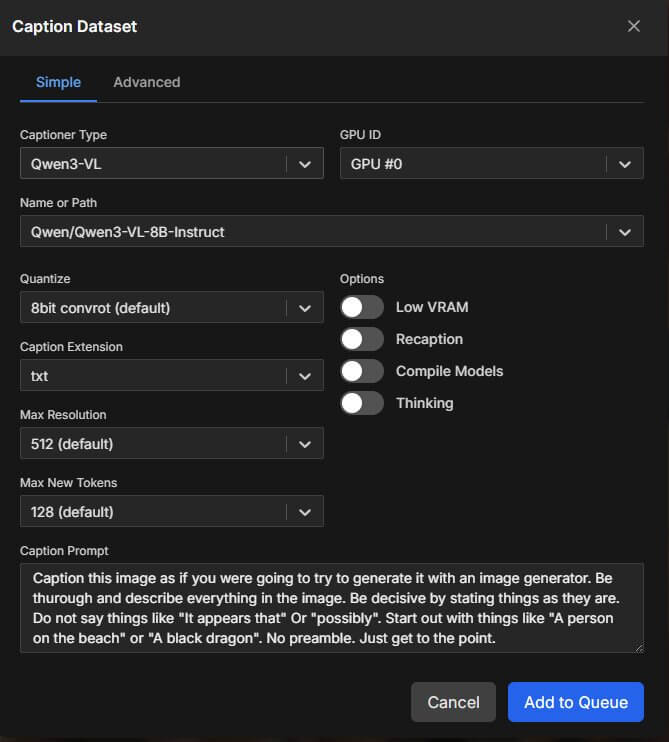
- Inside your dataset page, click the Auto Caption button.
- Under Captioner Type, select Qwen3-VL. A second dropdown appears letting you pick the model size — 2B, 4B, 8B, or 30B parameters (this number is roughly how large and how capable the captioning model is).
- Pick your size based on VRAM (the memory built into your graphics card, separate from your system RAM): the 2B model uses under 6GB but produces noticeably weaker captions, so it's not recommended. Use 8B if you have more than 12GB of VRAM, or 4B if you have less — both give solid results. Skip the 30B model unless you have a very high-VRAM GPU.
- Leave the remaining settings at their defaults and click Add to Queue. AI Toolkit downloads the captioning model on its first run, then captions every image in your dataset one after another. This can take a few minutes depending on your dataset size and GPU.
Why You Still Need to Add Your Trigger Word by Hand
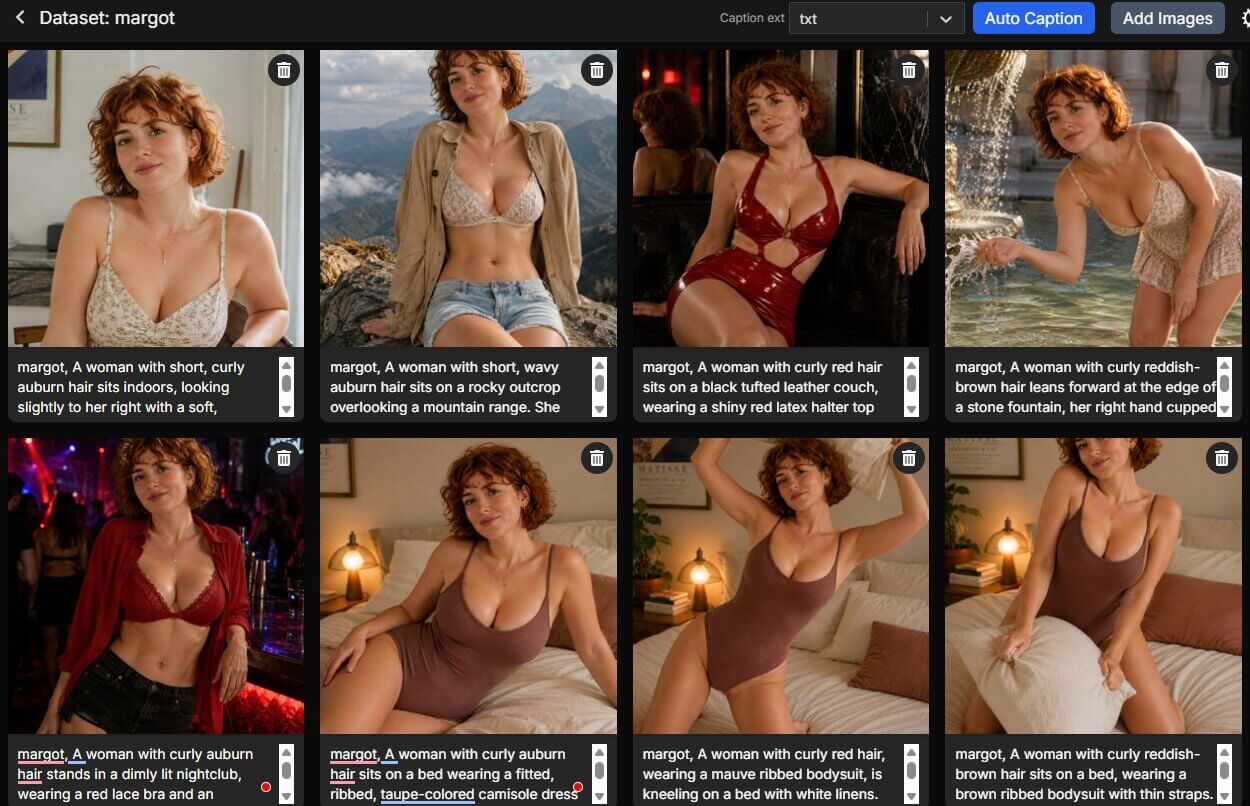
A trigger wordis the specific word you'll use in a prompt later to activate your LoRA — for example, typing that word tells Krea 2 to generate your trained subject instead of a generic one. The Qwen3-VL auto-captioner can describe what it sees in an image, but it has no way of knowing what you've decided to name your subject, so it will never add this word on its own.
Open each caption file and manually add your trigger word at the start, before the auto-generated description. If Krea 2 already has some knowledge of your subject — a well-known public figure, for example — using their actual name as the trigger word helps the model connect the new images to what it already knows.
Why You Must Choose Krea 2 Raw, Not Turbo
This is the single most common mistake in Krea 2 LoRA training, and it's an easy one to make — both options sit right next to each other in the same dropdown.
When you create your training job and set Model Architecture, you'll see two Krea 2 options: Krea 2 Raw and Krea 2 Turbo (sometimes labeled with a training adapter). Krea 2 Turbo is a distilled model — a compressed version of Krea 2 built to generate images in far fewer steps for speed. Training a LoRA directly on top of that distillation breaks it in unpredictable ways, and the quality difference is not subtle — LoRAs trained on Turbo consistently come out worse than the same dataset trained on Raw.
Always select Krea 2 Raw. The LoRA you train on Raw still works perfectly when you later generate images using Krea 2 Turbo for speed — you only need Raw during training itself.

What Training Settings Should You Use for Krea 2?
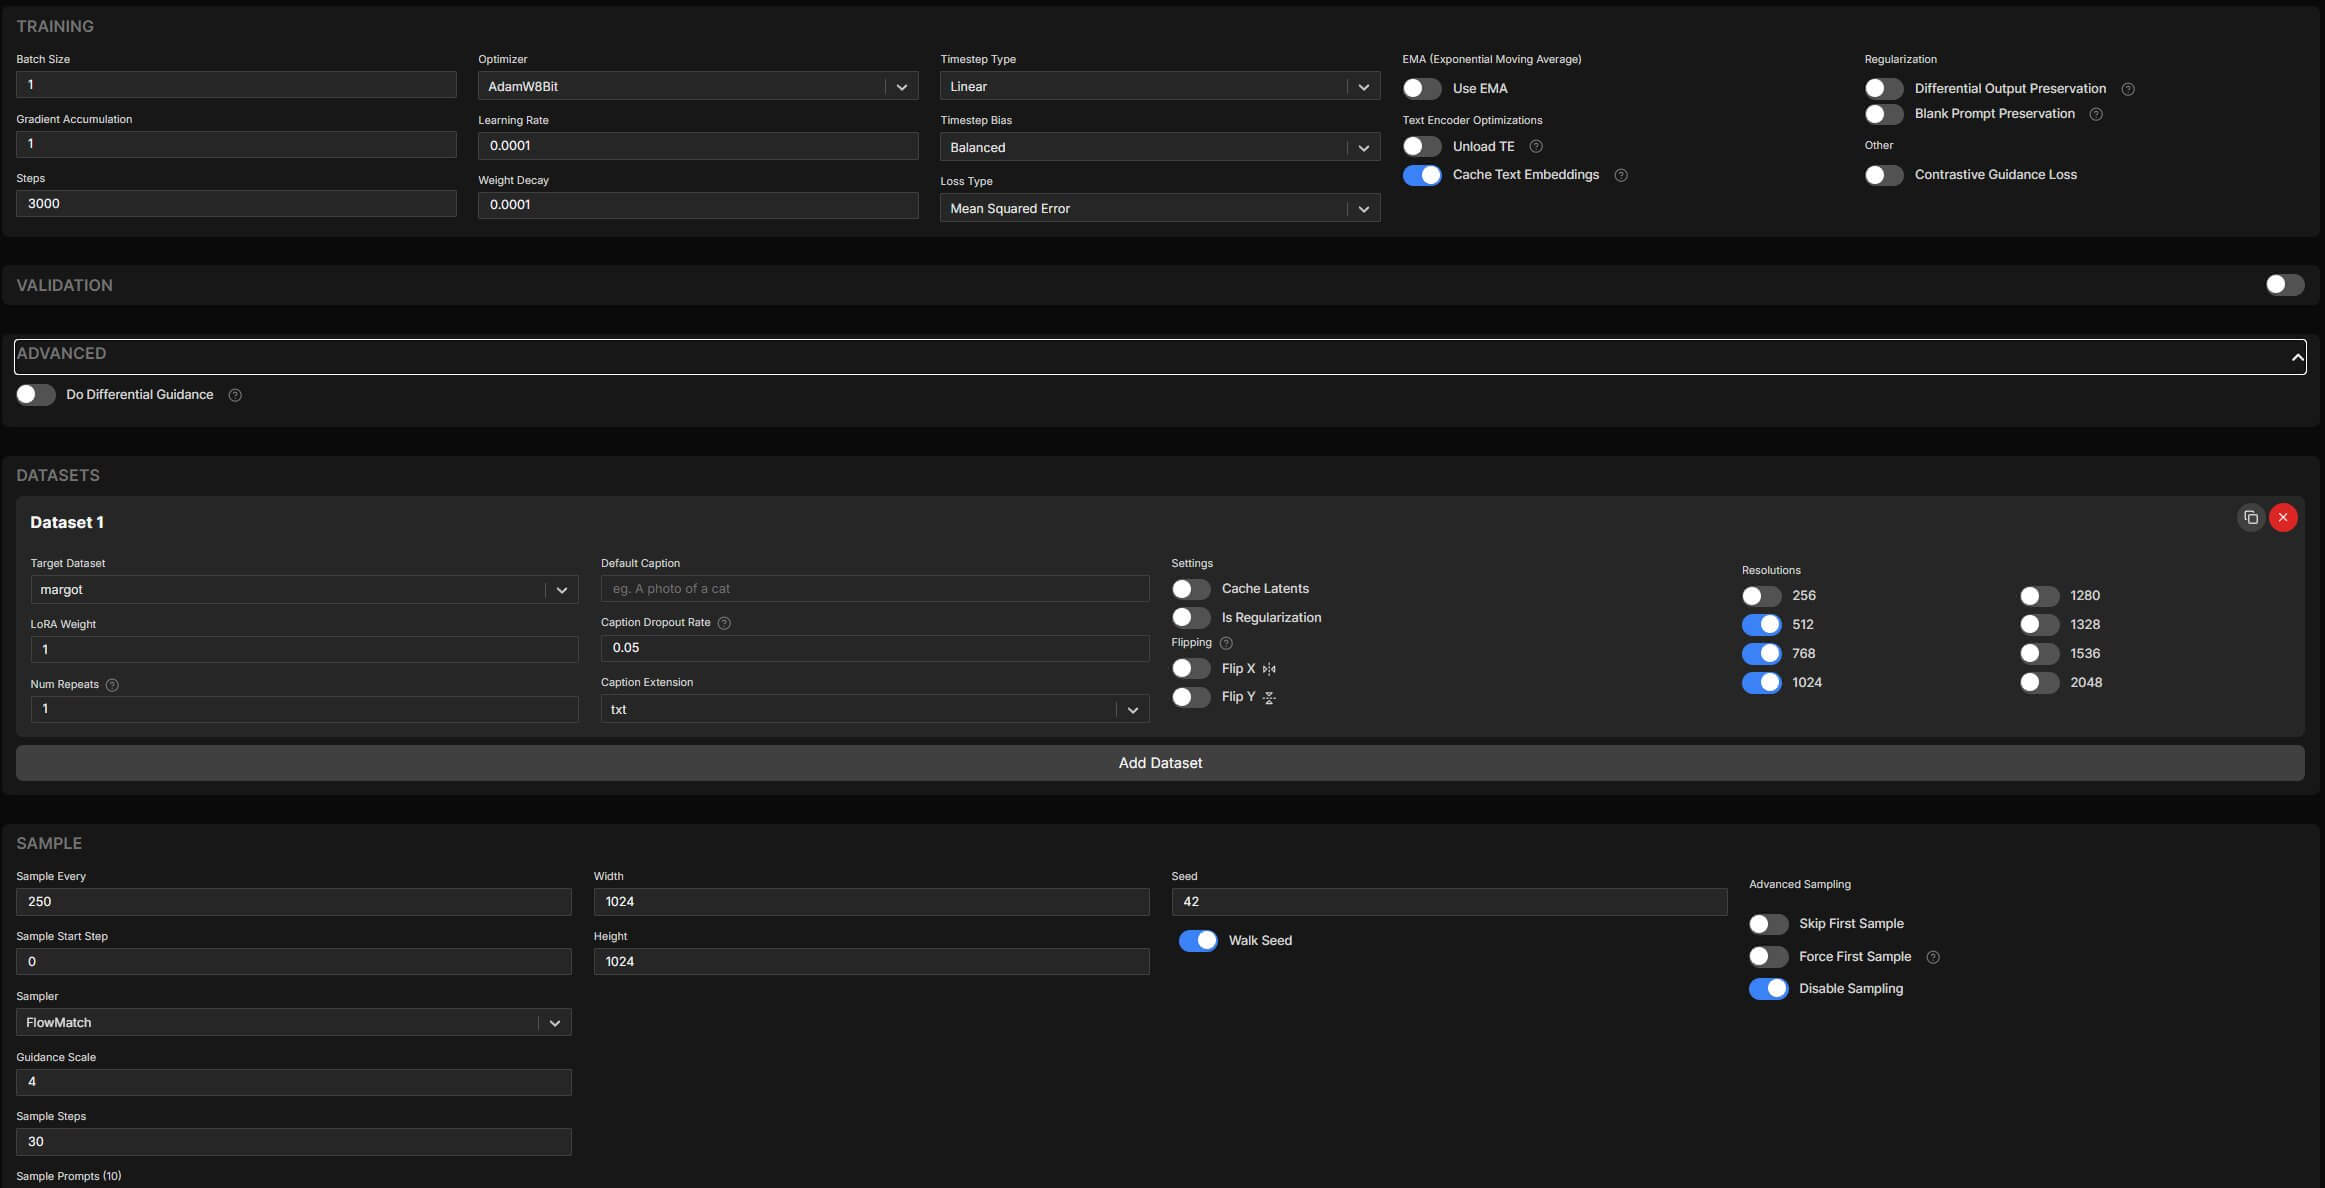
Krea 2 is unusually well-behaved to train — the default settings inside AI Toolkit already work well for almost anything you throw at them. The table below covers the handful of settings actually worth adjusting, and why.
| Setting | What to Use | Why |
|---|---|---|
Model Architecture | Krea 2 Raw | Never Krea 2 Turbo — see the section below on why this single choice matters more than any other setting. |
Linear Rank | 32 (default) | Controls how much the LoRA can learn. The default works for almost everything you'll train. |
Max Step Saves to Keep | Increase from the default | The default only keeps a handful of checkpoints. Raise this so you keep every checkpoint to compare later. |
Total Steps | 3,000 (or lower to 2,000) | Most usable results land between 1,000 and 2,000 steps — more steps can make the LoRA less flexible, not better. |
Timestep Type | Linear Balanced | The best default for almost every subject and style. Only switch to Weighted High Noise for a very strong, very precise style dataset. |
EMA | Disabled | In testing, LoRAs trained without EMA came out more consistent than those trained with it enabled. |
Differential Guidance | Disabled | Leaving this off produced slightly better results in side-by-side testing. |
Resolution | 1024 | Krea 2 needs full resolution to produce a sharp LoRA — see the dataset resolution guide linked below for the full explanation. |
Sample Generation | Disabled | Samples during training use flow-match on the raw model and do not represent real ComfyUI output — disabling this saves time and VRAM. |
Naming Your Job and Skipping the Trigger Word Field
When you create the job, give it a clear Training Name that includes both your subject and the model — for example, margot-krea2 — so you never mix it up with LoRAs trained for other models later. You can leave the built-in Trigger Wordfield blank if you're caching text embeddings, since your trigger word is already baked into each caption file from Step 2 above.
Step 3: Run the Training Job and Download Your LoRA
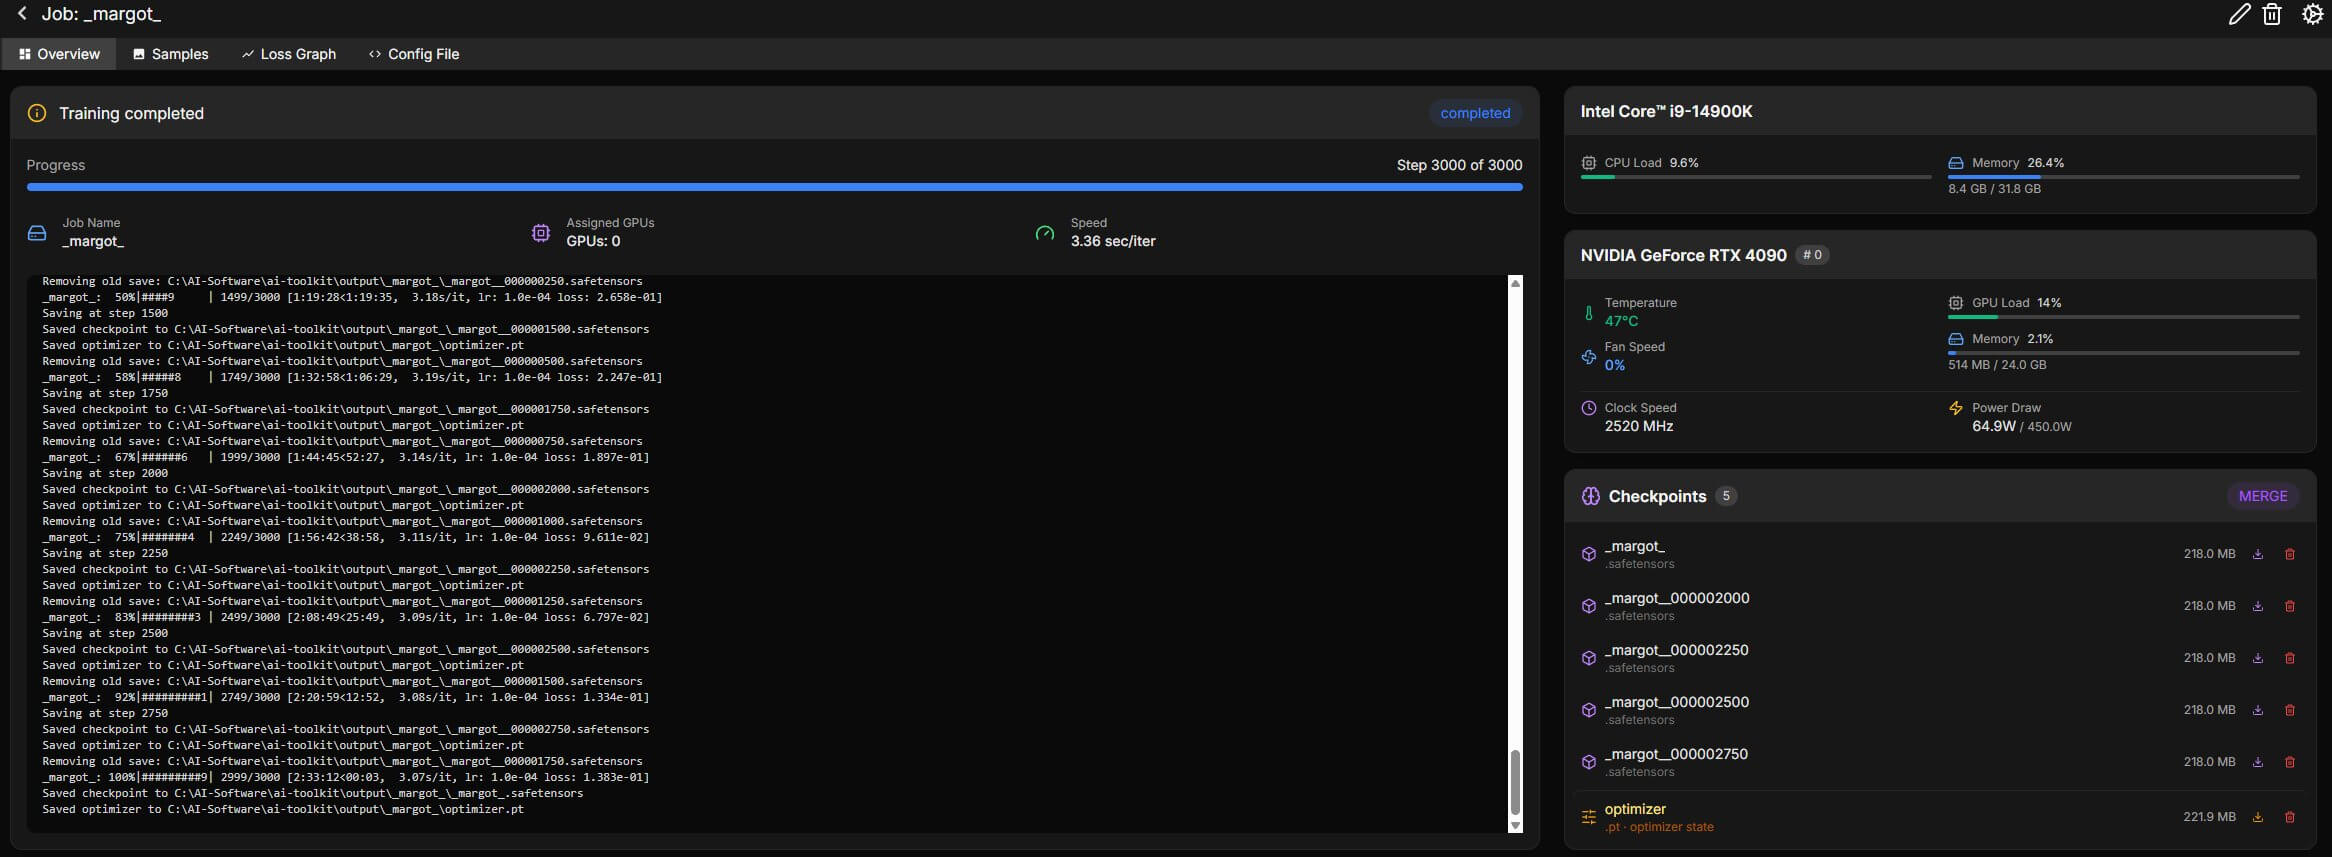
- Once every setting above is confirmed, click Create Job, then click the small play button next to it to start training. AI Toolkit begins processing your dataset, then starts the training loop — you'll see a live step counter and a loss value updating as it runs.
- As training progresses, AI Toolkit saves a checkpoint — a snapshot .safetensorsfile of the LoRA at that point — at regular intervals. You'll see each one appear in a list on the right-hand side of the job page as it's created.
- Once training finishes (or once you have enough checkpoints saved between roughly step 500 and step 2,000), click the download button next to each checkpoint you want to test, then move every downloaded file into ComfyUI/models/loras/ on your computer.
Or Skip Training and Try a Real Trained LoRA First
If you'd rather see a finished result before running your own job, download the exact LoRA trained for this guide below and use it directly in the next section.
🎯 Download the Trained LoRA From This Guide
This is the actual Krea 2 LoRA trained while writing this guide — trigger word margot. Download it and drop it straight into ComfyUI to see what a finished LoRA looks like before you train your own.
⬇ Download _margot_.safetensors (218 MB)How to Use Your Trained LoRA Inside ComfyUI
Once you have a .safetensorsfile — either one you trained yourself or the sample LoRA downloaded above — getting it working in ComfyUI takes just a few steps. Grab the ready-made workflow below so you don't have to wire up the nodes from scratch.
(krea2-lora-workflow.json)- Move your downloaded .safetensors LoRA file into ComfyUI/models/loras/ on your computer.
- Refresh the ComfyUI page in your browser (or restart ComfyUI if it's running locally) so it picks up the new file.
- In your workflow, find the Lora section — add a Load LoRAnode if you don't already have one — and select your newly added LoRA from the dropdown list.
- Type a prompt that includes your trigger word (for example, margot if you're using the sample LoRA from above), then click Queue Prompt to generate your first image.

If you saved multiple checkpoints from your own training job, repeat these steps with each one — swap the selected LoRA in the loader node, keep the same prompt and seed, and generate again. That gives you a like-for-like way to see which checkpoint actually looks best before you settle on a final one.
Troubleshooting Common Krea 2 LoRA Training Errors
"CUDA out of memory" during training
What causes it: Krea 2 Raw and its Qwen3-VL text encoder are large, and your GPU ran out of VRAM partway through loading the model or during the first training step.
- Enable Low VRAM and layer offloading in the job settings — this trades some speed for a much lower VRAM requirement.
- Confirm quantization is enabled for both the transformer and text encoder, and that batch size is set to 1.
- If you still run out of memory, renting a GPU on RunPod removes the local VRAM ceiling entirely.
Your LoRA doesn't look like your subject at all
What causes it: This is almost always the Turbo mistake covered above — the job was trained on Krea 2 Turbo instead of Krea 2 Raw. Too few training steps or a missing trigger word in some captions can also cause this.
How to fix it: Check your job's Model Architecture setting first. If it was set to Turbo, retrain on Raw — there's no settings fix that corrects a Turbo-trained LoRA after the fact. If it was already Raw, confirm your trigger word appears in every caption file, not just some of them.
Your LoRA doesn't show up in the ComfyUI dropdown
What causes it: The file wasn't moved into the correct folder, or ComfyUI hasn't refreshed its model list since the file was added.
How to fix it: Double-check the file sits directly inside ComfyUI/models/loras/, not a subfolder you created by accident, then refresh the browser tab or restart ComfyUI so it rescans the folder.
Frequently Asked Questions
What to Do Next
Download the trained LoRA and generate your first image today.
Even without training your own LoRA yet, the sample LoRA above is worth loading into ComfyUI — it's the fastest way to confirm the workflow works before you spend time training.
Published: 2026-08-18 · Last updated: 2026-08-19· Training steps verified against AI Toolkit's current web UI.
Join the discussion
Sign in to leave a comment or reply
No comments yet
Be the first to share your thoughts!