

Why Upscale Images?
The typical ComfyUI workflow is to generate a well-composed image at 720p–1080p, then use upscaling tools to reach 4K or 8K — while keeping fine detail intact. Here are the main reasons to upscale:
Photography, Prints, and Social Media
Upscaling helps produce print-ready images with less visible pixelation and richer detail at large output sizes. For social media, upscaling turns low-res exports into crisp, high-quality thumbnails and post images.
AI Art and Image Restoration
- AI art: Upscaling can enhance style and add fine detail while keeping the original composition intact.
- Restoration: Improve old or damaged images by intelligently reconstructing faces, textures, and small details that were lost due to compression or age.
What Is ComfyUI Image Upscaling?
ComfyUI upscaling means converting a low-resolution image into a higher-resolution version using the ComfyUI node interface. You can use simple pixel interpolation methods or AI models that intelligently reconstruct missing detail.
Core Upscaling Methods
Pixel Upscaling
Directly increases visible resolution by duplicating or interpolating pixels. Good for small resolution changes.
Best for: Small scale-ups where speed matters more than quality
Traditional Interpolation
Bicubic, Bilinear, or Lanczos algorithms. Fast but can look soft or blurry at large scales. Available via the Upscale Image By node.
Best for: Quick previews and non-critical output
AI Model Upscaling
Uses models like Realesrgan, SwinIR, or 4x-UltraSharp to intelligently rebuild detail. Uses Load Upscale Model and Upscale Image (using Model) nodes.
Best for: High-quality final output for art and photography
Latent Upscaling (Hi-Res Fix)
Upscales inside the latent space with a second sampler pass using the Upscale Latent node. Can add new creative details — keep denoise below 0.5 to preserve composition.
Best for: Adding fine AI-generated detail to existing images
Quick Note on Terms
- Upscaling = increasing resolution while reconstructing or adding detail.
- Enhancement = improving perceived quality through denoise, sharpening, face restoration, or color correction.
Popular Upscaling Methods and Models
There are several proven upscaling workflows for ComfyUI. Each has different strengths — choose based on the quality level you need and the type of image you are working with.
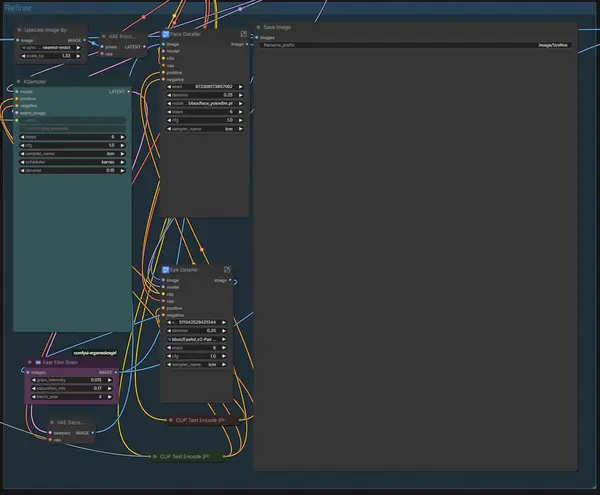
Using an SDXL Model for Upscaling and Face Refining
This method uses a full SDXL checkpoint model for latent upscaling combined with face refinement. It produces high-quality results with sharp detail and natural-looking faces — especially useful for portrait upscaling.
Download SDXL Upscale WorkflowDownload and open the workflow.
Save the JSON file above and drag it into ComfyUI to load the workflow.
Fix any red nodes if they appear.
If you see red nodes, follow the missing nodes fix guide: How to Install Missing Nodes in ComfyUI
Add the image you want to upscale.
Use the Load Image node to select your source image. Click the node and upload your file.
seedvr2
seedvr2 is useful for specific artistic detail profiles and produces distinctive texture and sharpness characteristics. Try seedvr2 when you want a different texture style from the standard SDXL latent method.
Download seedvr2 Workflow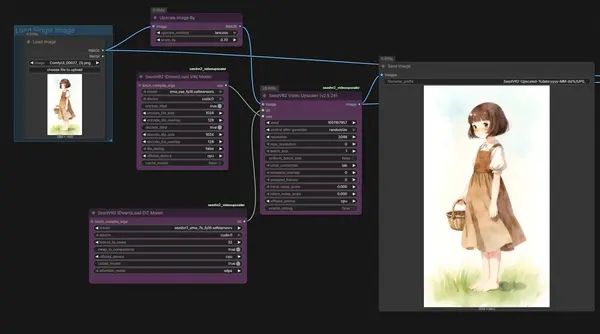
Ultimate SD Upscale / 4x-UltraSharp
Designed for Stable Diffusion pipelines, Ultimate SD Upscale is a classic tile-based upscaling method. It is older now and has largely been surpassed by newer latent and AI model methods — but it can still produce good results on SD 1.5 pipelines and is worth knowing.
Download Ultimate SD Upscale Workflow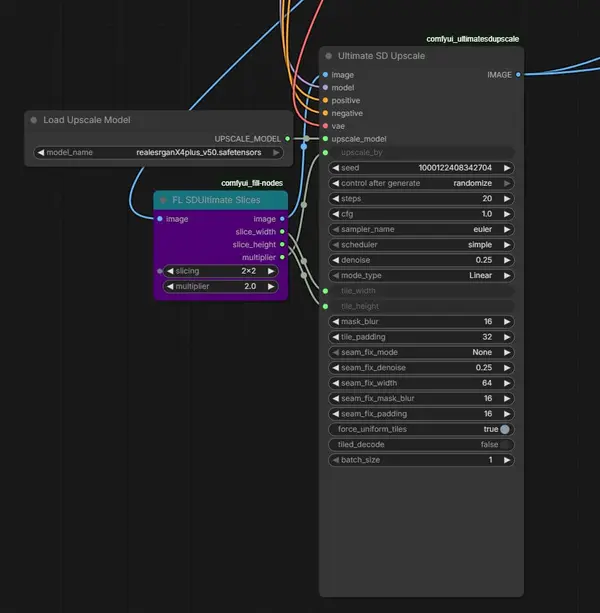
Settings & Practical Tips
These four settings have the biggest impact on your upscaling results. Understanding each one will help you get clean, sharp output without artifacts.
Denoise
Lower denoise preserves the original composition; higher denoise lets the model reimagine details. For latent upscaling (hi-res fix), keep denoise generally below 0.5. A value of 0.2–0.35 is a good starting point for most upscaling tasks.
Face Restoration
Face restore nodes improve portrait quality significantly. Use them sparingly — overuse can make faces look unnatural or plastic. Start at a low strength and increase gradually, testing after each change.
Sharpening
Apply sharpening after upscaling if the result looks soft. Small amounts are usually enough — too much sharpening introduces halo artifacts around edges, which is hard to reverse.
Artifacts
Common artifacts include blockiness, ringing, and over-smoothing. To reduce them: try a different upscale model (e.g. Realesrgan vs latent), reduce the upscale factor, or adjust denoise and sharpen settings.
Batch Processing Multiple Images
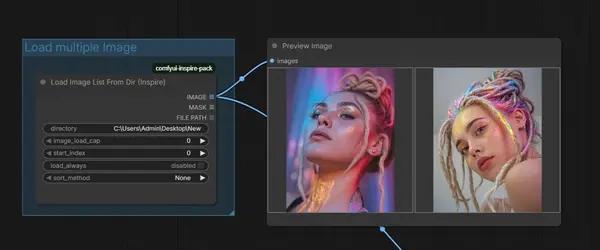
If you need to upscale many images with the same settings, use a batch upscaling workflow. This saves you from manually running the workflow for each file.
Download Batch Upscale WorkflowPlace all images in one folder.
Organise your source images into a single directory before running the batch.
Use a folder-reading node to loop the workflow.
The batch workflow reads each file in the folder and processes them sequentially.
Test with one image first.
Confirm your settings are correct on a single image before running the full batch — this avoids wasting time on incorrect settings.
Combining Text-to-Image Workflows with Upscaling
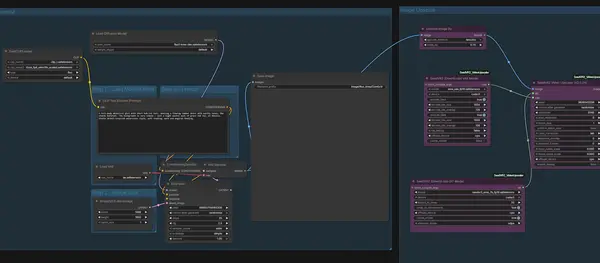
The most efficient ComfyUI workflow generates and upscales in one pass: your text-to-image nodes feed directly into the upscaling nodes. This eliminates the need to save, reload, and re-import images manually.
Download Combined T2I + Upscale WorkflowLink your text-to-image nodes (KSampler → VAE Decode → Image) directly to the upscaling input. The image is generated and then immediately passed through the upscaler in a single queue run.
Beginner Mistakes to Avoid
These are the most common errors people make when first using ComfyUI upscaling — and how to avoid them:
Upscaling noisy or heavily compressed images without cleaning first.
Fix: Apply a denoise or cleanup pass before upscaling. Feeding garbage in produces garbage out — upscalers amplify existing noise and compression artifacts.
Using very high denoise values with latent upscaling.
Fix: High denoise (above 0.6) causes the model to reimagine the image entirely, losing your original composition. Keep denoise below 0.5 for upscaling tasks.
Upscaling full-resolution images without testing on a crop first.
Fix: Always test settings on a small cropped section of the image. This gives you fast feedback on whether the settings are correct before spending time on a full-resolution run.
Frequently Asked Questions
Join the discussion
Sign in to leave a comment or reply
No comments yet
Be the first to share your thoughts!