
⚡ Quick Answer
MiniMax H3 FastVideo is a 4-step distilled version of MiniMax H3, built by the FastVideo research team (hao-ai-lab) and converted for ComfyUI by Kijai. It swaps H3's normal 20–50 sampling steps for 4–8, runs on a standard UNETLoader plus a SageAttention patch node, and turns a several-minute generation into roughly two and a half to three minutes on consumer hardware. This guide covers the exact files, the settings that actually matter, and real tested speed on an RTX 4090.
If you've already run base MiniMax H3 in ComfyUI, you know the wait: a single clip can take a long time even with SageAttention turned on. MiniMax H3 FastVideo is a separate, distilled checkpoint built specifically to fix that, and it landed in the ComfyUI ecosystem only in the last few weeks. This guide walks through downloading the right files, wiring the workflow, and understanding the handful of settings that control speed and quality.
Hardware and versions used for this guide: ComfyUI 0.30.0+, tested on an RTX 4090 (24GB VRAM).
What to Expect: Example Outputs
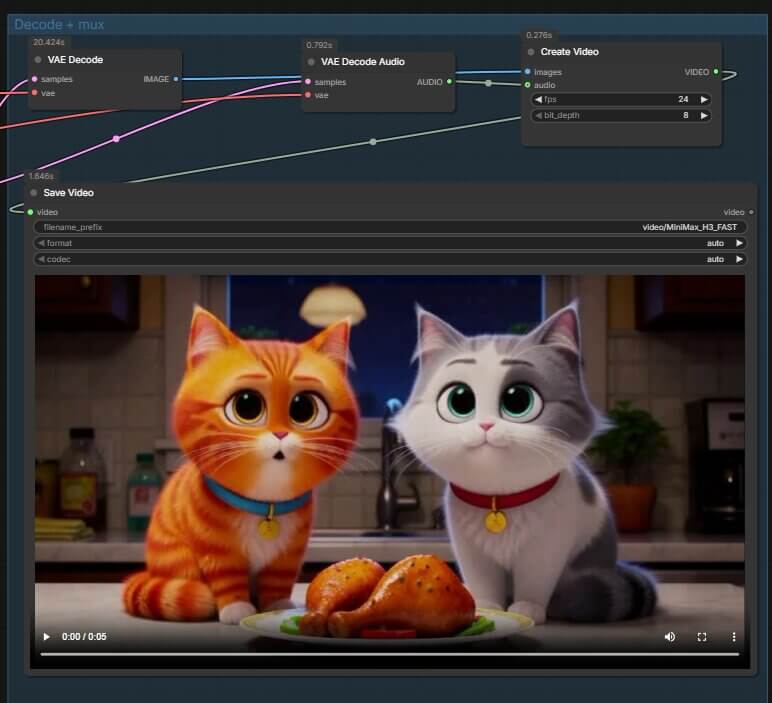
Before you download anything, here's what the FastVideo workflow actually produces — both clips below were generated as image-to-video, using the same 4-file setup covered further down this page.
FastVideo example
FastVideo example
What Is MiniMax H3 FastVideo, and Why Is It Faster?
MiniMax H3 normally generates video through a diffusion model (this is the part of the AI that turns random noise into a finished video, a little at a time, over many repeated passes called steps) — and it typically needs somewhere between 20 and 50 of those steps to produce a clean result. Each step means running the full model again, so more steps directly means more waiting.
FastVideois a separate checkpoint (this means a different saved version of the model's weights, not a plugin or add-on) built by the FastVideo research team at hao-ai-lab. They used a technique called DMD2 distillation to train a version of H3 that produces a comparable result in just 4 steps. Kijai — a well-known ComfyUI node developer — then converted that checkpoint into a format ComfyUI can load natively, which is the file this guide uses.
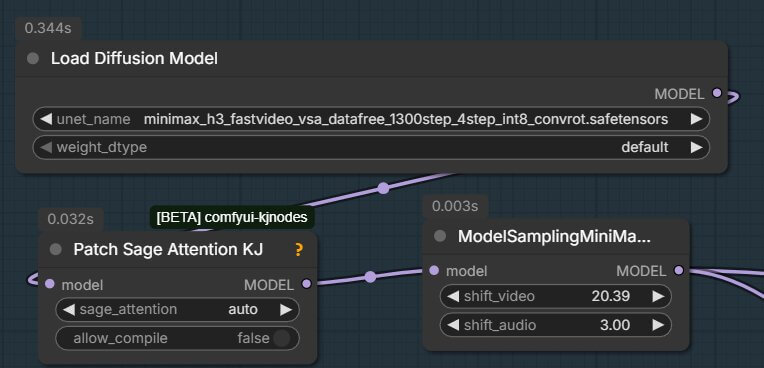
The workflow in this guide loads that checkpoint through a plain UNETLoader node, the same node type used for any other diffusion model in ComfyUI. It also uses a SageAttentionpatch node (this speeds up the model's attention calculations, a core part of how it processes each step) instead of FastVideo's more specialized Video Sparse Attention system — that specialized system still needs two ComfyUI pull requests to be merged before it works out of the box, so SageAttention is the practical path today.
FastVideo vs. MiniMax H3 Turbo LoRA — What's the Difference?
You may have also come across the MiniMax H3 Turbo LoRA, and it's easy to assume they're the same thing. A LoRA (short for Low-Rank Adaptation) is a small patch file you load on top of an existing model to change how it behaves — the Turbo LoRA, built by a different creator called larryvrh, is applied on top of the standard base MiniMax H3 checkpoint. FastVideo, by contrast, is a complete, standalone checkpoint with the distillation baked directly into the weights — there's no separate base model to load alongside it, and no LoRA loader node involved. If you want the LoRA route instead, we cover that setup in our MiniMax H3 Turbo LoRA workflow guide.
What You Need Before You Start
Unlike base MiniMax H3, FastVideo only comes in one size — there's no bf16, int8, or pruned choice to make here, since the distillation itself is the compression. You need exactly four files, each going into a different ComfyUI models folder:
| File | Goes In | Size | What It Is |
|---|---|---|---|
minimax_h3_fastvideo_vsa_datafree_1300step_4step_int8_convrot.safetensors | diffusion_models/ | ≈21 GB | The FastVideo diffusion model itself — this is the file that replaces H3’s normal 20–50 step sampling with 4–8 steps. |
qwen3vl_32b_minimax_h3_int8_convrot.safetensors | text_encoders/ | ≈27.1 GB | The text encoder — this is the part of the model that reads your written prompt and turns it into something the diffusion model can understand. |
minimax_h3_video_vae_fp16.safetensors | vae/ | ≈500 MB | The video VAE (Variational Auto-Encoder) — decodes the model’s internal representation into the actual video frames you see. |
minimax_h3_audio_vae_fp32.safetensors | vae/ | ≈190 MB | The audio VAE — decodes the model’s internal representation into the stereo sound that plays alongside the video. |
Where Everything Goes
You also need ComfyUI 0.30.0 or later for native MiniMax H3 node support, and the SageAttention custom node installed, since the workflow's attention patch has nothing to connect to without it. If you haven't installed it yet, follow our SageAttention install guide first — it takes a few minutes and this workflow won't run without it.
How to Set Up the MiniMax H3 FastVideo Workflow
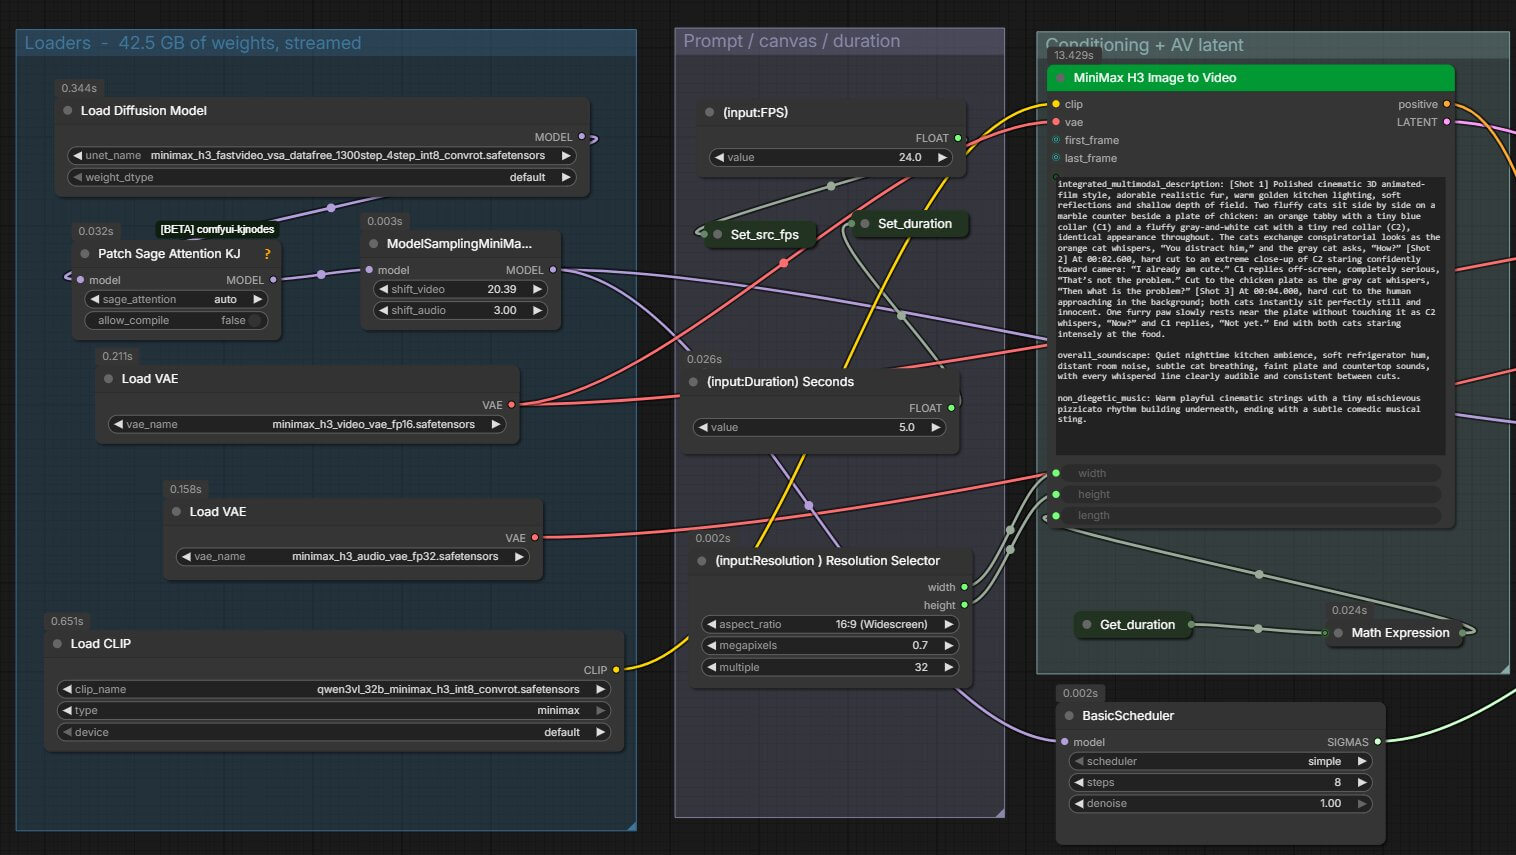
This is an image-to-video workflow — you provide a starting image and a prompt describing what happens next, and FastVideo animates it. The graph looks busy the first time you open it, but you only need to touch four things: the loader nodes, the SageAttention node, your prompt, and Queue Prompt.
(minimax_h3_fastvideo_i2v.json)- Confirm your four loader nodes are correct. Before touching anything else, check that UNETLoader, CLIPLoader, and both VAELoader nodes each have the matching file selected from the table above — not blank, and not a file from a different MiniMax H3 workflow. If a file doesn't show up in a dropdown, it's sitting in the wrong folder.
- Install and connect SageAttention. This workflow includes a PathchSageAttentionKJ node sitting between the model loader and the sampler. We need this connected because it's what lets the model run its attention calculations faster — without it installed, this node will error out the moment you try to generate. Install it through ComfyUI Manager first if you haven't already.
- Load your starting image. Connect an image to the MiniMax H3 Image To Video node's image input. This is the frame FastVideo will animate from.
- Write a structured prompt. MiniMax H3 responds best to prompts broken into shots with timestamps, describing what the camera sees and what changes. We cover the exact format in the prompt section just below — write your prompt directly into the MiniMax H3 Image To Video node's text field.
- Set your duration and resolution. Still on the same node, set how many seconds of video you want and pick a resolution. As covered further down, your requested duration gets rounded up to the model's fixed frame grid, so don't worry if the output runs a little longer than what you typed.
- Queue the prompt. Click the orange Queue Prompt button in the top-right of the screen. A progress bar appears underneath it. On an RTX 4090, a 5-second clip takes roughly 150 to 180 seconds — see the speed section below for the full breakdown.
For the full breakdown of MiniMax H3's prompt structure — the shot format, camera direction, and worked examples — see our MiniMax H3 prompt guide. The same structure applies whether you're on the base model or FastVideo.
What Do the FastVideo Settings Actually Control?
This workflow has five settings worth understanding, in the order you're most likely to need to touch them.
How Many Steps Should You Use?
The Scheduler node's steps value controls how many times the model refines the video before finishing. Every single step re-runs the full model, so step count is directly proportional to how long you wait. The workflow ships with 8 stepsas its default, which noticeably improves motion quality over the model's minimum of 4 steps for a modest time cost. Going up to 12–14 steps is fine if you want to double-check framing and motion before committing to a longer render, but pushing much past that stops helping — FastVideo was distilled specifically to work well in a small number of steps, and extra steps beyond roughly 14–20 mostly just add wait time.
Why Doesn't My Video Match the Duration I Set?
MiniMax H3 generates video in fixed frame blocks at 24 frames per second, so typing "2.0 seconds" doesn't always give you exactly 2.0 seconds back — the workflow rounds your request up to the nearest length the model can actually produce:
| You Set | Frames | Real Length |
|---|---|---|
| 1.0 s | 39 | 1.62 s |
| 2.0 s | 56 | 2.33 s |
| 2.5 s or 3.0 s | 73 | 3.04 s |
| 3.5 s | 90 | 3.75 s |
| 4.0 s | 107 | 4.46 s |
| 4.5 s or 5.0 s | 124 | 5.17 s |
What Resolution Should You Pick?
Resolution barely affects how much VRAM you use, since the model's weights take up far more memory than the video frames being generated — what it does change is how long generation takes. FastVideo was trained on a 768-pixel short edge, capped at 768×1344, so going below 768 on the short edge costs real quality for only a modest speed gain:
| Aspect Ratio | Megapixels | Result |
|---|---|---|
| 1:1 | 0.56 | 768 × 768 |
| 4:3 | 0.75 | 1024 × 768 |
| 3:4 | 0.75 | 768 × 1024 |
| 16:9 | 0.98 | 1344 × 768 (default) |
| 9:16 | 0.98 | 768 × 1344 |
1344×768 at 5 seconds is the heaviest combination this checkpoint officially supports — around 37,000 tokens passing through the model at once. It still fits in 8GB of VRAM, but it's the first place you'd see an out-of-memory error if something else is using your GPU at the same time.
Should You Touch Sigma Shift or Text Encoder Placement?
The workflow includes a MiniMax H3 Sigma Shiftnode, which controls how the model paces its denoising schedule across video and audio separately. The values shipped with the workflow match the model's own built-in defaults, so this node is effectively a no-op unless you go looking for it — it's there so you have the option to lower the video shift value for tighter, less drifty motion if you want to experiment. Leave it alone for your first few generations.
The CLIPLoadernode also has a device setting that can be switched to run the text encoder on your CPU instead of your GPU. Only do this if you're running out of memory during the text-encoding step — it permanently pins around 15.7GB in your system RAM and runs a 32-billion-parameter model on your CPU, which is slower than letting ComfyUI stream it through your GPU as needed.
How Fast Is MiniMax H3 FastVideo on an RTX 4090?
These numbers come from our own testing on an RTX 4090 (24GB VRAM), using the default 8-step setting and the SageAttention patch node connected and working.
Both example clips in the "What to Expect" section above were generated at these exact settings: 8 steps, 1344×768, 5 seconds. If your own generation times are noticeably slower, check three things first: whether SageAttention is actually connected and installed (not bypassed), whether another application is using your GPU at the same time, and whether you've bumped the resolution or duration above the defaults shown in the settings section.
Troubleshooting MiniMax H3 FastVideo Errors
"This node type does not exist" (MiniMaxH3ImageToVideo)
What causes it: Your ComfyUI installation is older than version 0.30.0, so it doesn't recognize MiniMax H3's native nodes yet.
How to fix it: Open ComfyUI Manager (the puzzle-piece icon in the top toolbar) and click Update ComfyUI. Restart ComfyUI completely afterward — node definitions only load on startup.
SageAttention Node Errors on Generation
What causes it: The PathchSageAttentionKJ node is connected in the workflow, but the SageAttention custom node itself isn't installed on your system.
- Install SageAttention through ComfyUI Manager, following our install guide.
- If you want to test the workflow before installing it, right-click the PathchSageAttentionKJ node and choose Bypass (or select it and press Ctrl+B). Generation will still work, just noticeably slower.
Generated Video Has No Sound
What causes it: The audio VAE (minimax_h3_audio_vae_fp32.safetensors) isn't loaded, or it's connected to the wrong VAELoader node.
How to fix it: Check both VAELoader nodes — one should point to the video VAE, the other to the audio VAE. Confirm a VAEDecodeAudio node is present and connected through to SaveVideo.
Frequently Asked Questions
What to Do Next
Run your first FastVideo generation at the default settings.
Download the workflow above, keep the defaults — 8 steps, 1344×768, 5 seconds — for your first clip, and compare your own generation time against the numbers in this guide before changing anything.
Published: 2026-09-04 · Last updated: 2026-09-04· Workflow structure verified against Kijai's ComfyUI-native MiniMax H3 FastVideo checkpoint.
Join the discussion
Sign in to leave a comment or reply
No comments yet
Be the first to share your thoughts!