
⚡ Quick Answer
Pika H3 Flex is an open-weights video model (the model files are public, so you can run it on your own computer) that makes video with sound. It is a faster version of MiniMax H3, and in ComfyUI it runs through two small add-on files. This page gives you 4 ready-to-use workflows (saved setups you load into ComfyUI) for the four ways to start a clip: a text prompt, one image, several reference images, or two images that mark the start and the end.
The official Pika H3 Flex ComfyUI workflow page is a list of templates. It assumes you already know where model files go and what the main settings do. If you are new, you have to guess all of that.
What Do the 4 Pika H3 Flex Workflows Make? (Example Clips)
Each clip below came from one of the four workflows in this guide. Press play with your sound on, because the audio is made together with the picture.
1. Text to video
2. Image to video
3. First-last frame to video
4. Reference to video
Which of the 4 Pika H3 Flex ComfyUI Workflows Should You Download First?
This guide removes the guessing. You get four workflows, the exact file names and folders, and a plain-language explanation of every setting that matters. Start with the text workflow. It needs no input pictures, so it is the easiest way to check that everything is installed correctly.
Pika H3 Flex is built on MiniMax H3 (see our MiniMax H3 ComfyUI workflow for the base model). Pika retrained it to work in six steps (a step is one pass where the model cleans up a noisy picture a little more, so fewer steps means a faster video). The MiniMax H3 templates in ComfyUI use a 20-step path, so Pika H3 Flex finishes sooner.
It comes as two LoRA files (a LoRA is a small add-on file that changes how a big AI model behaves, so you do not need to download a whole new model). You load them on top of the MiniMax H3 base model. The two adapters are called FL2VA (first-last frame to video and audio) and Ref2VA (reference to video and audio).
There are four ways to start a clip. The first two use text-to-video and image-to-video, which means making a video from words or from one picture. The fourth uses a start frame and end frame, which are two pictures that mark where the video begins and ends.
| Workflow | You start with | Adapter | Best for |
|---|---|---|---|
| 1. Text to video | A text prompt only | FL2VA | Your first test, or ideas with no source picture |
| 2. Image to video | One image (the first frame) | FL2VA | Animating a picture you already have |
| 3. Reference to video | 2 or more images (up to 12 files with video and audio) | Ref2VA | Keeping the same person or object in the shot |
| 4. First-last frame to video | Two images | FL2VA | A shot where you know the start and the end |
Pika's official ComfyUI page lists three templates: video_pika_h3_flex_t2v.json, video_pika_h3_flex_ref2va.json and video_pika_h3_flex_fl2va.json. Workflows 1, 3 and 4 match those. Workflow 2 is Earngenix's own setup built on the FL2VA files.
What Do You Need Before You Start?
A wrong file name or a wrong folder is the usual reason a workflow fails. This section prevents both. Read it before you download anything.
What computer do you need?
Video models keep their working data in VRAM (the memory on your graphics card, measured in GB). Pika H3 Flex is built on a model with 33 billion parameters (33 billion adjustable numbers, which makes it very large), so VRAM matters more here than it does for image models.
At the time of writing, Pika has not published a minimum for home graphics cards. Each LoRA file is about 2 GB, so a card that already runs MiniMax H3 needs only a little more memory. Test with a 5-second, 480p clip first.
Pika's headline claim is 15 seconds of video in about 7 seconds. That number covers only the main model's work on high-end data-center hardware. A full run on a home computer takes longer, because loading the models and decoding the video also take time.
If your card is too small, you can run the same templates in Comfy Cloud (ComfyUI's online service, which costs money). The official Pika H3 Flex page has a Run on Comfy Cloud link for each template.
Which files do you need, and where do they go?
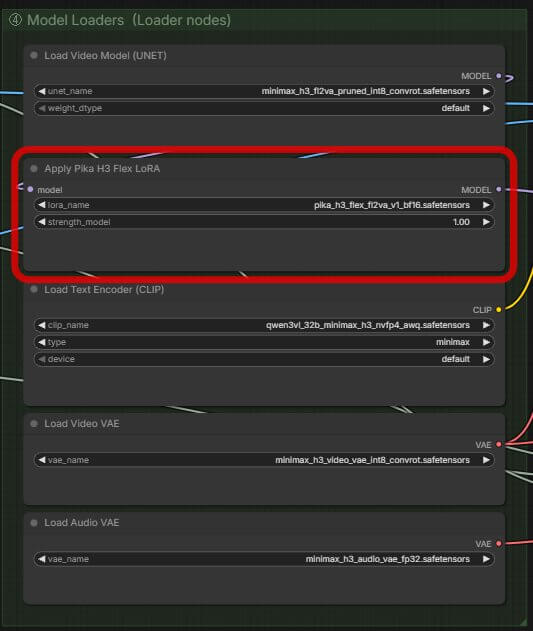
A few terms first. The diffusion model is the main AI model that creates the video. A VAEis a helper file that turns the model's internal data into video and sound you can play (there is one for video and one for audio). The text encoder is the file that reads your prompt and turns the words into numbers the model understands.
All files use the safetensors format (a safe file format for AI models). Some names include int8, which means the model is quantized (stored with smaller numbers so it uses less memory, with a small trade-off in quality).
| File name | What it is | Put it in | Used by |
|---|---|---|---|
| minimax_h3_fl2va_pruned_int8_convrot.safetensors | Diffusion model (FL2VA version) | ComfyUI/models/diffusion_models/ | Workflows 1, 2, 4 |
| pika_h3_flex_fl2va_v1_bf16.safetensors | LoRA (FL2VA) | ComfyUI/models/loras/ | Workflows 1, 2, 4 |
| minimax_h3_ref2va_pruned_int8_convrot.safetensors | Diffusion model (Ref2VA version) | ComfyUI/models/diffusion_models/ | Workflow 3 |
| pika_h3_flex_ref2va_v1_bf16.safetensors | LoRA (Ref2VA) | ComfyUI/models/loras/ | Workflow 3 |
| qwen3vl_32b_minimax_h3_nvfp4_awq.safetensors | Text encoder | ComfyUI/models/text_encoders/ | All four |
| minimax_h3_video_vae_int8_convrot.safetensors | Video VAE | ComfyUI/models/vae/ | All four |
| minimax_h3_audio_vae_fp32.safetensors | Audio VAE | ComfyUI/models/vae/ | All four |
When all seven files are in place, your folders look like this:
How Do You Download and Load the Pika H3 Flex Workflow Files in ComfyUI?
A workflow is a map of connected blocks. Each block is a node (a rectangle that does one job, such as loading a model or saving the video). A workflow file is a JSON file (a plain text file that stores the whole layout of that map). When you load it, ComfyUI rebuilds the map for you.
Download the 4 workflow files
Download the workflow you need. If you are not sure which one to pick, start with text to video.
How do you load a workflow file?
- Open ComfyUI.
- Drag the downloaded JSON file onto the ComfyUI canvas (the big grid in the middle of the screen). You can also open the Workflow menu and choose Open.
- Wait a moment. The nodes appear and the wires connect.
- Click the file name in each loader node and check that it matches the files in the table above.
If ComfyUI cannot find a model file, it shows a message that lists the missing files. Check the folder table above and fix the file name or the folder.
What Do the Six-Step Settings Mean, and Which Ones Should You Never Change?
All four workflows share the same settings. They are already filled in. You only need to know what they are so you do not break them by accident.
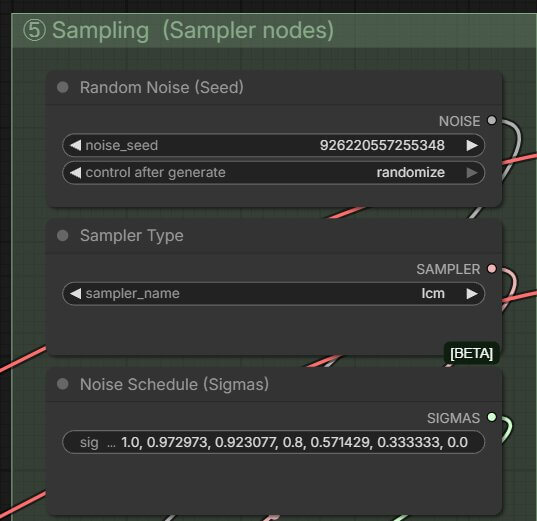
Four terms: the sampler is the part that does the cleaning-up passes. The scheduler decides how strong each pass is. CFG scale is a number that sets how hard the model pushes toward your prompt. A sigma is a noise level, and the list of sigmas tells the sampler how noisy the picture is at each pass.
| Setting | Value | What it does | Why it matters |
|---|---|---|---|
| Sampler | lcm | Chooses the method used for each pass | This is the method Pika trained the model for |
| Sigmas | Seven values that step down from 1000 to 0 (1000, 750, 500, 250, 100, 40, 0) | Sets the noise level at each pass | Seven values make six steps, one for each gap |
| CFG | 1.0 | Sets how hard the prompt is pushed | The model already follows prompts without extra push |
| LoRA strength | 1.0 | Sets how strongly the Pika adapter is applied | Other values change the look and can break the schedule |
The ManualSigmasnode holds the list of sigma values, and the templates already contain Pika's list in ComfyUI's own number format. Do not retype it. Pika's reference setup also lists a video shift of 12 and an audio shift of 3, and the templates already include them.
There are six steps because that is how the model was trained. Raising the step count does not add detail, and removing a value from the sigma list breaks the schedule.
These workflows have no negative prompt box. With CFG at 1.0, a negative prompt (a list of things you do not want) has no effect.
Workflow 1: How Do You Make a Video From a Text Prompt Alone?
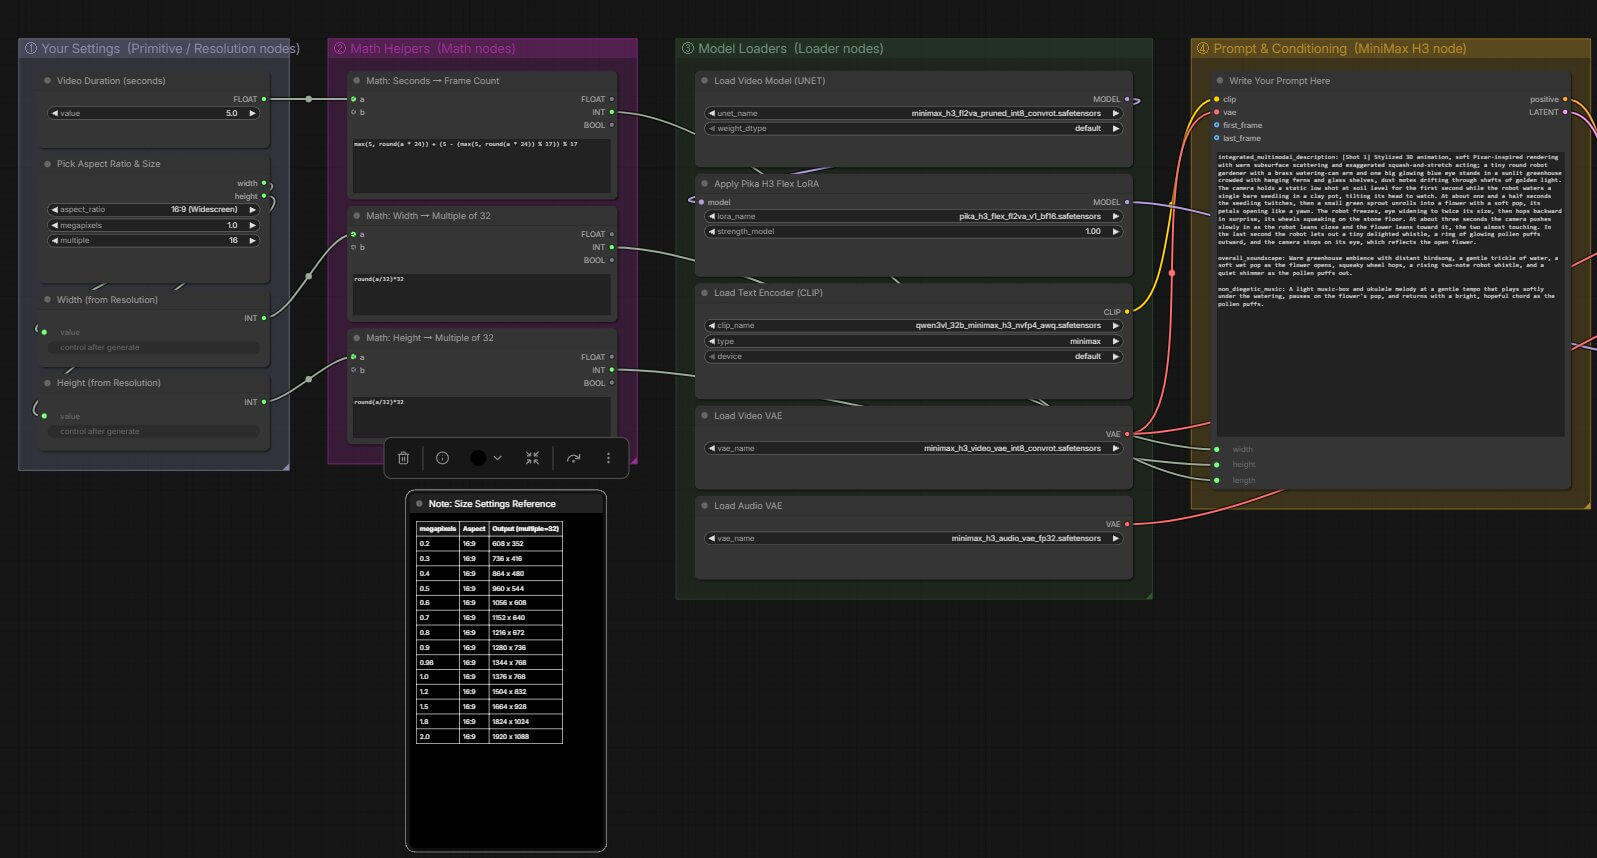
This workflow is the best first test. It has no input pictures, so any problem you see comes from your install, not from your images. It uses the FL2VA files.
Download text to video(video_pika_h3_flex_t2v.json)Which nodes matter most?
| Node | What it does |
|---|---|
| LoraLoaderModelOnly | Loads a LoRA and applies it to the main model only. Pick pika_h3_flex_fl2va_v1_bf16.safetensors and keep the strength at 1.0. |
| ManualSigmas | Holds the list of noise levels the sampler follows. Keep Pika’s seven values. |
| BasicGuider | Sends your prompt to the sampler without extra push, which matches CFG 1.0. |
How do you run it?
- Load the workflow (see the loading steps above).
- Check the model loaders. Click the file name in each loader node and make sure it matches the FL2VA files from the table. Why: if a name does not match, ComfyUI stops with an error.
- Click the prompt box and write your prompt. Why: with no picture, the prompt is the only thing the model has to work from. Use the structure from the prompt section below.
- Set the seed (a number that decides the starting noise, so the same seed and settings give the same video). Change the number to get a different video from the same prompt.
- Click the Run button in the top-right corner. Older versions call it Queue Prompt (the button that sends your workflow to be processed). A green outline moves from node to node, and a progress bar appears. The first run is slower because the models have to load.
- When the run finishes, the video appears in the save node at the end. Play it with your sound on. The file is also saved in the
ComfyUI/output/folder.
Workflow 2: How Do You Turn One Image Into a Video?
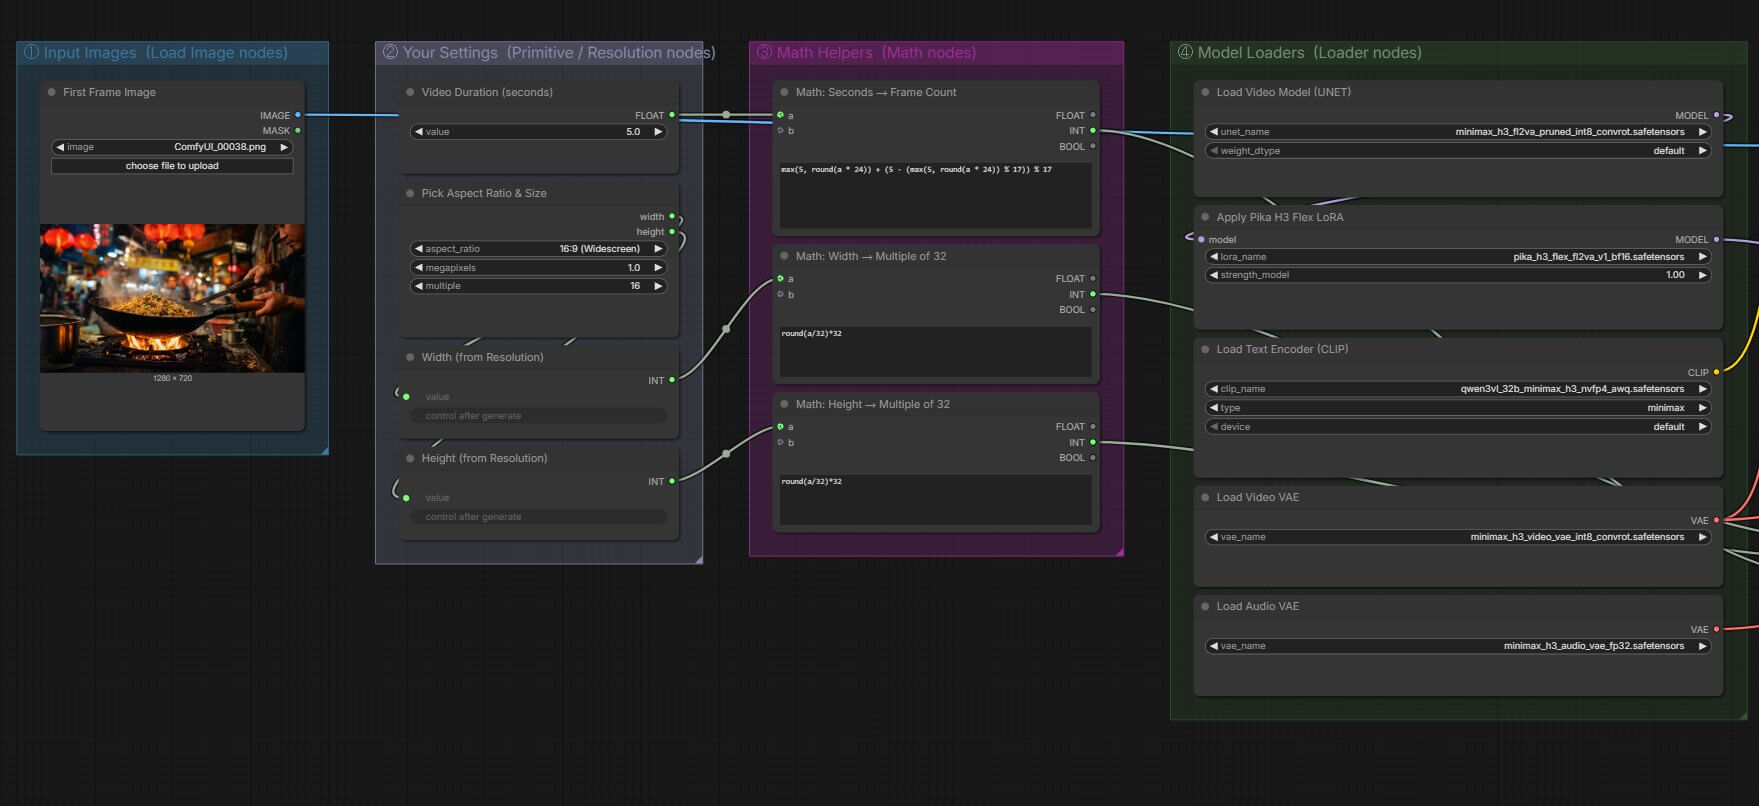
Use this workflow when you already have a picture and want it to move. The image becomes the first frame of the video, so the video starts exactly where your picture is. It uses the same FL2VA files as workflow 1.
Pika's official page does not list a separate image template. This workflow is Earngenix's own setup built on the FL2VA template.
Download image to video(video_pika_h3_flex_i2v.json)- Load the workflow.
- Find the Load Image node. Click choose file to upload and pick your picture. A small preview of the picture appears in the node. Why: the model reads this picture as the first frame.
- Write your prompt. Describe what changes and what moves, such as the camera move, the action and the sound. The picture already shows what is there.
- Click Run. The video starts from your picture and moves from there.
Workflow 3: How Do You Use Reference Images to Keep the Same Subject?
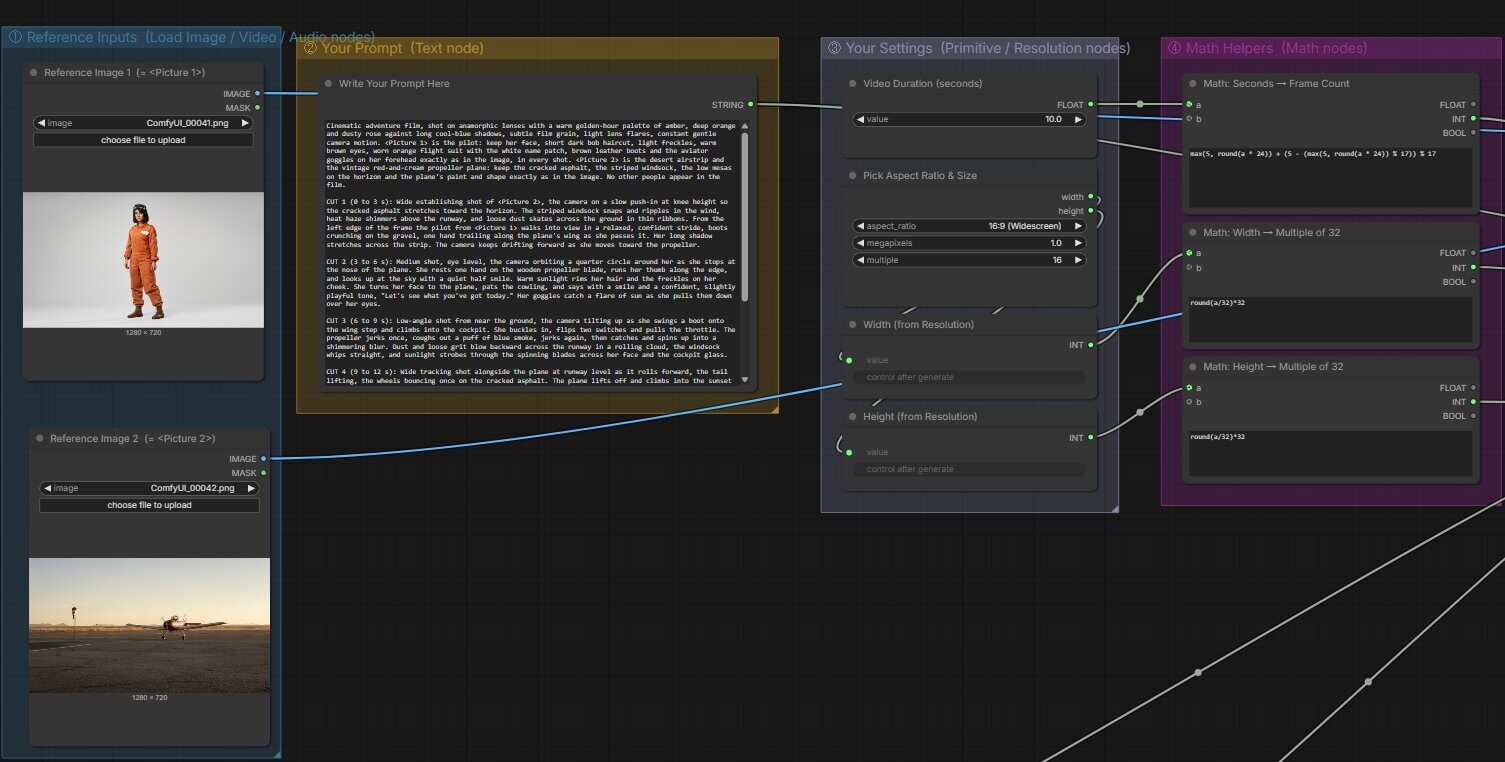
A reference is a picture, a short video or an audio clip that tells the model what something should look or sound like. The reference workflow helps with character consistency (keeping the same face, outfit or object across clips). It uses the Ref2VA files, so use those files and not the FL2VA ones.
You can use up to 12 references in one run: 9 images, 3 videos and 3 audio clips. Each video clip and each audio clip must be between 2 and 15 seconds long, and the clips of one type must add up to 15 seconds or less.
The model finds each reference by its label. Use <Subject 1> for a person or object, <Picture 1> for an image, <Video 1> for a video and <Audio 1> for an audio clip. Number them in the order you connect them. Say what job each reference does, such as the face, the style, the motion or the voice.
- Load the reference workflow file.
- Replace the two sample images with your own. The official template uses
ref_pilot_profile.pngas reference 1 andref_subject_station.pngas reference 2. Why: each image tells the model what to keep from it. - Write the prompt. In plain words, the full reference prompt has the parts listed below.
- Click Run. The subjects from your images appear in the new video.
subject_definitions: who or what each subject issummary: the shot in one or two sentencesretention_analysis: what must stay the same from each referencedetailed_description: the shot in detailoverall_soundscape: the real sounds in the scenenon_diegetic_music: background music the characters cannot hear
For the full format, read MiniMax's reference prompt guide.
Workflow 4: How Do You Animate Between a First Frame and a Last Frame?
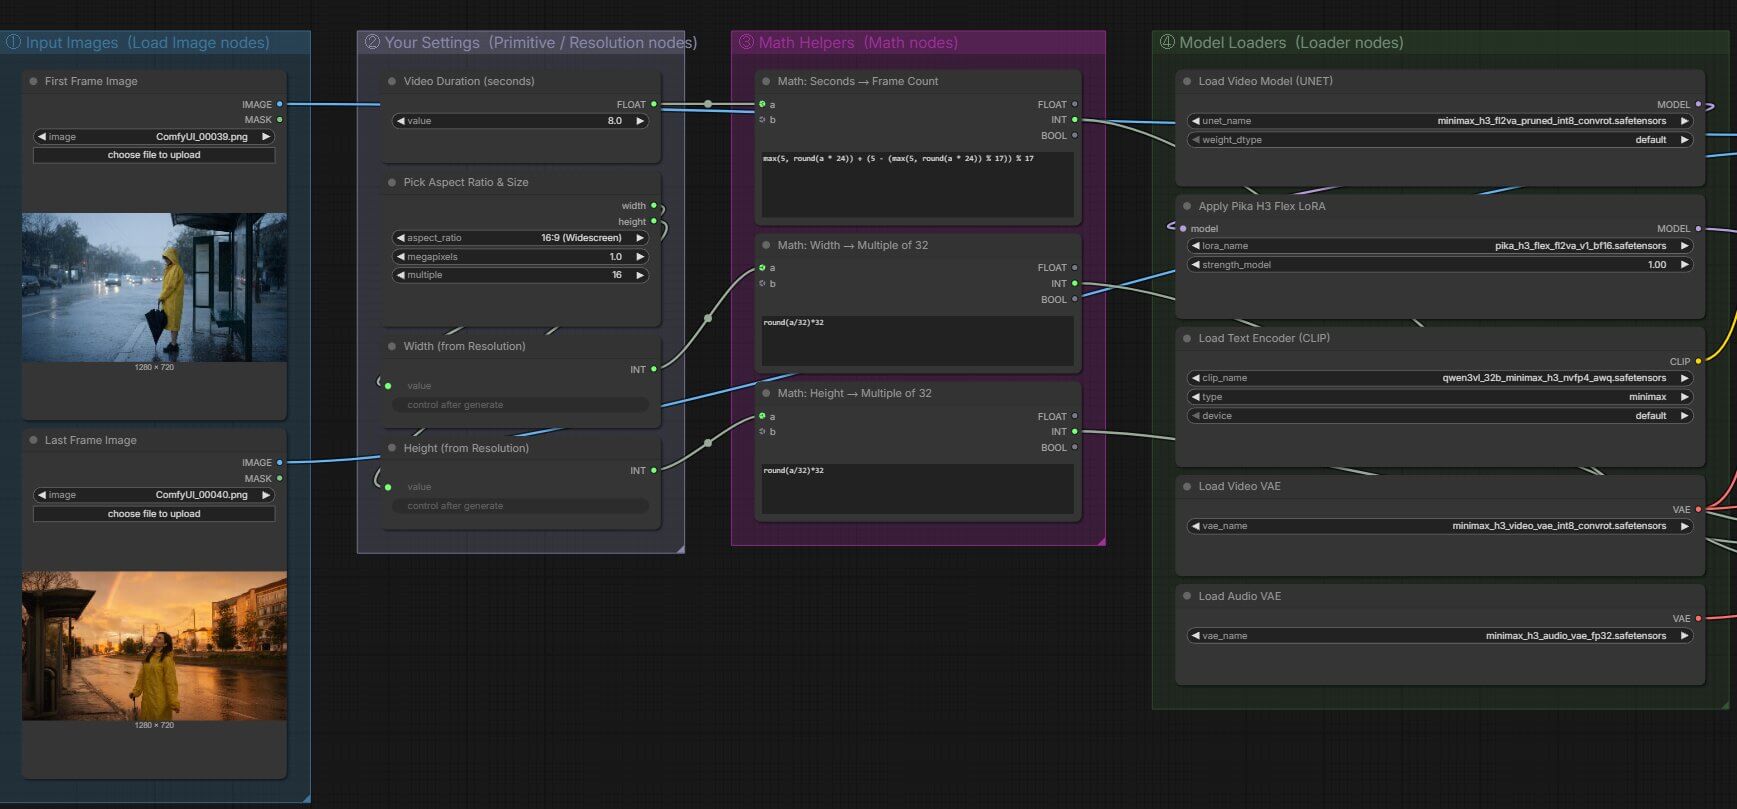
Use this workflow when you know how the shot should begin and how it should end. You give ComfyUI two pictures. The first opens the shot, the last closes it, and the model creates the movement in between. The official name is Pika H3 Flex: FL2VA.
Download first-last frame(video_pika_h3_flex_fl2va.json)- Load the first-last frame workflow file.
- Load your first picture in the first-frame image node and your last picture in the last-frame image node. The official template uses
ref_popart_woman.pngas the first frame andlastP_spin_jump_hole.pngas the last frame. Why: the first picture sets the start of the video and the second sets the end. - Write a prompt that describes the path between the two pictures, plus the sound. Do not describe the pictures again.
- Click Run. The video starts on your first picture and ends on your last one.
How Do You Write a Prompt That Pika H3 Flex Follows?
The model reads the picture, the camera and the sound from one prompt. For the text and first-last frame workflows, write the style first, then each shot with its camera move, then two sound lines: one for real sounds and one for music.
Use this shape and replace the text in brackets:
Four practical notes from the official page:
- Give every camera move a stopping point. Camera amounts are only a suggestion to the model. Exact degrees and cut times can land 0.2 to 0.3 seconds off.
- Describe the frame as content. The words "wide shot" alone often give a medium shot. Say the subject is small inside a large empty room instead.
- Do not rely on fine contact. A hand that should stop a few centimetres away often touches the object.
- Short text on props stays readable. Labels on products held up across camera moves in testing.
For more, read our MiniMax H3 prompt guide.
What Do You Do When Pika H3 Flex Breaks in ComfyUI?
Prompt outputs failed validation: Value not in list
What causes it: ComfyUI cannot find a model file that the workflow asks for. The file is missing, in the wrong folder, or has a different name.
How to fix it:
- Compare the file names in the error with the file table above.
- Move the file into the correct folder.
- Click the canvas and press R to refresh the model lists. If the name is still missing, restart ComfyUI.
- Click the file name in the loader node and pick the file again.
OutOfMemoryError (out of memory)
What causes it: The model needs more VRAM than your graphics card has.
How to fix it:
- Close other programs that use your graphics card, such as games and browsers with video.
- Make a shorter clip. Start with 5 seconds.
- Use the lower resolution, 480p.
If none of these work, your card is probably too small for this model. Use Comfy Cloud, or try a lighter model from our best local AI video model guide.
Red nodes after loading a workflow
What causes it: A node used by the workflow is not available in your ComfyUI. This usually happens on an old ComfyUI version. Sometimes a node also fails to load when ComfyUI starts.
How to fix it:
- Update ComfyUI with our how to update ComfyUI guide.
- Restart ComfyUI and load the workflow file again.
- If a node is still red, read the text in the ComfyUI terminal window as it starts. It names the node that failed to load.
The video looks broken or noisy after adding a speed LoRA
What causes it: The Pika adapter is already built for six steps. A second speed LoRA (Turbo, Lightning or similar) fights with it.
How to fix it:
- Remove the extra LoRA from the workflow.
- Set the Pika LoRA strength back to 1.0.
- Check that the sampler is lcm and the sigma list still has seven values.
- Run again with the same seed to compare.
Frequently Asked Questions
What to Do Next
Make one 5-second clip with the text workflow today.
Load the text workflow and run one short clip to confirm your install works. When it runs, see how Pika H3 Flex compares with the other local video models.
What to Read Next
If you want a faster route with the same base model, read our MiniMax H3 FastVideo workflow. If you are deciding between video models, our LTX-2.5 workflow shows another option, and the MiniMax H3 prompt guide helps with any of them.
— Written as a personal recommendation from the Earngenix team.
Published: 2026-11-03 · Last updated: 2026-11-03 · File names and settings checked against the official ComfyUI Pika H3 Flex page and the Pika H3 Flex model card.
Join the discussion
Sign in to leave a comment or reply
No comments yet
Be the first to share your thoughts!