
⚡ Quick Answer
This FLUX.3 Klein ComfyUI workflow takes a short idea, such as "a red fox in snow," and a built-in prompt enhancer turns it into a long, detailed prompt before the image is made. It is a text-to-image workflow (words go in, a picture comes out; a workflow is a saved layout of connected blocks). You download four model files, put them in the right folders, load the workflow file, and click Run. You need ComfyUI 0.41 or newer.
FLUX.3 Klein is an open-weights image model from Black Forest Labs, announced on October 15, 2026. The files sit in a locked Hugging Face repository, and the repository holds nine diffusion files with similar names. Most beginners do not know which one to pick.
This workflow removes two problems. It uses one file set that is easy to find, and it writes the long prompt for you, so you can type five words and still get a detailed image. You can read the final prompt before the model uses it, and you can turn the enhancer off at any time.
You do not need to write code. Every step below says what to click, what you should see, and what to do if something goes wrong.
Model files checked on Hugging Face: October 16, 2026. Official sources: ComfyUI docs, Hugging Face repository and Black Forest Labs on GitHub.
What Can FLUX.3 Klein Generate? Five Sample Outputs and Their Prompts
Here is what to expect from FLUX.3 Klein before you download anything. These five images cover five very different styles: a photo, an anime scene, a neon city, an oil painting and a product shot. Each one comes with the exact prompt used to make it. Click an image to zoom in, click Show prompt to read the prompt, or click Copy prompt to copy the full text without opening it.
1.Photorealistic street portrait

2.Hand-painted anime film scene

3.Cyberpunk neon night city

4.Classical oil painting fantasy landscape
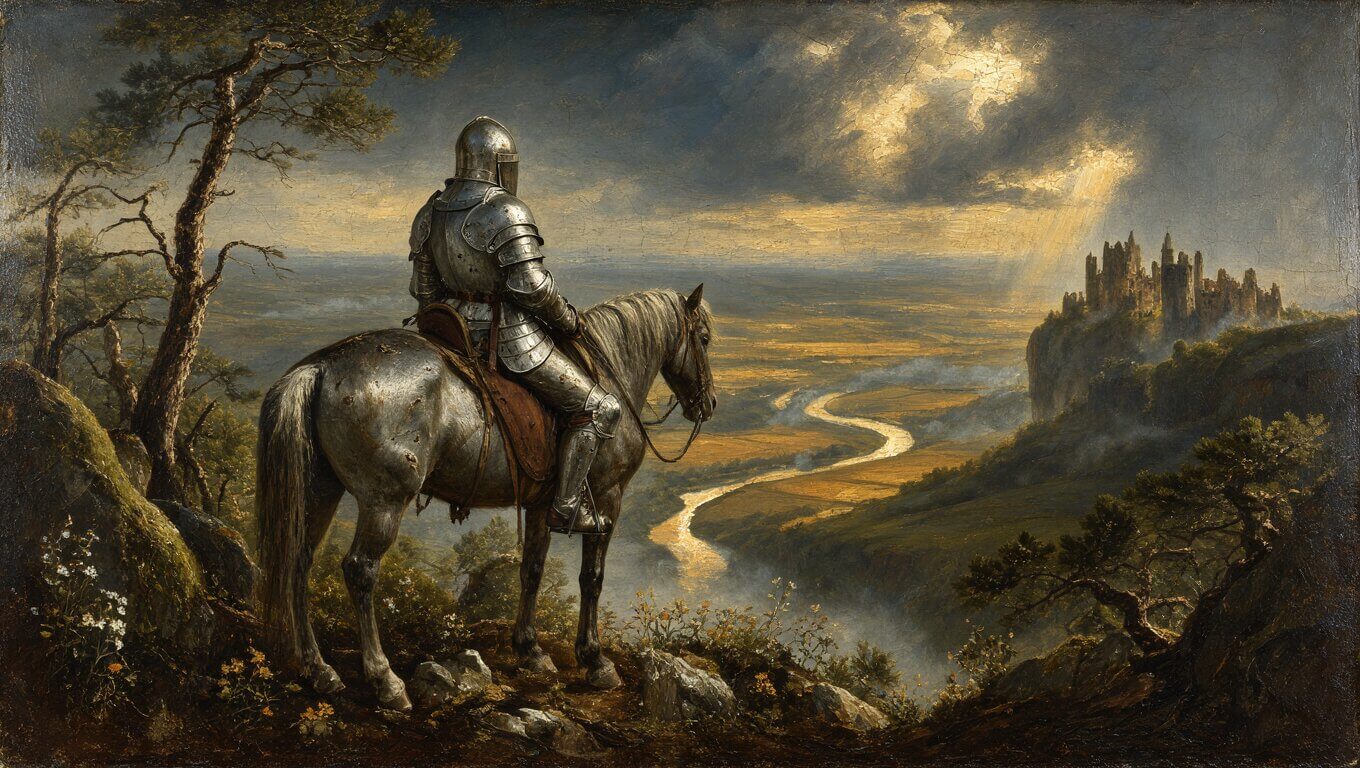
5.Luxury product photography

flux3_image_klein_bf16.safetensors, the full (non-distilled) model. Your results will look a little different if you use the distilled file this workflow loads by default, and the same prompt with a different seed gives a different picture.How Do You Run the Full bf16 Model? (KSampler Settings to Change)
This workflow loads the distilled INT8 file, which is smaller and faster. If you want to get the same kind of results as the samples above, switch to the full bf16 model and change five values in the KSampler. The full model needs more steps and a higher cfg value to make a good image.
Which KSampler settings change for the full model?
| Setting | Distilled (sd) Model | Full bf16 Model |
|---|---|---|
steps | 15 | 25 (try 50 for best quality) |
cfg | 1 | 3.5 |
sampler_name | res_2s_ode | euler |
scheduler | bong_tangent | simple |
denoise | 1 | 1 |
The distilled column is what this workflow ships with. The denoise value stays at 1 for both models, because text-to-image always uses full strength.
How do you switch to the full bf16 model?
- Download
flux3_image_klein_bf16.safetensors(11.1 GB) and put it inComfyUI/models/diffusion_models. The text encoder, enhancer and VAE files stay the same. - Press R to refresh the file lists.
- Click the filename in the Diffusion Model (FLUX.3 Klein) node and pick
flux3_image_klein_bf16.safetensors. - On the KSampler, change steps, cfg, sampler_name and scheduler to the values in the Full bf16 column. Leave denoise at 1.
- Click Run.
flux3_image_klein_int8_convrot.safetensors instead. It is the full model in a smaller file and uses the same KSampler values.What Do You Need Before Running the FLUX.3 Klein Workflow?
You need four things: ComfyUI 0.41 or newer, a free Hugging Face account, enough disk space for the model files, and a graphics card. The main model file alone is 5.83 GB, so check your free disk space first. For the bigger picture of Flux models, read how to install Flux and Flux.2 in ComfyUI.
Which ComfyUI version do you need?
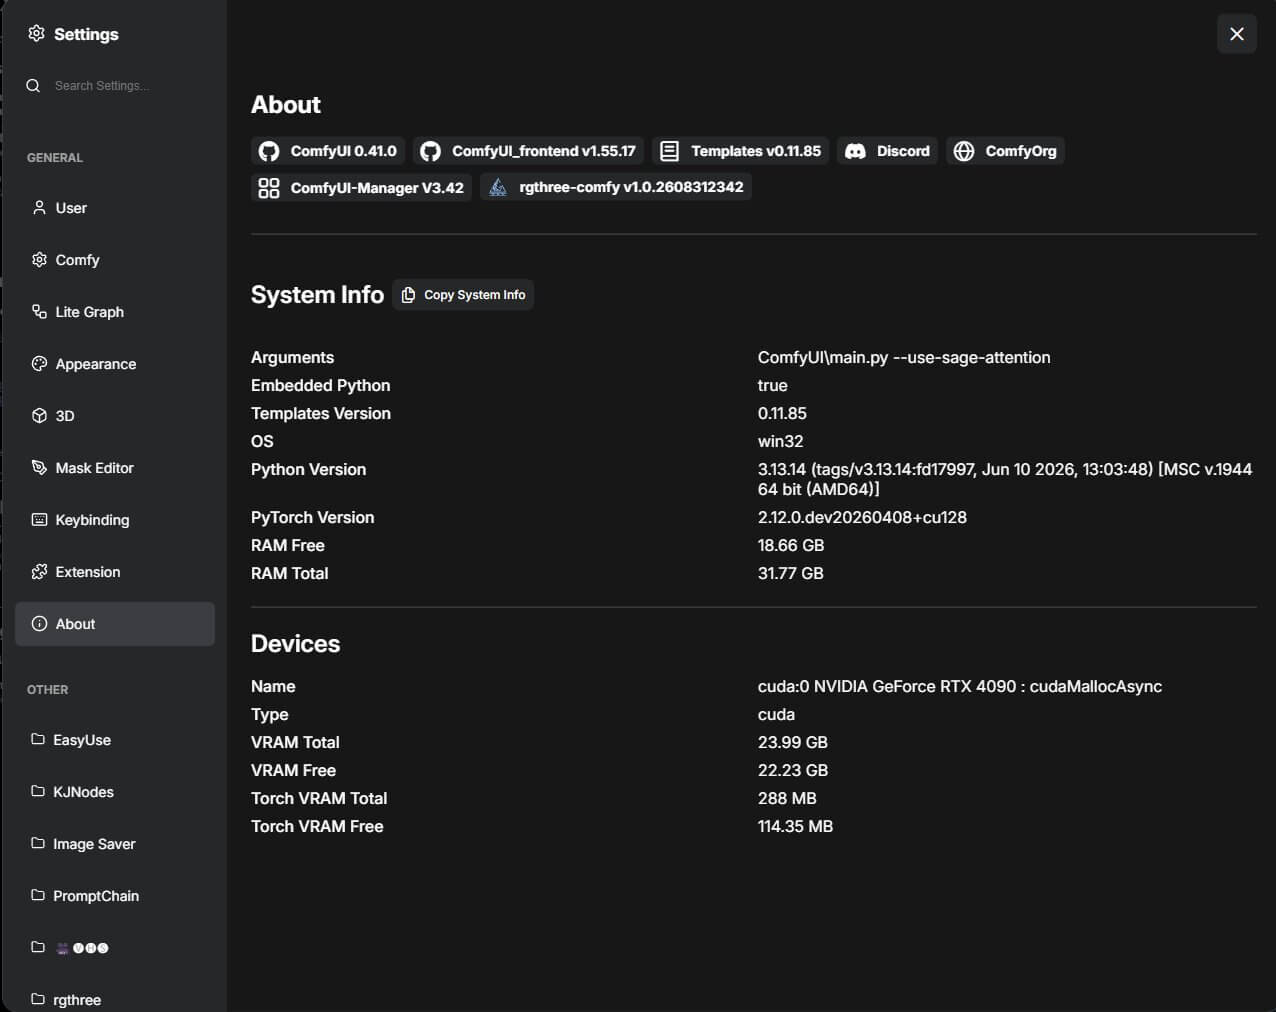
You need ComfyUI 0.41.0 or newer. The official FLUX.3 Klein templates require it. Older versions do not have the new nodes (a node is a rectangular block that does one job, like loading a model or making an image) that this workflow uses.
- Open ComfyUI Settings and look for the About page.
- Read the ComfyUI version number.
- If it is lower than 0.41.0, update ComfyUI and restart it.
You should see the new version number on the About page after the restart.
How do you get access to the FLUX.3 Klein files on Hugging Face?
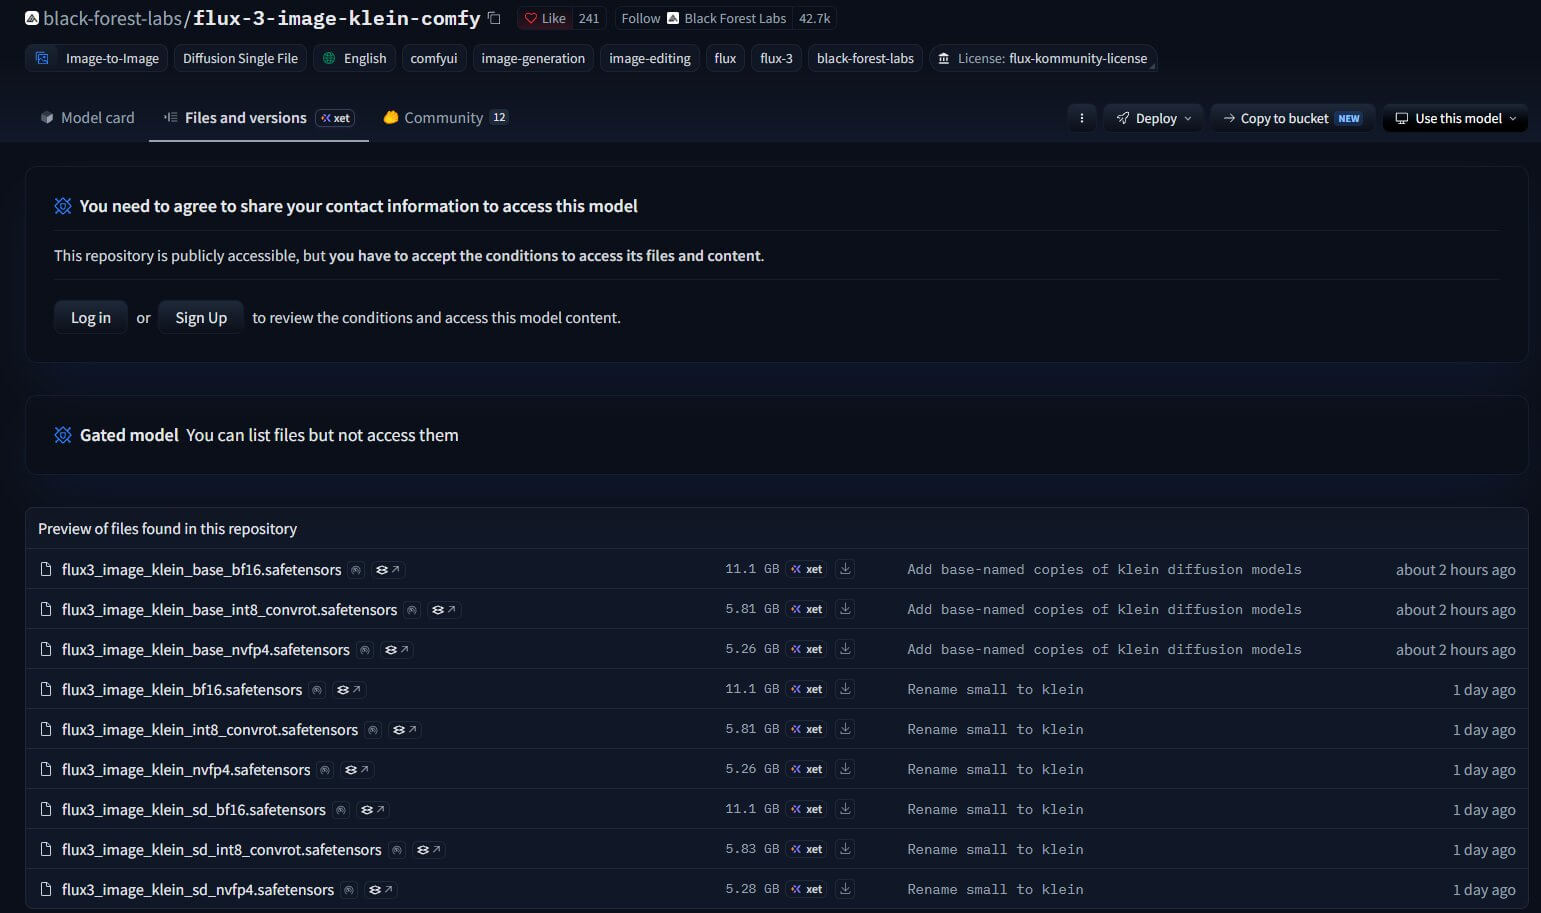
The files are in a gated repository. Gated means you must log in and accept a license agreement before Hugging Face lets you download anything. The account is free.
- Create a free account at huggingface.co, or log in.
- Open the flux-3-image-klein-comfy repository.
- Read the license text. The weights use the FLUX Kommunity License.
- Accept the agreement on the repository page.
You should now see the file list with working download links.
Which four files does this workflow use?
The workflow needs four files, and each one does a different job. Put each file in the matching folder inside the models folder of your ComfyUI folder. All four use the safetensors format, a safe file type for AI models.
| File | What It Does | Folder |
|---|---|---|
flux3_image_klein_sd_int8_convrot.safetensors | The diffusion model — the main image-making model. | diffusion_models |
qwen3vl_4b_int8_convrot.safetensors | The text encoder. It turns your words into numbers the model understands. | text_encoders |
qwen3.5_9b_flux3_prompt_upsampler_int8_convrot.safetensors | The prompt enhancer. It expands your short idea into a long prompt. | text_encoders |
flux2-vae.safetensors | The VAE. It turns the model’s internal picture into a normal image. | vae |
The first file is the diffusion model. The second is the text encoder, a CLIP-type file. The last is the VAE. Download buttons for all four:
Your folders should look like this:
Which FLUX.3 Klein Model File Should You Download? (Full File List)
Start with flux3_image_klein_sd_int8_convrot.safetensors. That is the file this workflow loads by default. The other eight files are different versions of the same model. This section explains the names so you can pick the right one later.
What does "sd" mean in the filename?
The letters sd stand for step-distilled. A distilled model is trained to make a good image in fewer steps. A step is one round where the model improves the picture a little. The distilled model runs about 15 steps, while the full model runs 25 steps in the official template. Fewer steps means faster images.
What is the difference between the klein, klein_sd and klein_base files?
- flux3_image_klein_sd_... is the distilled model. It is fast and needs no guidance setting.
- flux3_image_klein_... (no
sd) is the full model, which the official docs call the full Flux.3 Image Klein checkpoint. A checkpoint is a model file. See checkpoint vs diffusion model for why the names get mixed. - flux3_image_klein_base_... files were added on October 16, 2026. The repository calls them base-named copies of the klein diffusion models, and their file sizes match the full-model files.
Full list of FLUX.3 Klein diffusion files
You only need one of these files, not all nine. Each filename links to its Hugging Face page.
| File | Size | What It Is |
|---|---|---|
flux3_image_klein_sd_int8_convrot.safetensors | 5.83 GB | Distilled, INT8. The file this workflow loads. Start here. |
flux3_image_klein_sd_bf16.safetensors | 11.1 GB | Distilled, BF16 (uncompressed). |
flux3_image_klein_sd_nvfp4.safetensors | 5.28 GB | Distilled, NVFP4. Smallest distilled file. Check that your GPU supports NVFP4 first. |
flux3_image_klein_int8_convrot.safetensors | 5.81 GB | Full model, INT8. Needs about 25 steps and cfg 3.5. |
flux3_image_klein_bf16.safetensors | 11.1 GB | Full model, BF16 (uncompressed). The file used for the sample images in this guide. |
flux3_image_klein_nvfp4.safetensors | 5.26 GB | Full model, NVFP4. Check that your GPU supports NVFP4 first. |
flux3_image_klein_base_int8_convrot.safetensors | 5.81 GB | Base-named copy of the full model, INT8. Use it if a guide names this file. |
flux3_image_klein_base_bf16.safetensors | 11.1 GB | Base-named copy of the full model, BF16. |
flux3_image_klein_base_nvfp4.safetensors | 5.26 GB | Base-named copy of the full model, NVFP4. |
The three file formats in the table mean this:
- BF16 is the original, uncompressed version. It is the biggest file (11.1 GB).
- INT8 is a quantized model (a model squeezed into a smaller file). It is about half the size of BF16.
- NVFP4 is a newer, even smaller format. Check that your GPU supports it before you use it. If you are not sure, choose INT8.
How Does the Workflow Work? (Every Node Explained)
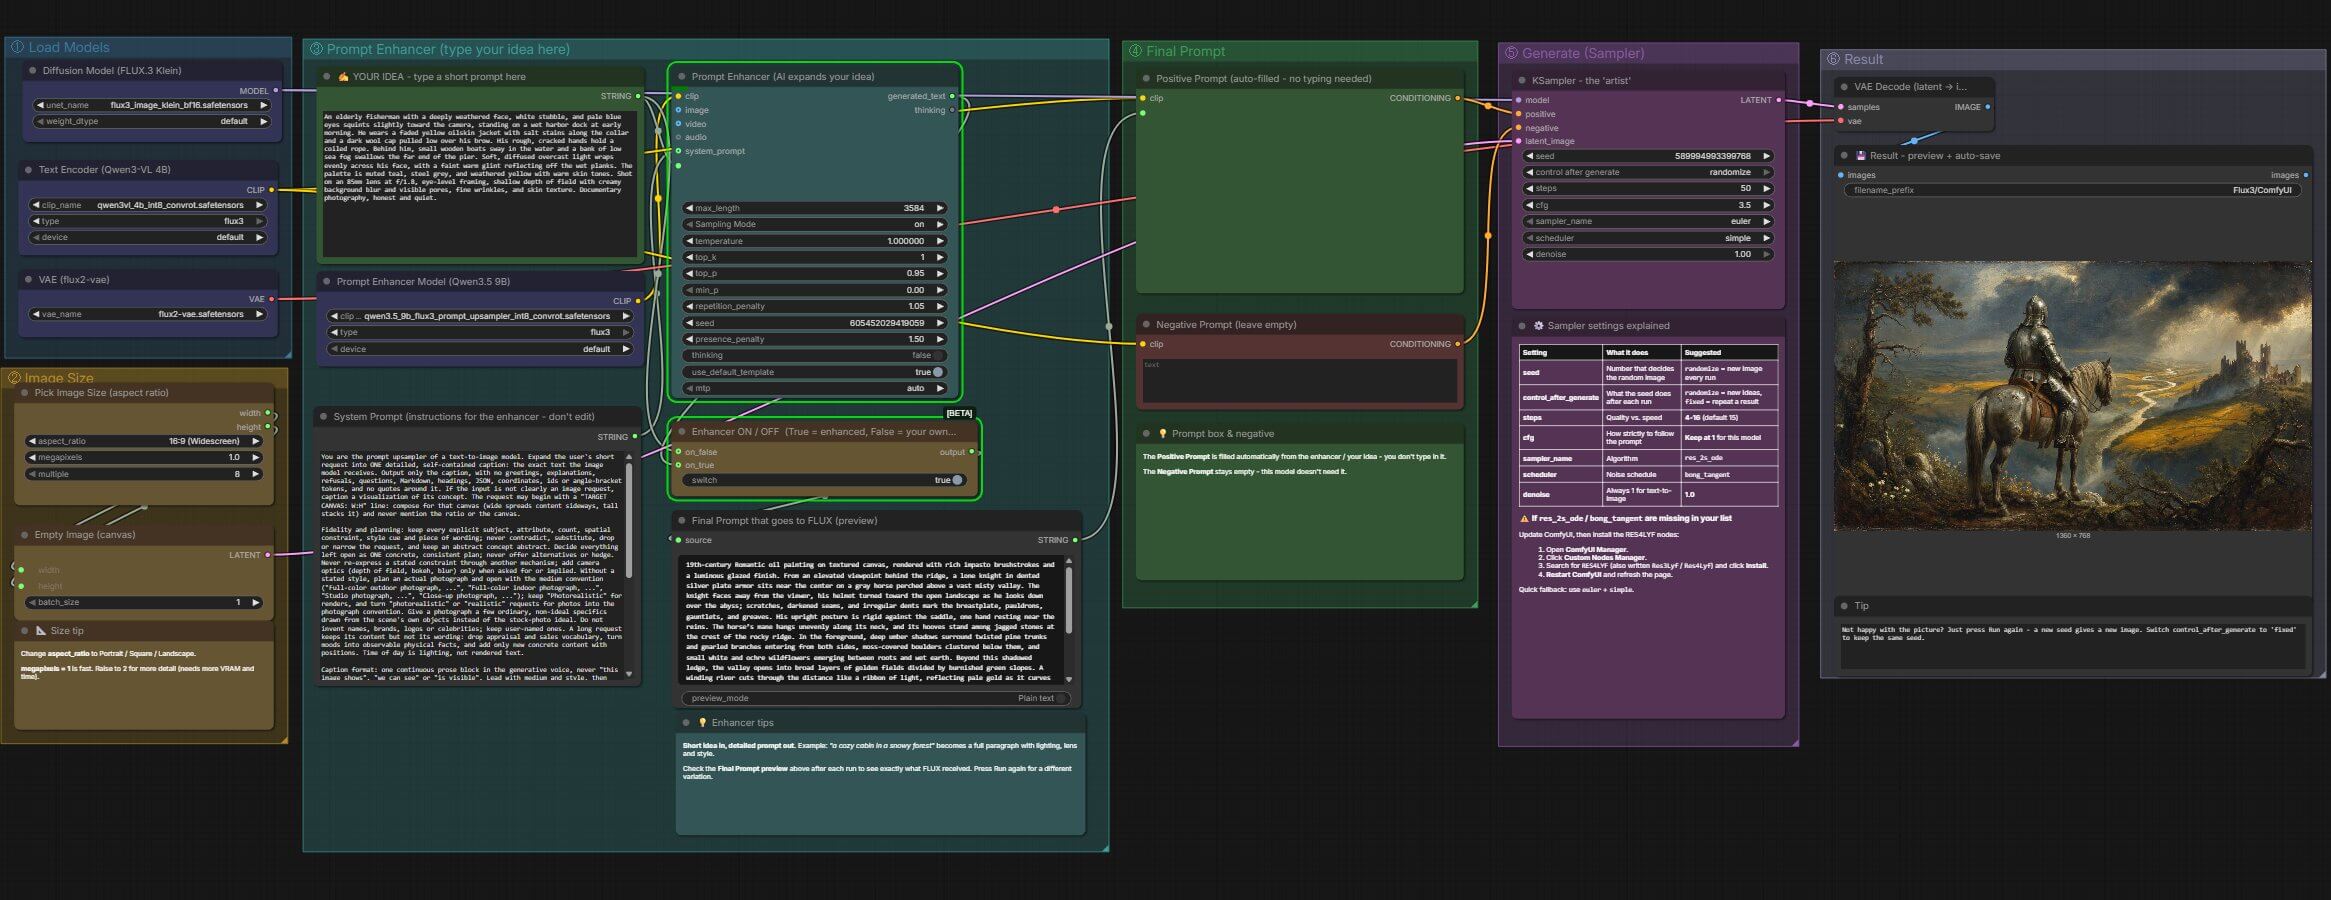
The workflow has three parts: load the models, write the prompt, and make the image. The data flows like this: your idea → enhancer → final prompt → KSampler → VAE Decode → image. The wires between nodes carry data from one block to the next.
The loader nodes are blue, the idea box is green, and the size and switch nodes are yellow.
Here is every node, in the order the data moves:
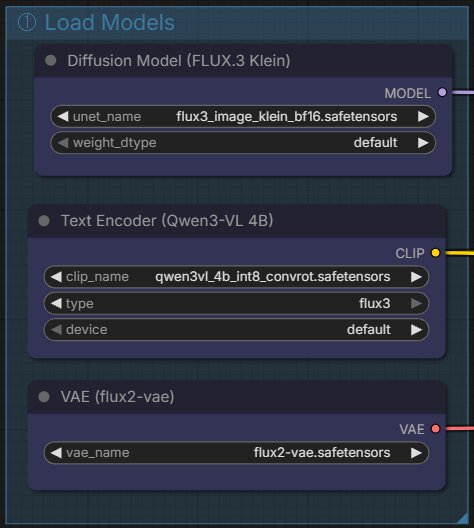
- Diffusion Model (FLUX.3 Klein) — A Load Diffusion Model node. It loads the main image model and sends it to the KSampler.
- Text Encoder (Qwen3-VL 4B) — A Load CLIP node with the type set to flux3. It loads the part that turns words into numbers and sends it to both prompt nodes.
- VAE (flux2-vae) — A Load VAE node. It loads the VAE file and sends it to the VAE Decode node.
- Pick Image Size (aspect ratio) — A ResolutionSelector node. You choose the shape of the picture and its size in megapixels.
- Empty Image (canvas) — An Empty Flux 2 Latent Image node. It makes a blank canvas for the model to draw on and sends it to the KSampler.
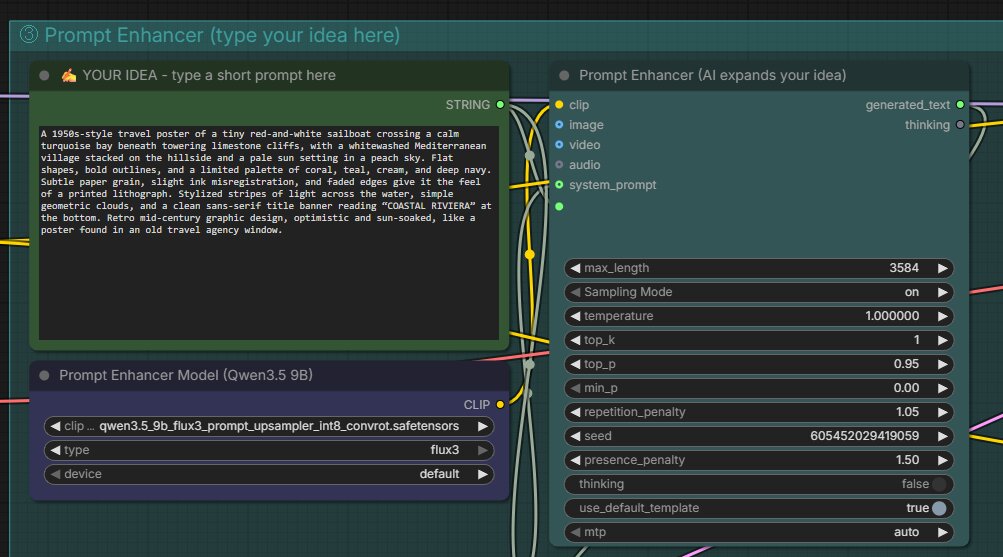
- YOUR IDEA — A text box. You type your short idea here. It feeds the enhancer and the ON / OFF switch.
- Prompt Enhancer Model (Qwen3.5 9B) — A second Load CLIP node, also set to flux3. It loads the enhancer model.
- System Prompt — Holds the instructions the enhancer follows. Do not edit it.
- Prompt Enhancer (AI expands your idea) — A TextGenerate node. It reads your idea and writes a long prompt, then sends it to the switch.
- Enhancer ON / OFF — A switch node. True sends the enhanced prompt forward. False sends your own text forward.
- Final Prompt that goes to FLUX (preview) — A Preview Any node. It shows the exact text the model receives.
- Positive Prompt (auto-filled) — A CLIP Text Encode node. It fills itself from the switch, so you never type in it.
- Negative Prompt (leave empty) — A CLIP Text Encode node. This model does not need a negative prompt, so leave it empty.
- KSampler — The node that draws the image. Its settings are explained below.
- VAE Decode (latent -> image) — Turns the finished drawing into a normal picture.
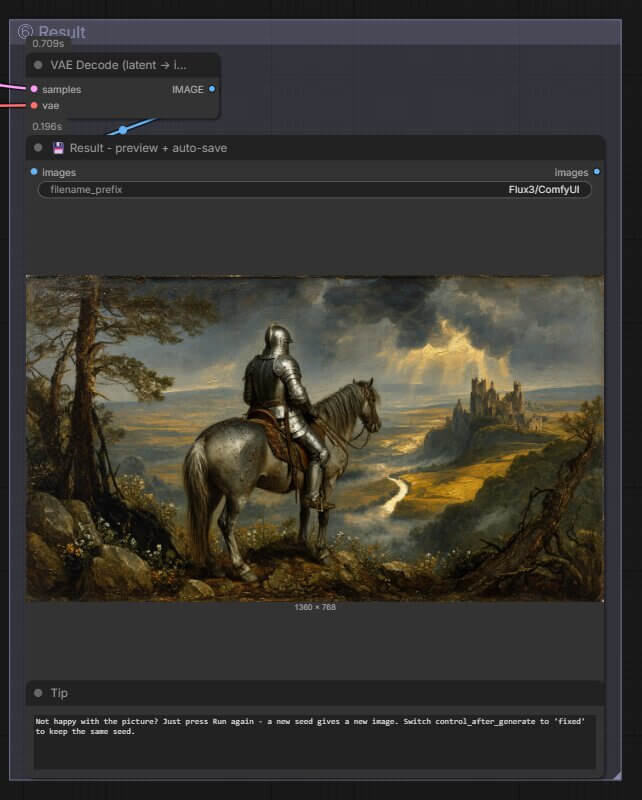
- Result — A Save Image node. It shows the picture and saves it to ComfyUI/output/Flux3/.
The Negative Prompt node is a negative prompt (a list of things you do not want in the picture). The Empty Image node draws in latent space (a hidden space where the model draws before the real image appears).
How Do You Run the FLUX.3 Image Klein Text-to-Image Workflow Step by Step?
Follow these eight steps in order. The first run takes the longest, because ComfyUI has to load the model files into memory. Later runs are faster.
Step 1: Load the workflow file
The workflow file is a small .json file that holds the whole node layout. Loading it saves you from building every node by hand.
- Download the workflow file with the button above.
- Open ComfyUI in your browser.
- Drag the
.jsonfile onto the big grid area (the canvas).
You should see all the nodes appear, plus a note titled START HERE with the same steps as this guide.
Step 2: Check that the four model files are selected
ComfyUI must find the exact filenames from the table above. A missing file stops the whole workflow.
- Find the three loader nodes and the VAE node.
- Click the filename inside each one. A list opens.
- Check that each name matches the table above. Pick it from the list if it does not.
You should see no red outlines. If a node has a red outline, go to the troubleshooting section.
Step 3: Type your short idea
This is the only text you need to write. The enhancer builds the long prompt from it.
- Click inside the green YOUR IDEA box.
- Delete the example text ("A red fox standing in fresh snow at sunrise").
- Type your own idea in 5 to 15 words.
Step 4: Pick the image size
Size changes how long the image takes and how much memory it needs. Start small.
- Find the yellow Pick Image Size (aspect ratio) node.
- Click aspect_ratio and choose a shape, such as 3:4 (Portrait Standard).
- Keep megapixels at 1.
Step 5: Check that the enhancer is on
Keep the enhancer on for your first run, so you can see what it does.
- Find the yellow Enhancer ON / OFF switch.
- Make sure it is set to True.
Step 6: Click Run
The Run button sends the workflow to ComfyUI to start generating. Some ComfyUI versions call it Queue Prompt.
- Click the Run button in the top-right corner, or press Ctrl+Enter.
You should see a green outline move from node to node. The enhancer runs first. Then a progress bar appears on the KSampler for 15 steps. Finally the picture appears in the Result node on the right.
Step 7: Read the final prompt
This step shows you what the model actually received. It is the best way to learn how the enhancer thinks.
- Look at the Final Prompt that goes to FLUX (preview) node.
- Read the text.
The enhancer is built to write about 100 to 350 words. It adds the camera, the light, and where things sit in the frame. If it changed something you care about, put that detail in your idea and run again.
Step 8: Find your saved image
ComfyUI saves every picture automatically. You do not need to click save.
- Open your ComfyUI folder.
- Go to
output, then open the folder namedFlux3.
You should see your new picture there.
How do you turn the prompt enhancer off?
Turn it off when you want full control. Your idea text is then sent to the model exactly as you wrote it.
- Set the yellow Enhancer ON / OFF switch to False.
- Write a full, detailed prompt in the YOUR IDEA box.
- Click Run.
A short idea gives weak results with the enhancer off, so write at least a few sentences about the subject, the light and the background. You can copy any of the sample prompts at the top of this guide as a starting point. For tips on long prompts, read our Flux.2 prompting guide. It was written for FLUX.2, so some details differ.
How do you get a new variation or repeat a result?
The KSampler seed is set to randomize, so each click on Run makes a new image.
- New image from the same idea: click Run again.
- New enhanced prompt: change one word in your idea. This forces the enhancer to write again.
- Repeat a result you liked: set control_after_generate on the KSampler to fixed.
Can You Use the Built-In ComfyUI Template Instead?
Yes. ComfyUI ships official FLUX.3 Klein templates, and both use the same model. Open the Template Library and search for "Flux.3 Image Klein: Text to Image" or "Flux.3 Image Klein Distilled: Text to Image." The official ComfyUI documentation lists all four templates.
The two options differ in layout. The official text-to-image template is a subgraph, so you open it to reach the loaders, the sampler and the canvas size. This workflow shows every node on the canvas, adds one switch for the enhancer, and shows the final prompt in a preview. It also includes notes inside the file.
Use the official template if you want the standard setup. Use this workflow if you want to see every part and control the enhancer.
What Do the KSampler Settings Actually Do?
The KSampler is the node that draws the image. Its settings decide how fast the image is made and how closely it follows your prompt. These are the values saved in this workflow, which loads the distilled model.
| Setting | What It Does | Value in This Workflow |
|---|---|---|
| seed | A number that decides which random image you get. | randomize (new image every run) |
control_after_generate | What the seed does after each run. | randomize (use fixed to repeat a result) |
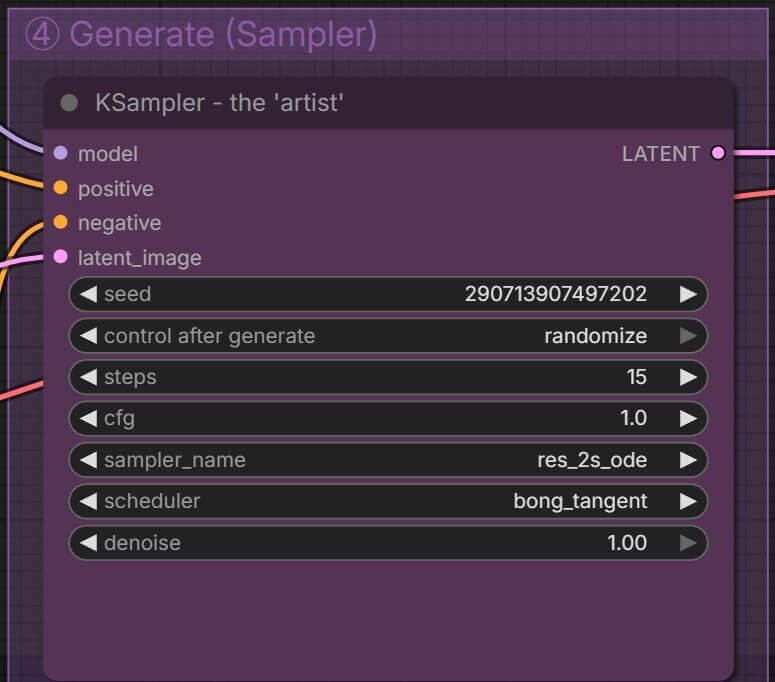
steps | Rounds of improvement. More steps is slower. | 15 (the distilled model works from 4 to 16) |
| cfg | How strictly the model follows your prompt. | 1 (keep it at 1 for the distilled model) |
| sampler_name | The method used to draw the image. | res_2s_ode |
| scheduler | How the model spreads its steps over time. | bong_tangent |
| denoise | How much noise the model removes. Text-to-image always uses full strength. | 1.0 |
Using the full bf16 model instead? It needs different values. See the full model settings table. If res_2s_ode or bong_tangent is missing from your lists, see the RES4LYF fix.
How Do You Fix "Value not in list: res_2s_ode / bong_tangent"? (Install RES4LYF)
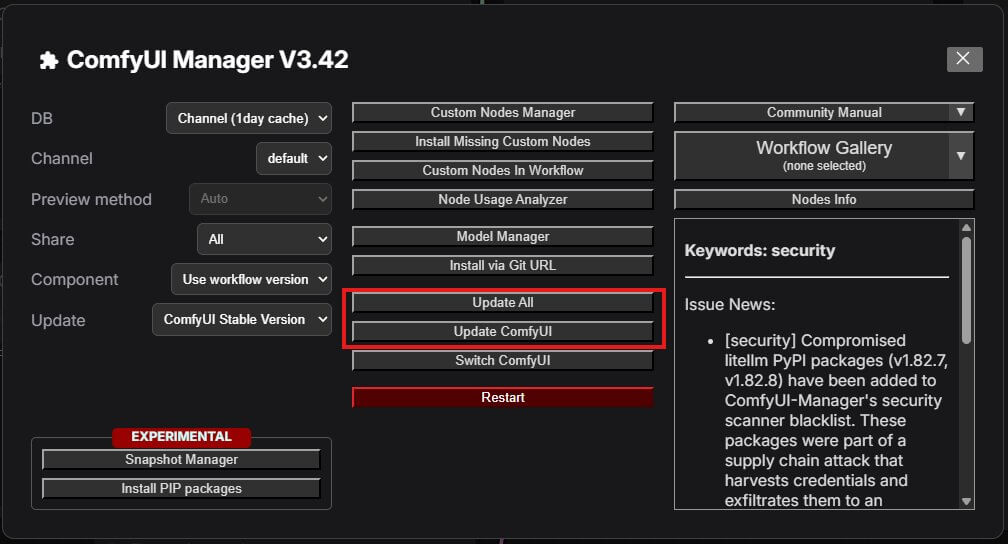
This error means your ComfyUI does not have the res_2s_ode sampler or the bong_tangent scheduler. Both come from a pack of custom nodes (extra blocks that other people build) called RES4LYF. You install it once with ComfyUI Manager, and the error goes away.
You will see a message like this when you load the workflow or click Run:

Step 1: Open ComfyUI Manager
- Look at the top bar of ComfyUI.
- Click the Manager button.
You should see the ComfyUI Manager window open. If there is no Manager button, your ComfyUI does not have the Manager yet. Follow our guide to install missing nodes in ComfyUI first, then come back to this step.
Step 2: Search for RES4LYF
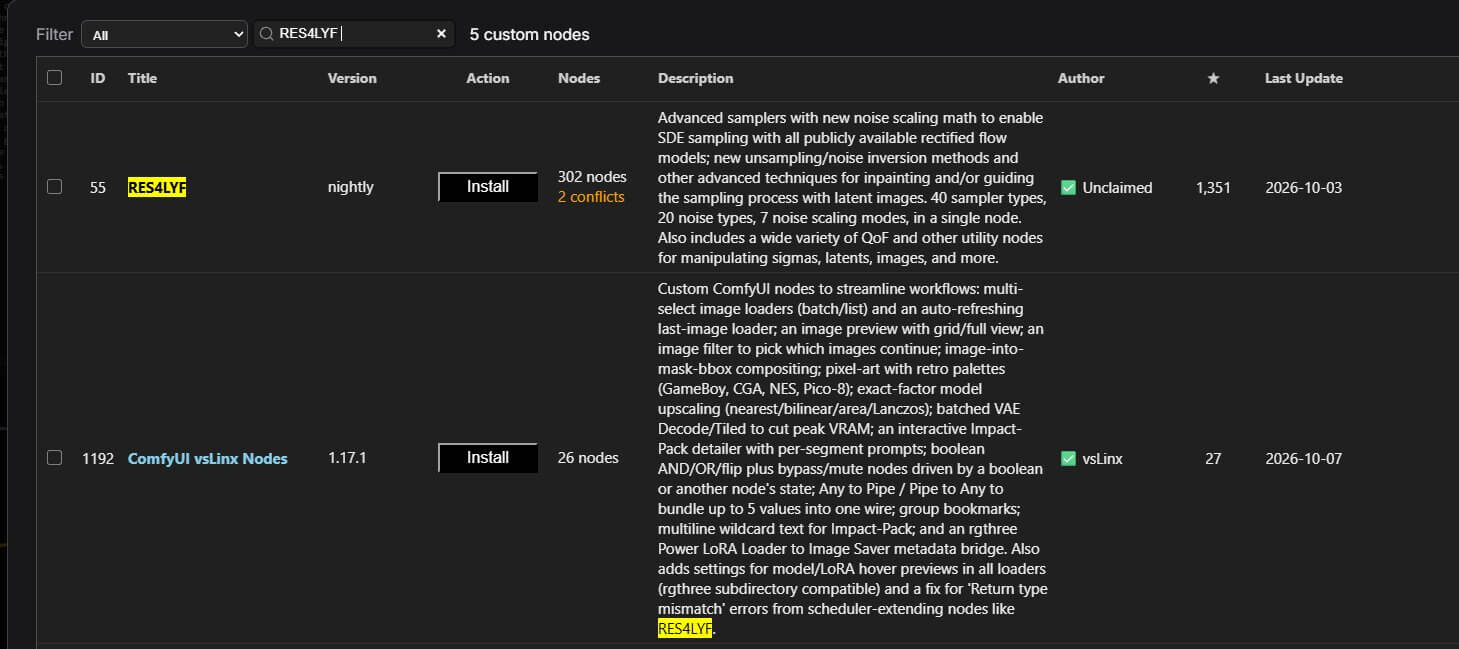
- In the Manager window, click Custom Nodes Manager.
- Click the search box and type RES4LYF.
- Find the card named RES4LYF. The author is ClownsharkBatwing.
Step 3: Install it
- Click Install on the RES4LYF card.
- If a version list opens, pick the latest version.
- Wait until the install finishes. This can take a minute.
Step 4: Restart ComfyUI and refresh the page
- Click the Restart button that appears after the install, then confirm.
- Wait for ComfyUI to come back, then press F5 to refresh the browser page.
Step 5: Check that the sampler and scheduler appear
- Find the KSampler node.
- Click sampler_name and look for
res_2s_odein the list. Pick it. - Click scheduler and pick
bong_tangent. - Click Run.
You should see both names in the lists and no error message.
What if the Manager install does not work?
You can install the pack by hand. Close ComfyUI first, then open a terminal inside ComfyUI/custom_nodes and run:
- If the new
RES4LYFfolder contains arequirements.txtfile, install it with the same Python that runs ComfyUI:pip install -r RES4LYF/requirements.txt. On the Windows portable build, use..\python_embeded\python.exe -m pip install -r RES4LYF\requirements.txt. - Start ComfyUI again and refresh the browser page.
- Check the KSampler lists as in step 5.
The pack's code and notes are on the RES4LYF GitHub page.
Want to skip the install? Use the fallback
Set sampler_name to euler and scheduler to simple. Both are built into ComfyUI, so they always show up in the list. Your pictures will look a little different from the res_2s_ode version, but the workflow runs without extra nodes.
How Do You Use the Other Model Files With This Workflow?
You can swap the main model file in the first loader node. Click the filename in Diffusion Model (FLUX.3 Klein) and pick another file from your diffusion_models folder. The text encoder, enhancer and VAE files stay the same.
The KSampler values depend on which kind of file you pick. For a full model file (no sd in the name), use the Full bf16 column in the full model settings table. For a distilled file (sd in the name), use the Distilled column, which is what this workflow ships with. Wrong values give bad pictures.
How Much VRAM Does FLUX.3 Klein Need?
Black Forest Labs says the INT8 build runs on NVIDIA RTX GPUs with as little as 8 GB of VRAM. They also report that, with the distilled model and the INT8 build, a 1 megapixel image takes about 4 seconds on an RTX 5090 and under 9 seconds on an RTX 4070 in ComfyUI. These are the company's own numbers.
The enhancer loads a second model, so it uses extra memory and time. If ComfyUI stops with an out-of-memory error, try these steps in order:
- Set the Enhancer ON / OFF switch to False.
- Keep megapixels at 1.
- Close other programs that use your graphics card.
- Use an INT8 file, not BF16.
Troubleshooting Common FLUX.3 Klein Workflow Errors
These are the three problems beginners hit most often with this workflow.
Value not in list: unet_name
What causes it: You see an error like Value not in list: unet_name: 'flux3_image_klein_sd_int8_convrot.safetensors' not in []. ComfyUI cannot find the model file. The same message can appear for clip_name or vae_name.
How to fix it:
- Check that the file is in the right folder from the table above.
- Check that the filename matches exactly, with no extra characters like
(1). - Press R to refresh, or restart ComfyUI.
- Click the filename in the loader node and pick it again.
When loading the graph, the following node types were not found
What causes it: Some nodes show a red outline. Your ComfyUI does not have the new nodes this workflow needs. The most common cause is a version older than 0.41.
How to fix it:
- Update ComfyUI and restart it.
- Load the workflow file again.
- If red nodes remain, see how to install missing nodes in ComfyUI.
Value not in list: sampler_name or scheduler (res_2s_ode, bong_tangent)
What causes it: You see an error about sampler_name: 'res_2s_ode' or the scheduler bong_tangent. Your setup does not include the RES4LYF node pack.
How to fix it: Install RES4LYF with ComfyUI Manager, or switch to euler and simple. The RES4LYF fix section has every click, with screenshots.
Something else went wrong? Our general ComfyUI troubleshooting guide covers errors that show up in every workflow.
Frequently Asked Questions
Looking for the FLUX.2 version? See our FLUX.2 Klein workflow.
What to Do Next
Run one idea twice: enhancer on, then enhancer off.
Type one idea of your own and compare both results. Then read our prompting guide to write a stronger full prompt for the enhancer-off version.
Flux.2 Prompting Guide →What to Read Next
If this workflow runs well, compare it with the FLUX.2 Klein workflow and see how it fits among the best local image generation models in 2026. If your graphics card struggled, the low VRAM guide has more ways to save memory.
Published: 2026-10-16 · Last updated: 2026-10-16 · Model files checked on Hugging Face: October 16, 2026.
Join the discussion
Sign in to leave a comment or reply
No comments yet
Be the first to share your thoughts!