
⚡ Quick Answer
A MiniMax H3 character sheet is one image that shows the same person from the front, the side, the back and in close-up portraits. In ComfyUI, you upload one photo and run a ready-made workflow (a saved set of connected blocks that does a job for you) to get a wide image with six views. Use the Standard workflow for the closest match to your photo, or the experimental Fastworkflow for quick tests. Check the license first: MiniMax H3's download license excludes the US, EU, UK and South Korea.
You make an AI character you like. Then you make a second image of the same character, and the face looks like someone else. A MiniMax H3 character sheet in ComfyUI gives you one fixed reference image to work from, so you stop starting over each time.
This guide shows you how to make one from a single photo. You get two workflows to download, a Standard one and a Fast one. Every step tells you what to click, what you should see, and why you are doing it. ComfyUI must already be installed. If it is not, follow our guide to install ComfyUI on Windows first.
A sheet helps keep a face steady, but it does not promise a perfect match every time. This guide points out where results can drift and what to do about it.
What Is a Character Sheet, and Will It Really Stop Your AI Character Changing Face?
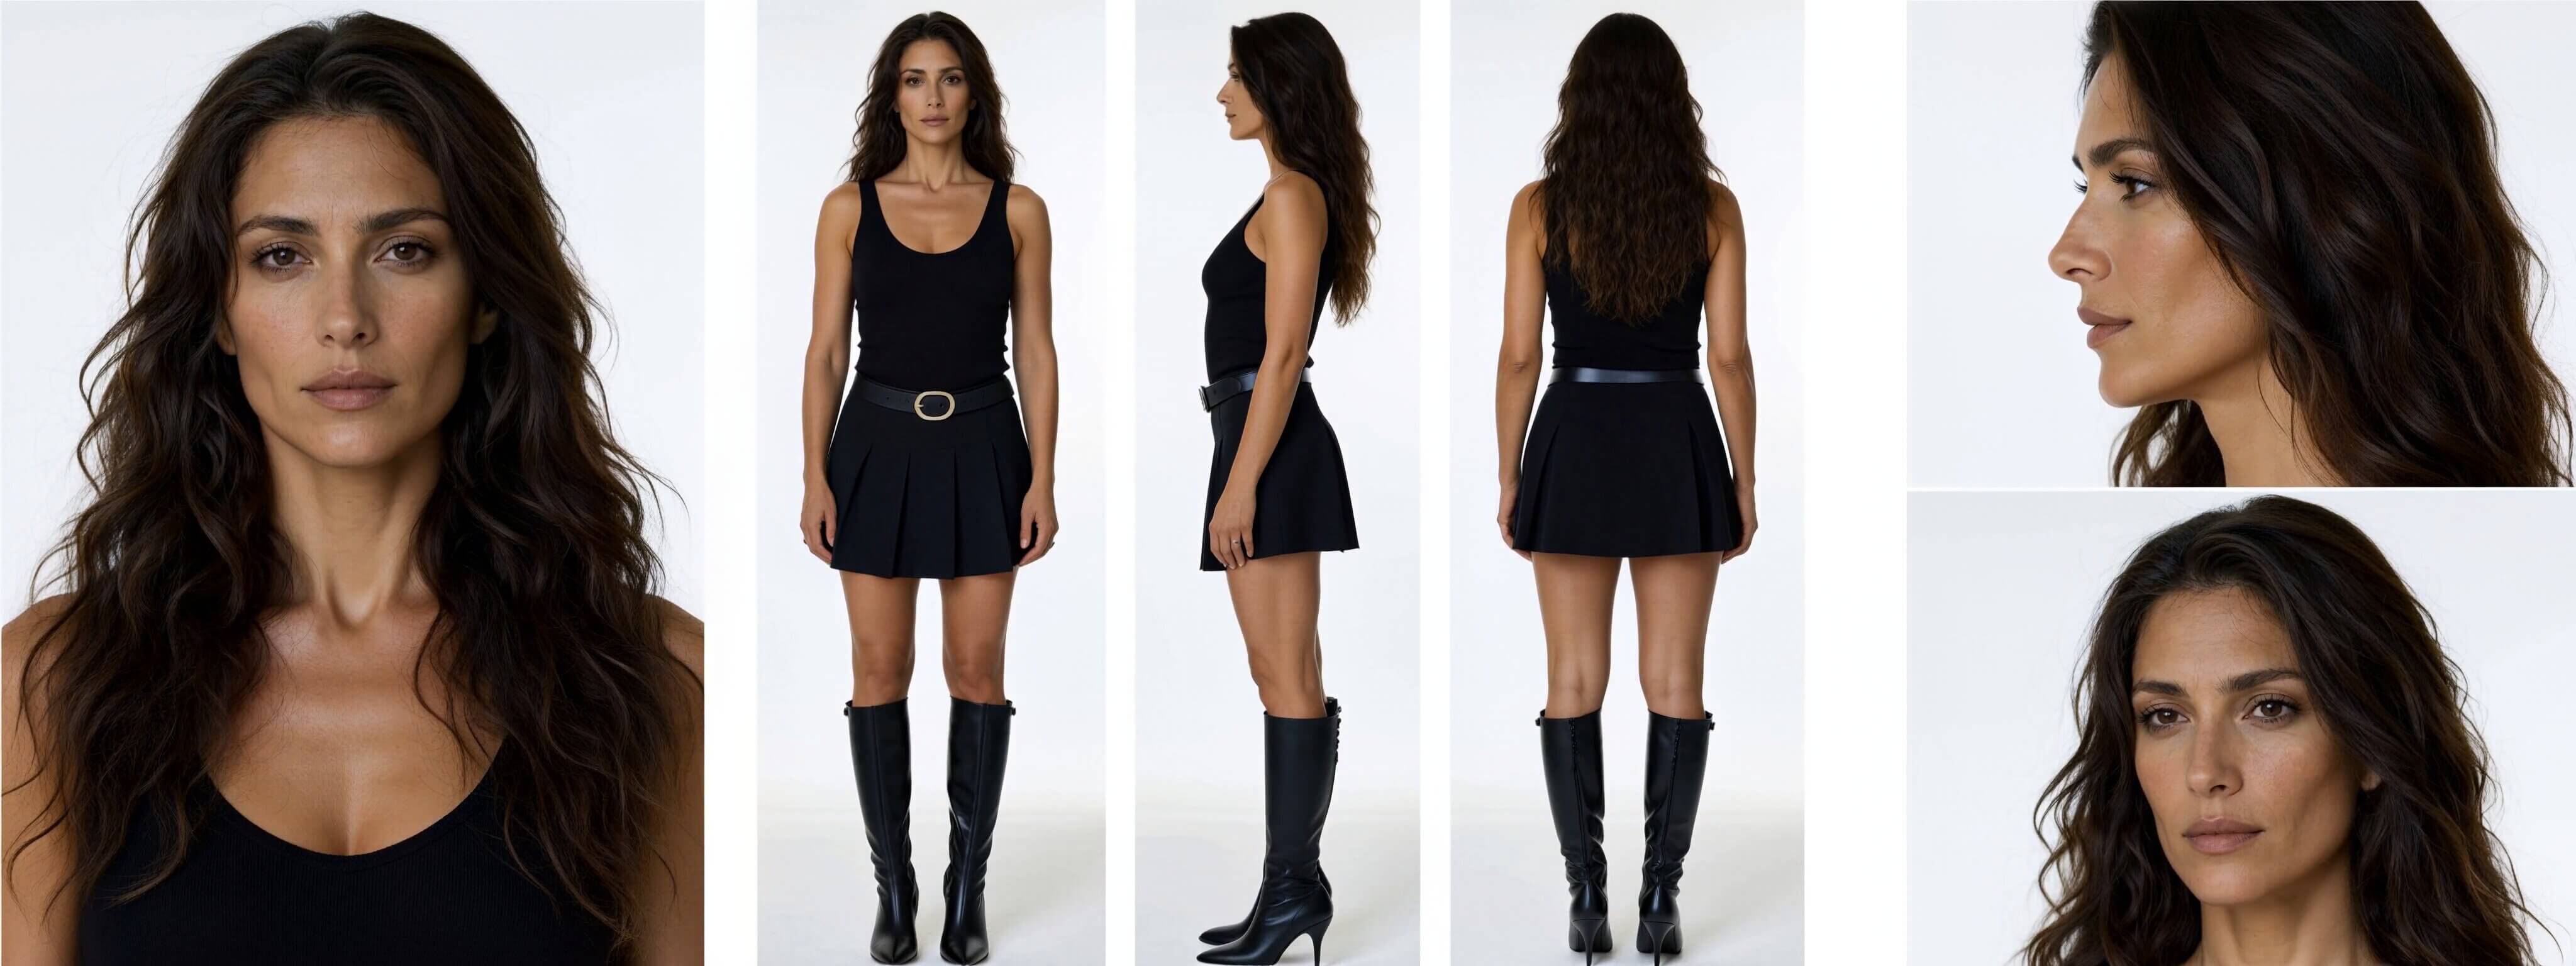
A character sheet is one picture that shows the same person from several angles. Game artists and animators use them so everyone draws the character the same way. You will use yours as a reference photo for later images and videos.
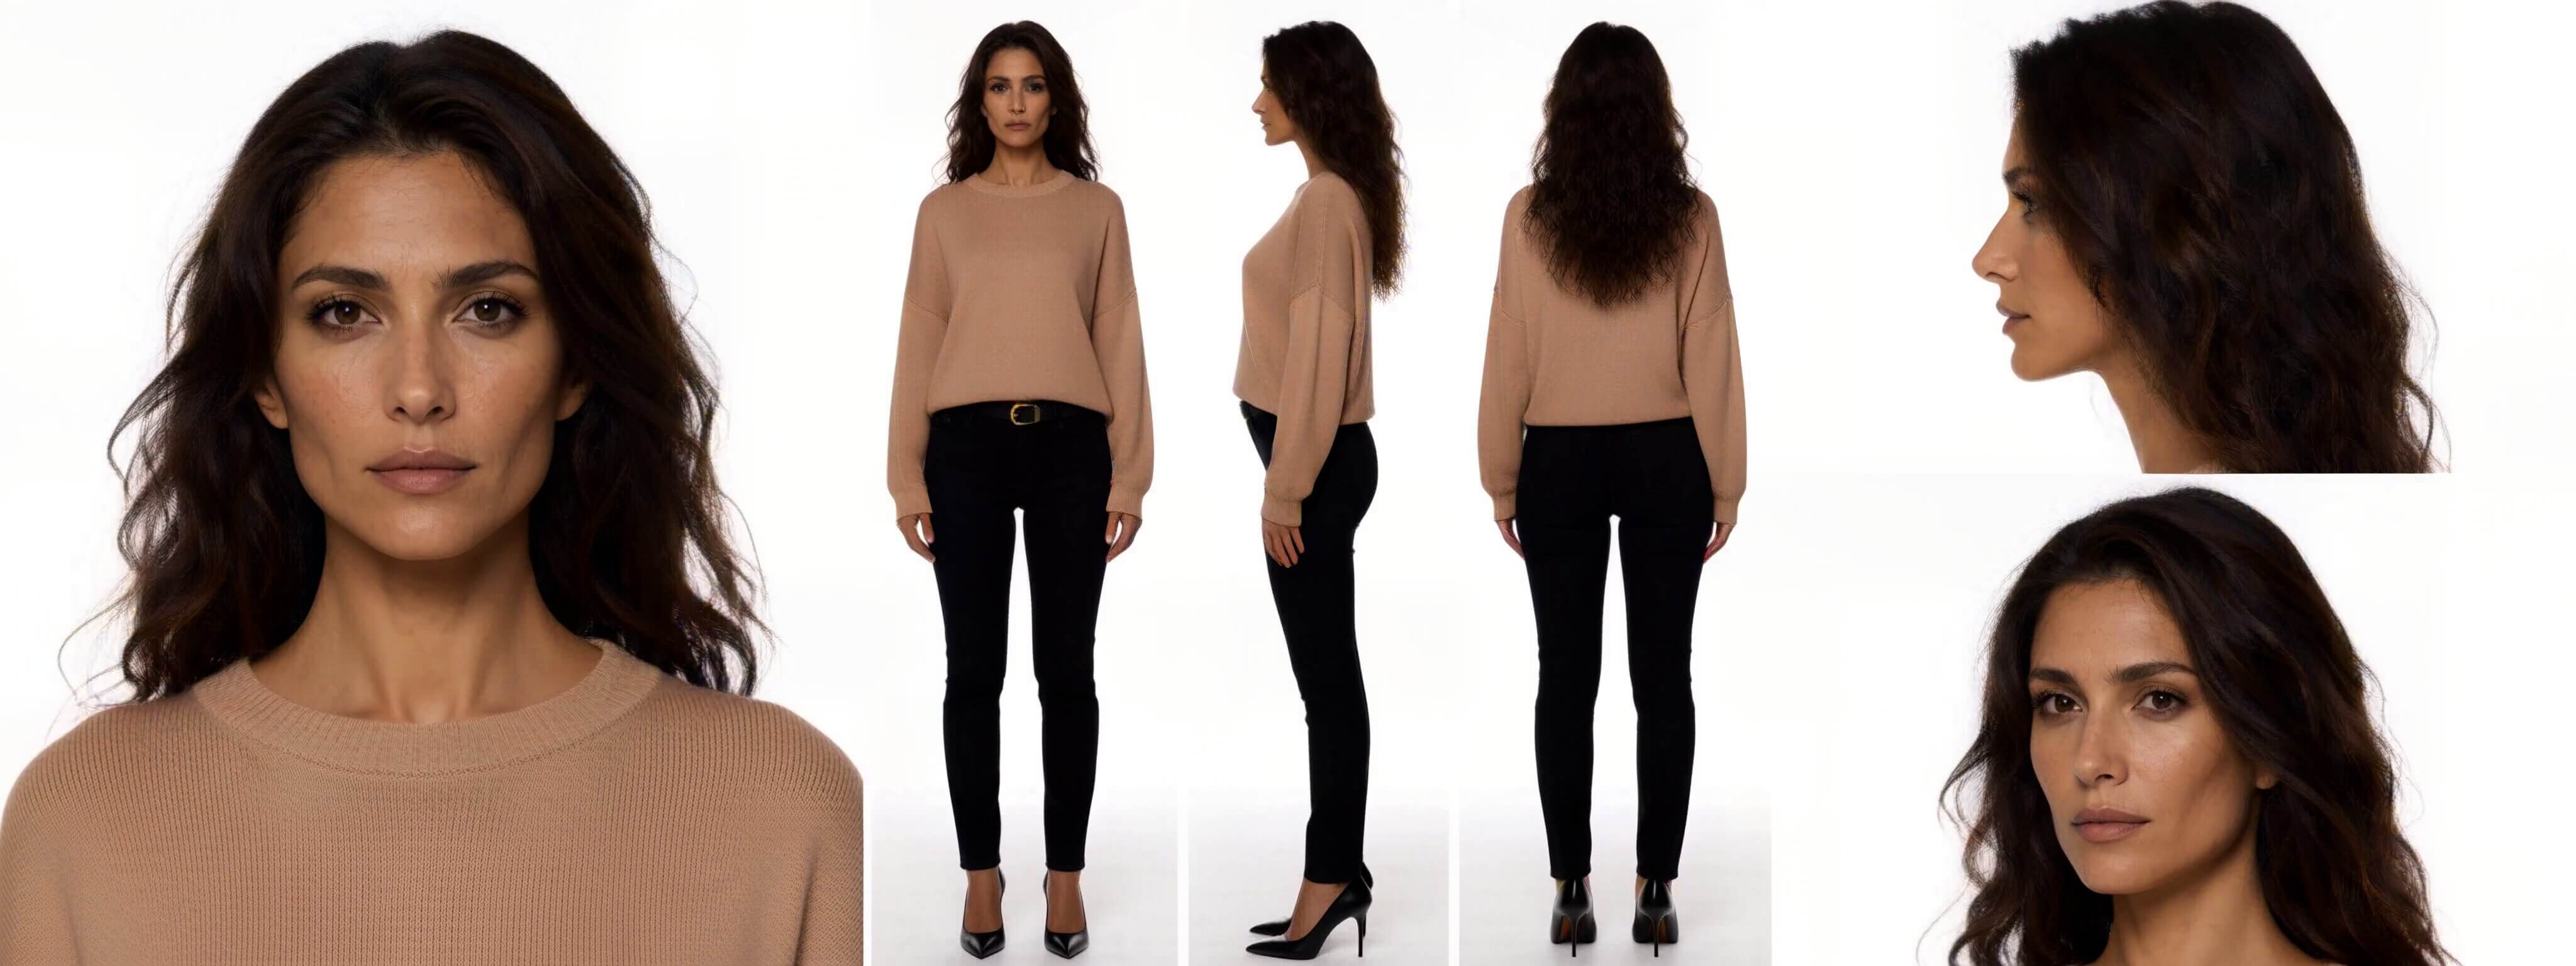
The sheet from these workflows is a wide image, 4096 × 1536 pixels, with six views:
- A close-up portrait of the head and chest on the left, facing the camera.
- A full-body view from the front, in the center.
- A full-body view from the side, in the center.
- A full-body view from the back, in the center.
- A side-profile portrait on the right, top.
- A three-quarter portrait on the right, bottom.
MiniMax H3 is a video model, which means it was built to make videos. Video models are built to keep a person looking the same from one frame to the next. These workflows ask H3 for a single frame instead of a video. All six views come out of one generation, so they share the same face, clothes and lighting.
That is why this works better than making six separate images. When you generate images one at a time, the AI starts fresh each time, and the face drifts. For more ways to keep a face steady, see our guide to character consistency in ComfyUI. In short, character consistency means keeping the same face and outfit across many images.
Can You Use MiniMax H3 in Your Country? (Check This Before You Download)
Read this before you download anything. MiniMax H3's download license excludes four places: the European Union, the United Kingdom, South Korea and the United States. One license analysis says the exclusion also covers the images you make with it, not only the download.
MiniMax says its hosted service (the API) is available worldwide and has separate terms. MiniMax also says organizations in the excluded regions can apply for a formal license. The full text is on the MiniMax-H3 page on Hugging Face (a free website where people share AI model files).
If you live outside those four places, keep reading. If you live inside one, check the license terms and your options before you spend time downloading large files.
Fast or Standard: Which MiniMax H3 Character Sheet Workflow Should You Download?
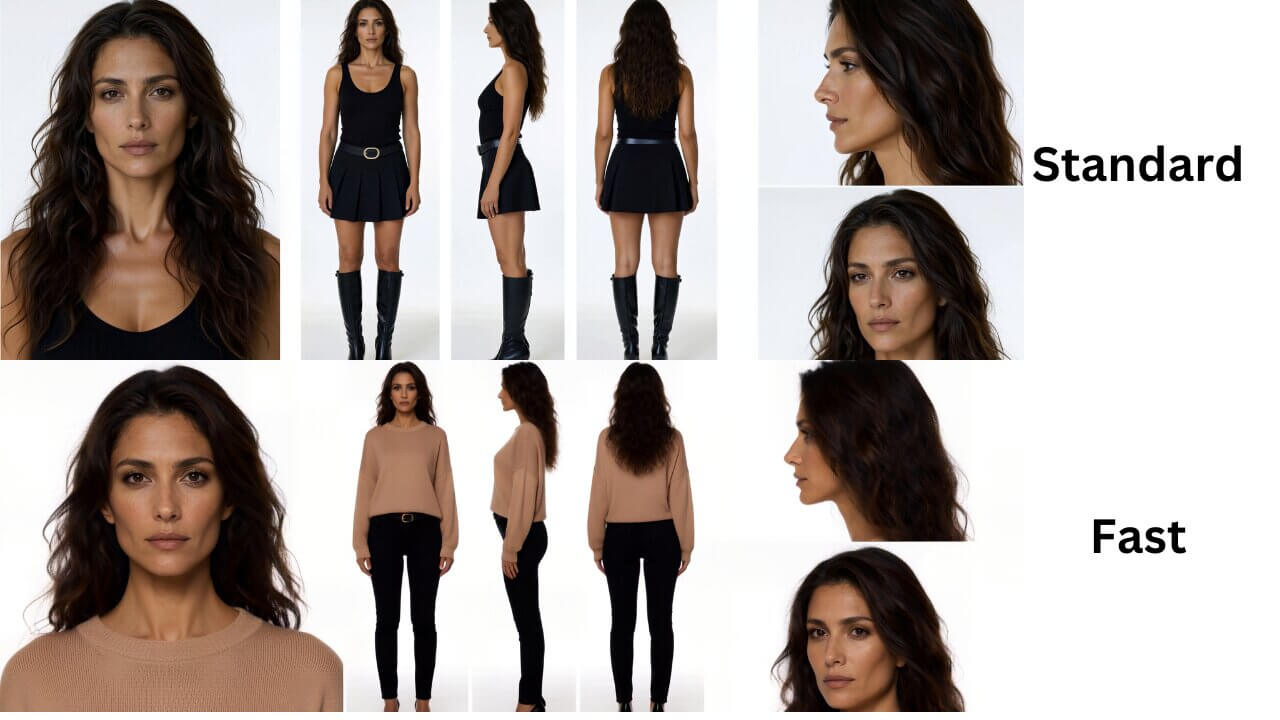
You get two workflows. They work the same way and look almost the same. The difference is which AI model file each one uses.
Standard (Ref2VA).Ref2VA means "reference images to video with audio." This model was built to follow reference photos, so it is the best choice for matching your photo. It runs more passes over the image, so it is slower.
Fast. This model is a shortcut version, built to make a result in far fewer passes. It is quicker. It is also experimental, and it can change a face or an outfit. Use it for quick tests, not for your final sheet.
| Standard (Ref2VA) | Fast | |
|---|---|---|
| Speed | Slower | Quicker |
| Match to your photo | Best choice | Can drift |
| Best for | Your final sheet | Quick tests |
| Status | Recommended default | Experimental |
Both models are quantized models (compressed to a smaller file size so more graphics cards can run them). Start with Standard. If a result looks off, you now know where to look. For a deeper look at the Fast model, see our MiniMax H3 FastVideo workflow article.
What Do You Need Before You Start? (Models, Custom Nodes, and Hardware)
Gather these before you begin. It takes less time than stopping halfway to download files. You also need free disk space, because the model files add up to tens of gigabytes.
Hardware
VRAM (the memory on your graphics card) is the main limit on whether a model runs. People report very different results with MiniMax H3, depending on their ComfyUI version and how much system RAM they have. Treat your own first run as the real test.
ComfyUI version
You need ComfyUI 0.30.0 or later, which has built-in MiniMax H3 support. Older versions do not have the H3 blocks, and the extra pack you install below will not appear at all.
Model files
A workflow loads several files. Each one has a job:
- The diffusion model (the main AI model file that makes the picture).
- The text encoder, also called CLIP (it reads your prompt and turns it into numbers the AI understands).
- The video VAE (a helper file that turns the AI's finished result into a picture you can see).
- The audio VAE. H3 also makes sound, so the workflow loads this file even though a sheet has no sound. Leave it as it is.
Every file ends in .safetensors (a safe file format for AI models). Download only the files for the workflow you chose.
Files for the Standard workflow
| File | What it does | Folder |
|---|---|---|
minimax_h3_ref2va_pruned_int8_convrot.safetensors | Diffusion model | ComfyUI/models/diffusion_models |
qwen3vl_32b_minimax_h3_nvfp4_awq.safetensors | Text encoder (CLIP) | ComfyUI/models/text_encoders |
minimax_h3_video_vae_int8_convrot.safetensors | Video VAE | ComfyUI/models/vae |
minimax_h3_audio_vae_fp32.safetensors | Audio VAE | ComfyUI/models/vae |
Get the two VAE files from the vae folder of Comfy-Org/MiniMax-H3 on Hugging Face.
qwen3vl_32b_minimax_h3_int8_convrot.safetensors instead. That is the file the Fast workflow uses.Files for the Fast workflow
| File | What it does | Folder |
|---|---|---|
minimax_h3_fastvideo_vsa_datafree_1300step_4step_int8_convrot.safetensors | Diffusion model (4-step) | ComfyUI/models/diffusion_models |
qwen3vl_32b_minimax_h3_int8_convrot.safetensors | Text encoder (CLIP) | ComfyUI/models/text_encoders |
minimax_h3_video_vae_fp16.safetensors | Video VAE | ComfyUI/models/vae |
minimax_h3_audio_vae_fp32.safetensors | Audio VAE | ComfyUI/models/vae |
The Fast diffusion model is on the community page Kijai/MiniMax-H3-experimental. It is not an official release, so expect it to change. The text encoder and VAE files are on the Comfy-Org page linked above.
Where everything goes
The custom node pack
Both workflows use two extra blocks that do not come with ComfyUI. They arrive in a pack of custom nodes (add-on blocks made by other people). A node is a rectangular block in ComfyUI that does one job, and you connect nodes with wires to build a workflow.
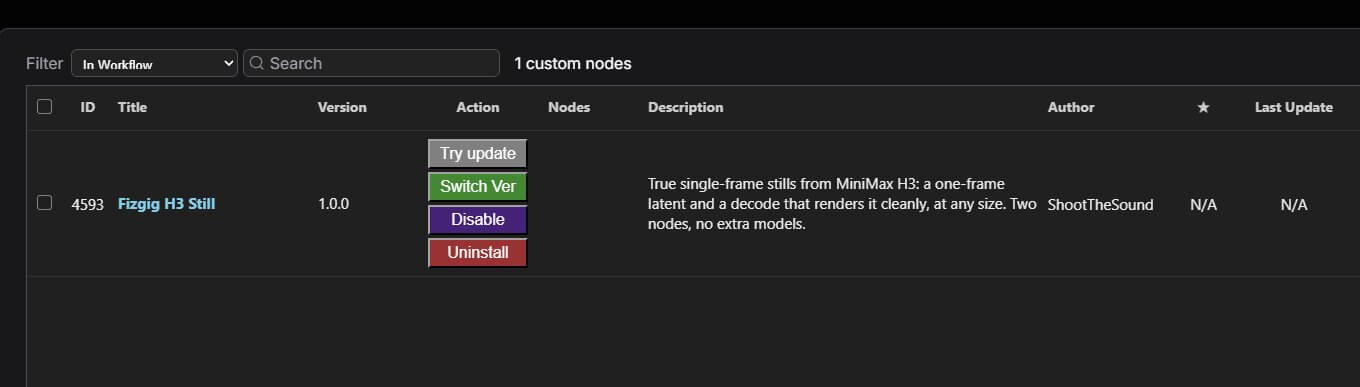
The pack is called ComfyUI-Fizgig-H3-Still. It adds Fizgig H3 Still Latent and Fizgig H3 Still Decode. These two blocks make H3 produce a true one-frame image instead of a short video. You can install the pack with ComfyUI Manager (a tool that installs add-ons for you), and the steps are below. The source is at github.com/shootthesound/ComfyUI-Fizgig-H3-Still.
Which One Photo Gives the Best Character Sheet in ComfyUI?
The sheet can only copy what it sees, so your photo matters more than any setting. These workflows use one photo as their only reference. A good photo is clear, front-facing and well lit. It shows the whole person from head to feet. The higher the resolution, the better.
Avoid these:
- Photos that cut off the head, the feet or an arm.
- Heavy filters, beauty effects or strong color changes.
- Dark photos, or photos where the person is turned away.
- Photos with several people in them.
Use your own photo, or a photo of someone who agreed to it.
How Do You Make a MiniMax H3 Character Sheet in ComfyUI, Step by Step?
Follow these nine steps in order. Each one explains why you are doing it, so nothing feels like magic.
Step 1: Update ComfyUI
H3 support is new, so an older ComfyUI does not have the blocks these workflows need. Updating first prevents the most common error.
Open ComfyUI Manager (the puzzle-piece icon in the top toolbar) and click Update ComfyUI. When it finishes, restart ComfyUI completely. You need version 0.30.0 or later. If anything goes wrong, follow our guide to updating ComfyUI.
Step 2: Install the Fizgig custom node pack
The workflows need the two Fizgig blocks to build a one-frame image. Without them, ComfyUI shows red boxes and the workflow will not run.
Option A: install with ComfyUI Manager (easiest).
- Click ComfyUI Manager in the top toolbar, then click Custom Nodes Manager.
- Type Fizgig H3 Still in the search box.
- If the pack appears, click Install. If it does not appear, use Option B or C below.
- Click Restart when ComfyUI asks, then refresh your browser page.
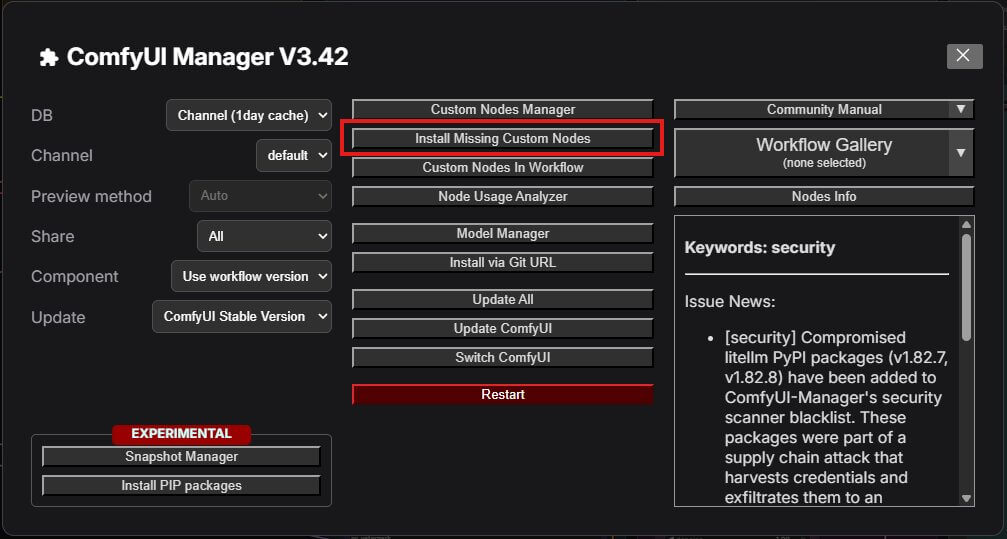
Option B: let ComfyUI find the missing blocks. Skip this step and finish Step 4 first. ComfyUI will list the missing blocks when you load the workflow. Then follow our guide to install missing nodes in ComfyUI.
Option C: install by hand. Open a terminal (a window where you type commands) inside your ComfyUI/custom_nodes folder and run this command. Restart ComfyUI afterward.
To check that it worked, double-click an empty spot on the ComfyUI canvas and type Fizgig H3 Still. You should see Fizgig H3 Still Latent and Fizgig H3 Still Decode in the list.
Step 3: Download the model files and place them in their folders
ComfyUI can only use model files that sit in its folders. Download each file from the tables in the "What Do You Need" section above, and put each one in the folder shown in the last column. Then restart ComfyUI so it sees the new files.
Step 4: Download your workflow and load it into ComfyUI
The workflow file holds every block and wire already connected for you. You do not need to build anything. Download the file for the version you chose:
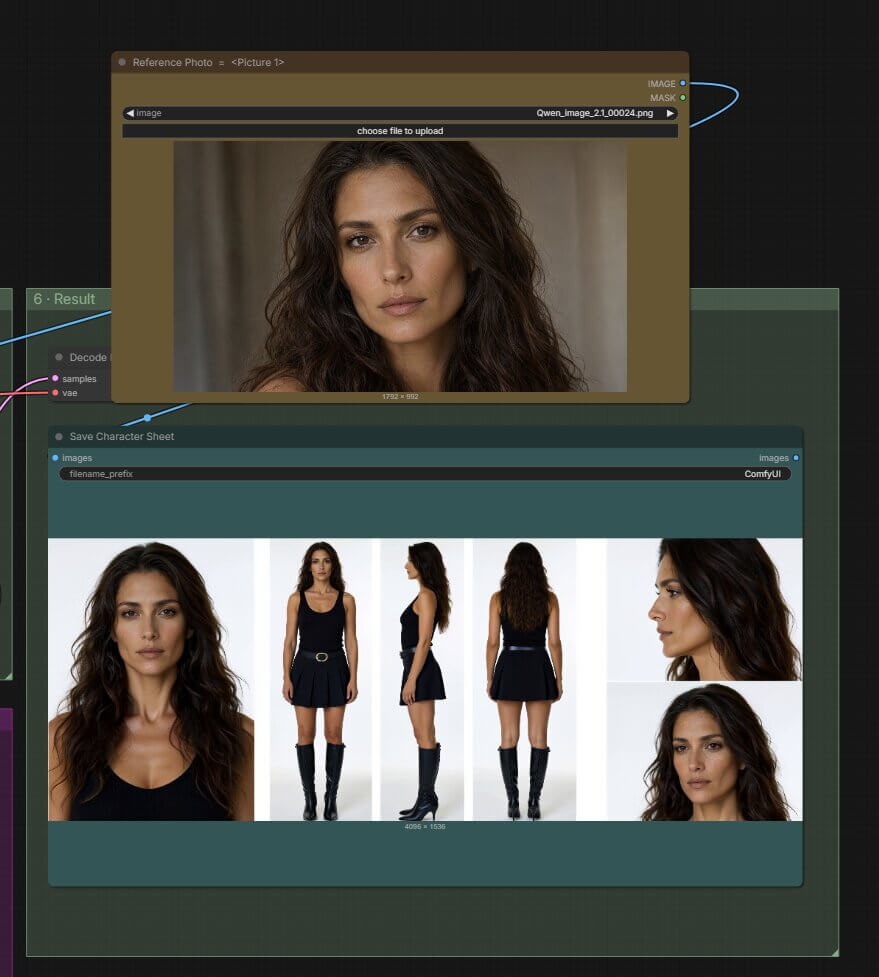
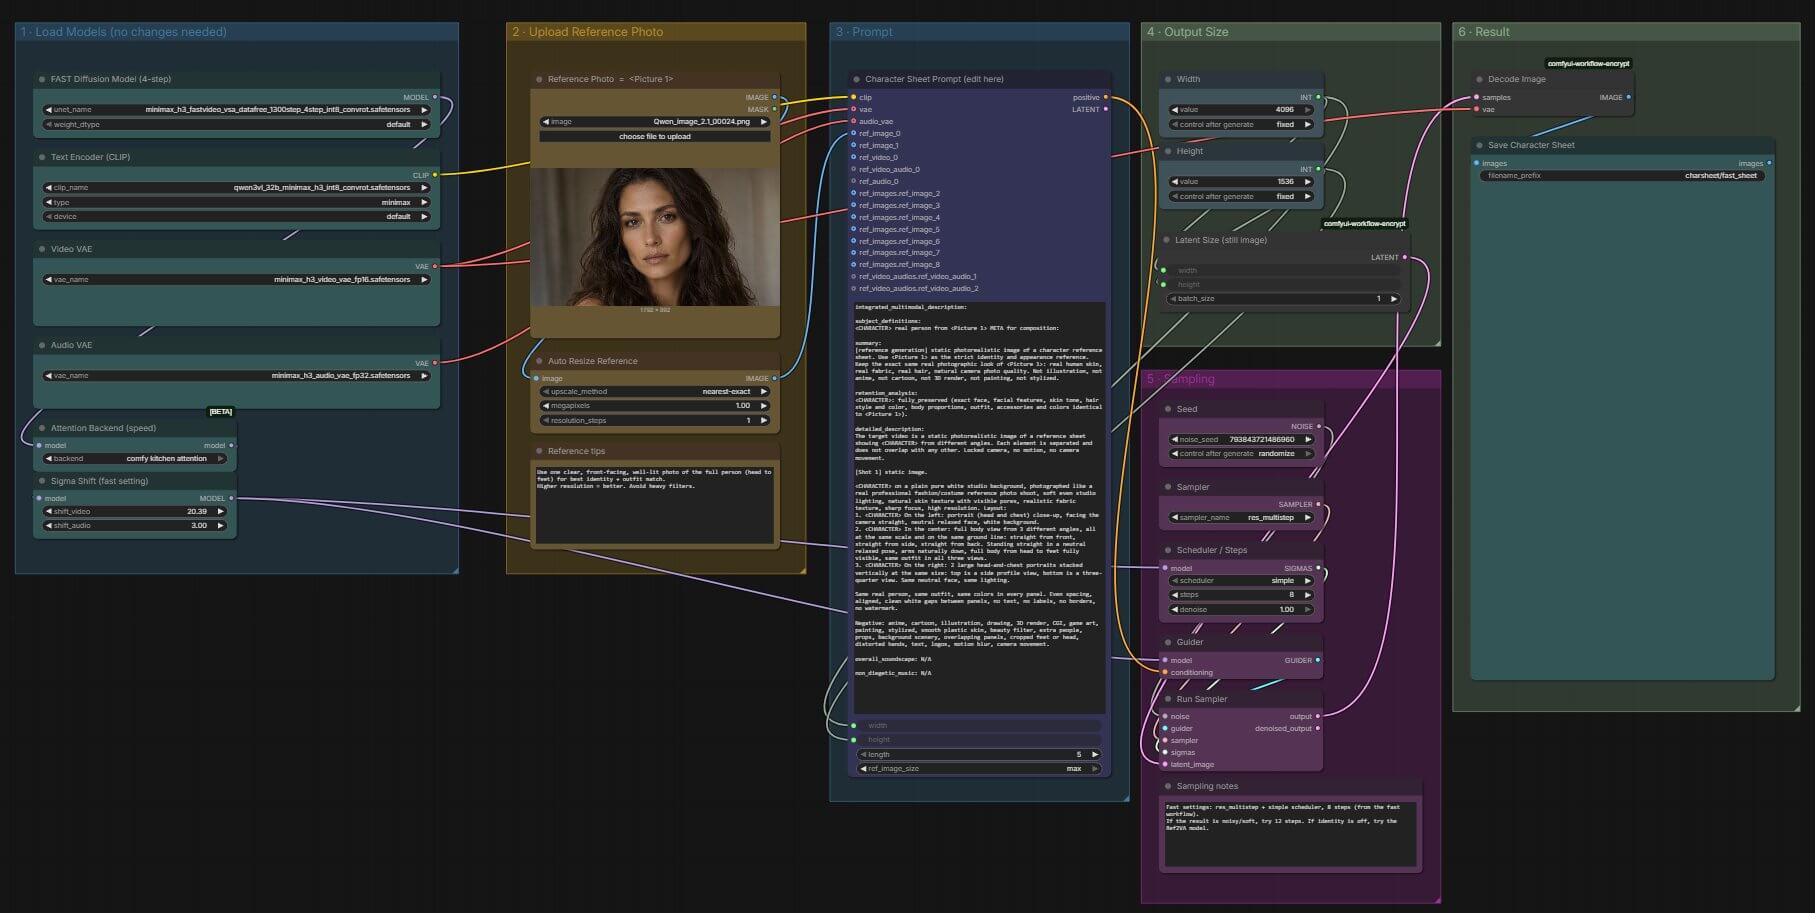
Drag the file from your downloads folder onto the ComfyUI canvas (the big dark workspace). You should see about 20 blocks laid out from left to right, with three yellow note boxes. If a pop-up lists missing blocks, go back to Step 2.
Step 5: Upload your photo
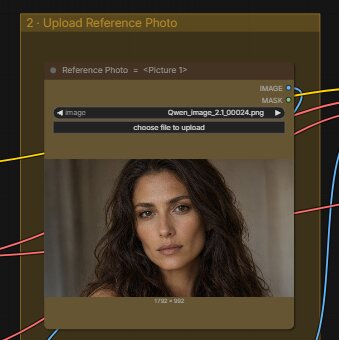
The AI copies this photo, so it is the most important input. In the workflow it is called <Picture 1>, and the prompt uses the same name.
- Find the block titled Reference Photo = <Picture 1>. It is a Load Image block.
- Click choose file to upload.
- Pick your photo.
You should see your photo appear as a small picture inside the block.
Step 6: Check the settings for your workflow
You do not need to change much. Each workflow already has tested values. Check that yours match this table:
| Setting | Standard | Fast |
|---|---|---|
| Sampler | er_sde | res_multistep |
| Scheduler | beta | simple |
| Steps | 18 | 8 |
| Size | 4096 × 1536 | 4096 × 1536 |
Here is what these mean:
- The sampler (the method the AI uses to build the picture bit by bit) is set in the block called Sampler.
- The scheduler (the plan for how much the picture changes at each pass) and the steps (how many passes the AI makes) are set in the block called Scheduler / Steps. More steps are slower and a little cleaner.
- The seed (a number that picks which version of the picture you get) is set in the block called Seed. It is set to randomize, so every run is different.
The Fast workflow has one extra block, Sigma Shift (fast setting). Leave it exactly as it is, and do not change anything else.
Step 7: Click Run
Clicking Run tells ComfyUI to start making the image. Click the Run button in the top-right corner of the screen. In older versions the same button is called Queue Prompt (the button that sends your workflow to be made).
You should see a colored outline move from block to block, and a progress bar on the sampler block. Your first run is slower, because ComfyUI has to load the big model files.
Step 8: Find your character sheet
When the run finishes, your sheet appears in the Save Character Sheet block at the far right. ComfyUI also saves it automatically to your ComfyUI/output folder.
Standard files start with the name ComfyUI. Fast files go into a folder called charsheet and start with fast_sheet. To save a copy somewhere else, right-click the picture and choose Save Image.
Look at the six views. You should see the same face, hair and outfit in each one, on a plain white background.
Step 9: Make a new version
Each run gives a different version of the sheet, because the seed is set to randomize. One run can match your photo better than another. Click Run again, compare the results and keep the best one.
What Does Each Part of the Workflow Do? (A Plain-English Tour)
You do not need to understand every block to get a result. This tour explains the main parts, so you know what you are looking at.
Loading the models
Three kinds of block load your files. Diffusion Model loads the main AI model, Text Encoder (CLIP) loads the prompt reader, and Video VAE and Audio VAE load the two helper files. In the Standard workflow the first block is titled Diffusion Model (H3 Ref2VA). In the Fast workflow it is titled FAST Diffusion Model (4-step).
Your photo and the MiniMax H3 Reference to Video block
The Reference Photo = <Picture 1> block holds your photo. A block called Auto Resize Reference then changes its size so it fits the model.
The Character Sheet Prompt (edit here) block is a MiniMax H3 Reference to Video block. It reads your photo and your written prompt together. In the prompt, <Picture 1> means your uploaded photo, and <CHARACTER> is a label for the person in it. The prompt tells H3 to keep the exact face, hair, skin tone and outfit from your photo.
Fizgig H3 Still Latent
The Latent Size (still image) block is the Fizgig H3 Still Latent block. It sets up an empty one-frame canvas, 4096 pixels wide and 1536 pixels tall. H3 normally makes a short video, so this block is what turns the job into a single picture.
The sampler group
The Seed, Sampler and Scheduler / Steps blocks do the actual picture-making, using the settings from Step 6. A guider block and the main sampling block connect them together. You never need to touch these.
Fizgig H3 Still Decode and Save Image
The Decode Image block is the Fizgig H3 Still Decode block. It turns the finished result into a picture you can see. The Save Character Sheet block shows it and saves it.
Can You Change the Prompt, Size, or Seed Without Breaking the Workflow?
You can change some things safely. Others break the result. Here is what to keep and what to try.
- Keep <CHARACTER> and <Picture 1> in the prompt. These two tags connect your photo to the written instructions. If you delete them, the workflow stops following your photo.
- Keep the width and height in multiples of 32. The default, 4096 × 1536, already is. A size that is not a multiple of 32 can cause an error that points at the wrong block.
- Leave the Negative line as written. The prompt has a line that starts with
Negative:and lists things to avoid, such as cartoon or anime looks. It sits inside the prompt box, and the workflow has no separate field for it. - Keep the photo-real wording. The prompt asks for a real photo look. If you add words like anime or illustration, the sheet will not match a real photo.
You can also change the layout. The sheet layout comes from these three lines in the prompt:
Try different wording here, such as a different number of angles. Change one thing at a time, so you know what caused the difference. To get a new variation without touching the prompt, click Run again, because the seed is set to randomize.
What Are the Most Common Errors, and How Do You Fix Them?
Red nodes, or "Fizgig H3 Still Latent" is missing
What causes it: Your ComfyUI is too old, or the Fizgig pack is not installed. The pack only works on ComfyUI versions with built-in H3 support. On older versions it silently fails to appear.
How to fix it:
- Update ComfyUI (see Step 1).
- Install the Fizgig pack (see Step 2). Our guide to installing missing nodes in ComfyUI covers the general process.
- Restart ComfyUI completely.
- Refresh your browser page and load the workflow again.
The sheet comes out black or blank
What causes it: The Standard workflow uses an int8 video VAE. One community note says this file needs ComfyUI 0.31.0 or newer, and that older builds give black output.
How to fix it:
- Update ComfyUI first.
- If the output is still black, change the Video VAE block to
minimax_h3_video_vae_fp16.safetensors. - Click Run again.
The face or outfit does not match my photo
What causes it: The most common cause is the Fast model, which is experimental. A weak input photo is the second cause.
How to fix it:
- Switch to the Standard workflow, with 18 steps.
- Use a clear, well-lit, front-facing, full-body photo.
- Click Run again with a new seed.
The sheet looks noisy or soft (Fast workflow)
What causes it: Eight steps may be too few for your photo.
How to fix it: In the Scheduler / Steps block, raise the steps from 8 to 12. If the face is still wrong, switch to the Standard workflow.
Frequently Asked Questions
What to Do Next
Use your sheet as a reference for new images.
Save your best sheet, then follow our guide to character consistency in ComfyUI to use it as a reference for new images.
What to Read Next
To move your character into new poses and angles, read our guide to multi-angle and pose control in ComfyUI. If you want to see what else MiniMax H3 can do, the MiniMax H3 text-to-video and image-to-video workflow and the MiniMax H3 prompt guide are the best next reads. If a run fails because your graphics card runs out of memory, our ComfyUI low VRAM guide has fixes.
Published: 2026-10-07 · Last updated: 2026-10-07 · Settings checked against the two downloadable workflow files.
Join the discussion
Sign in to leave a comment or reply
No comments yet
Be the first to share your thoughts!