
⚡ Quick Answer
To run ComfyUI on RunPod, you rent a cloud computer with a graphics card (a "pod"), start it from RunPod's official ComfyUI template (a ready-made setup), and open ComfyUI in your web browser. You need a RunPod account with at least $10 in credits and no graphics card in your own computer. The three beginner mistakes that burn credits are leaving the pod running, skipping the network volume (extra storage that survives after the pod is deleted), and renting a bigger GPU than you need.
Most beginners hit the same wall. ComfyUI, a free program for making AI images, needs a strong graphics card, and their computer does not have one. You can run ComfyUI on RunPod instead. RunPod is a company that rents powerful computers over the internet, and you control them from a browser tab.
This guide takes you from sign-up to your first image in eight steps. After that, it covers the three mistakes that waste money and the errors you are most likely to see on the way.
Hardware and versions used for this guide: ComfyUI, pod GPU: RTX 4090, 24.
What Do You Need Before You Start?
You need five things:
- A RunPod account.
- At least $10 in RunPod credits (credits are prepaid money that RunPod uses up while your pod runs).
- Any computer with a web browser and an internet connection.
- A free Civitai account and a Civitai API key. You will need the key in Step 6 to download models.
- Up to 30 minutes of patience for your first start. RunPod says a first deploy can take that long.
Here are the terms you will see in this guide:
- GPU is the graphics card. It is the chip that does the heavy math when the AI draws an image.
- VRAM (the memory on the graphics card; an AI model has to fit inside it to run). An RTX 4090 has 24 GB of it.
- Pod is a rented computer in a RunPod data center. It has a GPU, and you control it from your browser.
- Template is a ready-made setup that installs ComfyUI on the pod for you, so you do not have to install anything by hand.
- Civicomfy is the button inside ComfyUI that searches Civitai and downloads models straight onto your pod.
We use SDXL-Turbo as the first model. It is a small, fast AI image model, and it is the one RunPod's own tutorial uses. You can read its model card on Hugging Face.
RunPod charges by the second while a pod is running. In June 2026, an RTX 4090 cost $0.34 per hour on Community Cloud and $0.69 per hour on Secure Cloud. Community Cloud runs on hardware from independent hosts and costs less. Secure Cloud runs in managed data centers (large buildings full of servers) and costs more. Prices change, so check the RunPod pricing page before you deploy.
If you would rather skip the setup and the billing chores, read about Comfy Cloud, the managed alternative.
Do You Need a GPU on Your Own Computer to Run ComfyUI on RunPod?
No. The pod does all the heavy work in RunPod's data center. Your computer only shows the ComfyUI screen in a browser tab, so an old laptop works.
If you have a decent graphics card and want to run ComfyUI at home instead, see how to install ComfyUI on your own PC. If your card is weak, the ComfyUI low VRAM guide shows what you can still run locally.
How to Run ComfyUI on RunPod, Step by Step
Step 1: Create a RunPod account and add credits
RunPod only starts a pod when your account has money in it. Add the credits first so you are not stopped halfway through.
- Go to runpod.io and click the sign-up button.
- Create your account by following the on-screen prompts.
- Open the billing section of the console and add at least $10 in credits.
Step 2: Which RunPod ComfyUI Template Should You Choose for Your GPU?
A template decides what gets installed on your pod. Picking the right one saves you from installing ComfyUI by hand.
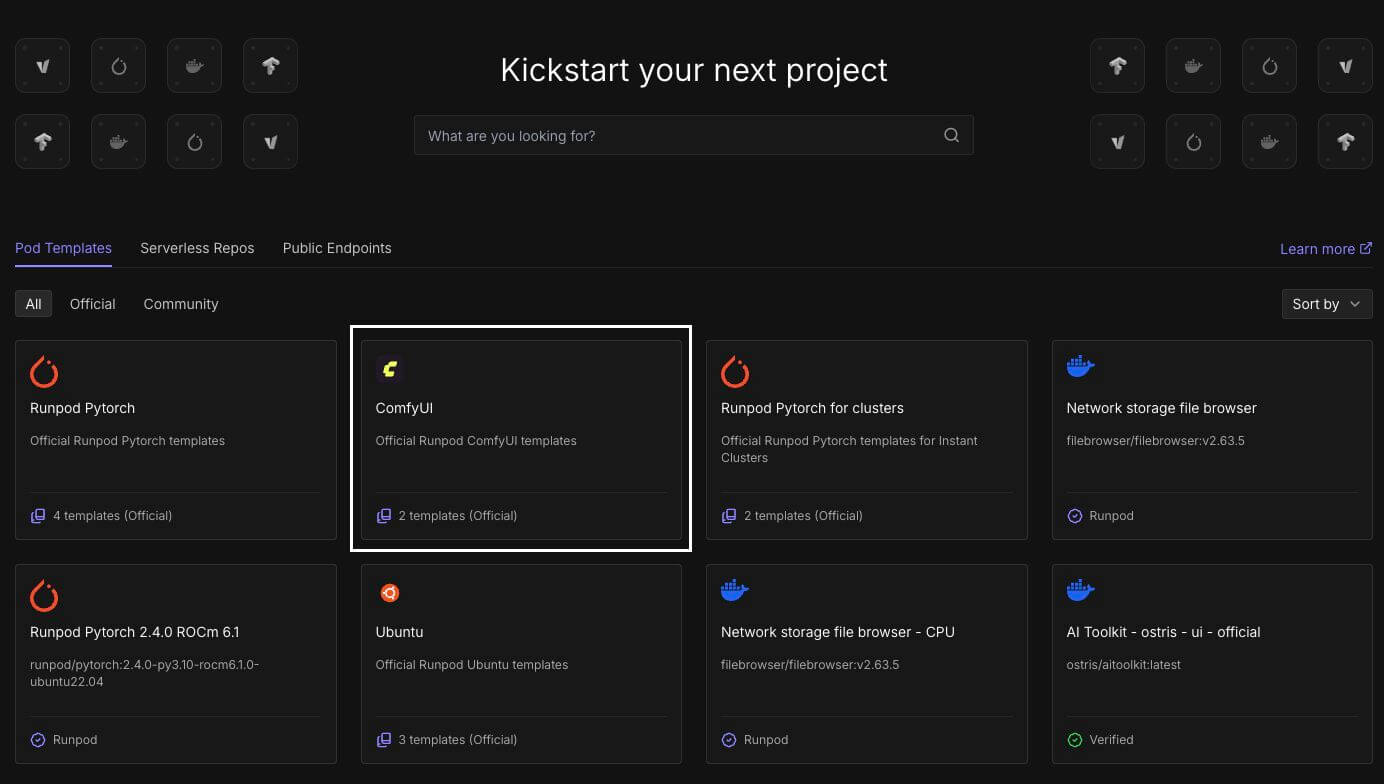
RunPod builds its official ComfyUI templates from one public repository, and they come with the ComfyUI Manager add-on pre-installed. The ComfyUI Manager (a built-in tool that manages add-ons inside ComfyUI) adds a Manager button to the top bar. The Civicomfy button, which you will use to download models in Step 6, sits right next to it.
- In the RunPod console, search for ComfyUI in the templates.
- Pick the template that matches your GPU:
- ComfyUI for standard GPUs such as the RTX 4090, L40 and A100.
- ComfyUI Blackwell Edition for the RTX 5090 and B200.
- Click Deploy on that template.
Step 3: Which GPU and Storage Settings Should You Pick?
The GPU decides how fast your images generate and how much you pay per hour. The storage decides which of your files survive when the pod stops. Choose both before you deploy, because some of these settings cannot be changed afterward.
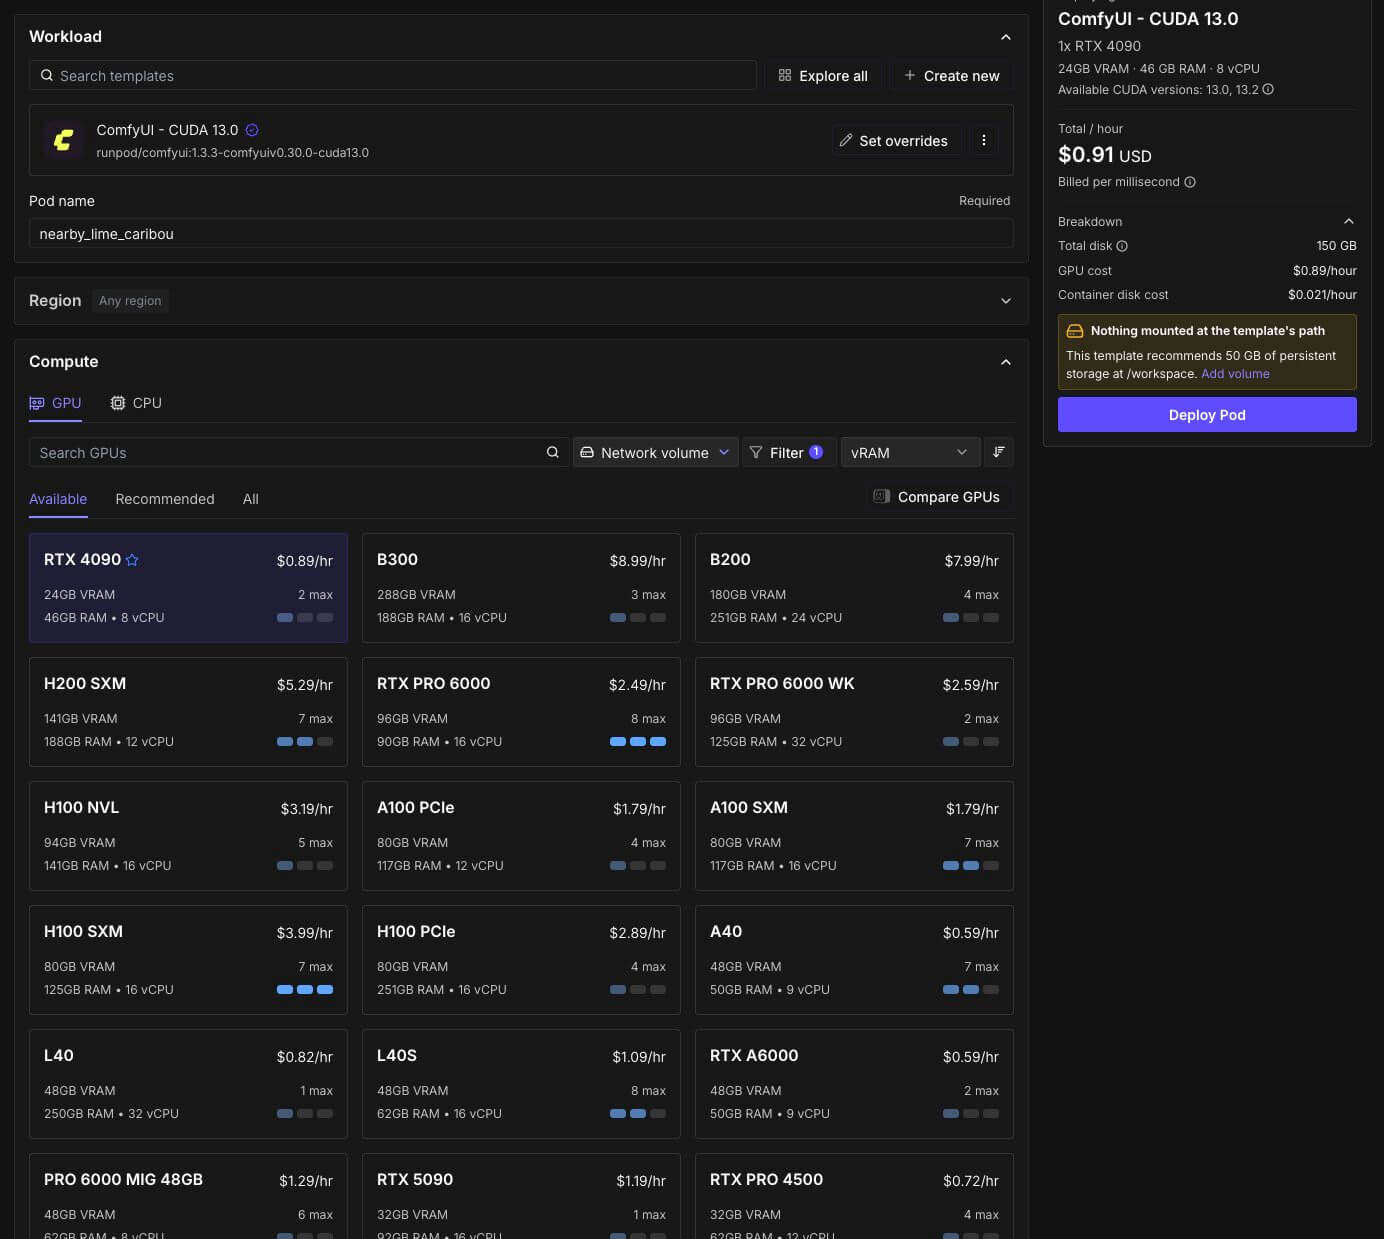
- Choose a GPU. The RunPod docs recommend an L40 or an RTX 4090 for SDXL-Turbo, and an RTX 5090 or B200 if you chose the Blackwell template. For more help choosing, see the best GPU for ComfyUI in 2026.
- Choose the cloud type. Community Cloud costs less. Secure Cloud costs more and runs in managed data centers.
- Set the deployment type to On-Demand. The docs suggest this for flexibility.
- Leave the default disk sizes as they are. The template's defaults are enough for SDXL-Turbo.
- Add a network volume. This step is optional, but it is the one that protects your models. A network volume is storage that lives apart from your pod. You must pick it now, because it has to be attached when the pod is created.
Mistake 2 below explains why the network volume matters.
Step 4: Deploy the Pod and Wait for It to Start
Deploying tells RunPod to build your pod and start ComfyUI on it. Nothing is ready to use yet when you click.
- Click Deploy On-Demand.
- Open the Pods section of the RunPod console. Your new pod appears in the list.
- Wait. The first start can take up to 30 minutes, and later starts are much faster.
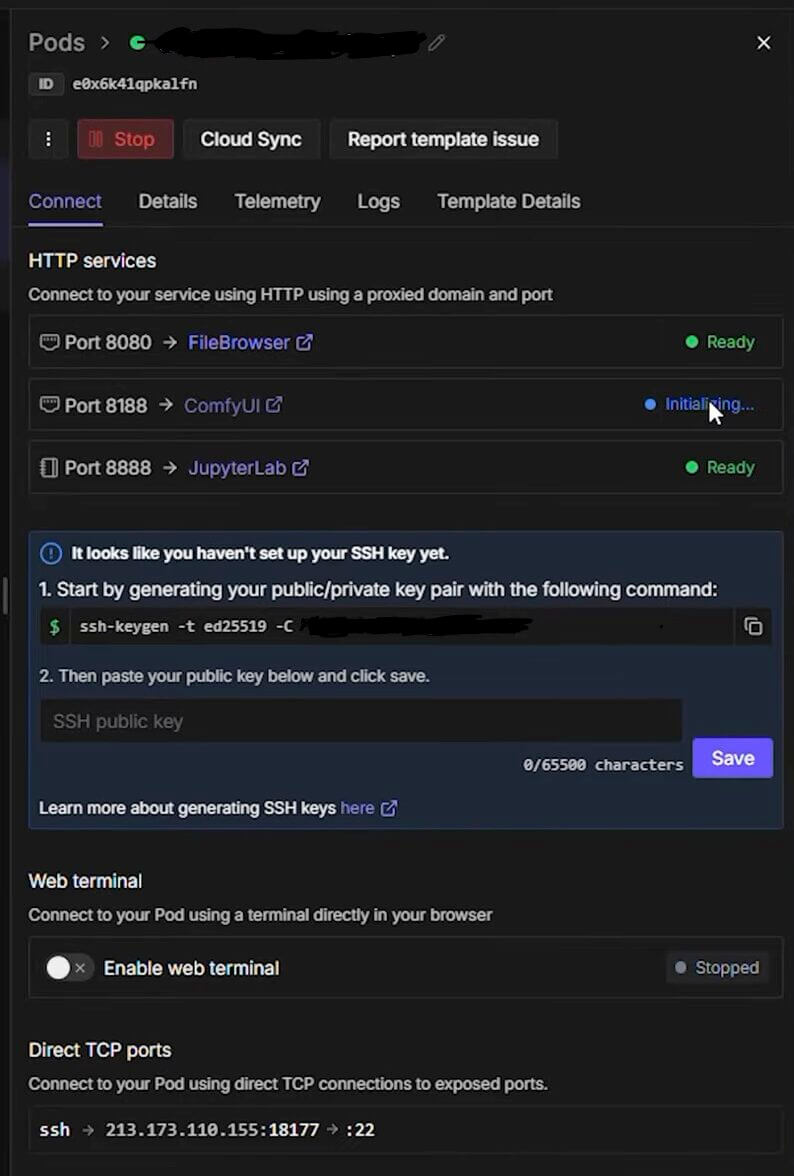
Plan as if the billing meter starts when the pod starts, because a slow first start costs money too.
Step 5: How to Open ComfyUI in Your Browser
ComfyUI runs on a "port" (a numbered door on the pod that a program listens on). ComfyUI uses port 8188, and RunPod gives you a button that opens that door.
- In the Pods section, find your pod and expand it.
- Click Connect.
- Click the last HTTP service button in the list, labeled Connect to HTTP Service [Port 8188].
- ComfyUI opens in a new browser tab. The address looks like
https://[POD_ID]-8188.proxy.runpod.net.
![RunPod Connect panel with the Connect to HTTP Service [Port 8188] button](/ui/blogs-images/run-comfyui-runpod/connect-panel.jpg)
ComfyUI is built from nodes. A node (a rectangular block that does one job, such as loading a model or making an image) is the building piece you will meet in the next step. If you want a tour of the screen first, read the ComfyUI interface overview.
If the button says Not Ready, or the page says Bad Gateway, jump to the troubleshooting section. It usually only needs a few minutes.
Step 6: How to Load a Workflow and Download Your First Model with Civicomfy
ComfyUI does nothing until you give it a workflow. A workflow (a saved layout of connected nodes that does one task, such as turning a text prompt into an image) tells it what to do. We load a ready-made one so you do not have to build anything.
- When ComfyUI opens, the template browser should appear on its own. If it does not, click Workflow in the top right corner and choose Browse Templates.
- Click the Image tab in the left sidebar, then click the SDXL-Turbo template. A set of connected nodes appears on the screen.
- A popup called Missing Models appears. This is normal. The template ships with no models installed.
- Close the popup with the X in the top right corner.
How to Download Models for Your Workflow with Civicomfy
Models are the big files that make ComfyUI draw. You download them straight onto your pod with Civicomfy, a button in the ComfyUI top bar, right next to the Manager button. It searches Civitai (a large site where people share AI models) and downloads what you pick directly to the pod, so nothing passes through your own computer.
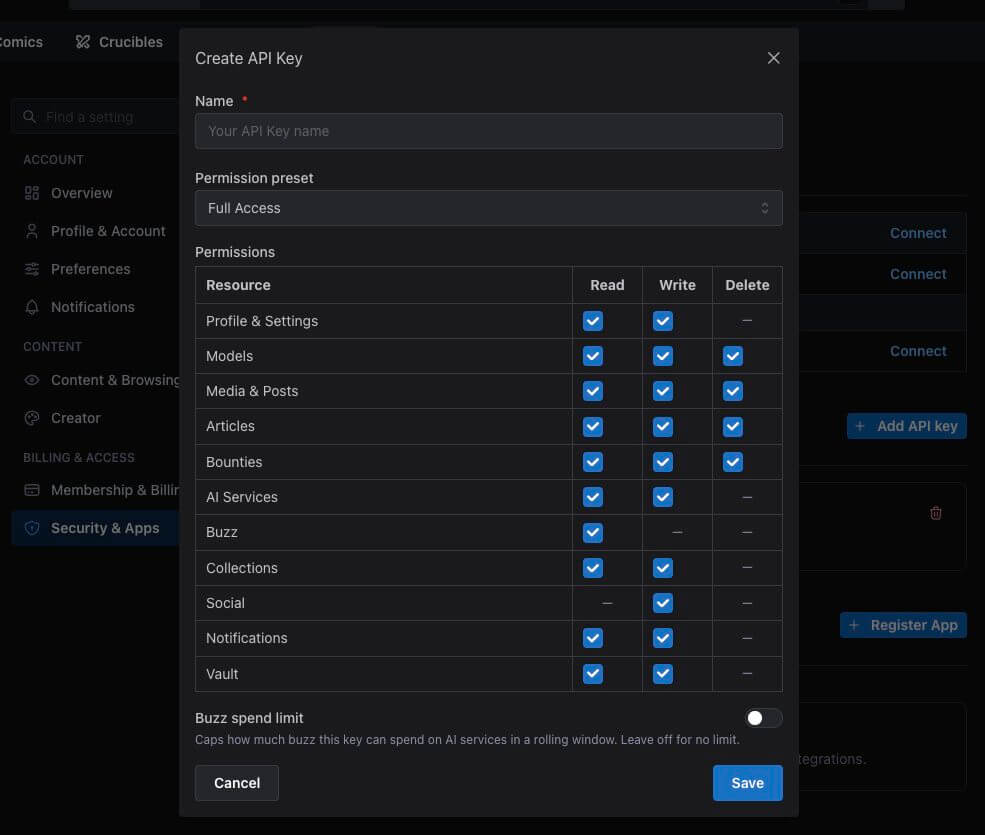
Part 1: Get your Civitai API key
An API key (a long private code that lets one program act on your behalf on another site) is how Civicomfy proves to Civitai that the download request is yours.
- Log in to civitai.com. Create a free account if you do not have one yet.
- Open your Account settings and scroll down to the API Keys section.
- Click the button to add a new key, give it a name such as
runpod-comfyui, and save it. - Copy the key right away. Keep it somewhere safe until you paste it into Civicomfy.
Part 2: Add the key to Civicomfy
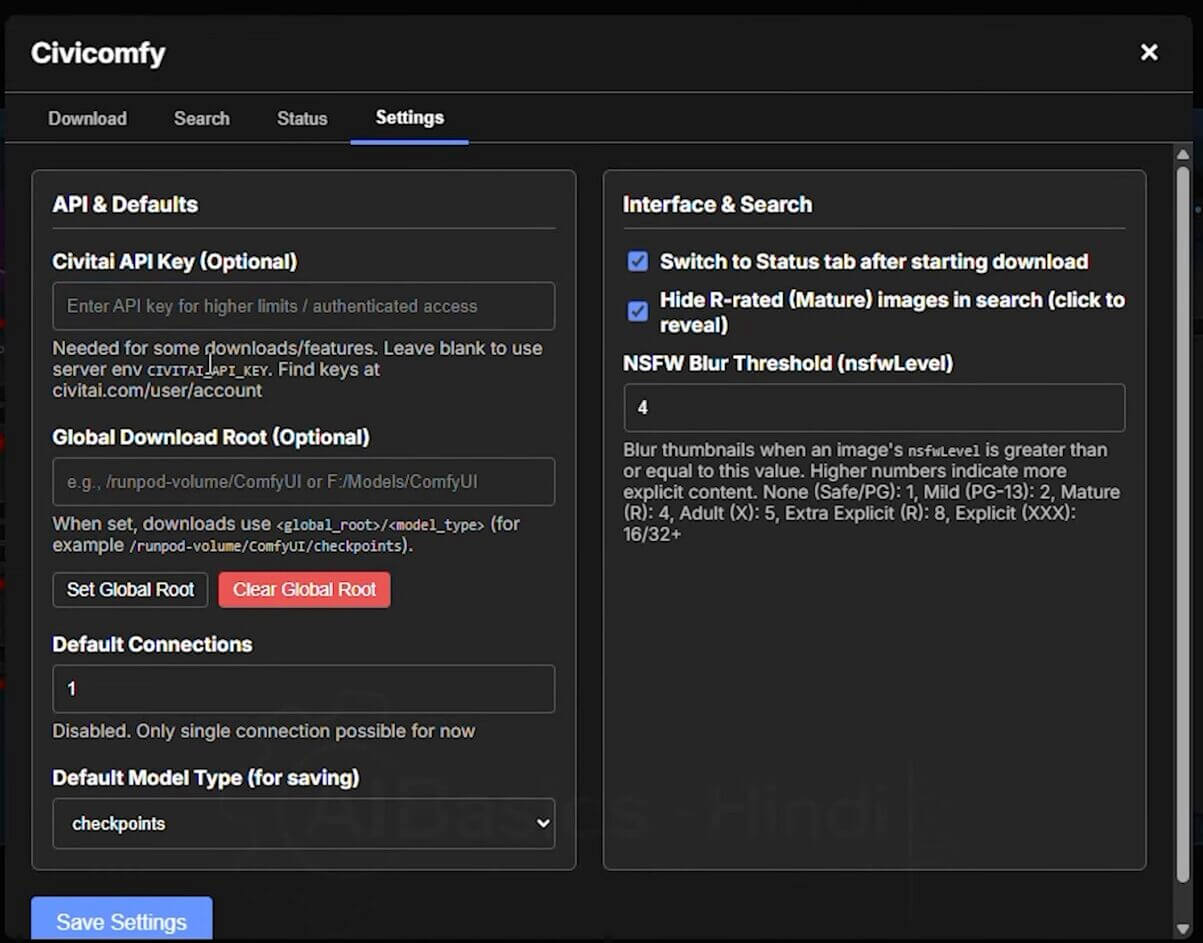
- In the ComfyUI top bar, find the Civicomfy button next to the Manager button and click it. The Civicomfy window opens.
- Open the settings area of the Civicomfy window and paste your Civitai API key into the API key box.
- Save the setting so Civicomfy remembers the key.

Part 3: Search for the model and download it
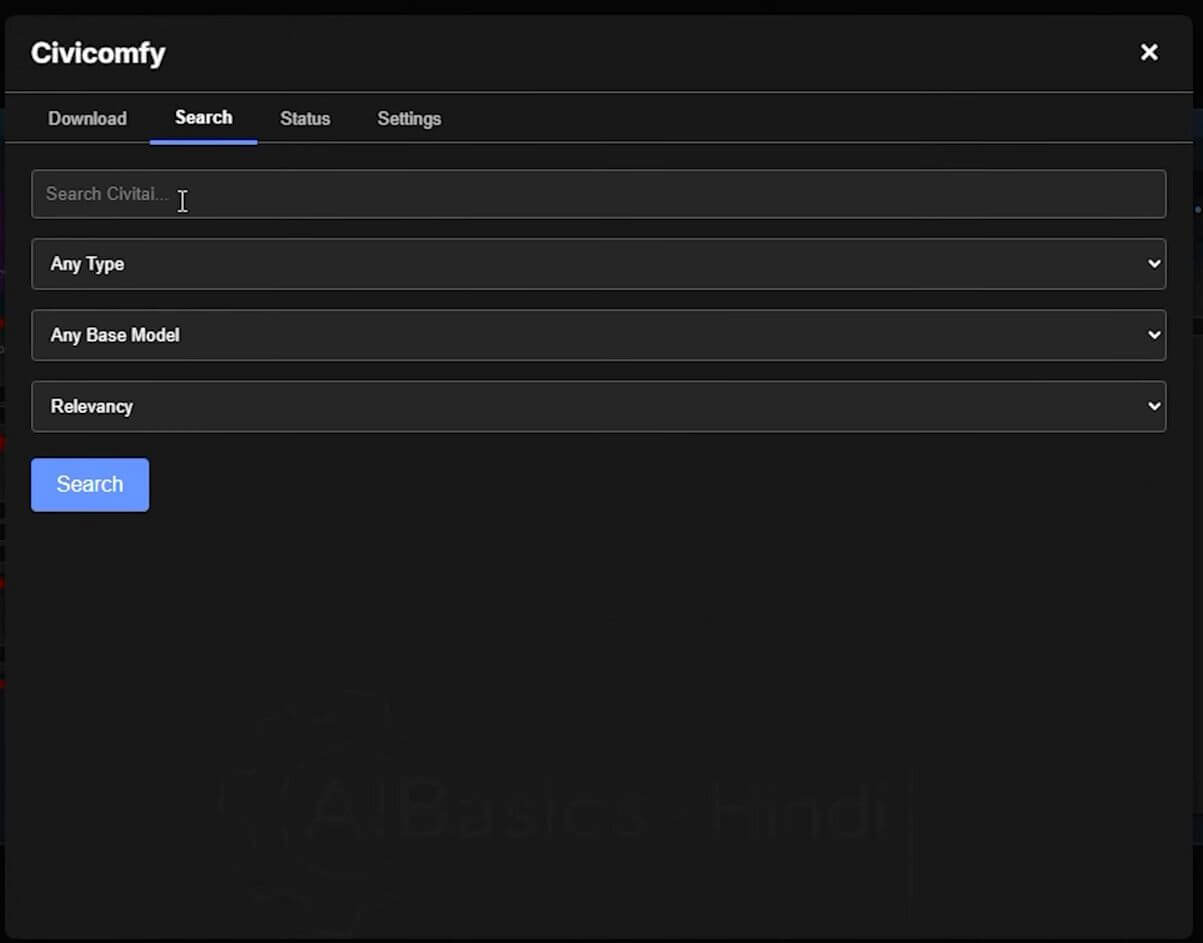
- In the Civicomfy window, open the Search tab.
- Type the name of the model you want in the search box. For this guide, type the name of the model your workflow asked for in the Missing Models popup.
- Look through the results, pick the model you want, and click its download button.
- Open the download list in Civicomfy to see your model. It shows the model while it downloads and after it finishes.
- Wait until the download list shows the model as finished. Big models can take a few minutes.
Part 4: Pick the downloaded model in your workflow
- Refresh your browser tab, or press the R key, so ComfyUI notices the new file.
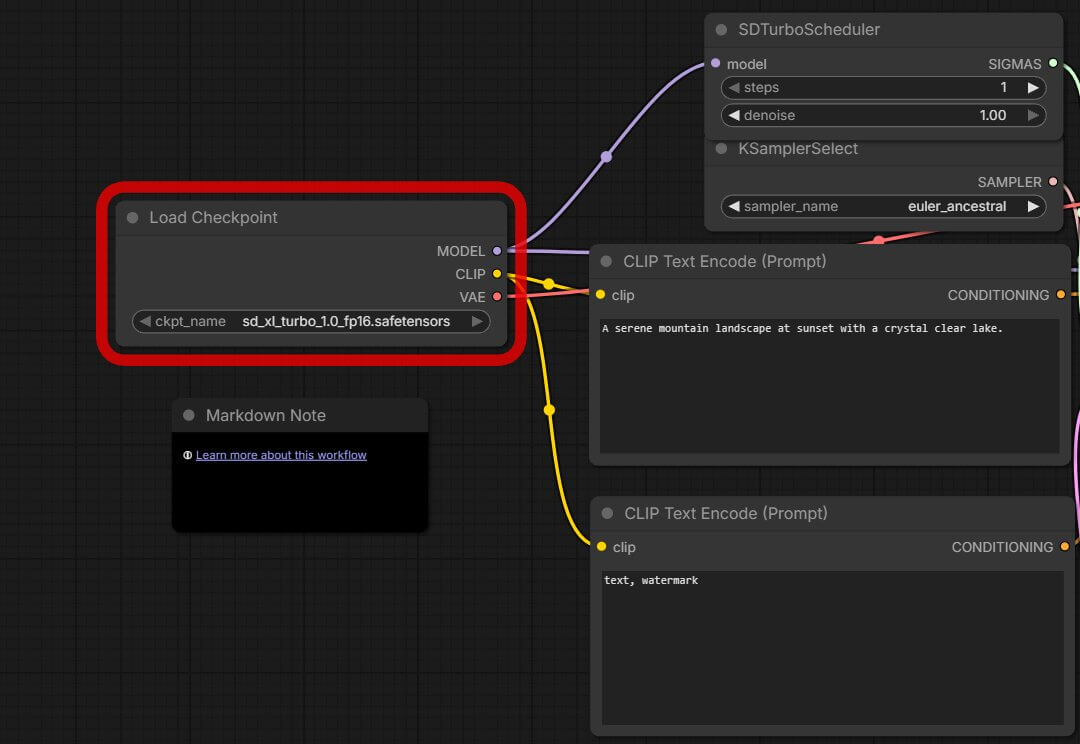
- Find the Load Checkpoint node, the first node on the left. A checkpoint (the main AI model file; it controls what style your images have) is what this node loads.
- Click the ckpt_name dropdown and choose the model you just downloaded. Model files usually end in .safetensors (a safe file format for AI models).
You should now see your model's file name shown inside the Load Checkpoint node.
Step 7: How to Generate Your First Image with ComfyUI on RunPod
This workflow is a text-to-image workflow (you type words, and the AI draws a picture from them).
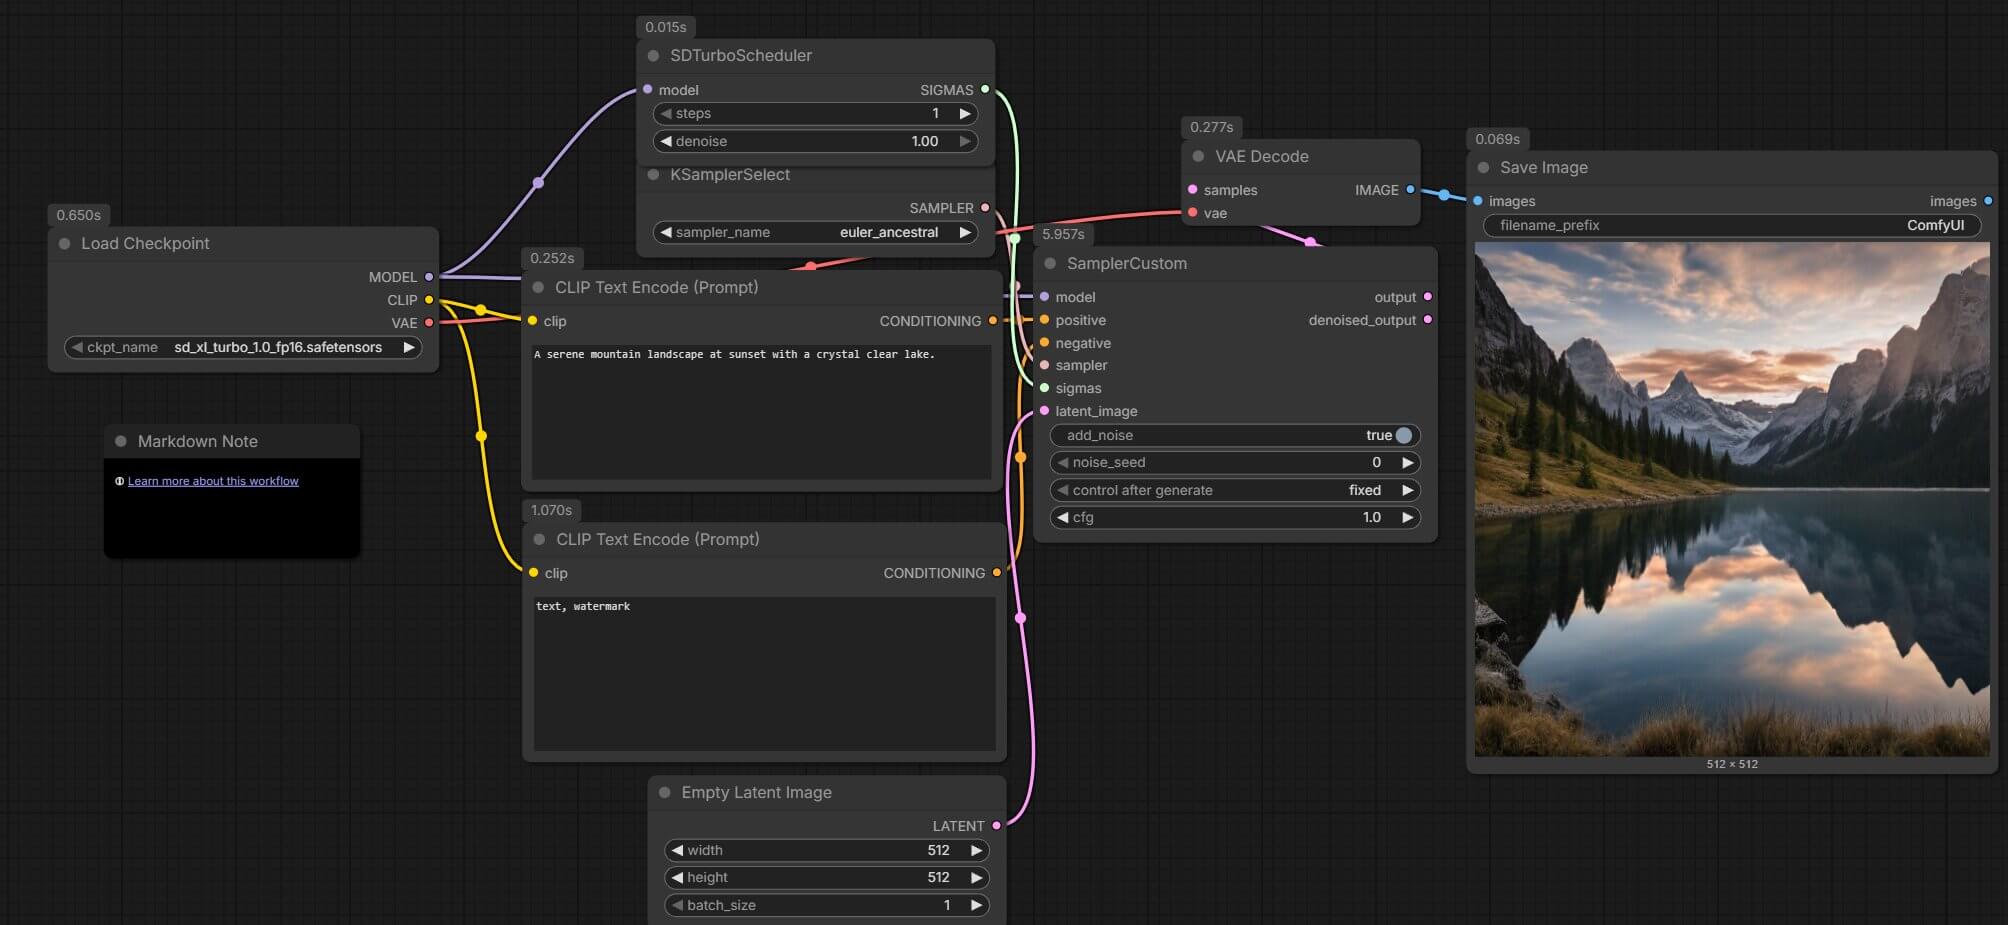
- Find the CLIP Text Encode (Prompt) node. CLIP (the part that reads your words and turns them into numbers the image model understands) is what this node uses.
- Click the text box inside it and replace the default text with your own idea. For example:
A serene mountain landscape at sunset with a crystal clear lake. - Click Run at the bottom of the workflow, or press Ctrl+Enter. This is the queue prompt step (it adds your job to ComfyUI's waiting line).
- Watch the nodes light up as ComfyUI reads your text, loads the model, and draws the image.
- Wait for the picture to appear in the output node. The first run can take a few minutes because the model has to load, and later runs are much faster.
- Right-click the image to save it to your computer.
You now have your first image made on a rented GPU. Do not close the tab yet, because the pod is still running and still costing money.
Step 8: How to Stop Your Pod When You Finish
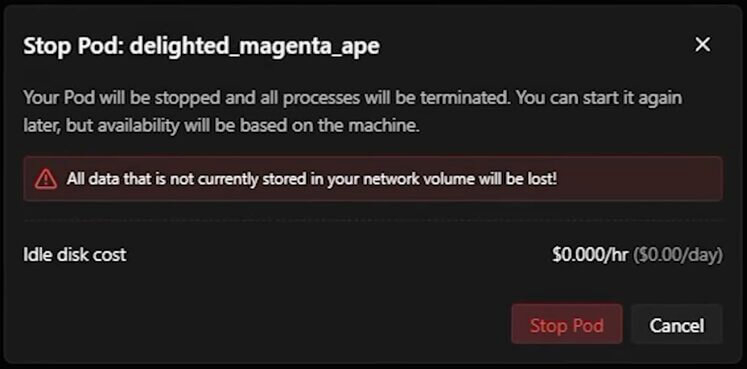
A running pod keeps charging you, even when nothing is happening in ComfyUI. The RunPod docs tell you to stop the pod when you finish, and to download your custom workflows first.
- Save your workflow and download your images. See how to save, load and share a ComfyUI workflow.
- Open the Pods page of the RunPod console.
- Find your pod and click Stop.
- Check that the pod's status changed, so you know the GPU meter has stopped.
What Are the 3 Beginner Mistakes That Burn Your Credits on RunPod?
Each of these costs real money, and each one is easy to avoid once you know about it.
Mistake 1: Leaving the pod running, or terminating when you meant to stop
Stop and Terminate sound alike, but they do very different things:
| Action | GPU billing | Your files |
|---|---|---|
| Stop | Ends | The disk stays, and you keep paying for its storage. |
| Terminate | Ends | The pod and its disk are deleted for good. RunPod keeps no copies. |
| Network volume | Not part of the pod | Stays after a Stop or a Terminate. |
Here is what forgetting costs on an RTX 4090 at the June 2026 rates from earlier:
| Hours left running | Community Cloud ($0.34/hr) | Secure Cloud ($0.69/hr) |
|---|---|---|
| 10 hours | $3.40 | $6.90 |
| 24 hours | $8.16 | $16.56 |
The fix: Stop the pod every time you finish. RunPod bills by the second, so a short session costs very little. Make a habit of checking the Pods page before you close your browser.
Mistake 2: Skipping the network volume, so you re-download models every session
When you terminate a pod, its disk is deleted. That includes the models you downloaded with Civicomfy. Without a network volume, your next pod starts empty, and you wait through the setup and the download again while the meter runs.
A network volume lives apart from any pod. If you terminate the pod, the volume stays. That is why models, outputs and settings kept on it survive between sessions.
The fix: Create the network volume in Step 3, before you deploy. You cannot add one to a pod that already exists. After your first model download, check that the model is still there when you start the pod again.
Mistake 3: Renting a bigger GPU than the model needs
A bigger GPU costs a lot more per hour, and SDXL-Turbo does not need one. An H100 with 80 GB starts at $1.99 per hour on-demand, while an RTX 4090 starts at $0.34. Ten hours on an H100 costs about $19.90, compared with $3.40 to $6.90 on an RTX 4090.
The fix:Start with an RTX 4090 or an L40, as the docs recommend. If you later see an "out of memory" error (the model does not fit in the GPU's memory), first lower the image size or the batch size (how many images ComfyUI makes at once). Rent a bigger GPU only if that does not help.
What Should You Do If ComfyUI Won't Open or Shows an Error?
Running into something not covered below? Our general ComfyUI troubleshooting guide covers the errors that show up across every workflow.
"Not Ready" on the port 8188 button
What causes it: ComfyUI is still starting on the pod.
- Wait 2 to 3 minutes and refresh the page.
- On a first deploy, keep waiting. It can take up to 30 minutes.
- Open the pod logs in the console (a running text record of what the pod is doing) and look for errors.
"Bad Gateway" when you first connect
What causes it: Your browser reached the pod before ComfyUI finished starting.
- Wait a minute or two and refresh. Community guides say 30 to 60 seconds after a restart, while the RunPod docs say 2 to 3 minutes.
- Check the Logs tab for errors.
- If it keeps happening, stop the pod, wait about 15 seconds, and start it again.
"Missing Models" popup after loading a workflow
What causes it: The template has no models installed yet.
- Close the popup with the X. Do not use its download button.
- Click the Civicomfy button next to Manager, search for the model named in the workflow, and download it. Your Civitai API key must be saved in Civicomfy first.
- Refresh the tab or press R, then pick the model in the Load Checkpoint node.
Civicomfy download does not start or fails
What causes it: The Civitai API key is missing or wrong, or the download has not finished yet.
- Open Civicomfy and check that your Civitai API key is pasted in and saved.
- If the key may be wrong, create a new one on Civitai and paste it in again.
- Check the download list to see whether the model is still downloading. Big files take a while.
Frequently Asked Questions
What to Do Next
Stop your pod, then build your own workflow next time.
Once the pod is stopped, follow the basic text-to-image tutorial to build a workflow from scratch the next time you start it.
What to Read Next
If your pod is running well, the three guides worth reading next are the ComfyUI interface overview, so the screen feels familiar, our guide to checkpoint models, so you know which models to download on your pod, and the troubleshooting guide for errors that are not RunPod-specific.
— Written as a personal recommendation from the Earngenix team.
Published: 2026-10-12 · Last updated: 2026-10-12 ·
Join the discussion
Sign in to leave a comment or reply
No comments yet
Be the first to share your thoughts!