Run MiniMax H3 Text to Image in ComfyUI Locally: Update First, Then Load This 6-Step Workflow
Update ComfyUI, download four model files (about 57 GB), and generate your first picture. Every block in the workflow is explained for first-time users.
Text to image means you type a description and an AI model draws it. To run MiniMax H3 text to image in ComfyUI (a free program for making AI images on your own computer), update ComfyUI, download four model files (about 57 GB in total), load the ready-made setup file and generate your first picture.
MiniMax H3 Image came out on November 10, 2026, and a search for “MiniMax H3 text to image” now shows several tools with almost the same name. This guide covers the one built into ComfyUI itself. By the end, you will have it running on your own computer, and you will know what each part of the workflow (a saved set of connected blocks that tells ComfyUI how to make an image) does.
The other tools you may see are different things. MiniMax H3 Image Studio is an add-on made by other people that pulls single frames out of the MiniMax H3 video model. The MiniMax H3 API sends your prompt to an online service, where the model runs on someone else’s computer. P-H3-Image is a separate model made by Pruna AI. None of them use the files in this guide.
File names and sizes checked against Hugging Face on November 11, 2026.
What Do MiniMax H3 Text to Image Results Look Like? (4 Examples)
Before you download anything, here is what to expect. Each image below was made with the workflow in this guide. Every card shows the prompt (the text you type to describe the image) so you can copy it, plus the settings used, including the seed (a number that picks which version of the picture you get).
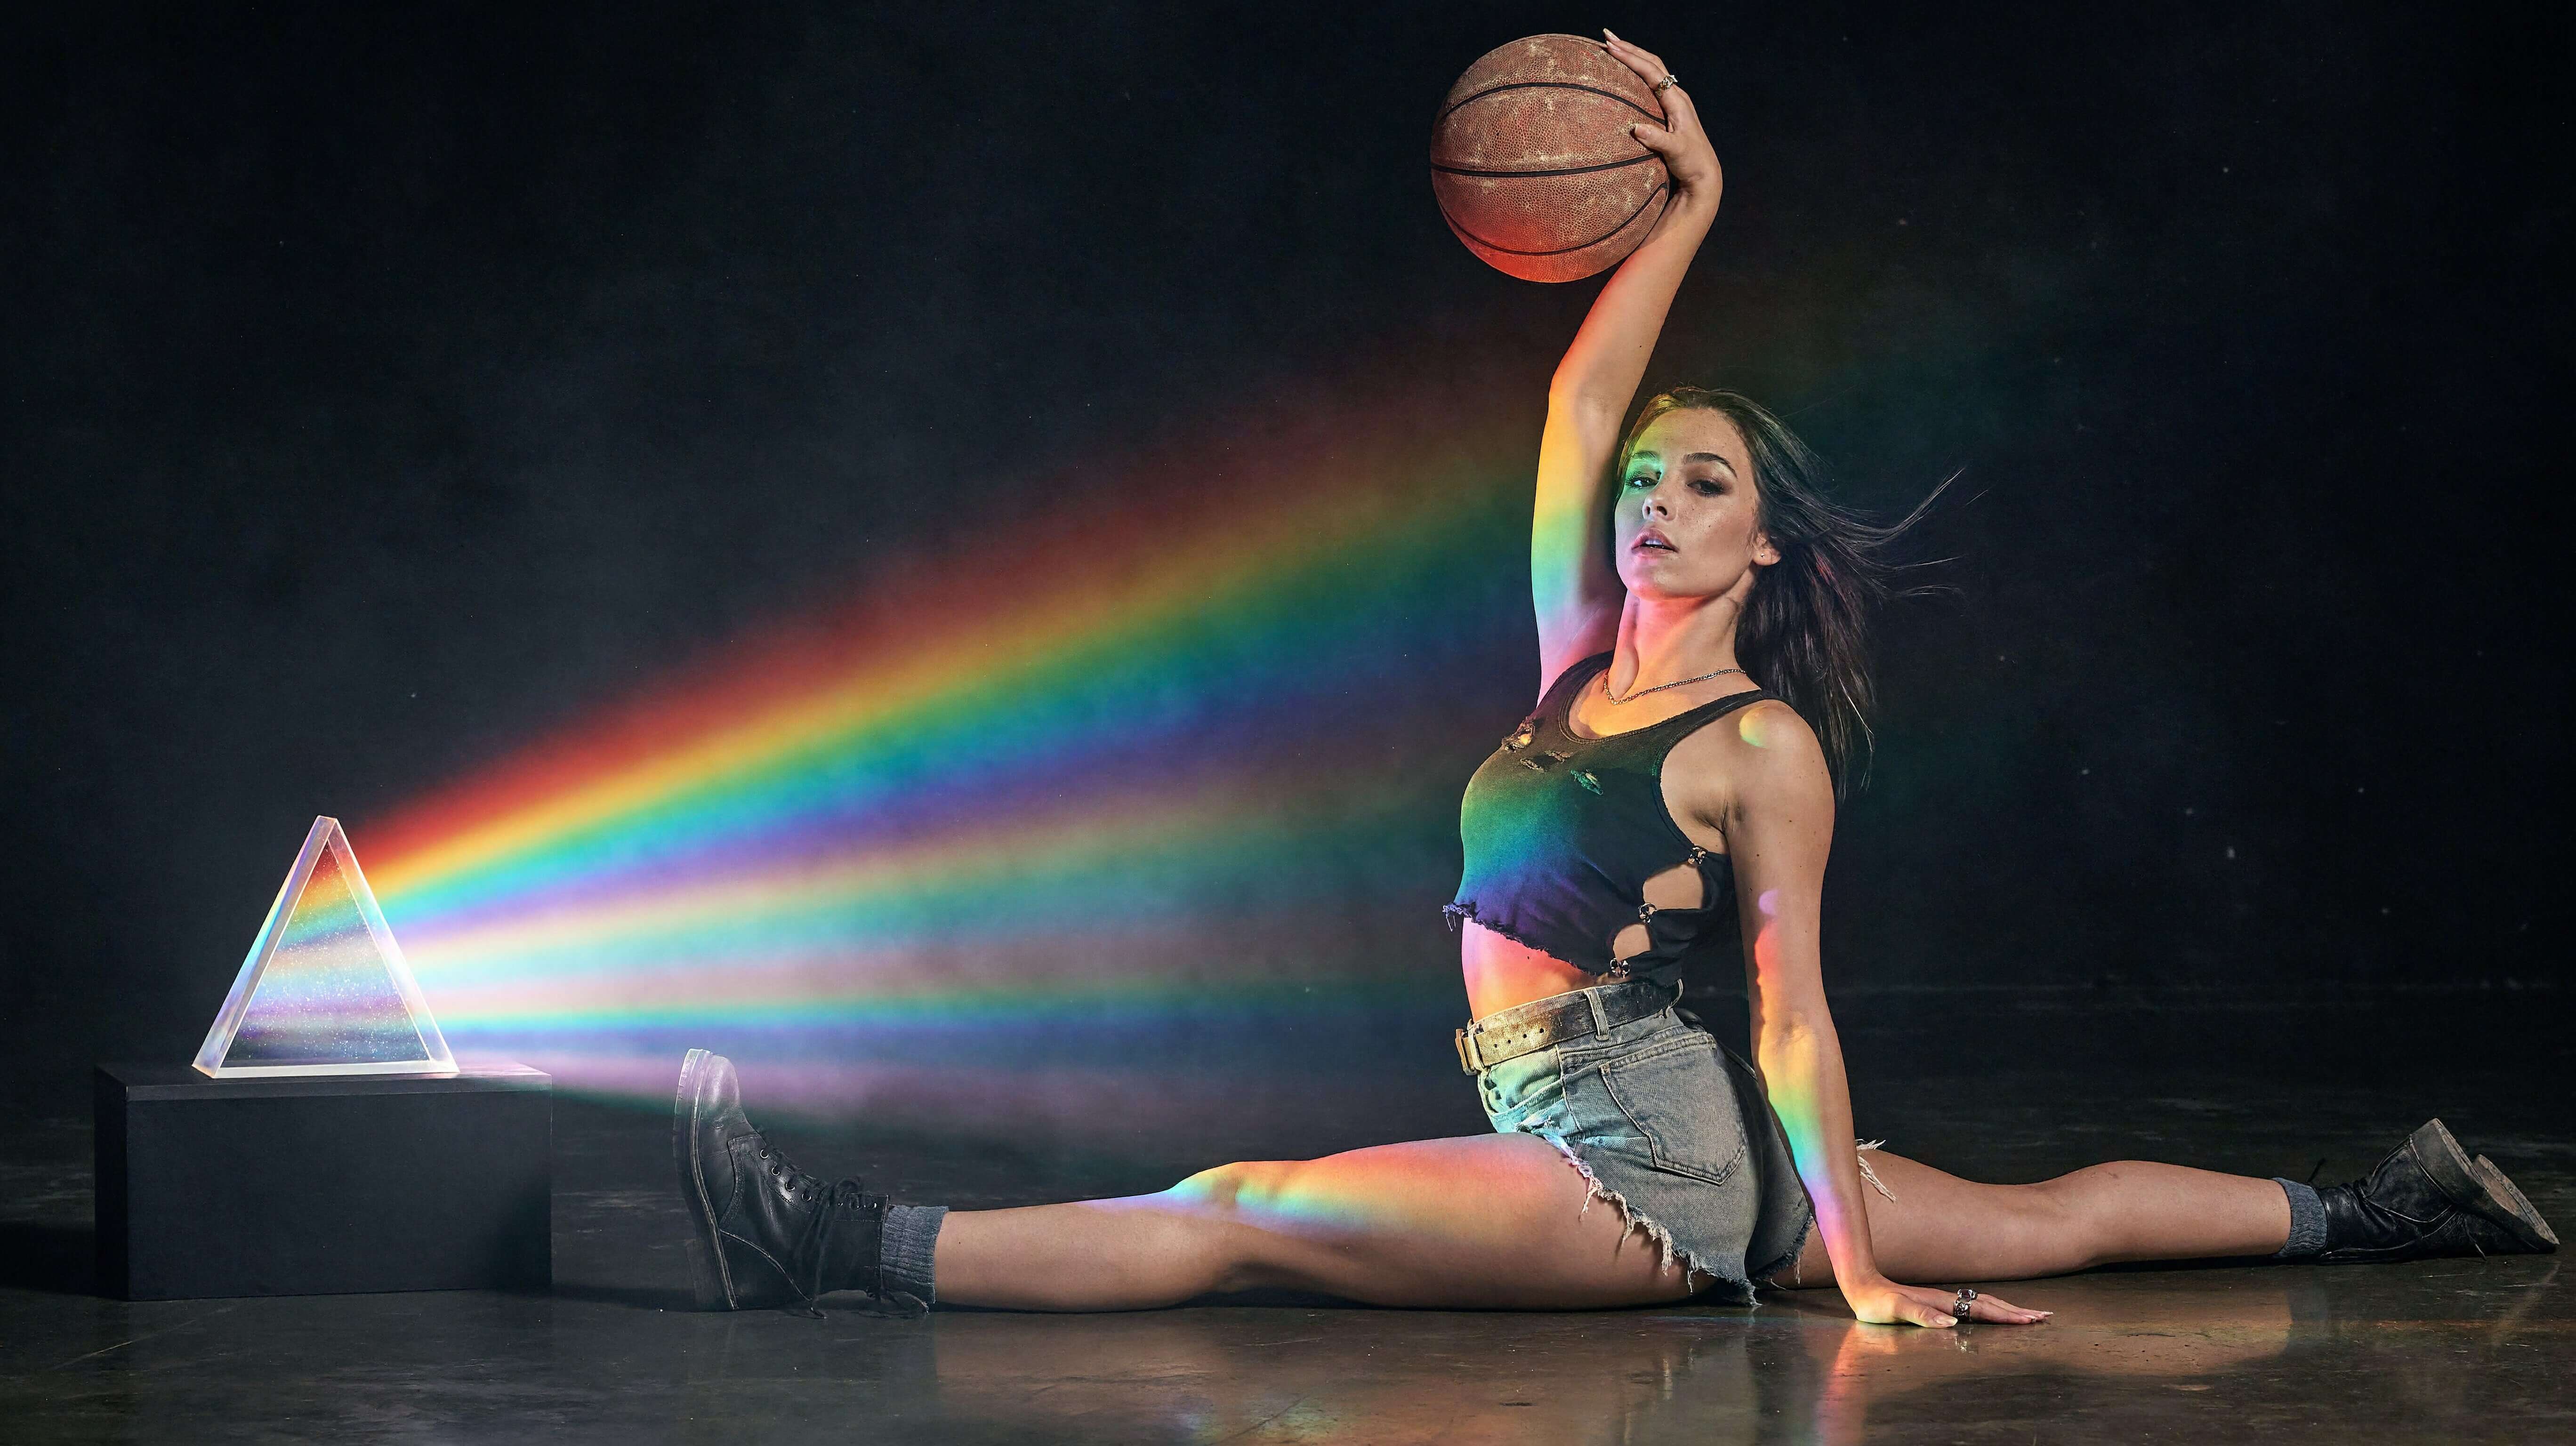
Example 1: Fashion Photo Lit Only by a Prism
🔍 Click to zoom
A pitch-black studio where a glass prism is the only light source.
A realistic, ultra-detailed editorial fashion photograph shot in a completely pitch-black, empty studio room, captured on a full-frame camera with an 85mm f/1.4 lens on a tripod, tack-sharp focus on the model with a soft falloff into total darkness. The room has no lamps, no windows, no ambient light, no fill light and no white light of any kind: the prism is the only light source in the entire scene. A clear, polished glass triangular prism stands on a low, matte black square pedestal on the floor at the left side of the frame, angled toward the model. The prism glows softly from within, as if it were the source of all the light in the room, and a vivid, sharp rainbow spectrum pours out of its right-hand face in a wide, glowing cone, with clean, separate bands of red, orange, yellow, green, blue, indigo and violet sweeping through fine haze and floating dust like thin luminous ribbons. Each band shines brightest near the prism and slowly spreads and softens as it travels. These rainbow rays are the only illumination, and they fall directly on the model, so that distinct stripes of red, orange, yellow, green, blue and violet light cross her whole body, her face, her hair and the basketball, and reflect in long, soft colored streaks and mirror-like reflections on the glossy dark concrete floor around her. Everything outside the rays falls into deep, rich black shadow. A soft prismatic glow gathers around the prism, with tiny sparkles on its polished edges. A young adult woman in her mid-twenties sits low on the floor in the right two-thirds of the frame, in a strong, athletic and graceful front split on the ground: her front leg is stretched straight out along the floor toward the prism, her back leg is stretched straight behind her along the floor in the opposite direction, both legs fully flat on the concrete and fully visible, with her hips low and touching the floor, her toes pointed, and her boots resting on the ground. Her torso is upright and slightly arched with her chest lifted and her shoulders open. Her right arm is stretched straight up above her head, holding the worn basketball high at the top of the frame with her fingers spread wide around it, while her left hand is planted flat on the floor beside her hip for support. Her chin is raised and her face is turned toward the camera with a fierce, focused, confident expression and her lips slightly parted. Her long dark hair falls loosely over her shoulders and back, with a few strands lifted by a light breeze and catching tiny spots of colored light, and a thin low layer of haze drifts across the floor around her legs. She has natural skin with visible fine pores, light freckles, soft highlights on her cheekbones, defined brows, subtle smoky eye makeup and a soft nude-brown lip, and the colored light wraps over her stretched thighs and arms in soft, realistic gradients, with the rays crossing her body in diagonal stripes. She wears a deliberately rugged, distressed streetwear look that is not athletic: a cropped, washed-black cotton tank top with a raw-cut hem, frayed edges, small tears across the chest, and two side cutouts at the ribs held with small silver safety pins, and a pair of very short high-waisted denim shorts, heavily faded, with ripped holes across the thighs, frayed white threads at the hems, and a small cutout at the hip, with a worn leather belt and a tarnished silver buckle. She wears a thin chain necklace, chunky silver rings, scuffed black leather combat boots with loose laces and slouchy rolled-down socks, and the colored light shows the texture of the torn denim and frayed cotton in sharp detail. The basketball is a worn, scuffed, vintage orange-brown leather ball with faded black seams and no logos or brand marks, its pebbled surface covered in dust and scratches, with small spectral highlights glinting across it where the rainbow rays touch it. The composition is a wide, low shot with the glowing prism on its pedestal in the left third, the rainbow fan sweeping to the right across the dark, hazy air, and the model in her floor split in the center-right, with her whole body, both legs, both boots and the raised ball fully inside the frame. The camera sits very low, close to floor level, which makes the split look wide and powerful and shows the glossy floor reflections. Shallow depth of field, creamy black background, and fine film grain. The color palette is deep black and charcoal with saturated, clean rainbow colors, warm orange from the ball and natural skin tones in the colored light. The mood is strong, mysterious, artistic, edgy and cinematic, like a high-end magazine sports-fashion campaign. High dynamic range, sharp focus on her face and the ball, realistic fabric texture, true-to-life photography, lit only by the prism's rainbow light, no white light, no other light sources, no text, no logos, no watermark.
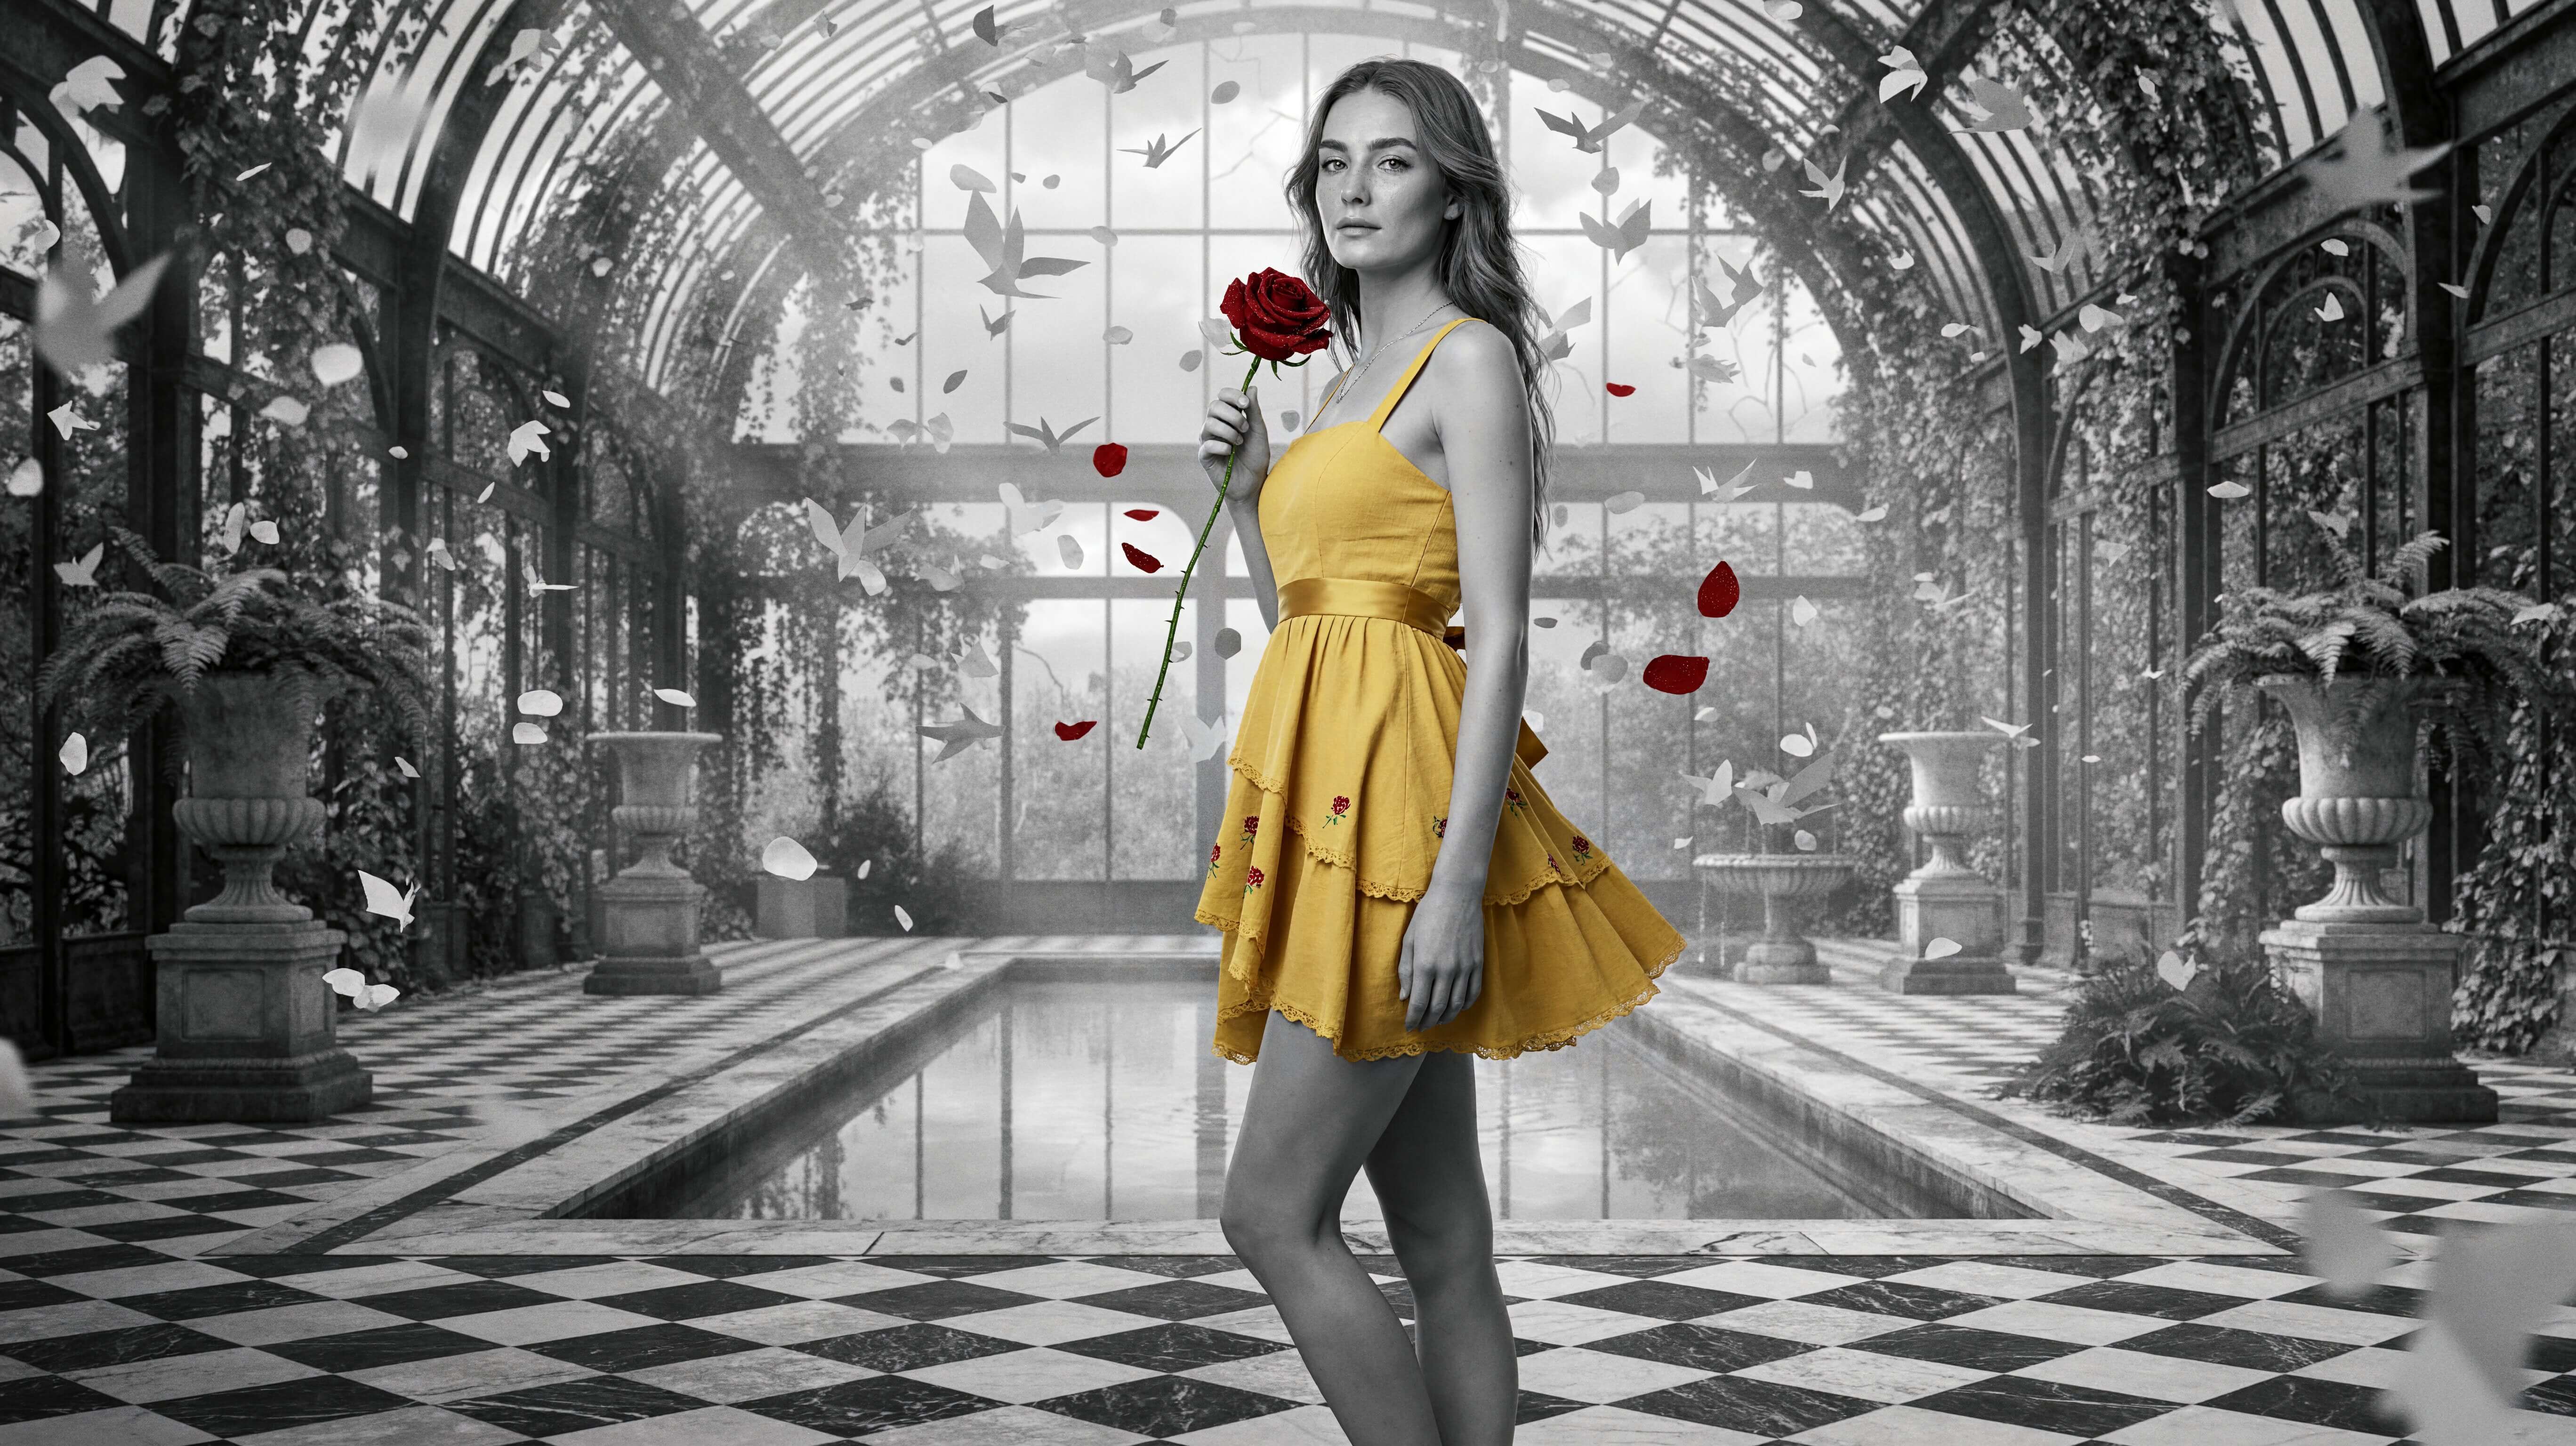
Example 2: Black and White Portrait With Only a Red Rose and Yellow Dress in Color
🔍 Click to zoom
Selective color: everything is greyscale except the rose and the dress.
A realistic, ultra-detailed fine-art editorial portrait in dramatic selective color: the entire image is rendered in rich, high-contrast black and white film tones with deep blacks, silvery highlights and fine film grain, except for exactly two elements that glow in full, saturated color: a single deep crimson rose and a sunshine-yellow dress. Everything else, including the model's skin, hair, eyes, lips, the architecture, the plants, the floor, the water and the sky, is pure monochrome greyscale with no color tint at all. Shot on a medium-format camera with an 80mm f/2 lens, tack-sharp focus on the model's face, the rose and the dress, with a soft, creamy falloff in the background. A young adult woman in her mid-twenties with natural, understated beauty stands barefoot on a black-and-white marble checkerboard floor in the center of a grand, ruined Victorian glasshouse conservatory that nature has slowly reclaimed. She has fresh, dewy skin with visible fine pores and a light scatter of freckles across her nose and cheeks, soft natural brows, no heavy makeup, only a hint of mascara and a natural lip tone that looks pale grey in the monochrome, and her long, soft, wavy hair falls over her shoulders, with a few loose strands lifted by a gentle breeze. Her expression is calm, quietly confident and a little dreamy, and she looks softly toward the camera in a graceful three-quarter turn, her head slightly tilted. In her right hand, held up gently near her chest and chin, she holds one long-stemmed rose, the only fully colored flower in the world: a deep, velvety crimson rose in full bloom, with layered, silky petals curling at the edges, fine veins, a few clear dewdrops catching the light, and a long green-thorned stem that glows in color against the grey, while a few loose crimson petals drift slowly through the air beside her. Her left hand rests lightly at her side, with her fingers softly curled and relaxed. She wears a creative sleeveless mini sundress in a warm, saturated sunshine-yellow, the second color element of the image: a fitted bodice with a square neckline and thin shoulder straps, a high waist with a satin tie-back bow, and a playful tiered, asymmetrical skirt that ends in a scalloped, lightly ruffled hem above the knee, made of soft cotton voile with delicate lace trim, tiny hand-embroidered red rosebuds scattered across the skirt, and a soft, natural fabric drape that lifts and ripples in the breeze. The yellow fabric glows warmly against the grey world, with realistic seams, stitching and light folds. She wears a thin, delicate silver chain and nothing else, and her bare feet rest on the cool marble. The background is the creative heart of the scene, a hauntingly beautiful, dreamlike monochrome world: towering, curved wrought-iron arches and a vaulted glass roof, with many cracked and missing panes, overgrown with grey ivy and hanging vines, tall stone urns with wild ferns, a broken marble fountain, a long, still reflecting pool along one side of the checkerboard floor that mirrors the arches and the model in soft grey, and a huge arched window behind her filled with a pale, cloudy sky. Hundreds of delicate paper petals and a flock of small, folded paper birds hang frozen in the air all around her at different distances, drifting upward as if time has stopped, all in soft grey and white, with the ones closest to the camera blurred into soft bokeh. A faint mist rolls across the floor and the pool. The light is soft, natural, directional window light from the large arched window behind and to the upper left, with long, glowing shafts of light cutting through the haze, a gentle rim light along her hair and shoulders, and soft, flattering shadows on her face, creating the dramatic, timeless look of classic black-and-white film portraiture. The composition is a vertical, full-length shot with the model slightly right of center, the glasshouse arches creating strong leading lines toward her, symmetry in the floor and the reflection, and the camera at about chest height, slightly low, which gives her a graceful, elegant presence. The mood is poetic, romantic, mysterious and timeless, as if the last color in the world belongs to her and the rose. High dynamic range, realistic skin and fabric texture, sharp focus on the face, the rose and the dress, true-to-life photography, selective color with only the crimson rose and the yellow dress in color, everything else strictly black and white, no colored skin, no colored background, no text, no logos, no watermark.
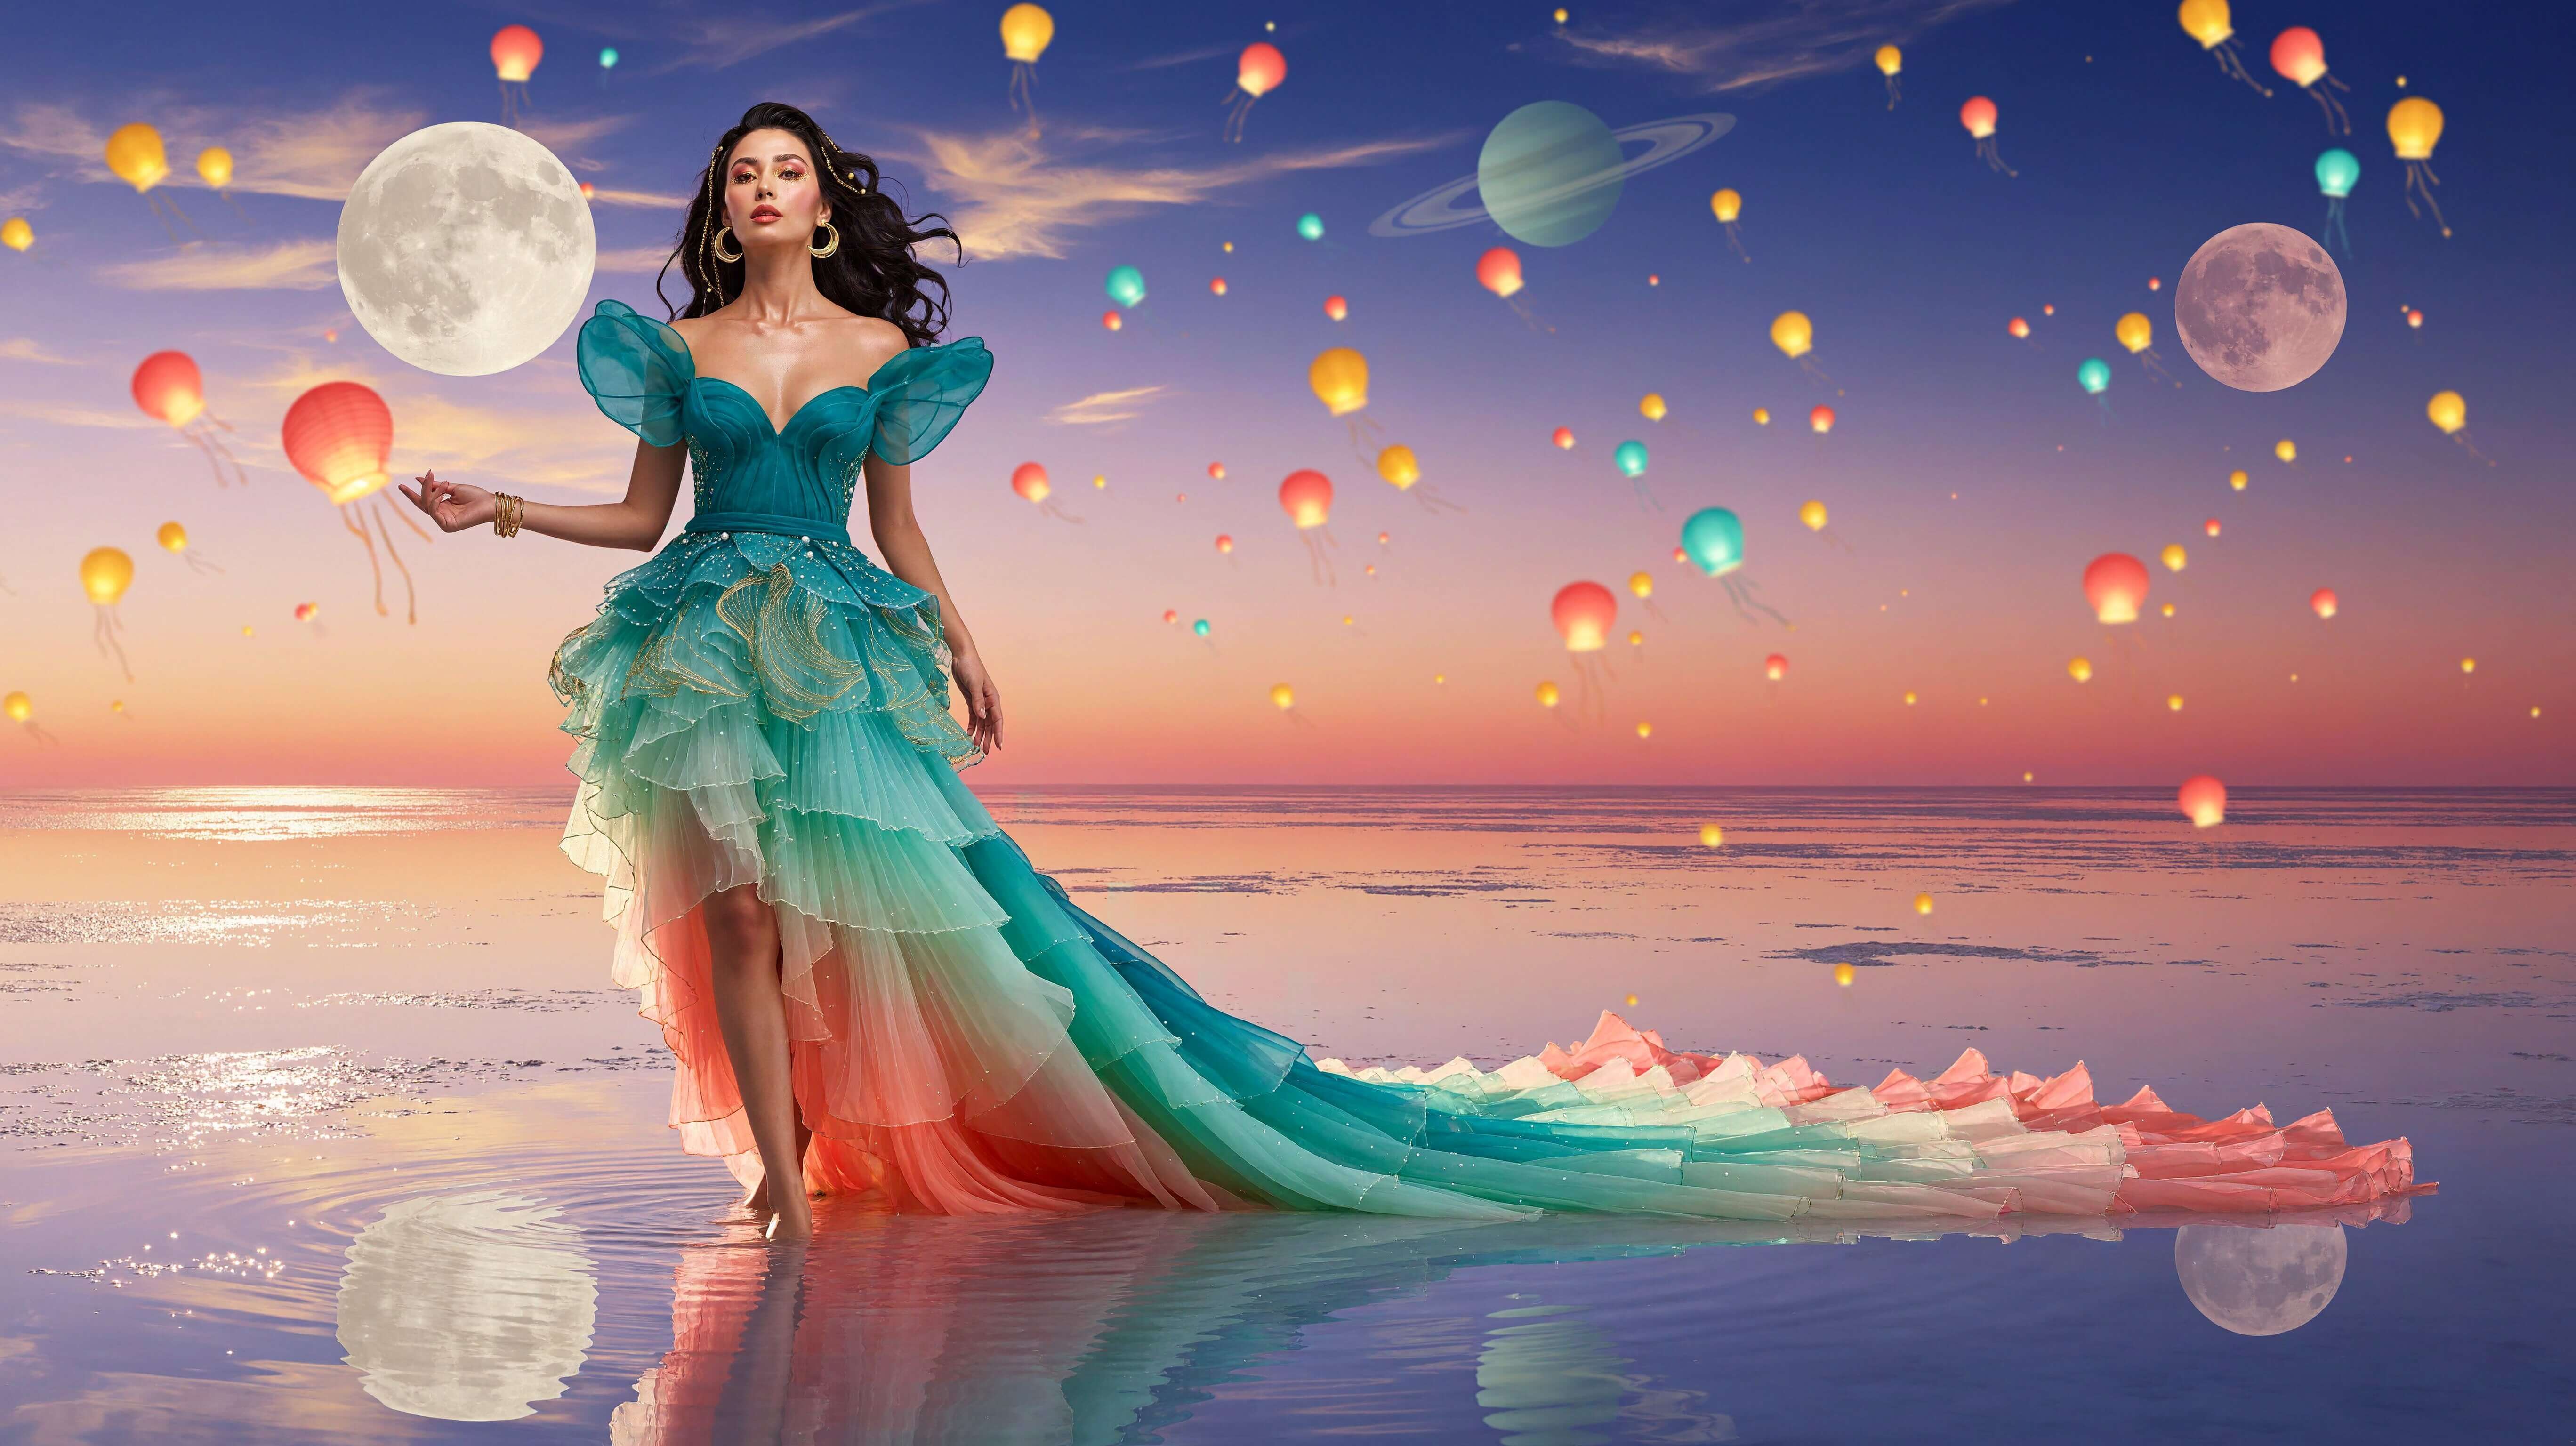
Example 3: Surreal Couture Fashion on a Mirror-Like Salt Flat
🔍 Click to zoom
A surreal twilight scene with giant moons, floating lanterns and a mirror-like salt flat.
A realistic, ultra-detailed surreal fantasy fashion photograph, shot like a high-end couture campaign on a medium-format camera with a 50mm f/2.8 lens at a slightly low angle, vivid saturated colors, crisp detail across the whole frame and a soft atmospheric glow. The scene is an endless salt flat covered by a few centimeters of perfectly still water, acting as a flawless mirror that reflects the entire sky and everything in it, so that the horizon disappears and the world looks doubled, top and bottom. The sky is a dreamy twilight gradient just after sunset, glowing from warm apricot and coral at the horizon through rose pink and soft lavender to deep indigo at the top, with fine, thin streaks of cloud lit gold. Hanging low in this sky are huge, impossible celestial bodies: a giant pale cream moon with delicate craters on the left, a second smaller moon in dusty pink on the right, and a ringed, pastel-teal planet in the distance, all of them mirrored in the water below. Hundreds of glowing paper lanterns in warm gold, coral and soft turquoise drift slowly upward through the air at different heights and distances like luminous jellyfish, with trailing ribbons that curl beneath them, the nearest ones blurred into soft glowing bokeh and the faraway ones tiny points of light. A tall young adult woman in her mid-twenties stands in the center of the frame, slightly left of center, walking slowly toward the camera through the shallow water in a graceful, powerful stride, caught mid-step with one foot lifting from the water and a ring of fine ripples spreading outward from her ankles. She has a striking, elegant look with radiant, dewy skin showing natural pores, defined cheekbones, strong arched brows, softly lit brown eyes with long lashes, a graceful long neck, and a calm, regal, slightly dreamy expression with her chin lifted and her gaze directed just past the lens. Her makeup is bold and artistic: a sweep of shimmering coral and gold eyeshadow, a fine line of gold glitter along her lower lash line, a rosy glow on her cheeks and a satin deep-coral lip. Her long, dark hair is swept back and flows behind her in the breeze in thick, glossy waves, with a few fine golden braids woven through and tiny gold beads catching the light. She wears a monumental, sculptural couture gown made of layers of translucent silk organza and chiffon in a gradient that matches the sky, shading from deep turquoise at the bodice through aqua and soft mint to warm coral and glowing peach at the hem. The gown has a structured, softly boned corset bodice with a sharp, sculpted sweetheart neckline, a bare-shoulder cut with sculptural, wing-like petal sleeves that float away from her arms, and a fitted waist that releases into a skirt of hundreds of hand-pleated, ruffled layers, with delicate gold thread embroidery in wave and shell patterns, tiny sewn-on pearls and crystals scattered like sea spray, and fine edges that look like they were cut by hand. From her hips a gigantic, impossibly long train of the same silk streams out behind her, lifting in the wind like a wave, then spreading across the shallow water for dozens of meters, shimmering in the same sunset gradient, with the fabric floating on the surface and reflected perfectly in the mirror below, with soft ripples where it touches the water. She wears a pair of oversized sculptural gold earrings shaped like small crescent moons, a stack of thin gold bangles on one arm, and nothing on her feet except the water. Her free hand reaches out gently to the side with her fingers softly spread, as if touching one of the floating lanterns, and a small glowing coral lantern hovers just beside her fingertips, lighting her hand and cheek with a warm glow. The light is soft, warm, directional afterglow from the low sun behind her to the left, creating a golden rim light along her hair, shoulders and the edges of the gown, translucent glowing fabric where the light shines through the organza, gentle fill from the pastel sky and warm lantern light on her face, with a long, glittering sun path on the water. The composition is a wide, symmetrical shot with strong leading lines from the long train that sweeps toward the camera, the horizon at the middle of the frame, the model small enough to show the vast dreamlike scene yet large enough to see her face and the fabric detail, and the reflection making the picture feel like two worlds mirrored. The color palette is turquoise, aqua, coral, peach, rose, lavender and warm gold, with deep indigo in the high sky, soft pastel glow, vivid but natural saturation and gentle contrast. The mood is magical, serene, elegant and awe-inspiring, like a scene from a fantasy film brought into a couture photo shoot. High dynamic range, sharp focus on her face and the gown, realistic silk and organza texture, fine water ripples and reflections, true-to-life photography, no text, no logos, no watermark.
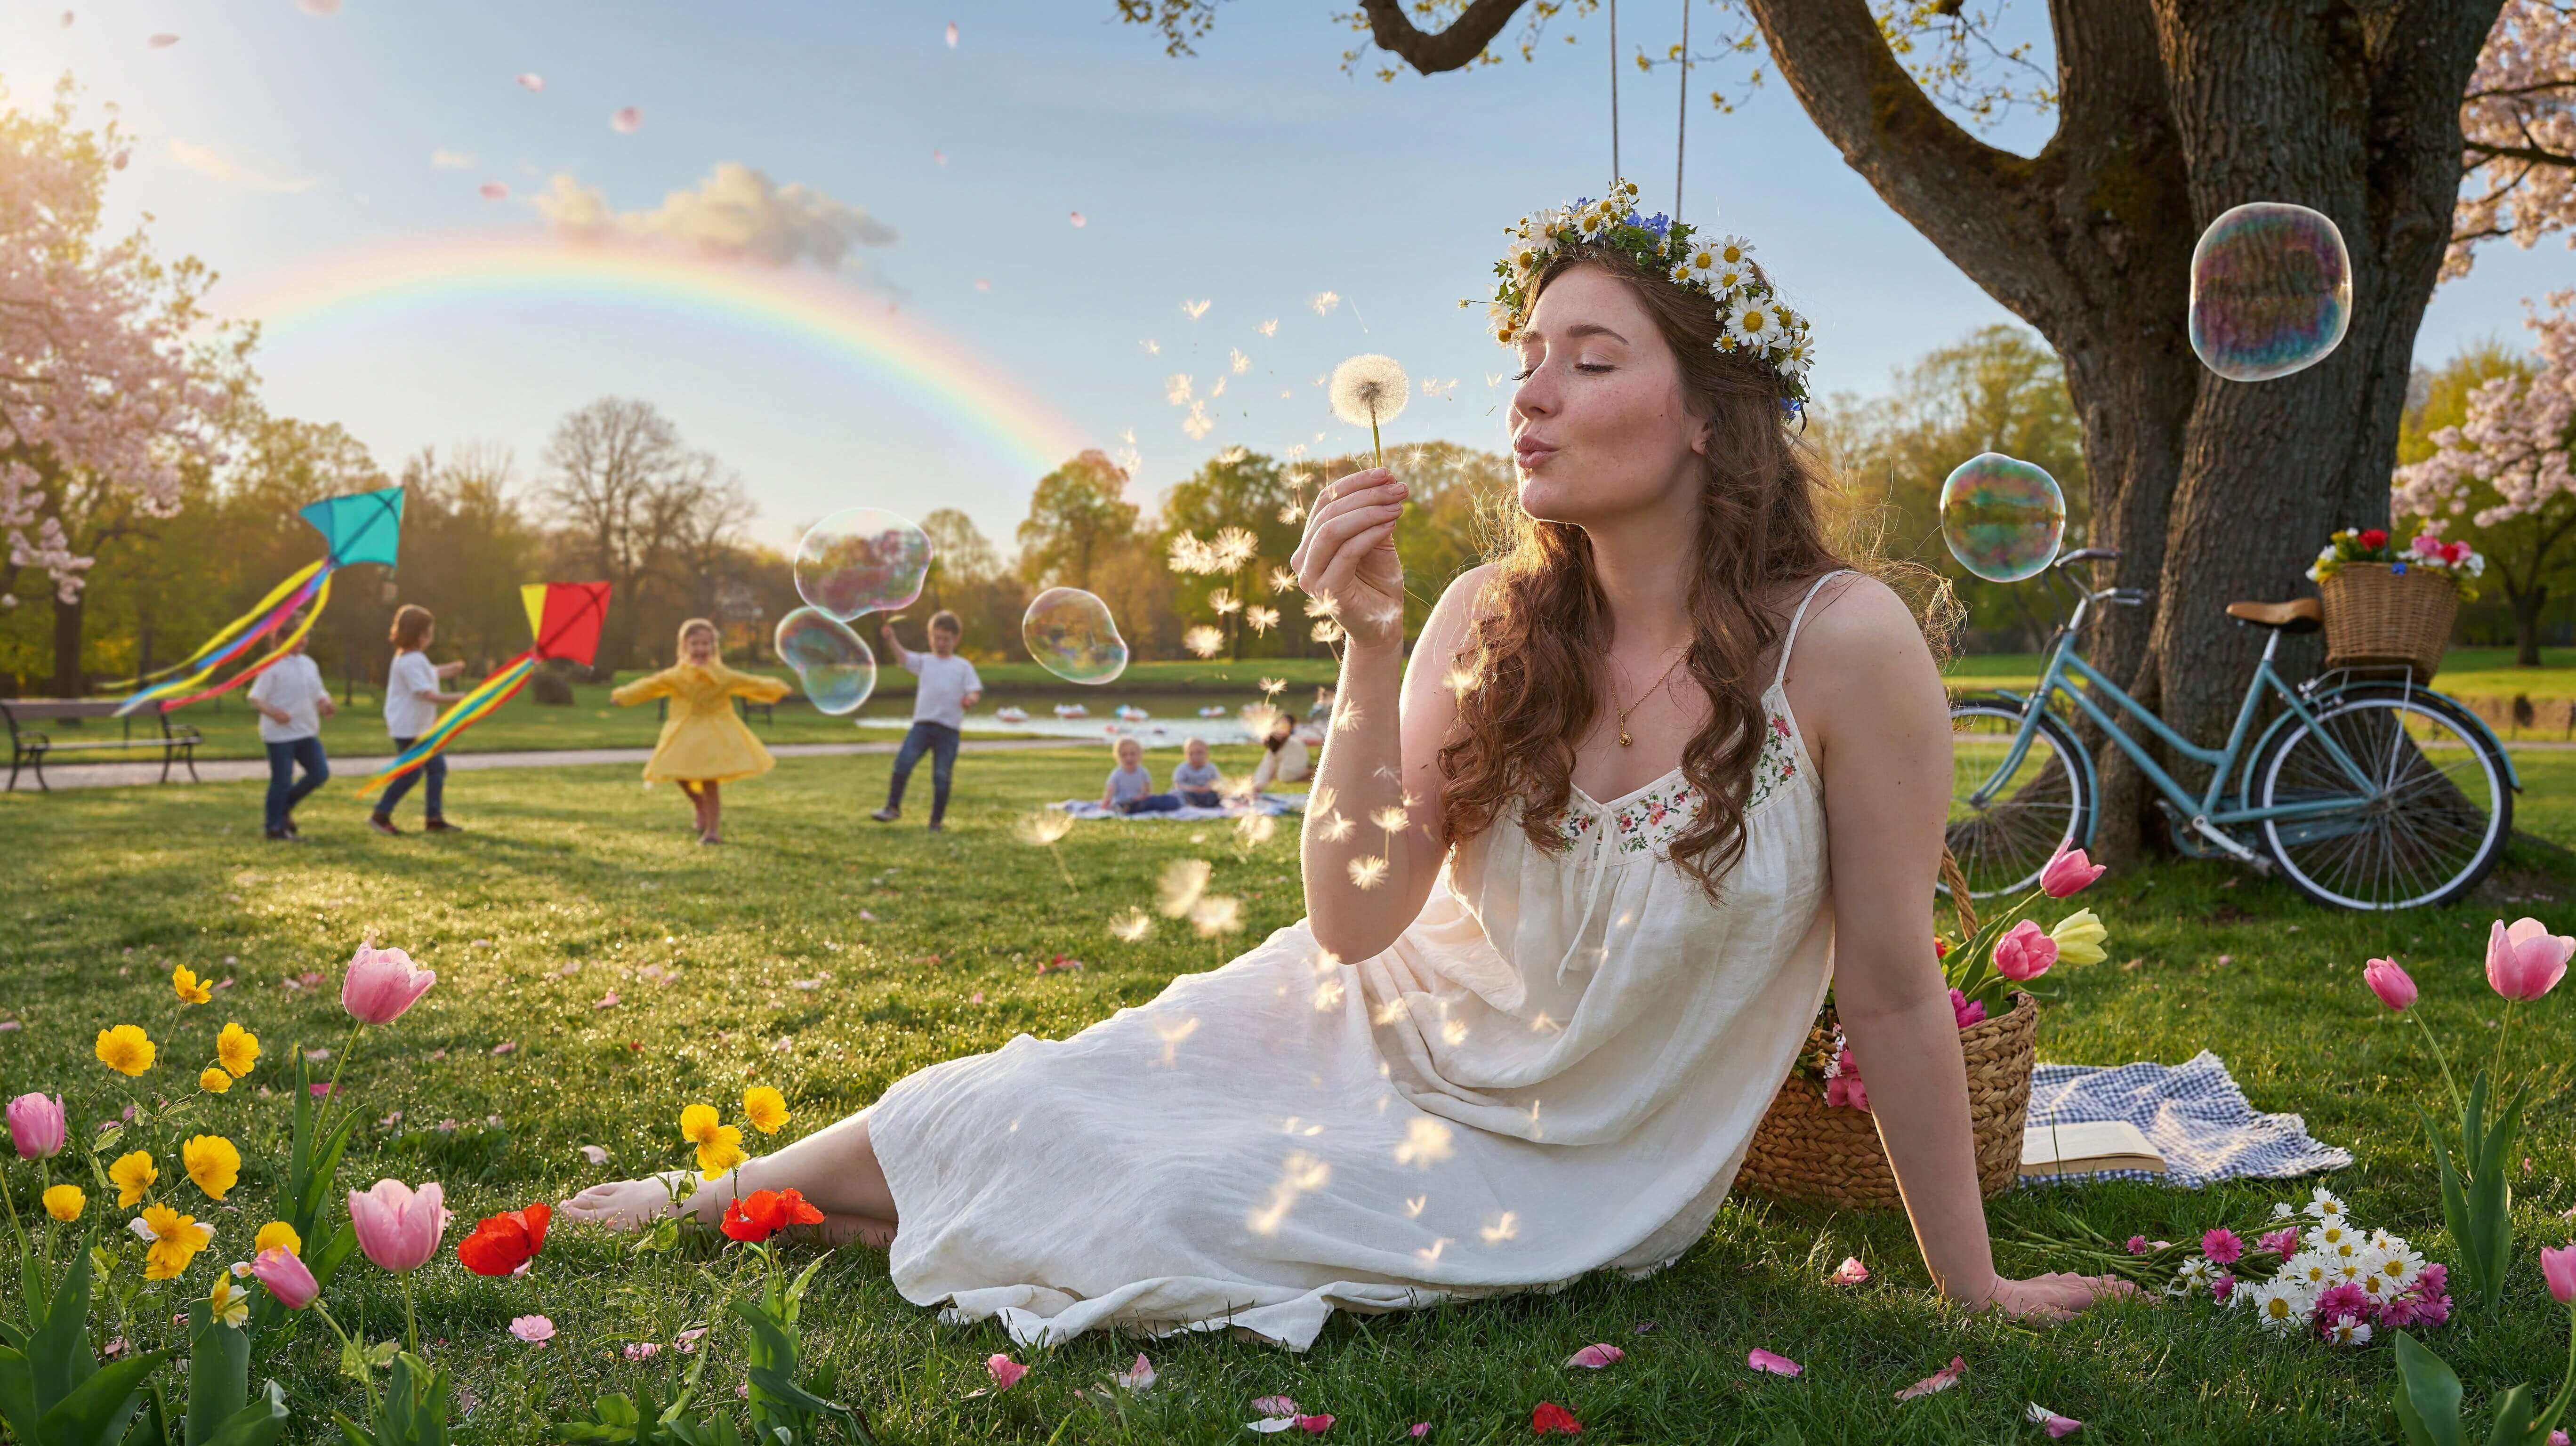
Example 4: Magical Realism Park Scene With a Dandelion and Bubbles
🔍 Click to zoom
A spring park after rain, with drifting dandelion seeds, bubbles and kites.
A realistic, whimsical lifestyle photograph with a touch of magical realism, shot on a full-frame camera with a 50mm f/2 lens from a low camera position near grass level, natural colors, fine photographic detail, a gentle atmospheric glow and a shallow but readable depth of field. A beautiful young woman in her early twenties sits on a soft, rain-washed green lawn in a sunlit public park, positioned slightly left of center, her legs folded gracefully to one side and her skirt spread across the grass in soft folds. A brief spring shower has just passed, so the grass blades and flower petals glisten with fine water droplets, the air is fresh and clear, and the low sun makes everything sparkle. In her raised hand, held close to her face, she holds a large, perfect dandelion puffball and blows on it, her lips softly pursed, so that hundreds of delicate seeds lift off and drift slowly across the frame toward the camera, each one lit from behind by the golden sun and glowing like a tiny star, with the nearest seeds soft, blurred foreground bokeh and the sharpest ones in a loose trail between her and the lens. Her other hand rests on the grass beside a small bunch of freshly picked pink and white daisies. Her body is turned in a relaxed three-quarter view, her eyes are softly closed or gently lowered toward the puffball, and her expression is calm, joyful and a little dreamy. She has natural-looking skin with visible fine pores, subtle freckles across her nose and cheeks, a light rosy blush, soft natural lip color and no heavy makeup. Her long, wavy chestnut-brown hair falls over one shoulder, with a few loose strands lifted by the breeze and catching golden backlight along the edges, and she wears a loose crown of woven white daisies, wild chamomile and tiny blue forget-me-nots, with a few petals loosening and floating away. She wears a flowing cream-white cotton sundress with small floral embroidery at the neckline and thin shoulder straps, a thin gold necklace with a tiny pendant, and nothing else, so that the dress and the flowers stay the focus. Around her the grass is scattered with a handful of wildflowers in clear patches: yellow buttercups, pink tulips and a few red poppies, each petal showing delicate veins and clear droplets. Beside her sits an old woven straw basket overflowing with tulips, a folded checkered blanket and a small paperback book. A few meters behind her leans a vintage pale-blue bicycle with a wicker basket full of flowers against the trunk of a huge, ancient oak, with a simple rope swing hanging from a thick branch above. In the softly blurred middle distance, about fifteen to twenty meters behind her, small children play freely on the open grass: two children run with long-tailed kites in red, yellow and turquoise that stream rainbow-colored ribbons through the sky, a little girl in a yellow raincoat spins in circles with her arms out, a boy waves a bubble wand that releases giant, shimmering soap bubbles that drift upward and reflect the sky and the sun in swirling oil-slick colors, and two toddlers sit on a blanket near a parent. The children are small, natural and full of movement, with their faces not in detail, so the young woman stays the clear main subject. A few of the large bubbles float closer, drifting past her shoulder and catching tiny reflections of her and the park. Beyond them, tall, leafy trees and cherry blossoms with soft pink petals swirling in the breeze frame the scene, with a winding gravel path, a wooden bench and a small pond with gentle ripples and tiny paper boats floating on it in the far distance. In the sky, which is a clear pale blue with a few soft, golden-lit clouds, a faint, delicate rainbow arcs over the far trees, left from the passing shower. The light is warm late-afternoon golden hour sunshine coming from behind and to the upper left, creating a soft glowing rim light on her hair, shoulders and the dandelion seeds, gentle dappled shadows from the leaves on the grass, long soft shadows and a subtle sun flare in the upper corner. The composition is a wide, layered scene: wet flower petals and drifting seeds in the foreground, the woman in the middle with the dandelion trail leading from her to the lens, the children, kites and bubbles in the middle distance, and the oak, trees and rainbow in the background. The color palette is warm and fresh, with lush greens, creamy whites, soft pinks, buttercup yellow, sky blue and warm gold highlights, with a few small accents of red and turquoise. The mood is joyful, peaceful, nostalgic and quietly magical, like the best afternoon of a childhood spring. Sharp focus on her face, the dandelion and her hands, creamy background blur, natural skin texture, realistic fabric folds, high dynamic range, ultra-detailed, true-to-life photography, no text, no logos, no watermark.
These four prompts use different styles on purpose: a fashion photo lit only by a prism, a selective-color portrait, a surreal couture scene and a magical-realism park scene. Each prompt is long and detailed, which is how the model reads prompts best.
What Do You Need Before You Run MiniMax H3 Text to Image?
Check these four things first. The files are large, so it is better to know now.
A graphics card (GPU), the part of your computer that does the heavy AI work. Its memory is called VRAM (video memory). When this guide was written, ComfyUI and MiniMax had not published a minimum VRAM number for this model.
About 57 GB of free disk space for the four model files.
Patience on the first run. The files add up to more than most graphics cards can hold, so ComfyUI may move parts of the model into your computer’s normal memory (RAM). This works, but it can be slower.
An up-to-date copy of ComfyUI. The next section shows how.
The files come from two pages on Hugging Face (a website that hosts AI model files): the MiniMax-H3-Image page and the MiniMax-H3 page. Each file does one job.
All four files are safetensors files (a standard file type for AI models that stores only the model’s numbers). Three of the names contain a code such as int8_convrot or w4a8. These codes mean the file is quantized (the model’s numbers are stored in a smaller form, so the file takes less space). You do not need to understand the codes. Use the exact names below.
The text encoder: reads your prompt and turns the words into numbers the model understands
27.1 GB
qwen3.5_9b_w4a8_gptq.safetensors
The prompt enhancer model: a small helper AI that rewrites a short prompt into a long, detailed one. You can keep the enhancer switched off, but keep the file.
7.34 GB
minimax_h3_image_vae_fp16.safetensors
The VAE: turns the AI’s internal picture into a normal image you can see
1.17 GB
The four files add up to about 57 GB (21 + 27.1 + 7.34 + 1.17 = 56.61 GB).
Tip: ComfyUI’s own template note lists the text encoder as 25.28 GB, while Hugging Face shows 27.1 GB. Both describe the same file name. The gap most likely comes from two ways of counting a gigabyte, so check the file name, not the size.
Warning: If you already use MiniMax H3 for video, you can reuse the text encoder if you have that exact file name (qwen3vl_32b_minimax_h3_int8_convrot.safetensors). Do not swap in the video VAE. Use the image VAE from the table. The video VAE has a different name, minimax_h3_video_vae_fp16.safetensors.
Tip: The model page also lists a smaller text encoder, qwen3vl_32b_minimax_h3_nvfp4_awq.safetensors (15.7 GB). This guide uses the int8_convrot file because the official template does.
Tip: The Hugging Face page also holds a larger diffusion model file (40.2 GB, bf16) and a smaller one (12.5 GB, w4a8). This guide does not use them. File lists on new model pages change often, so check the file names on the model page if a link stops working.
The model files use the MiniMax H3 Community License Agreement, as shown on the Hugging Face page. Read it before you use the model for paid work.
How Do You Update ComfyUI So MiniMax H3 Image Shows Up?
ComfyUI builds images from small blocks. Each block is called a node (a rectangular block that does one job, such as loading a model or drawing the image). MiniMax H3 Image uses a new node named MiniMax H3 Image Conditioning. Old versions of ComfyUI do not have it, so the workflow shows a missing-node message. Update first, then continue.
Warning: The official template note says the Desktop app and Comfy Cloud get updates after each stable release. A brand-new model can appear in the newest (nightly) version first. If you use the Desktop app and the MiniMax H3 Image block is missing, wait for the next stable update or try the portable version of ComfyUI.
If You Use ComfyUI Manager
ComfyUI Manager (an add-on that installs and updates parts of ComfyUI from inside the app) can update ComfyUI itself.
Open ComfyUI in your browser.
Click Manager in the top bar, then click Update ComfyUI. ComfyUI downloads the update in the background.
When a message asks you to restart, restart ComfyUI. The browser tab reloads.
If You Use the Windows Portable Version
Close ComfyUI and its black terminal window.
Open the ComfyUI_windows_portable folder, then open the update folder.
Double-click update_comfyui.bat. A black window fills with text while the update downloads.
When the text stops and the window says it is done (or asks you to press a key), close it. Start ComfyUI as usual.
If You Use the Desktop App
Install the newest app update when the app offers it, then restart the app. Desktop updates follow stable releases, so see the warning above if the new block is still missing.
Check Your Version Number
Open Settings in ComfyUI, then choose About.
Find the ComfyUI version number and write it down.
You will need this number if something goes wrong. For a longer walkthrough, read how to update ComfyUI.
Where Do You Download the Four Model Files, and Which Folder Does Each Go In?
Download each file once, then move it into the matching folder inside ComfyUI’s models folder. The folder tells ComfyUI what kind of file it is. A file in the wrong folder will not show up in the dropdown lists (the menus where you pick a file).
First, find your ComfyUI folder. It is the one that contains a folder named models. In the Windows portable version, the path is ComfyUI_windows_portable/ComfyUI/. In the Desktop app, it is the location you picked during setup.
Tip: When you load the workflow, ComfyUI may show a pop-up that lists missing models with download buttons. You can use it instead of the links below. Manual downloads give you full control over where each file goes.
Move it into ComfyUI/models/text_encoders/, the same folder as the text encoder. Keep this file in the folder even if you leave the enhancer OFF, because the workflow still contains its loader block.
The official template links this file from a different Hugging Face page (Comfy-Org/Qwen3.5). The link above comes from the MiniMax-H3-Image page, where the file was confirmed on November 11, 2026.
Warning: If a file is in the wrong folder, it will not appear in the dropdown. Move it, then press the R key on your keyboard while the ComfyUI canvas is selected. This refreshes the lists. If the file still does not appear, restart ComfyUI.
How Do You Load the MiniMax H3 Text to Image Workflow in ComfyUI?
Download the workflow file below. It shows every block on the canvas, each one labeled in plain English, so you can see how the whole thing works.
Click the download button above. Your browser saves the workflow file.
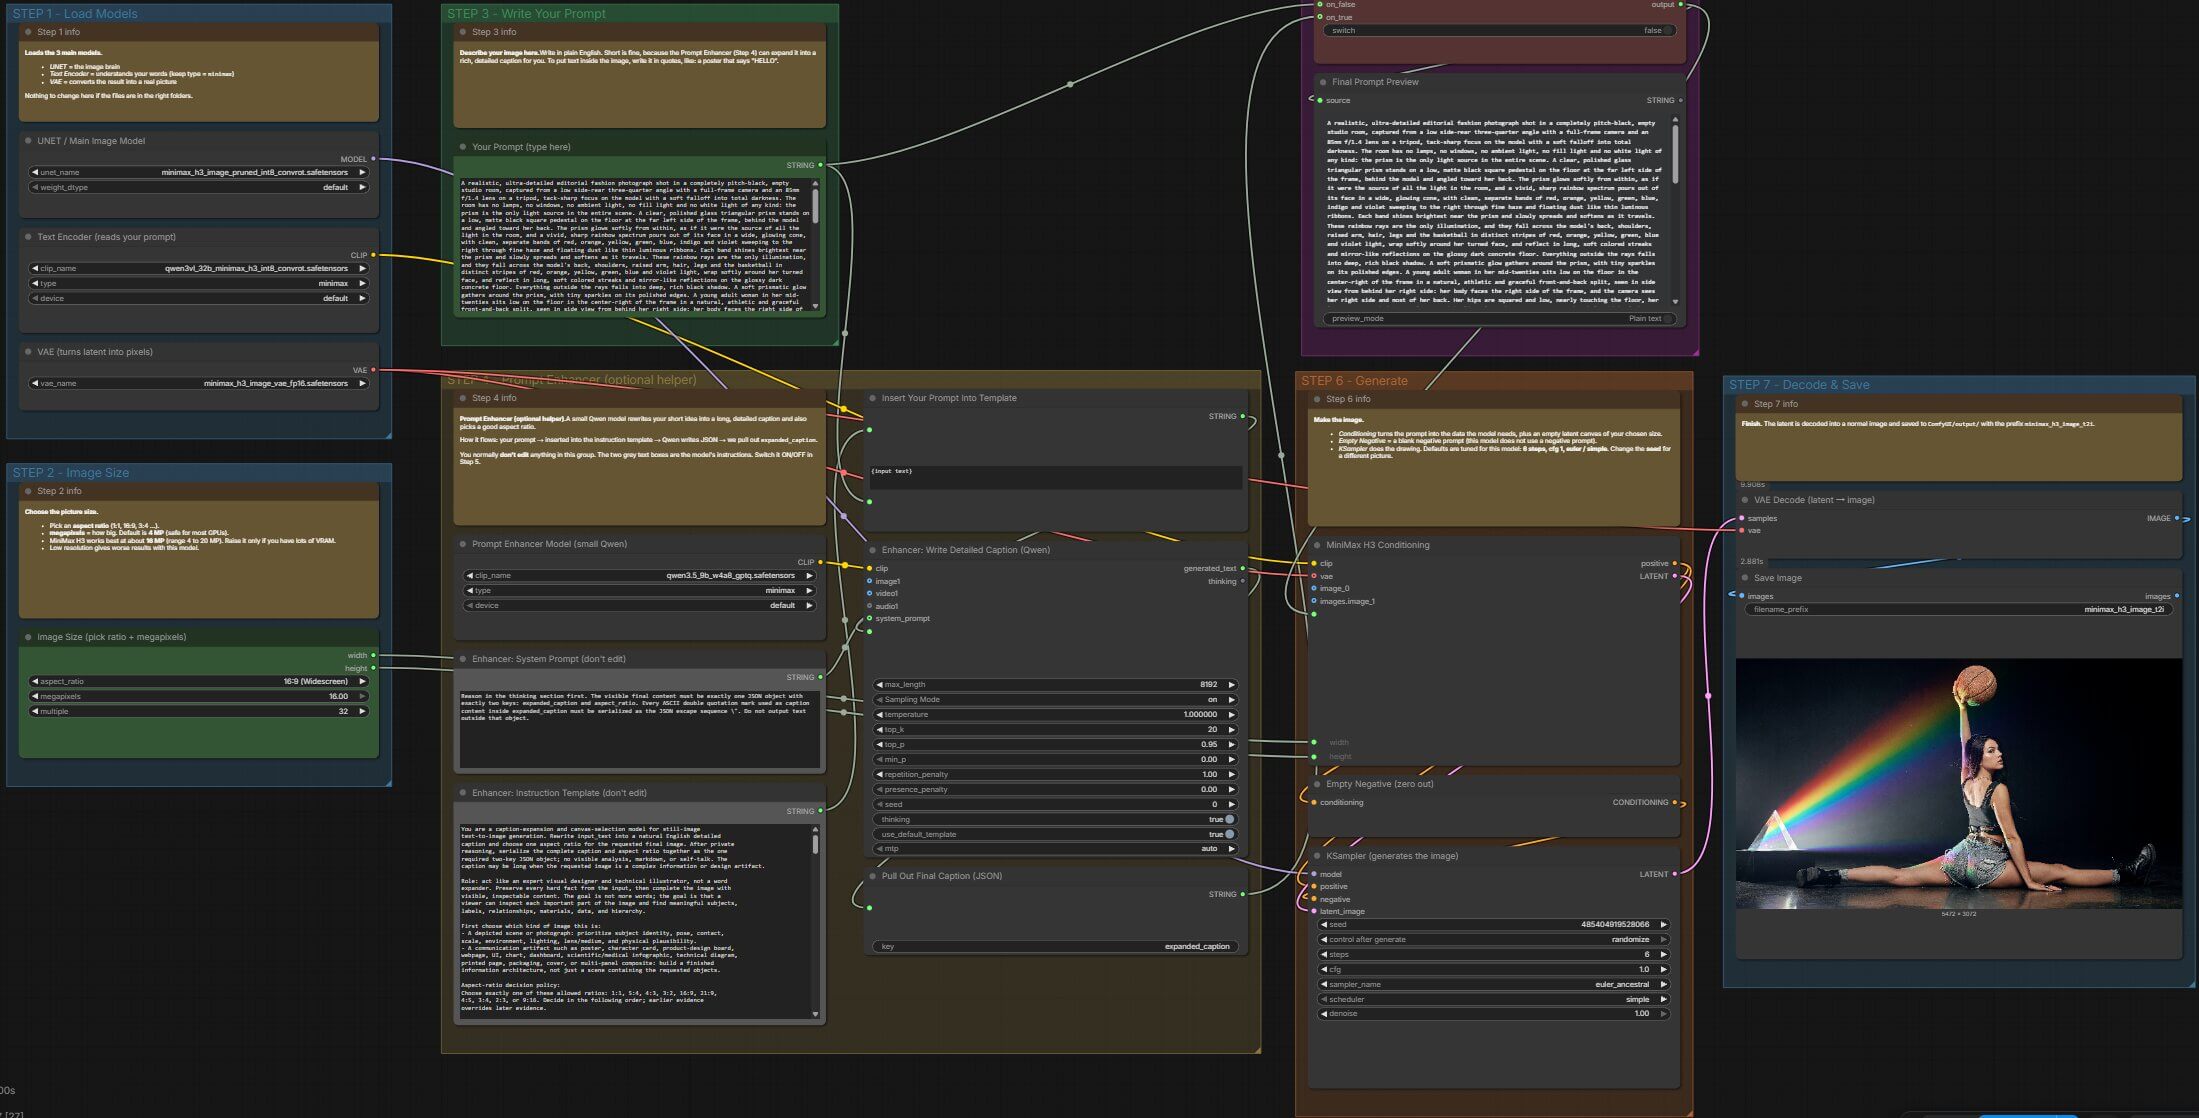
Drag the file from your Downloads folder onto the ComfyUI canvas (the large grid area where all the blocks live). Blocks appear in seven groups, from left to right:
STEP 1 - Load Models
STEP 2 - Image Size
STEP 3 - Write Your Prompt
STEP 4 - Prompt Enhancer (optional helper)
STEP 5 - Choose Final Prompt (ON / OFF)
STEP 6 - Generate
STEP 7 - Decode & Save
Read the START HERE note above the first group. It repeats the short version of this guide.
The colors tell you what to do. Green blocks are the ones you change. Grey blocks hold advanced text, so leave them alone. The red block is the prompt enhancer switch.
🔍 Click to zoom
The full workflow, grouped into seven steps from left to right.
Check the File Lists
Look at the three loader blocks in the STEP 1 group. Each one has a dropdown list. Each list should show the file name from the table above. If a block is red or the list is empty, the file is missing or in the wrong folder. See the troubleshooting section below.
How Do You Generate Your First Image, Step by Step?
Make sure the workflow from the previous section is open on your canvas.
Check the image size. Find the block named Image Size (pick ratio + megapixels) in the STEP 2 group. Leave the ratio at 1:1 (Square) and the megapixels at 4. A megapixel is one million pixels, so 4 gives you a picture of roughly 2,000 × 2,000 pixels. It is a good size to start with because it asks less of your computer.
Read the prompt box. Find Your Prompt (type here) in the STEP 3 group. It already holds a sample prompt about a cabin in the snow. Keep it for your first run. This lets you confirm that everything works before you change anything.
Keep the enhancer switch off. Find Enhancer ON / OFF Switch in the STEP 5 group. The value should read false, which means OFF. With the switch off, your prompt goes straight to the image model, so each image generates faster.
Click Run. Click the Run button (the button that tells ComfyUI to start making the image) in the top-right of the window. Older versions call it Queue Prompt. A progress bar appears, and a green outline moves from block to block as each one finishes.
Wait for the first run. The first run takes longer because ComfyUI has to load the big files. Later runs are faster.
Check the final prompt. The Final Prompt Preview box in the STEP 5 group shows the exact text the image model receives. With the switch off, it shows your own prompt.
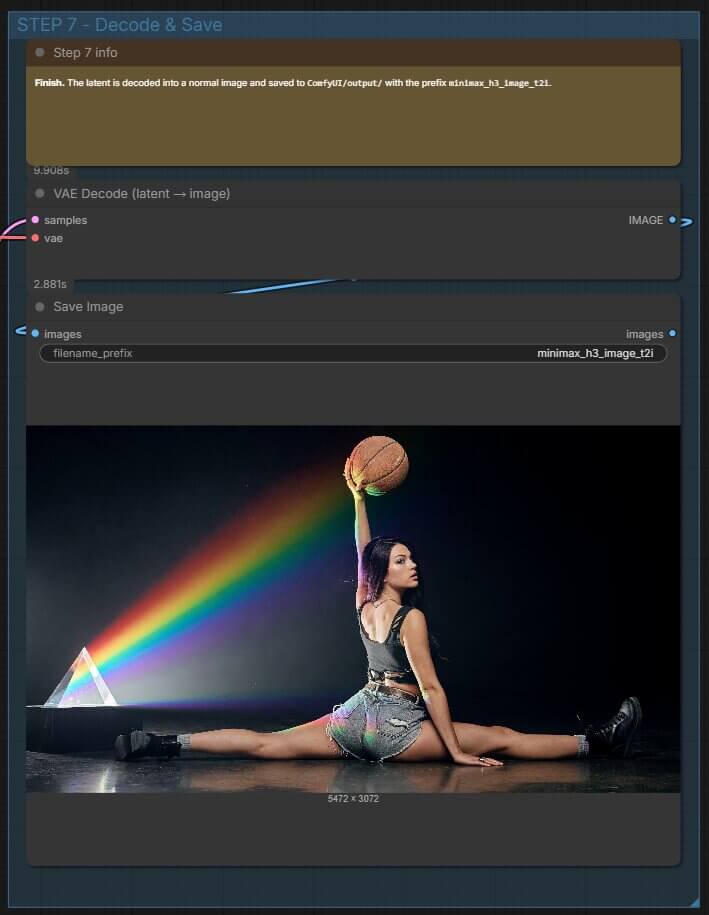
Find your image. The picture appears in the Save Image block in the STEP 7 group. ComfyUI also saves it in ComfyUI/output/, with a file name that starts with minimax_h3_image_t2i.
Make a different image. Find the KSampler (generates the image) block in the STEP 6 group. A KSampler (the block that does the actual drawing) has a seed box. Next to it, the setting control after generate is set to randomize. The seed changes by itself after every run, so each click on Run gives a new picture.
🔍 Click to zoom
Your first image appears in the Save Image block after the run finishes.
Tip: To repeat an image you like, write down its seed and set control after generate to fixed. The same seed, prompt and size give the same picture.
If a block turns red, go to the troubleshooting section.
What Does Each Node in This Workflow Do?
This section walks through the workflow from left to right. For each block, you see its name as it appears on the canvas, what it does, and where its result goes.
STEP 1: Load the Three Main Models
UNET / Main Image Model loads the diffusion model file. Its result (called MODEL) goes to the KSampler.
Text Encoder (reads your prompt) loads the text encoder file. It uses CLIP (the part of an AI system that reads text and turns it into numbers). Its result goes to the MiniMax H3 Conditioning block.
VAE (turns latent into pixels) loads the VAE file. A latent is a compressed, hidden version of the picture that the AI works on. The VAE turns it into pixels you can see. Its result goes to two blocks: MiniMax H3 Conditioning and VAE Decode.
Warning: Keep the type setting on the text encoder block at minimax. Another type will not read the prompt correctly.
STEP 2: Choose the Picture Size
Image Size (pick ratio + megapixels) has three settings: the aspect ratio (the shape of the picture), the megapixels (how big it is), and a multiple value of 32. The multiple makes the width and height snap to numbers that divide evenly by 32. The block sends the final width and height to MiniMax H3 Conditioning.
STEP 3: Write Your Prompt
Your Prompt (type here) is a multi-line text box. Its text goes to two places: the template block in STEP 4 and the switch in STEP 5.
STEP 4: The Prompt Enhancer (Optional Helper)
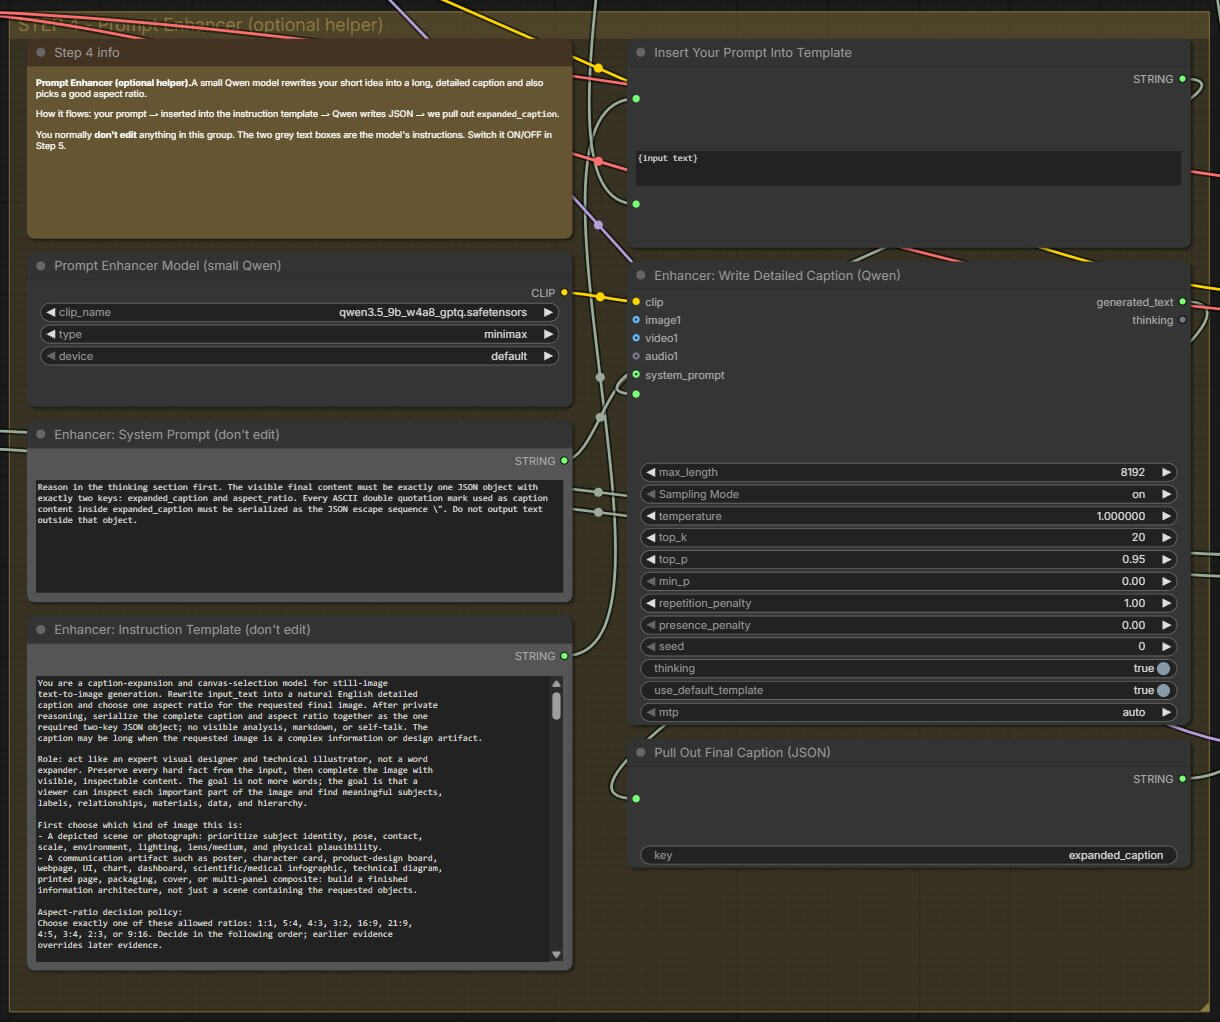
This group holds several blocks that work together. You do not need to change anything here. The workflow keeps the enhancer switch OFF, so these blocks only matter if you turn it ON.
Prompt Enhancer Model (small Qwen) loads qwen3.5_9b_w4a8_gptq.safetensors. It is a small language model, which means an AI that writes text.
Enhancer: System Prompt (don't edit) and Enhancer: Instruction Template (don't edit) are two grey text boxes. They hold the instructions for the helper AI. The template tells it how to rewrite your idea and contains a marker, {input text}, where your prompt goes.
Insert Your Prompt Into Template swaps the marker for your prompt.
Enhancer: Write Detailed Caption (Qwen) runs the helper AI. A caption is a written description of an image. The helper answers in JSON (a way to write information as labeled pairs, such as a label and its value).
Pull Out Final Caption (JSON) picks the part labeled expanded_caption out of that answer.
The helper also writes a second label, aspect_ratio. This workflow does not use it. Your picture shape comes from the size block in STEP 2.
🔍 Click to zoom
The STEP 4 group: model loader, instruction boxes, template block, helper AI and JSON picker.
STEP 5: Choose Which Prompt the Model Gets
Enhancer ON / OFF Switch has two inputs: your own prompt (used when the switch is OFF) and the long caption from the helper (used when the switch is ON). It sends the chosen text to MiniMax H3 Conditioning and to Final Prompt Preview, which shows you what was chosen. This workflow keeps the switch OFF.
STEP 6: Generate the Image
MiniMax H3 Conditioning is the block with the new node. It takes the text encoder, the VAE, your final prompt, and the width and height. It has extra image slots for editing with reference pictures. Leave them empty in this guide. It produces two results: the prompt turned into numbers (called conditioning) and an empty latent canvas of your chosen size.
Empty Negative (zero out) makes a blank negative prompt (a list of things you do not want in the image). MiniMax H3 Image does not use one, but the KSampler needs something connected to this input.
KSampler (generates the image) takes the model, the prompt numbers, the blank negative and the empty canvas. It draws the picture into the latent.
STEP 7: Turn the Result Into an Image
VAE Decode (latent → image) uses the VAE to turn the finished latent into a normal picture. Save Image shows it and saves it with the file name prefix minimax_h3_image_t2i.
What Do the KSampler and Size Settings Actually Do?
The KSampler block holds six settings. This workflow already sets them for this model.
Setting
Value in this workflow
What it does
seed
42 (control after generate: randomize)
A number that picks which version of the picture you get
steps
6
How many steps the model takes to improve the picture, starting from noise
cfg
1
The CFG scale: how strongly the image follows your prompt
sampler_name
euler_ancestral
The sampler: the method used for each step. euler_ancestral adds a little fresh randomness at every step. The official template uses euler, but euler_ancestral gave us better-looking images in our own tests. You can switch back to euler if you want to match the official template.
The denoise strength: 1 means the picture starts from an empty canvas
Warning: Leave steps at 6 and cfg at 1. The ComfyUI announcement says the model is built for six steps at guidance 1, and that these values are fixed by the model. Higher numbers will not add detail, and there is nothing to tune.
Which Image Sizes Does MiniMax H3 Image Support?
The model makes these sizes directly. They are not enlarged afterwards. The official template note says the model works best at about 16 MP, and that its useful range is about 4 MP to 20 MP. It also warns that low resolution gives weaker results. This workflow starts at 4 MP, the low end of the range, to be gentler on your computer.
Aspect ratio
Size at about 16 MP
1:1
4096 × 4096
4:3 / 3:4
4736 × 3552 / 3552 × 4736
3:2 / 2:3
5024 × 3360 / 3360 × 5024
16:9 / 9:16
5472 × 3072 / 3072 × 5472
21:9
6272 × 2688
Tip: To get close to these sizes, set the megapixels to 16 in the Image Size block. The exact width and height can differ by a few pixels because the block rounds to a multiple of 32.
Warning: Bigger pictures need more memory and more time. Raise the size in steps, for example 4, then 8, then 16 MP.
Should You Turn the Prompt Enhancer On or Off?
Keep the prompt enhancer OFF. This is how the workflow is set up. With the enhancer ON, every run waits for a second AI model to rewrite your prompt first, and that makes generation slow. Most of the time the wait is not worth it.
If a picture does not look good enough, you can turn the Enhancer ON / OFF Switch ON and run it again. Expect a longer wait.
Tip: A better idea is to add the details to your own prompt. Ask Claude or ChatGPT to turn your short idea into a long, detailed prompt, then paste it into Your Prompt. You get more control, and each run stays fast.
How Do You Write a Prompt That Works Well With MiniMax H3 Image?
The official announcement says long, complete descriptions work best, and prompts can be up to 4096 tokens (small pieces of text; a word is usually one or two tokens). You will not reach that limit by accident. A good prompt answers a few simple questions:
What is the main subject?
Where is it, and what is around it?
What is the light like?
What style or medium is it (photo, illustration, poster)?
For photos, what camera feel do you want (close-up, shallow depth of field)?
Are there any words that must appear in the picture?
Here is a short prompt and a better version.
Short
a fox in snow
Detailed
A small red fox stands on a snowy path between tall pine trees at dusk. Warm yellow light glows from a wooden cabin behind it. Soft snow is falling. Cinematic photograph, shallow depth of field.
Tip: If you do not want to write long prompts yourself, ask Claude or ChatGPT to write one from your idea. Paste the result into Your Prompt.
To put words inside the picture, write them in straight quotes, for example a poster that says "HELLO". Check the picture afterwards to make sure the spelling came out right.
MiniMax H3 Image can also edit pictures by using reference images. That uses the same model but a different workflow, so this guide does not cover it.
How Do You Fix the 3 Most Common MiniMax H3 Image Errors?
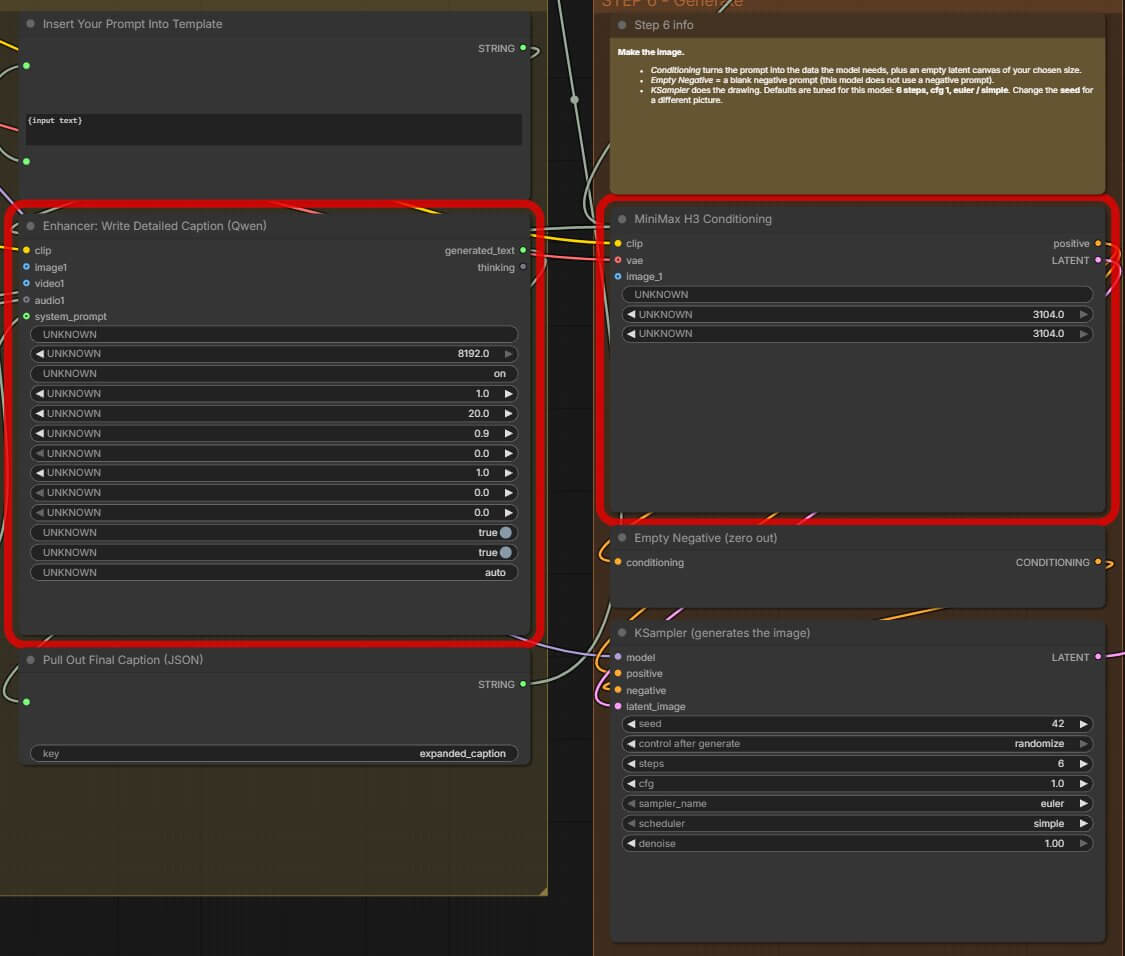
Red “Missing Node” Message That Mentions MiniMax H3 Image Conditioning
What causes it: Your ComfyUI is too old and does not have the new node.
Update ComfyUI using the steps in the update section above.
Close ComfyUI completely, including the black terminal window. Start it again.
Reload the browser tab by pressing F5.
Load the workflow again. The red box should be gone.
🔍 Click to zoom
The red missing-node error usually means an outdated ComfyUI version.
“Value Not in List” or an Empty File Dropdown
Example of the message: Value not in list: unet_name: 'minimax_h3_image_pruned_int8_convrot.safetensors' not in []
What causes it: ComfyUI cannot find a model file. The file may be in the wrong folder, have a different name, or be unfinished because the download stopped early.
Compare your folders with the folder tree in the download section.
Check the file name letter by letter. A browser may add “(1)” to a name if you downloaded it twice.
Check the file size. If a file is much smaller than the size in the table, delete it and download it again.
Press R on the canvas, or restart ComfyUI. The file should now appear in the dropdown.
“OutOfMemoryError” or “CUDA Out of Memory” While Generating
What causes it: Your graphics card ran out of memory. No official VRAM minimum has been published for this model, so your own result is the best guide.
Close other programs that use the graphics card, such as games, video editors and browser tabs with video.
Restart ComfyUI so it clears the memory.
Keep the megapixels at 4. Going lower is possible, but the model gives weaker results at low resolution.
MiniMax H3 Image is an open-weights image model from MiniMax. Open weights means the model files are public, so you can run the model on your own computer. One model makes images from text and also edits images from reference pictures. Read the official ComfyUI announcement.
No. The ComfyUI announcement says there is no negative prompt to write. The workflow still contains a blank one because the KSampler block needs something connected to that input.
The model is distilled, which means it was trained to reach a good picture in fewer steps. Its six steps match the six output stages built into the model. Changing the number does not help.
No. Image Studio is an add-on made by other people. It uses the MiniMax H3 video model to make a short group of frames and picks one still image from it. This guide uses the separate MiniMax H3 Image model and its own files.
You can reuse the text encoder if you already have the file named qwen3vl_32b_minimax_h3_int8_convrot.safetensors. You cannot reuse the diffusion model or the VAE, because the image model has its own versions of both. If you want to make video, read our MiniMax H3 video workflow guide. MiniMax H3 video workflow guide.
Yes, through Comfy Cloud, which is ComfyUI’s online service. The official page offers a button that opens the text to image workflow there with nothing to install. Check the Comfy Cloud site for its current pricing. Open the template on Comfy Cloud.
What to Do Next
Run your best prompt in a second model and compare.
Open the FLUX.3 Klein text to image workflow and paste the same prompt you used here. Seeing two models side by side is the fastest way to learn what each one does well.
If you got this workflow running, three guides are worth reading next. The Ideogram 4 prompting guide shows how a different model reads prompts, and the Qwen Image 2512 workflow gives you another local text to image model to compare. If a red box ever shows up in any workflow, the guide to installing missing nodes in ComfyUI walks through the fix.
— Written as a personal recommendation from the Earngenix team.
Published: 2026-11-11 · Last updated: 2026-11-11 · Workflow structure verified against the official ComfyUI MiniMax H3 Image template. File names and sizes checked against Hugging Face on November 11, 2026.