
⚡ Quick Answer
FLUX.3 Klein image edit in ComfyUI lets you change a photo by typing what you want, such as “Change the dress color to red.” You download three model files, upload your photo, type the change, and click the run button. You need ComfyUI 0.41.0 or later. It runs on your own computer, so there are no per-image credits.
You have a photo and you want one thing changed: a dress color, a background, a hat you want gone. This guide shows you how to do that with FLUX.3 Klein image edit in ComfyUI. You will download the exact model files, load a ready-made workflow (a saved set of connected blocks that does a job for you), and edit your first photo.
If you want to make a new picture from text only, use our FLUX.3 Klein text-to-image workflow instead. This page is only about editing a photo you already have.
What Can FLUX.3 Klein Image Edit Do? 4 Examples With the Exact Prompts
Before you download anything, here is what one sentence can do. Each example below shows the original photo, the exact prompt that was typed, and the result. You can copy any of these prompts and try them on your own photos once your workflow is running.
Example 1: Change a color
Prompt used
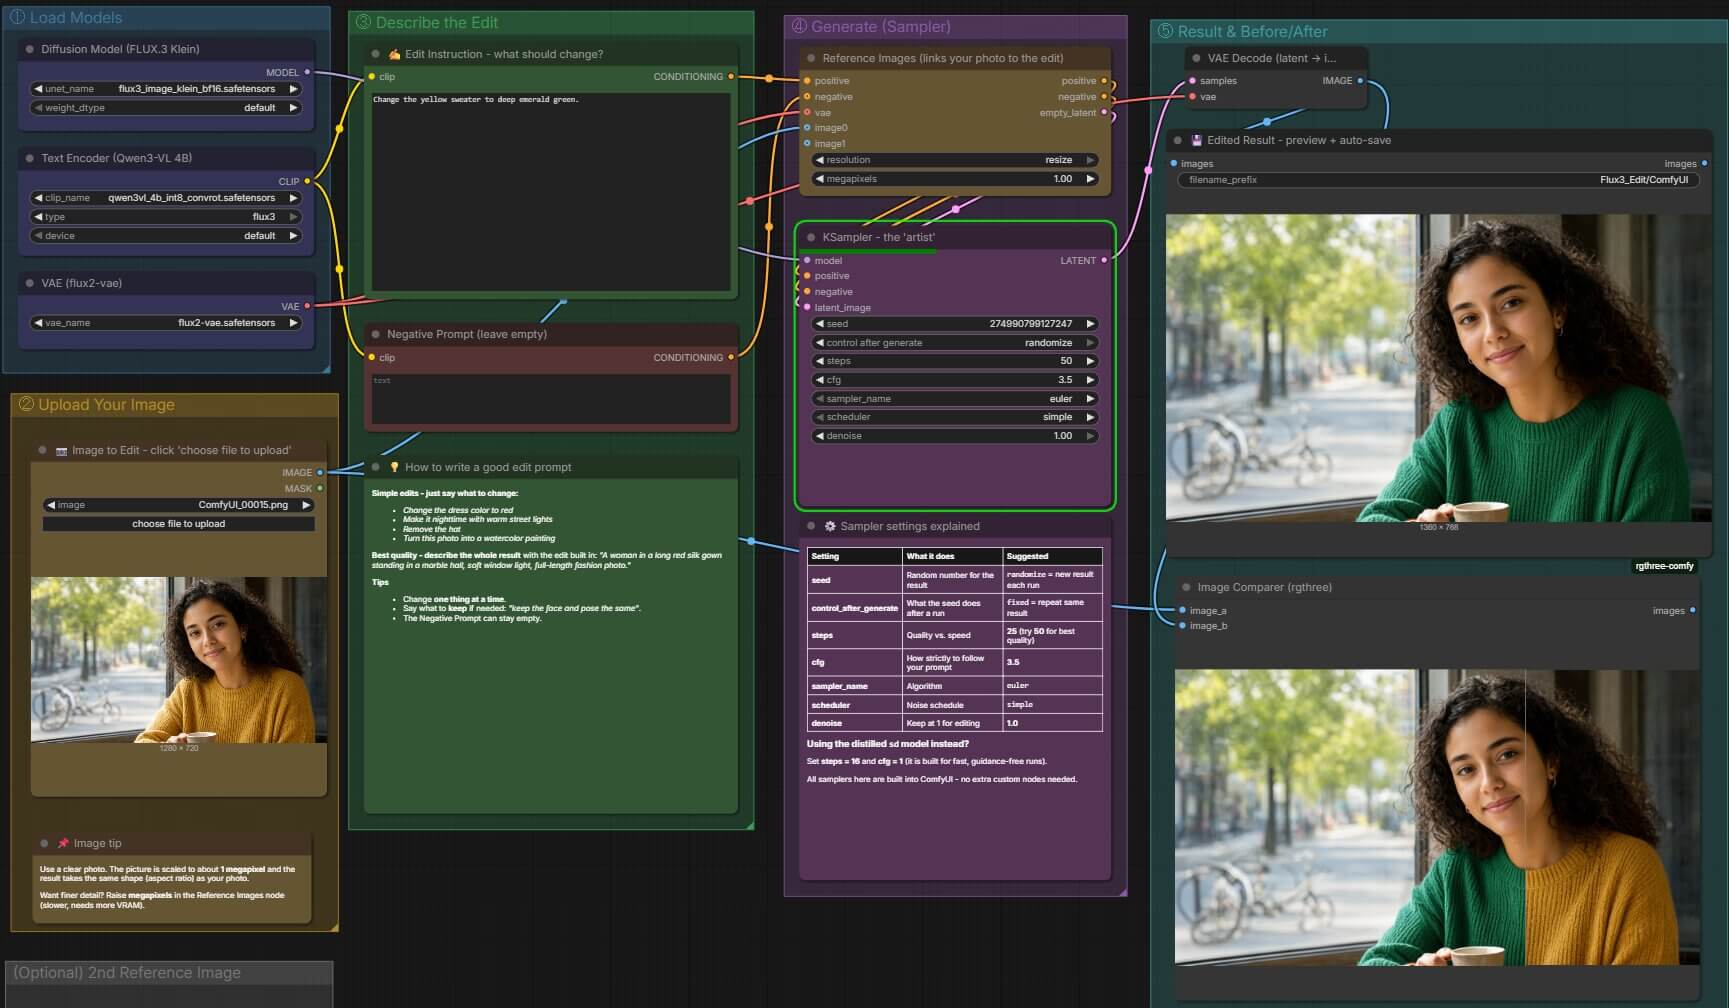
Change the yellow sweater to deep emerald green.


A short instruction that names one thing to change. This is the easiest kind of edit to start with.
Example 2: Swap one object for another
Prompt used
Replace the spaghetti with a bowl of ramen noodles with a soft-boiled egg and green onions, keep the table and lighting the same.


The prompt describes the new object in detail and ends with what to keep, so the table and lighting stay put.
Example 3: Change two things in one prompt
Prompt used
Change the sofa to a dark brown leather sofa and the walls to deep forest green, keep everything else the same.

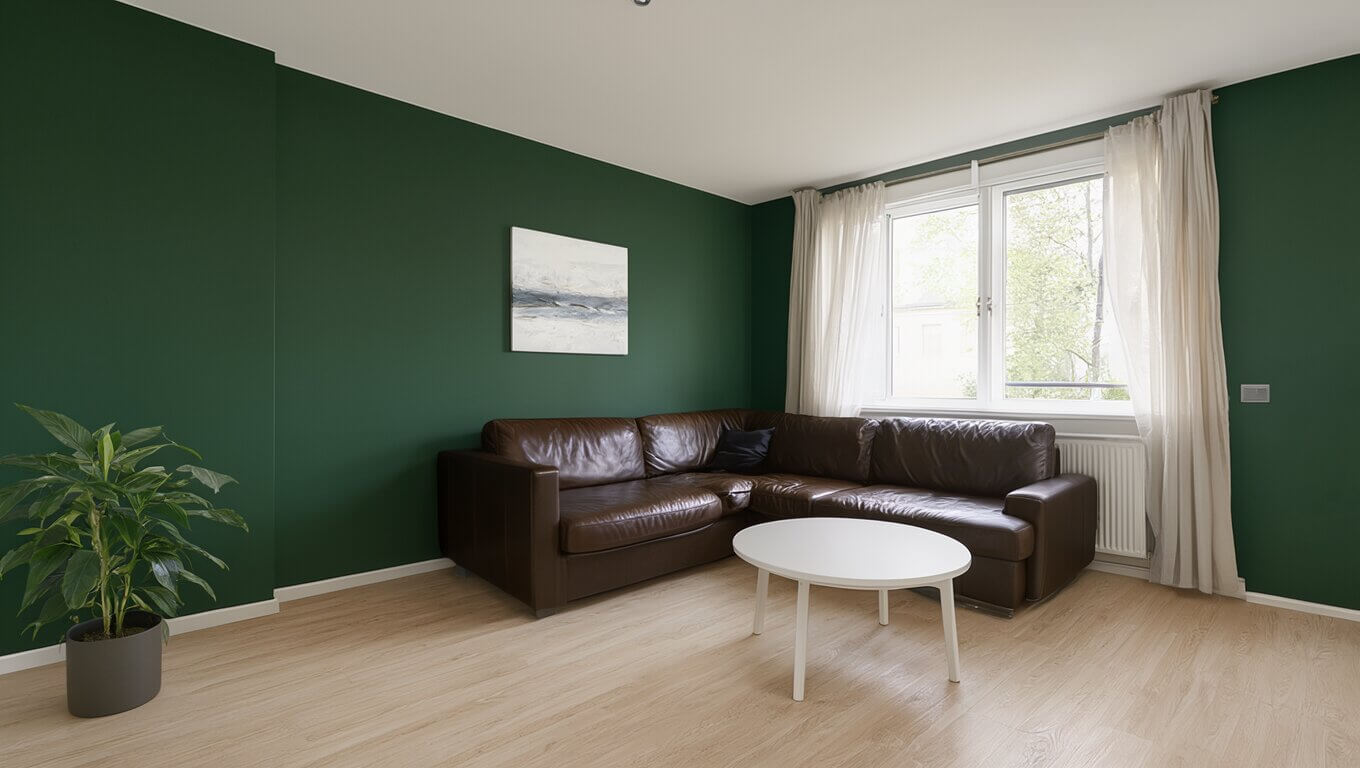
This prompt makes two changes at once. It works because both changes are named clearly and the prompt says what to keep. If a prompt like this changes too much on your photo, split it into two separate runs.
Example 4: Combine two photos
Prompt used
Put the jacket from <ref_image_1> on the man in <ref_image_0>, keep his face, pose, and the studio background the same.

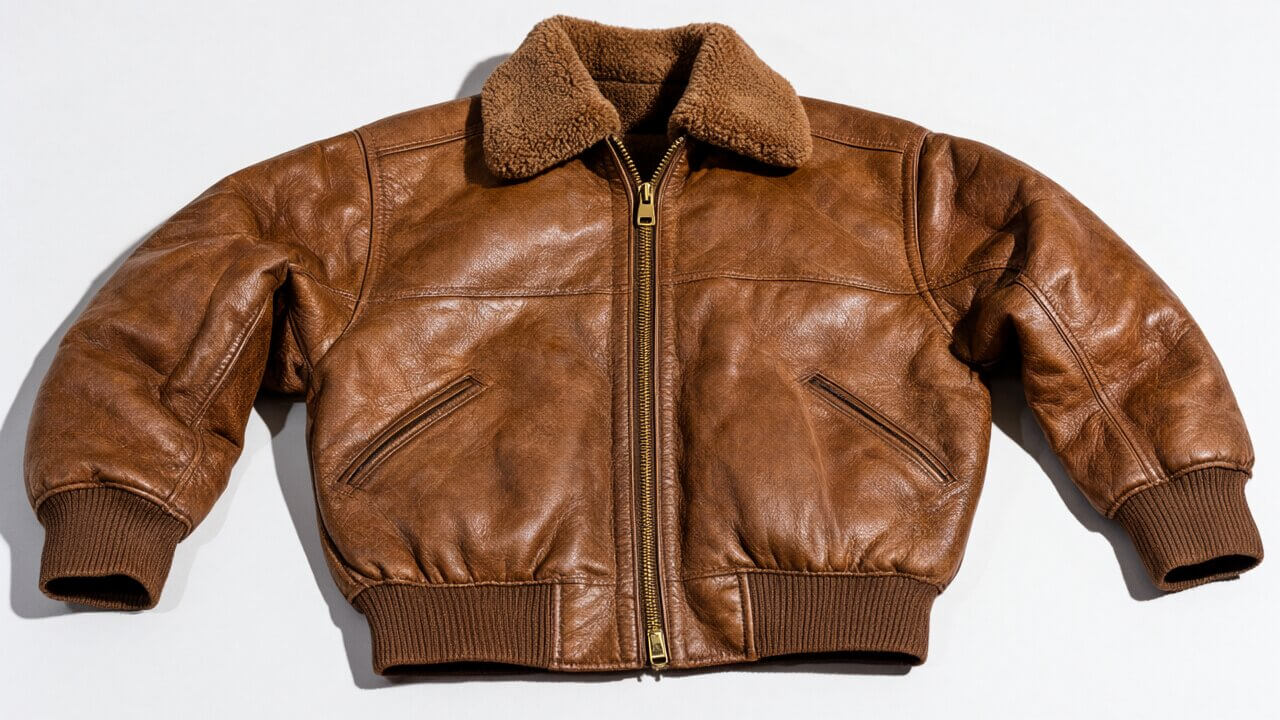

This example uses two reference images. The tags tell the model which photo is which. The two-reference section below shows how to set it up. Jump to the two-reference setup.
What Do You Need Before You Start?
You need three things: a computer that can run the model, a recent version of ComfyUI, and three model files from Hugging Face (a website where AI models are shared). Check each one before you download anything, so you do not waste time on a 6 GB download that will not run.
Your computer. FLUX.3 Klein runs on your graphics card, called the GPU. The key number is VRAM (the memory on your graphics card, measured in GB). Black Forest Labs, the company that makes FLUX, has not published an official VRAM number for FLUX.3 Klein that we could find. The file used in this guide is 5.81 GB, which is small compared with the 11.1 GB full-precision version.
ComfyUI 0.41.0 or later. The official ComfyUI documentation says the FLUX.3 Klein templates need version 0.41.0 or newer. If your version is older, nodes show up red and the model will not load. Our guide to updating ComfyUI shows you how to update in a few minutes.
Three model files. A checkpoint (the main AI model file that does the real work) is only one part here. FLUX.3 Klein needs a diffusion model file, a text encoder file, and a VAE file. The next sections explain each one.
Is This the Free Local Model or the Paid FLUX 3 Image API?
FLUX.3 Klein is the free option that runs on your own GPU. You download it once, and there are no credits and no API key.
ComfyUI also has a separate Flux 3 Image Partner Node. That one runs on a company server and charges credits for every picture. Both use the name “FLUX.3,” so people mix them up. This guide uses the free local model only.
Which FLUX.3 Klein File Should You Download?
The Hugging Face repository has six diffusion model files. They all end in .safetensors (a safe file format for AI models, and the standard one for ComfyUI). The names look confusing, so here is what each part means:
- No
_sd_in the name means the full model. It gives the best quality and needs more steps. _sd_in the name means the distilled model. A distilled model is a faster version trained to need far fewer steps.bf16is the biggest file with the most detail.int8_convrotis a quantized model (a model squeezed into a smaller file so it uses less memory, with a small quality trade-off).nvfp4is another compressed format. We did not confirm which GPUs it needs, so start withint8_convrot.
| File | Size | What It Is |
|---|---|---|
flux3_image_klein_bf16.safetensors | 11.1 GB | Full model, BF16 — the largest file with the most detail |
flux3_image_klein_int8_convrot.safetensors | 5.81 GB | Full model, int8 — used in this guide |
flux3_image_klein_nvfp4.safetensors | 5.26 GB | Full model, NVFP4 — another compressed format |
flux3_image_klein_sd_bf16.safetensors | 11.1 GB | Distilled model, BF16 |
flux3_image_klein_sd_int8_convrot.safetensors | 5.83 GB | Distilled model, int8 — the fast option |
flux3_image_klein_sd_nvfp4.safetensors | 5.28 GB | Distilled model, NVFP4 |
You also need two more files, and they are the same for every version:
| File | Size | What It Is |
|---|---|---|
qwen3vl_4b_int8_convrot.safetensors | — | Text encoder — turns your typed words into numbers the model understands |
flux2-vae.safetensors | — | VAE — turns the model’s internal picture into a normal image |
Start with flux3_image_klein_int8_convrot.safetensors. It matches the workflow in this guide. You can switch to the distilled file later in the settings section.
How Do You Download From a Gated Hugging Face Repository?
The FLUX.3 Klein files are “gated.” This means you must agree to a license before Hugging Face lets you download them. The official ComfyUI page does not stress this step, and it is the one that stops many beginners.
- Open the official repository: black-forest-labs/flux-3-image-klein-comfy.
- Log in to your free Hugging Face account. If you do not have one, click Sign Up in the top-right corner and create one.
- Find the box that asks you to accept the license terms and click the agree button. The page then shows the file list instead of the license box.
- Open each of the three files you need and click the download arrow next to its name.
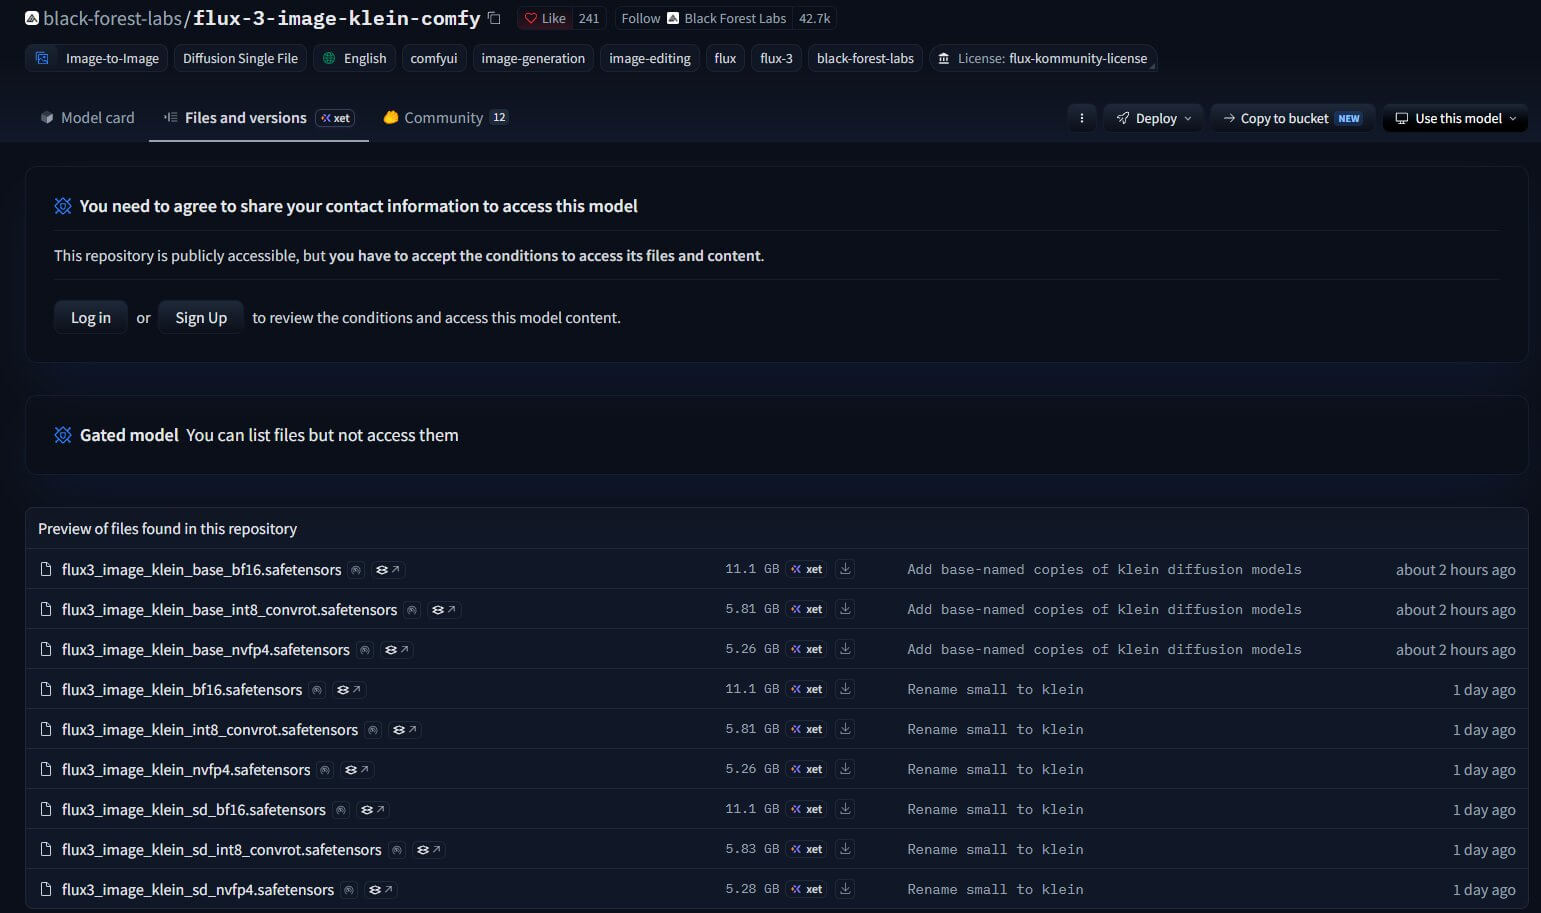
If the download is blocked or a file is not found, you probably did not accept the license on the same account you are logged in with.
Where Do the Files Go?
ComfyUI only finds model files in specific folders. If a file is in the wrong folder, it will not appear in the dropdown lists later. The folder ComfyUI/models/ already exists in your ComfyUI folder.
Restart ComfyUI after you copy the files. ComfyUI only reads the model folders when it starts, so a file added while it is running will not show up.
How Do You Load the FLUX.3 Klein Image Edit Workflow in ComfyUI?
A workflow is a saved file that holds a whole setup of connected blocks. Loading a ready-made one means you do not have to build anything yourself. You drag one file onto the screen and the whole setup appears.
Download Workflow JSON(FLUX3_Klein_ImageEdit_Simple.json)- Download the workflow file with the button above. It is a small file that ends in
.json. - Open ComfyUI in your browser. You should see a large dark canvas with grid lines.
- Drag the
.jsonfile from your Downloads folder and drop it anywhere on the canvas. The workflow appears as colored boxes joined by wires. - Look at the boxes. If everything is gray, blue, yellow, or green, you are good. If any box has a red outline, go to the troubleshooting section.
You can also use the official template. Open the Template Library in ComfyUI and search for Flux.3 Image Klein: Image Edit. If the template is missing, your ComfyUI is too old. The official source is the ComfyUI documentation page for Flux.3 Klein, and the template files live in the Comfy-Org/workflow_templates repository.
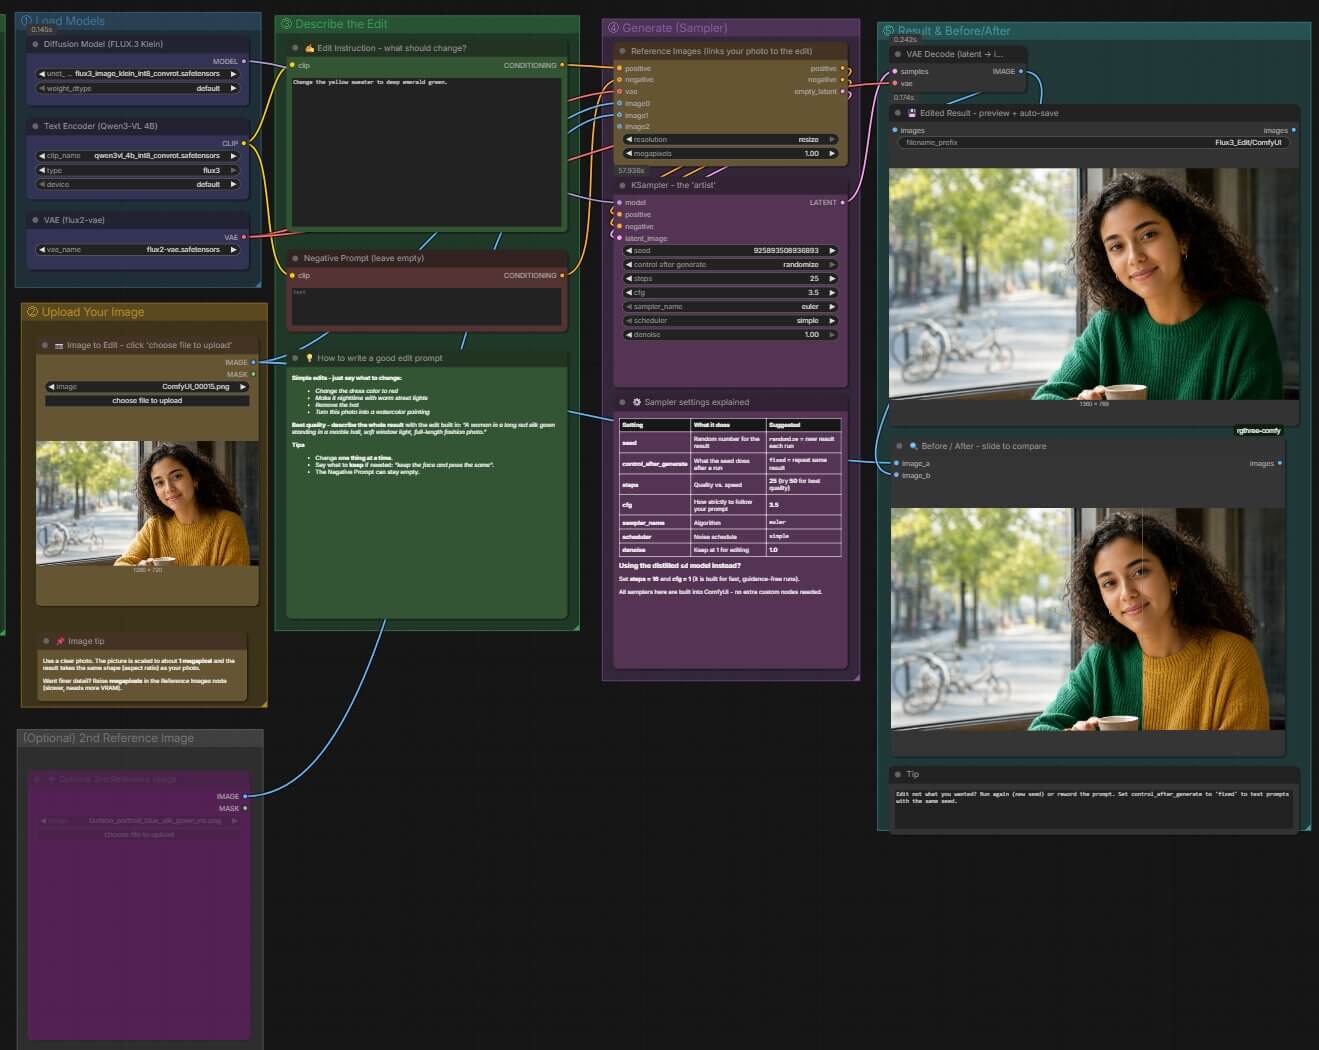
The workflow in this guide has the same parts as the official one, but it adds written notes on the canvas, color-coded groups, and a before and after slider.
What Does Each Node in This Workflow Do?
A node is a rectangular block that does one job. You connect nodes together with wires to build a workflow. Data flows left to right: your photo and words go in, an edited photo comes out. Here is every node, in the order the data moves through them.
Group 1: Load Models (blue boxes)
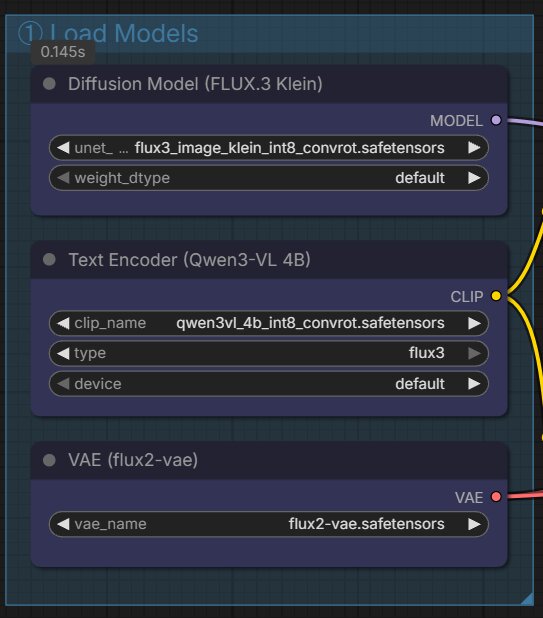
- UNETLoader (named “Diffusion Model (FLUX.3 Klein)”) loads the main model, the diffusion model (the part that actually draws the picture). It outputs MODEL.
- CLIPLoader (named “Text Encoder (Qwen3-VL 4B)”) loads the text encoder. The CLIP loader is the node that reads your typed words. Its type must be flux3. It outputs CLIP.
- VAELoader (named “VAE (flux2-vae)”) loads the VAE (the tool that converts between the model’s hidden image format and a normal picture). It outputs VAE.
Group 2: Upload Your Image (yellow box)
- LoadImage holds the photo you want to edit. It outputs IMAGE.
Group 3: Describe the Edit (green boxes)
- CLIPTextEncode (the big one, “Edit Instruction”) is where you type the change. It takes CLIP in and outputs CONDITIONING (your words converted into numbers).
- CLIPTextEncode (the small one, “Negative Prompt”). A negative prompt tells the model what to avoid. Leave it empty for editing.
Group 4: Generate
- ReferenceMultiLatent attaches your photo to the instruction so the model knows what to edit. It takes your words, the VAE, and your photo, and it creates an empty canvas in latent space (the hidden format where the model works). Its setting is called megapixels and it is set to 1.
- KSampler is the artist. The KSampler starts from noise and cleans it up step by step until your edit appears.
- VAEDecode turns the finished hidden image into a normal picture.
Group 5: Result
- SaveImage shows the result and saves it into
ComfyUI/output/Flux3_Edit/. - ImageCompare shows your original and the edited photo with a slider you can drag.
There is also an optional second LoadImage box. It does nothing until you connect it. The section on two reference images shows how.
How Do You Edit Your First Photo?
We use the free practice photo so you can follow along and get the same result. Then you can swap in your own photo.
Step 1: Upload Your Photo
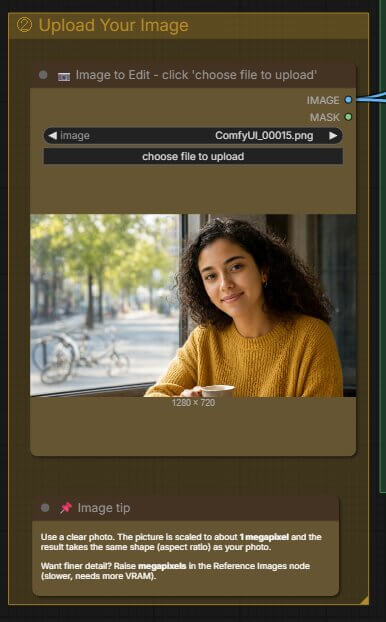
The model needs a photo to change. Find the yellow box called Image to Edit - click ‘choose file to upload’.
- Click the choose file to upload button in that box.
- Pick your photo from your computer. A small preview of the photo appears inside the box.
For practice, download the sample fashion_portrait_blue_silk_gown_vis.png and upload that. The workflow starts with this image already selected. The picture is shrunk to about 1 megapixel (about one million pixels), and your result keeps the same shape as your photo.
Step 2: Type What You Want to Change
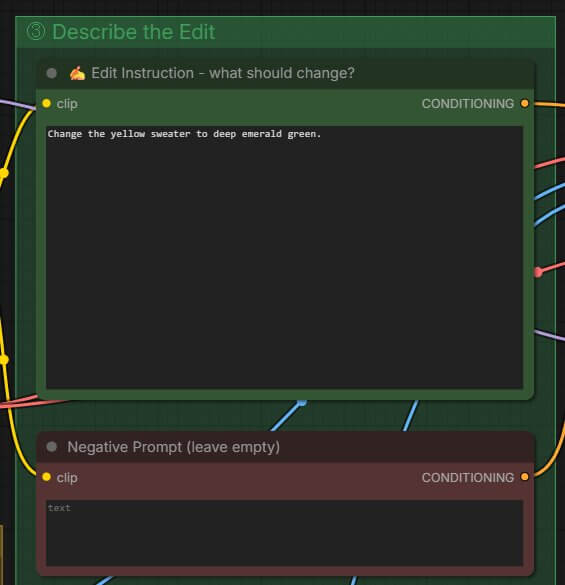
The model follows the words you type. Find the green box called Edit Instruction - what should change?
- Click inside the text area and delete any text already there.
- Type:
Change the dress color to red
The text appears in the box as you type. Leave the Negative Prompt box empty.
Step 3: Check the Sampler Settings
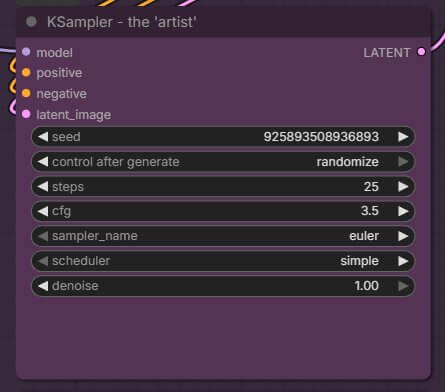
The sampler is the method the KSampler uses to clean up the noise. The workflow already has working settings, so you do not need to change anything for your first run. Find the KSampler box and check that it shows these values:
- seed: any number. The seed is a random number that decides the result; the same seed gives the same picture.
- control_after_generate: randomize. This picks a new seed every run.
- steps: 25. The steps are how many cleaning rounds the model does.
- cfg: 3.5. The CFG scale is how strictly the model follows your words.
- sampler_name: euler
- scheduler: simple
- denoise: 1. Leave it at 1 for editing.
The next sections explain how to pick steps and CFG for each model file.
Step 4: Click the Run Button
This starts the edit. Click the run button in the top-right corner of ComfyUI, or press Ctrl+Enter on your keyboard. The official ComfyUI guide calls this the Queue button, and newer versions label it Run.
A green outline moves from node to node as ComfyUI works through the workflow, and a progress bar appears on the KSampler box. The first run takes longer because ComfyUI has to load the models into memory. After that, an edit takes about 20–30 seconds on RTX 4090 (24 GB VRAM). See queue prompt for what happens behind the scenes.
Step 5: Compare and Save Your Result
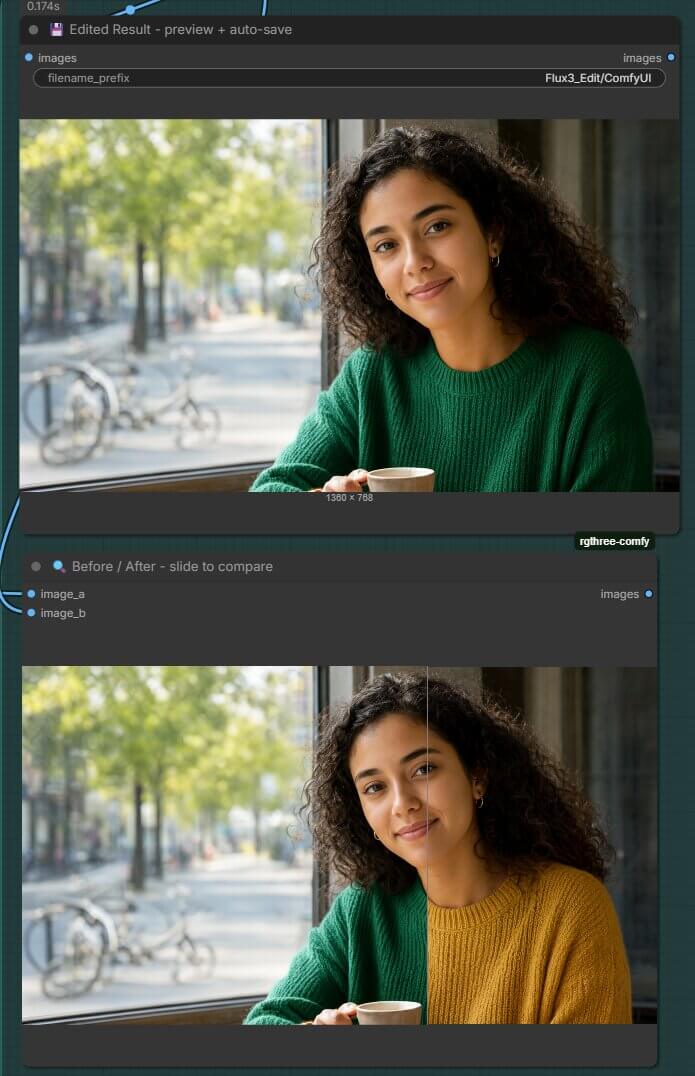
When the run finishes, the edited photo appears in the Edited Result box on the right. Below it, the Before / After box shows two images with a slider.
- Drag the slider left and right. You should see the original dress on one side and the red dress on the other.
- If you like the result, you do not need to save it. It is already saved in
ComfyUI/output/Flux3_Edit/. - If you do not like it, click the run button again. A new seed gives a new version.
How Do You Write an Edit Prompt That Works?
A prompt is the text you type to tell the model what to do. There are two ways to write an edit prompt, and the best one depends on how big your change is. The four prompts in the examples at the top of this guide are good models to copy.
Method 1: Say what to change
Use a short instruction. This is good for small edits.
Change the dress color to redRemove the hatMake it nighttime with warm street lightsTurn this photo into a watercolor painting
Method 2: Describe the finished picture
Write the whole result with the edit already included. ComfyUI’s official guide recommends describing the result you want, and this style works well for bigger changes.
A woman in a long red silk gown standing in a marble hall, soft window light, full-length fashion photo.
Three rules that make edits more reliable
- Change one thing at a time. If you ask for a new dress, a new background, and a new hairstyle together, the model may change too much.
- Say what to keep. Add a phrase like
keep the face and pose the same. - Run it more than once. Each new seed gives a slightly different result. Pick the best one.
For more edit ideas, see our image-to-image use cases.
What Steps and CFG Should You Use for the Full vs Distilled File?
The two file types need different settings. Using the wrong ones is a common reason an edit looks bad. The values below come from the official ComfyUI guide.
| Setting | Full file (no _sd_) | Distilled file (_sd_) |
|---|---|---|
| steps | 25 (try 50 for best quality) | 4 to 16 (16 is a good start) |
| cfg | 3.5 | 1 |
| sampler_name | euler | euler |
| scheduler | simple | simple |
| denoise | 1 | 1 |
How to switch to the distilled file
- Download
flux3_image_klein_sd_int8_convrot.safetensorsfrom the same gated repository and put it inComfyUI/models/diffusion_models/. - Restart ComfyUI.
- In the UNETLoader box, click the file name and pick the
_sd_file from the list. - In the KSampler box, set steps to 16 and cfg to 1.
The workflow also has a scheduler and a denoise strength setting. Leave both as they are for editing.
How Do You Use Two Reference Images in One Edit?
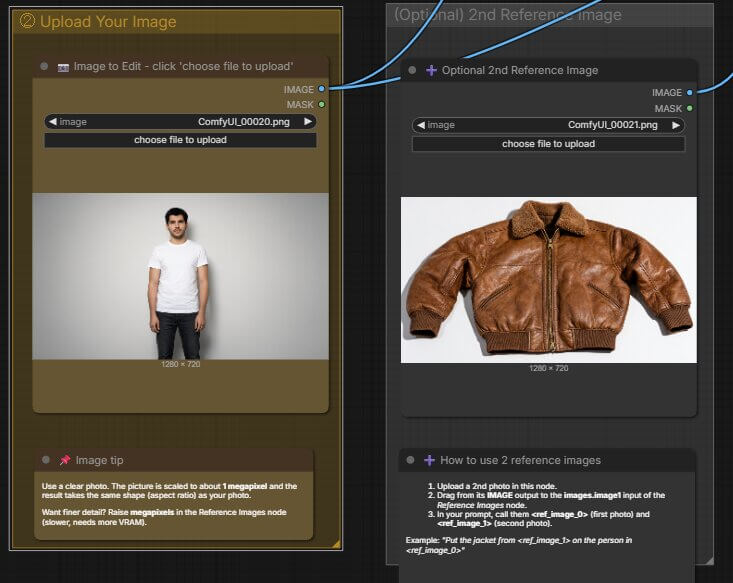
A reference image is a photo that the model uses as input. You can give it two photos and tell it how to combine them, for example putting a jacket from one photo onto the person in another.
- Find the box called Optional 2nd Reference Image and upload your second photo.
- Drag a wire from the IMAGE output of that box (the small dot on its right side) to the images.image1 input on the ReferenceMultiLatent box.
- Name the photos in your prompt. The first photo is
<ref_image_0>and the second is<ref_image_1>. - Type a prompt such as:
Put the jacket from <ref_image_1> on the person in <ref_image_0> - Click the run button.
The numbering starts at 0. Your main photo is always <ref_image_0>.
If you want another model that handles many reference images, see our Qwen Image 2.1 guide for 10 reference images.
Why Is Your FLUX.3 Klein Edit Not Working?
These are the three most likely problems. Running into something else? Our general ComfyUI troubleshooting guide covers errors that show up across every workflow.
Red boxes, or “Flux.3 Image Klein: Image Edit” is missing from the Template Library
What causes it: Your ComfyUI is older than 0.41.0, so it does not know the FLUX.3 Klein nodes.
- Update ComfyUI using our update guide.
- Restart ComfyUI fully by closing the black terminal window and starting it again.
- Load the workflow again. The red outlines should be gone.
The model dropdown is empty, or the download was denied
What causes it: Either the files are in the wrong folder, or you did not accept the license on Hugging Face.
- Check the folders against the file tree in this guide.
- Check that the file name matches exactly, including
int8_convrot. - Restart ComfyUI so it reads the folders again.
- If the download itself failed, open the repository while logged in and accept the license first.
“OutOfMemoryError” or the run stops partway
What causes it: Your GPU ran out of VRAM.
- Close other programs that use the GPU, such as games or video editors.
- Use an
int8_convrotfile, notbf16. - Find the ReferenceMultiLatent box and lower megapixels from 1 to a smaller number, such as 0.5. The image gets smaller and uses less memory.
- Restart ComfyUI and run again.
See also our low VRAM guide.
Frequently Asked Questions
What to Do Next
Edit just one part of a photo with a mask.
Once your first edit works, try the same photo with inpainting: you paint over the area you want to change, and the rest of the picture stays untouched.
What to Read Next
If this workflow is running, three guides are worth reading next. Our FLUX.2 Klein image editing guide shows how the earlier Klein family handles the same job, the Qwen Image 2.1 edit tutorial covers a different editing model, and the ControlNet workflow gives you precise control over pose and structure.
Published: 2026-10-17 · Last updated: 2026-10-17 · Workflow checked against the official FLUX.3 Klein ComfyUI documentation.
Join the discussion
Sign in to leave a comment or reply
No comments yet
Be the first to share your thoughts!